Table of Contents
Advertisement
Quick Links
E-Gel
Power Snap Electrophoresis System
™
USER GUIDE
E-Gel
Power Snap Electrophoresis Device and E-Gel
™
For use with E-Gel
™
Catalog Numbers G8100, G8200, G8300, G8141ST, G8142ST, G8121ST, G8122ST, G8168ST,
G8162ST, G8341ST, G8342ST, G8321ST, G8322ST
Publication Number MAN0017050
Revision C.0
For Research Use Only. Not for use in diagnostic procedures.
, E-Gel
EX, CloneWell
™
Power Snap Camera
™
, and SizeSelect
agarose gels
™
™
Advertisement
Table of Contents
Troubleshooting

Related Manuals for Thermo Scientific invitrogen E-Gel G8121ST


Summary of Contents for Thermo Scientific invitrogen E-Gel G8121ST
- Page 1 E-Gel Power Snap Electrophoresis System ™ USER GUIDE E-Gel Power Snap Electrophoresis Device and E-Gel Power Snap Camera ™ ™ For use with E-Gel , E-Gel EX, CloneWell , and SizeSelect agarose gels ™ ™ ™ ™ Catalog Numbers G8100, G8200, G8300, G8141ST, G8142ST, G8121ST, G8122ST, G8168ST, G8162ST, G8341ST, G8342ST, G8321ST, G8322ST Publication Number MAN0017050 Revision C.0...
- Page 2 Life Technologies Holdings Pte Ltd | Block 33 | Marsiling Industrial Estate Road 3 | #07-06, Singapore 739256 For descriptions of symbols on product labels or product documents, go to thermofisher.com/symbols-definition. The information in this guide is subject to change without notice. DISCLAIMER: TO THE EXTENT ALLOWED BY LAW, LIFE TECHNOLOGIES AND/OR ITS AFFILIATE(S) WILL NOT BE LIABLE FOR SPECIAL, INCIDENTAL, INDIRECT, PUNITIVE, MULTIPLE, OR CONSEQUENTIAL DAMAGES IN CONNECTION WITH OR ARISING FROM THIS DOCUMENT, INCLUDING YOUR USE OF IT.
-
Page 3: Table Of Contents
Contents About this guide ......................7 Purpose of the guide ........................... 7 Safety ................................7 Product Information ....................... 8 Product description ............................8 Features ............................... 8 Throughput ..............................8 System components ............................ 8 Kit contents and storage ..........................9 Upon receiving the instrument ........................9 Storage ................................. - Page 4 Attach the camera ............................21 Remove the camera ............................21 View gel................................22 Capture image ............................... 22 Adjust capture settings ..........................22 Automatic image capture ..........................23 Cancel auto capture ..........................23 Export image ..............................23 Export from capture screen ........................23 Export from image gallery ........................
- Page 5 Upgrade system firmware ..........................39 Instrument Specifications ..........................40 Instrument dimensions and specifications ....................40 Electrical requirements ..........................41 Environmental requirements ........................41 Appendix C ........................42 E-Gel agarose gels ............................42 ™ Choosing the right gel ..........................43 Analytical gels ............................43 Gels for preparative gel electrophoresis in Cloning and NGS applications ...........
- Page 6 Accessory items ............................55 Appendix H ........................56 Safety ................................56 Before starting ............................56 Installing the instrument .......................... 57 Electromagnetic compatibility (EMC) standards ..................57 Class A notice ............................57 Electrical safety ............................58 Service operation requirements ....................... 58 LED (Light-Emitting Diode) ........................
-
Page 7: About This Guide
About this guide Important: Before using this product, read and understand the information in the “Safety” appendix in this document. Purpose of This user guide contains detailed information about usage of the E-Gel Power Snap ™ Electrophoresis System and E-Gel pre-cast agarose gels. -
Page 8: Product Information
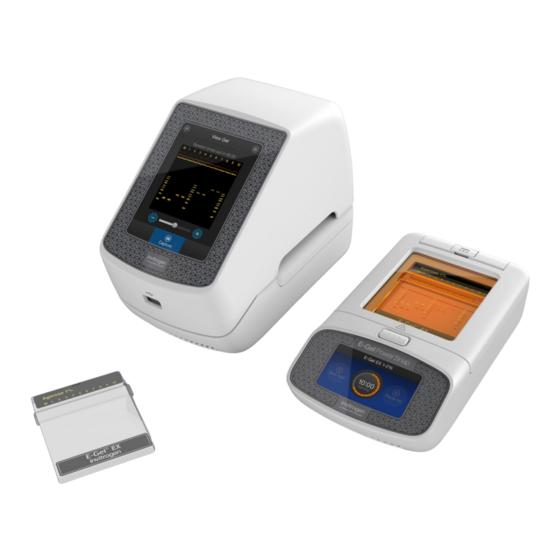
Product Information Product description The E-Gel Power Snap Electrophoresis System is designed to produce a fast and convenient DNA ™ agarose gel electrophoresis and documentation workflow. The E-Gel Power Snap Electrophoresis System is composed of two units: ™ The E-Gel Power Snap Electrophoresis Device consists of a power supply, blue light ™... -
Page 9: Kit Contents And Storage
Kit contents and storage Depending on the ordered catalog number the product will arrive with following components: Component G8100 G8200 G8300 E-Gel Power Snap Electrophoresis Device 1 each — 1 each ™ E-Gel Power Snap Camera — 1 each 1 each ™... -
Page 10: Description Of Parts
Description of parts Front view E-Gel Power Snap Camera ™ (docked) E-Gel Power Snap ™ Electrophoresis Device Camera control touch screen USB port for image export/firmware upgrade Electrophoresis unit control touch screen ... -
Page 11: Parts Of The E-Gel ™ Power Snap Electrophoresis Device
Parts of the E-Gel Power Snap Electrophoresis Device ™ USB port for firmware upgrade Adaptor DC input DC output cable Power switch Connector to DC input of electrophoresis unit ... -
Page 12: Parts Of The E-Gel ™ Power Snap Camera
Parts of the E-Gel Power Snap Camera ™ Docking connector cover (open) Docking connector Camera connector Battery compartment USB port for image export/firmware upgrade E-Gel Power Snap Electrophoresis System User Guide ™... -
Page 13: User Graphical Interface Overview
User graphical interface overview The E-Gel Power Snap Electrophoresis System is intuitive and easy-to-use. Both the E-Gel ™ ™ Power Snap Electrophoresis Device and E-Gel Power Snap Camera are controlled using touch ™ screens. The following table describes common controls of the Power Snap system. Control Function E-Gel... -
Page 14: Using The E-Gel ™ Power Snap Electrophoresis Device
Using the E-Gel Power Snap Electrophoresis Device ™ This section provides instructions for performing electrophoresis using the E-Gel Power Snap ™ Electrophoresis Device. For specific protocols describing the use of E-Gel CloneWell II Agarose Gels, see page 25. ™ ™ For specific protocols describing the use of E-Gel SizeSelect II Agarose Gels, see page 30. -
Page 15: Dilute Samples Containing High Salt
Dilute E-Gel EX gels are sensitive to high salt and EDTA content. Samples containing ≥50 mM NaCl, ™ 100 mM KCl, 10 mM acetate ions, or 10 mM EDTA (i.e., certain restriction enzyme and PCR samples buffers) cause loss of resolution on E-Gel agarose gels. -
Page 16: Prepare Gel
Prepare gel Remove E-Gel agarose gel from package. ™ Gently remove comb from the cassette. Load the gel into the cassette compartment, starting from the right edge. Press down on the left side of the cassette to secure the cassette. Load gels within 15 minutes after opening the package. -
Page 17: Load Samples
Load samples Load prepared samples. Keep all sample volumes uniform. Load prepared DNA ladder. Note: Total loading volume for marker lanes in double comb E-Gel agarose gels is 10 μL. ™ Load 1X E-Gel Sample Loading Buffer or deionized water in all empty wells. Note: For E-Gel EX agarose gels, use 0.1X ™... -
Page 18: Check Status
(Optional) Adjust the duration of the gel run using the +/– buttons or press in the duration field to open a keyboard to enter a number. Press Start run to begin running the gel. Note: Do not exceed the maximum run time indicated for the specific gel type, as this will impact separation quality. -
Page 19: Cancel The Run
Cancel the Press Pause run to temporarily stop the run. Press the status dial. Press Cancel run to stop the run. Edit gel Press Pause run to temporarily stop the run. duration Press the status dial. Press Edit gel duration. Adjust the protocol duration using the +/–... -
Page 20: Using The E-Gel ™ Power Snap Camera
Using the E-Gel Power Snap Camera ™ General guidelines • The E-Gel Power Snap Camera is an integral part of The E-Gel Power Snap Electrophoresis ™ ™ System, and only works when docked to The E-Gel Power Snap Electrophoresis Device. ™... -
Page 21: Attach The Camera
Attach the camera The E-Gel Power Snap Camera can be attached to ™ the E-Gel Power Snap Electrophoresis Device either ™ during a run, or after the run is completed. Unfasten the docking connector cover. Align the docking connector with the camera connector. -
Page 22: View Gel
View gel Press View Gel to access the view gel screen and visualize the bands on the gel. Adjust exposure setting if necessary. Note: The gel image in the capture screen is a still picture which is refreshed periodically, or when adjustment sliders are used. -
Page 23: Automatic Image Capture
Automatic image capture The E-Gel Power Snap Camera can automatically capture images as the gel runs. The camera can ™ capture and save 2–5 images of the gel at evenly spaced intervals. Press Settings / Select Auto capture. Select one of following capture methods: Smart exposure: captures each image at the optimal exposure level. -
Page 24: Export From Image Gallery
Export from Insert a USB storage device into the USB port at the front of the E-Gel Power Snap Camera. ™ image gallery Press Gallery from the home screen. Select Thumbnails or List view for navigation. (Optional ) Select Sort to organize files by date, or file type. -
Page 25: E-Gel ™ Clonewell ™ Ii Gels
E-Gel CloneWell II gels ™ ™ E-Gel CloneWell II pre-cast agarose gels are designed for use with the E-Gel Power Snap Electrophoresis Device, ™ ™ ™ and provide a fast, safe, and effective DNA fragment isolation method for DNA cloning workflows. Advantages •... -
Page 26: Prepare Gel
Prepare gel Remove the gel from the package. Gently remove the combs. Do not allow the combs to bend or create suction in the wells during removal. Insert gel cassette into the E-Gel Power ™ Snap Electrophoresis Device, starting from the right edge. -
Page 27: Check Status
Check status Check the gel status by activating the Back light. Monitor the gel during the run to avoid the target fragment missing the recovery well Pause the gel when the band of interest reaches the reference line (RF) near the row of recovery wells. -
Page 28: Guidelines For Estimating Run Time
Guidelines for estimating run time Refer to the E-Gel 1 Kb Plus Express DNA Ladder migration pattern table to estimate • ™ target DNA run time to the reference line. The run times indicated in the table are estimates. Monitor your gel in real time during •... -
Page 29: Troubleshooting
Troubleshooting For common E-Gel troubleshooting guidelines refer to troubleshooting guide (see page 36). ™ Observation Cause Recommended action Poor resolution or Do not load more than 800 ng of DNA in a single Sample is overloaded smearing of bands lane High salt concentration Dilute your samples 2- to 30-fold Total sample volume is too low... -
Page 30: E-Gel ™ Sizeselect ™ Ii Gels
E-Gel SizeSelect II gels ™ ™ E-Gel SizeSelect II 2% Agarose Gels are designed for use with the E-Gel Power Snap Electrophoresis Device, and ™ ™ ™ provide a fast and convenient method for DNA fragment library size selection as part of NGS library preparation workflows. -
Page 31: Prepare Gel
Prepare gel Remove the gel from the package. Gently remove the combs. Do not allow the combs to bend or create suction in the wells during removal. Insert gel cassette into the E-Gel Power ™ Snap Electrophoresis Device, starting from the right edge. -
Page 32: Check Status
Check status Check the gel status by activating the Back light. Monitor the gel during the run to avoid the target fragment missing the recovery well Pause the gel when the reference band of the DNA ladder reaches the reference line (RF) near the row of recovery wells. -
Page 33: Guidelines For Estimating Run Time
Guidelines for estimating run time Refer to the E-Gel Sizing DNA Ladder migration pattern table to estimate target DNA • ™ run time to the reference line. The E-Gel DNA Sizing Ladder is also used as a size reference marker. Refer to the NGS •... - Page 34 NGS library size selection reference Library Size Target Run time to Input Stop the run and collect your Schematic library sample sample when… view reference amount peak line Ion S5™ XL System 600 bp band has just completely 500 ng entered the top edge of the collection well –...
-
Page 35: Quantitation Of Isolated Dna
Quantitation of isolated DNA Recovered DNA can be assessed using the Qubit fluorometer (Cat. No. Q32868), or by • ™ gel electrophoresis. qPCR is recommended for accurate quantitation of next generation sequencing libraries • recovered from E-Gel SizeSelect II gels. ™... -
Page 36: Troubleshooting
Appendix A Troubleshooting Observation Cause Recommended action No current Cassette improperly Remove and re-insert cassette or try using new cassette. Use properly stored gels before the specified Inserted, defective or expired expiration date. Incorrect adaptor used Use only UL Listed Class 2 Direct Plug-in Adaptor included with the E-Gel Power Snap Electrophoresis ™... - Page 37 Observation Cause Recommended action Sample leaking from the Sample is overloaded Load the recommended sample volume per well. wells Wells damaged during comb Remove the gel comb gently without damaging the removal wells. DNA sample cannot be Inhibition of visualization by heat Wait 10–15 minutes for gel to cool before seen visualization.
-
Page 38: System Maintenance
Appendix B System maintenance Repeated instrument use can result in formation of spots and smudges on the glass over the transilluminator and on the amber filter, which can then decrease image quality. Clean the glass over the transilluminator and amber filter as needed. -
Page 39: Upgrade System Firmware
Upgrade system firmware Download the latest firmware file from thermofisher.com to your PC. Unzip and transfer the firmware upgrade files to a USB storage device. Insert the USB storage device into a USB port on the instrument. Use the port located at the back of the E-Gel Power Snap Electrophoresis ™... -
Page 40: Instrument Specifications
Instrument Specifications Instrument dimensions and specifications Specification E-Gel Power Snap Electrophoresis Device Dimensions 242 mm × 130 mm × 70 mm Weight 1 kg Touchscreen LCD display 77.4 mm × 43.86 mm Viewing surface dimensions 90 mm × 110 mm Amber filter dimensions 86 mm ×... -
Page 41: Electrical Requirements
Electrical requirements Warning: For safety, the power outlet used for powering the instrument must be accessible at all times. In case of emergency, you must be able to immediately disconnect the main power supply to the instrument. Allow adequate space between the wall and the equipment so the power cord can be disconnected in case of emergency. Electric receptacle with grounding capability •... -
Page 42: E-Gel ™ Agarose Gels
Appendix C E-Gel agarose gels ™ E-Gel agarose gels are precast bufferless gels with electrodes embedded in the agarose matrix. ™ Each gel contains an ion generating system, a pH balancing system, and DNA stain packaged inside a transparent plastic cassette. Each gel cassette contains two ion exchange matrices (IEMs) that are in contact with the gel and electrodes. -
Page 43: Choosing The Right Gel
Choosing the right gel To obtain the best results for your application, it is important to choose the correct agarose percentage and well format. The tables below list the various types of gel and resolution for each gel type. Analytical gels E-Gel E-Gel EX Double... -
Page 44: Other Available Gel Types For Routine Electrophoresis
Other available gel types for routine electrophoresis E-Gel EX Agarose Gels can be used to run RNA samples. RNA can be run under denaturing or ™ non-denaturing conditions. Use non-denaturing conditions only when checking for RNA quality, where accurately determining size is not critical. See page 47 for instructions on performing electrophoresis of RNA samples. -
Page 45: Open An E-Gel ™ Cassette With A Gel Knife
Open an E-Gel cassette with a Gel Knife ™ Place the cassette on a flat surface, with the Insert wells facing upward. Insert the sharp edge of the gel knife into the groove around the edge of the cassette edge, then lever the knife up and down to crack the seal. -
Page 46: Choosing The Right Dna Ladder
Appendix D Choosing the right DNA ladder Use the following table to select the E-Gel DNA ladder that yields the best resolution for your E-Gel agarose gel. ™ ™ E-Gel 1 Kb E-Gel 1 Kb E-Gel E-Gel 96 High E-Gel E-Gel Ultra Millenium... -
Page 47: Running Rna Samples On E-Gel ™ Ex Agarose Gels
Appendix E Running RNA Samples on E-Gel EX Agarose Gels ™ E-Gel EX Agarose Gels can be used to run RNA samples. RNA is separated on the gel under denaturing conditions. ™ E-Gel EX Gel Type Recommended RNA ladder E-Gel ™... -
Page 48: E-Gel ™ Power Snap Blue-Light Transilluminator
Appendix F E-Gel Power Snap Blue-Light Transilluminator ™ To monitor sample separation right at laboratory bench, the E-Gel Power Snap Electrophoresis Device has an ™ integrated blue-light LED source with emission maximum at 465 nm. This enables real-time monitoring of samples running on E-Gel agarose gels that are pre-stained with SYBR Safe or SYBR Gold II DNA stains. -
Page 49: Nucleic Acid Stain Use In E-Gel ™ Agarose Gels
Nucleic acid stain use in E-Gel agarose gels ™ SYBR Safe DNA Gel Stain ™ SYBR Safe DNA gel stain has been specifically developed for reduced mutagenicity, making it ™ safer than ethidium bromide for staining DNA in agarose gels. The detection sensitivity of E-Gel ™... -
Page 50: Visualization
Visualization For quick visualization and documentation of SYBR Safe stained E-Gel agarose gels use E-Gel ™ ™ ™ Power Snap Camera. Alternatively, use a blue light transilluminator or a standard UV transilluminator. The UV excitation range is not optimal for SYBR Safe stain, therefore gels visualized on UV transilluminator will provide lower sensitivity. -
Page 51: Instrument Starter Kits
Appendix G Instrument starter kits E-Gel Power Snap Electrophoresis Device Starter Kit Included Equipment ™ Cat. No. E-Gel Power E-Gel Power Cord Safe Imager Gel Knife ™ ™ Snap Power Snap w/ Adaptor Viewing Electrophoresis Camera Glasses (Cat. Device No. S37103) G8141ST 1 each G8142ST... - Page 52 E-Gel Power Snap Electrophoresis Device Starter Kit Included Reagent List ™ E-Gel™ Agarose Gel Ladders Cat. No. Type # of E-Gel™ E-Gel™ E-Gel™ E-Gel™ 96 E-Gel™ Low E-Gel™ Gels 1Kb Plus 1Kb Plus 50 bp High Range Range Sizing DNA Express Quant.
-
Page 53: E-Gel Agarose Gels
E-Gel agarose gels ™ Refer to Choosing the right gel (page 43) to select the most suitable gel for your application. Application Products % Agarose Stain type No. of sample wells Quantity Catalog No. 10 gels G401001 20 gels G402021 E-Gel EX Agarose Gels 10 gels... - Page 54 E-Gel agarose gels, continued ™ Refer to Choosing the right gel (page 43) to select the most suitable gel for your application. Application Products % Agarose Stain type No. of sample wells Quantity Catalog No. 8 gels G820801 32 gels G820841 8 gels G820802...
-
Page 55: Accessory Products
Accessory products E-Gel DNA Ladders Quantity Applications Catalog No. E-Gel 1 Kb Plus DNA Ladder (25 ng/μL) 2 x 1 mL 100 apps 10488090 ™ E-Gel 1 Kb Plus Express Ladder (40 ng/μL) 2 x 1.25 mL 100 apps 10488091 ™... -
Page 56: Safety
Appendix H Safety Before Before you begin using this product, or any installation or service operation, please read the following safety information. Attention to these warnings will help prevent personal injuries and starting damage to the products. It is your responsibility to use the product in an appropriate manner. This product is designed for use solely in laboratory environments, and must not be used in any way that may cause personal injury or property damage. -
Page 57: Installing The Instrument
Installing The product may be installed only under the conditions and in the positions specified by Thermo Fisher Scientific. instrument Following are the required operating position and conditions: Do not place the product in an area where it will be subject to vibration. •... -
Page 58: Electrical Safety
Electrical safety The following information on electrical safety must be observed, failing to follow these instruction may result in electric shock, fire and/or serious personal injury or death. Service In the event of an equipment malfunction, it is the responsibility of the customer to report the need for service to Thermo Fisher Scientific or to one of the authorized agents. -
Page 59: Led (Light-Emitting Diode)
LED (Light- CAUTION! LED (light-emitting diode) HAZARD. Removing the protective covers and (when applicable) defeating the interlock(s) may result in exposure to the internal LED. LEDs can burn Emitting the retina, causing permanent blind spots. To ensure safe LED operation: Diode) Never look directly into the light beam. -
Page 60: Customer And Technical Support
Appendix I Customer and technical support Visit Thermo Fisher Scientific support for the latest in services and support, including: Worldwide contact telephone numbers • Product support, including: • – Product FAQs – Software, patches, and updates • Order and web support Product documentation, including: •... - Page 61 For support visit thermofisher.com/techresources or email techsupport@lifetech.com thermofisher.com/lifescience 7 May 2023...
Need help?
Do you have a question about the invitrogen E-Gel G8121ST and is the answer not in the manual?
Questions and answers