Table of Contents
Advertisement
Quick Links
Advertisement
Table of Contents

Related Manuals for Oracle X9-2


Summary of Contents for Oracle X9-2
- Page 1 Oracle® Database Appliance X9-2 Owner's Guide F58387-02 July 2022...
- Page 2 Oracle Corporation and its affiliates disclaim any liability for any damages caused by use of this software or hardware in dangerous applications.
-
Page 3: Table Of Contents
Oracle Database Appliance Setup Tasks Task Checklist Overview of Oracle Database Appliance Oracle Database Appliance X9-2 Series Components and Capabilities Oracle Database Appliance X9-2S/X9-2L Front and Back Panels Oracle Database Appliance X9-2S/X9-2L Front Panel Oracle Database Appliance X9-2S/X9-2L Back Panel... - Page 4 Installing Oracle Database Appliance X9-2S/X9-2L Into a Rack Contents of the Shipping Container Tools and Equipment Needed Stabilize the Rack for Installation Installing the Server Into a Rack Installing Oracle Database Appliance X9-2-HA Into a Rack Contents of the Shipping Container Installation Sequence 4-10 Verify Component Compatibility...
-
Page 5: Audience
Preface This guide provides a system overview and instructions for racking the Oracle Database Appliance. • Audience • Documentation Accessibility • Related Documents • Conventions Audience This document is intended for technicians, system administrators, and authorized service providers responsible for installing the Oracle Database Appliance. - Page 6 Preface Conventions The following text conventions are used in this document: Convention Meaning boldface Boldface type indicates graphical user interface elements associated with an action or terms defined in the text. italic Italic type indicates book titles, emphasis, or placeholder variables for which you supply particular values.
-
Page 7: Oracle Database Appliance Setup Tasks
Complete these tasks to setup Oracle Database Appliance. • Task Checklist List of steps with links to information describing the setup of Oracle Database Appliance. Task Checklist List of steps with links to information describing the setup of Oracle Database Appliance. -
Page 8: Overview Of Oracle Database Appliance
How to obtain technical support for your appliance. Oracle Database Appliance X9-2 Series Components and Capabilities See a listing of the various supported capabilities for the Oracle Database Appliance X9-2 series. The following table lists supported components and capabilities for the Oracle Database Appliance X9-2 series systems. - Page 9 Chapter 2 Oracle Database Appliance X9-2 Series Components and Capabilities Component Oracle Database Oracle Database Oracle Database Appliance X9-2S Appliance X9-2L Appliance X9-2-HA Memory 256 GB – eight 32 GB low- 512 GB – sixteen 32 GB 512 GB – sixteen 32 GB...
- Page 10 Chapter 2 Oracle Database Appliance X9-2 Series Components and Capabilities Component Oracle Database Oracle Database Oracle Database Appliance X9-2S Appliance X9-2L Appliance X9-2-HA PCI Express (PCIe) I/O Ten external low-profile Ten external low-profile Ten external low-profile slots PCIe Gen-4 slots. In the PCIe Gen-4 slots.
-
Page 11: Oracle Database Appliance X9-2S/X9-2L Front And Back Panels
Out Manager (ILOM) 5.1. Oracle Database Appliance X9-2S/X9-2L Front and Back Panels See views and descriptions of front and back panel features for Oracle Database Appliance X9-2S/X9-2L. This section describes Oracle Database Appliance X9-2S/X9-2L front and back panels. If you have some other Oracle Database Appliance model, select the... -
Page 12: Oracle Database Appliance X9-2S/X9-2L Front Panel
Chapter 2 Oracle Database Appliance X9-2S/X9-2L Front and Back Panels • Oracle Database Appliance X9-2S/X9-2L Front Panel See an illustration and description of Oracle Database Appliance X9-2S/X9-2L front panel features. • Oracle Database Appliance X9-2S/X9-2L Back Panel See an illustration and description of Oracle Database Appliance X9-2S/X9-2L back panel features. -
Page 13: Oracle Database Appliance X9-2S/X9-2L Back Panel
2 - 11 (callouts 12, 13 and 15 - 22) Oracle Database Appliance X9-2S/X9-2L Back Panel See an illustration and description of Oracle Database Appliance X9-2S/X9-2L back panel features. The following figure shows the components on the back panel of an Oracle Database Appliance X9-2S/X9-2L. Callout Description... - Page 14 Chapter 2 Oracle Database Appliance X9-2S/X9-2L Front and Back Panels Callout Description PCIe card slot 4: • Oracle Database Appliance X9-2S: filler panel • Oracle Database Appliance X9-2L: filler panel, or optional Oracle Dual Port 25Gb Ethernet Adapter, or optional Oracle...
-
Page 15: Oracle Database Appliance X9-2-Ha Front And Back Panels
X9-2L's) and an Oracle DE3-24C storage shelf. The entire unit occupies 8RU. The optional storage expansion shelf requires an additional 4RU, increasing the total to 12RU. The following figure shows the front of Oracle Database Appliance X9-2-HA with an optional storage expansion shelf. - Page 16 Storage shelf (DE3-24C) Optional storage expansion shelf (DE3-24C) • Server Node Front Panel Features See an illustration and listing of Oracle Database Appliance X9-2-HA server node front panel features. • Storage Shelf Front Panel Features See an illustration and listing of Oracle Database Appliance X9-2-HA storage shelf front...
-
Page 17: Server Node Front Panel Features
Oracle Database Appliance X9-2-HA Front and Back Panels Server Node Front Panel Features See an illustration and listing of Oracle Database Appliance X9-2-HA server node front panel features. The following figure shows the components on the front panel of an Oracle Database Appliance X9-2-HA server node. -
Page 18: Storage Shelf Front Panel Features
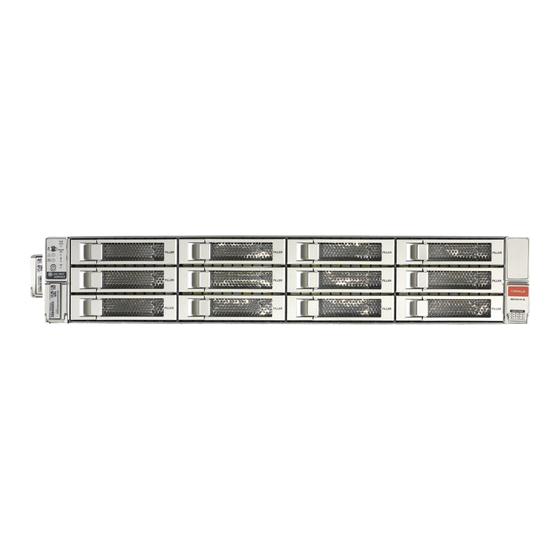
For details, see Technical Support. Storage Shelf Front Panel Features See an illustration and listing of Oracle Database Appliance X9-2-HA storage shelf front panel features. The following figure shows the Oracle Database Appliance X9-2-HA storage shelf front panel features. -
Page 19: Oracle Database Appliance X9-2-Ha Back Panel
Drive fault indicator Drive power/activity indicator Oracle Database Appliance X9-2-HA Back Panel See an illustration and listing of Oracle Database Appliance X9-2-HA back panel features. This section describes the back panel features for Oracle Database Appliance X9-2- The following figure shows the Oracle Database Appliance X9-2-HA. -
Page 20: Server Node Back Panel Features
See an illustration and listing of Oracle Database Appliance X9-2-HA storage shelf back panel features. Server Node Back Panel Features See an illustration and listing of Oracle Database Appliance X9-2-HA server node back panel features. The following figure shows the components on the back panel of an Oracle Database Appliance X9-2-HA server node. -
Page 21: Storage Shelf Back Panel Features
PCIe card slot 10: filler panel Storage Shelf Back Panel Features See an illustration and listing of Oracle Database Appliance X9-2-HA storage shelf back panel features. The following figure shows the Oracle Database Appliance X9-2-HA storage shelf back features. -
Page 22: Oracle Database Appliance Specifications
Oracle Database Appliance Specifications This section describes the physical, electrical and environmental specifications for the various Oracle Database Appliance models. • Physical Specifications for Oracle Database Appliance X9-2 Series • Electrical Specifications for Oracle Database Appliance X9-2 Series • Environmental Specifications for Oracle Database Appliance X9-2 Series... -
Page 23: Physical Specifications For Oracle Database Appliance X9-2 Series
Chapter 2 Oracle Database Appliance Specifications Physical Specifications for Oracle Database Appliance X9-2 Series Item Oracle Database Oracle Database Oracle Database Appliance X9-2S Appliance X9-2L Appliance X9-2-HA Height 86.9 mm (3.4 in) 86.9 mm (3.4 in) 86.9 mm (3.4 in) per server node 175 mm (6.9 in) per... -
Page 24: Environmental Specifications For Oracle Database Appliance X9-2 Series
Chapter 2 Technical Support Environmental Specifications for Oracle Database Appliance X9-2 Series Item Oracle Database Appliance Oracle Database Appliance Oracle Database Appliance X9-2S X9-2L X9-2-HA Operating 5° C to 35° C (41° F to 95° F) 5° C to 35° C (41° F to 95° F) 5°... - Page 25 TLI numbers. • Slide a server node partway out on its rails, just far enough to see the TLI. See the Oracle Database Appliance X9-2 Service Manual for details. You only need to extend the server node a couple of inches on its slide rails to see the TLI.
-
Page 26: Site Preparation
Site Preparation Learn about site preparation requirements for the Oracle Database Appliance before installing it into a rack and cabling it. • Prepare Your Site Use this procedure before installing the appliance into a rack. Prepare Your Site Use this procedure before installing the appliance into a rack. - Page 27 System failure. All items in a shipment are designed to be used together as a single system. Do not mix components from different shipments; this could cause the system to fail. It should contain: Oracle Database Appliance X9-2S/X9-2L Oracle Database Appliance X9-2-HA • Preconfigured system • The server nodes include: •...
-
Page 28: Installing Oracle Database Appliance Into A Rack
Procedures describing how to install the various Oracle Database Appliance models into a rack. Task Overview Tasks to perform when installing various models of Oracle Database Appliance into a rack. Follow the appropriate procedures to rack mount your system. Note: These procedures describe how to install the appliance into a rack. -
Page 29: Optional Component Installation
(one for each processor). – For Oracle Database Appliance X9-2-HA with 512 GB of base memory: You have the option of ordering memory expansion to 1 TB per server node. Memory kits come in sets of 8 x 32 GB DIMMs, which means you need four kits (two for each server node) for 1 TB. - Page 30 • Optional Network cards: For Oracle Database Appliance X9-2 series, you have the option of ordering up to two additional public network PCIe cards per system (or per node for the X9-2-HA). Supported network cards include the Oracle Dual Port 25Gb Ethernet Adapter, Oracle Dual Port 100Gb Ethernet Adapter, and the Oracle Quad Port 10GBase-T Adapter.
-
Page 31: Safety Precautions When Rackmounting
Deployment and User's Guide for instructions on cabling and software configuration. Safety Precautions When Rackmounting Learn about safety precautions during rack installation for Oracle Database Appliance. This section describes safety precautions you must follow when installing the server into a rack. -
Page 32: Esd Precautions
ESD Precautions Learn about electrostatic discharge precautions during rack installation for Oracle Database Appliance. Caution: Equipment damage. To prevent damage from electrostatic discharge, use the following precautions when installing or servicing components. -
Page 33: Installing The System Into A Rack
• Installing Oracle Database Appliance X9-2-HA Into a Rack Procedures describing how to install Oracle Database Appliance X9-2-HA into a rack. Installing Oracle Database Appliance X9-2S/X9-2L Into a Rack Procedures describing how to install Oracle Database Appliance X9-2S/X9-2L into a rack. -
Page 34: Contents Of The Shipping Container
Installing the System Into a Rack • Tools and Equipment Needed A listing of the tools you will need to install Oracle Database Appliance X9-2S/X9-2L. • Stabilize the Rack for Installation Use this procedure to stabilize the rack before installing Oracle Database Appliance X9-2S/X9-2L. -
Page 35: Installing The Server Into A Rack
Tasks to complete to install Oracle Database Appliance into a rack. Note: The links in the following table take you to instructions outside of the Oracle Database Appliance library to the Oracle Server X9-2 documentation library. Use your browser's Back button to return to the Oracle Database Appliance library. -
Page 36: Contents Of The Shipping Container
Ensure that appliance components bundled together from the factory are connected together. • Tools and Equipment Needed A listing of the tools you will need to install Oracle Database Appliance X9-2-HA. • Stabilize the Rack for Installation Use this procedure to stabilize the rack before installing Oracle Database Appliance X9-2-HA. -
Page 37: Installation Sequence
TLI numbers (a TLI part number and TLI serial number). Tools and Equipment Needed A listing of the tools you will need to install Oracle Database Appliance X9-2-HA. Obtain the following tools and equipment before beginning the installation of Oracle Database Appliance X9-2-HA. -
Page 38: Stabilize The Rack For Installation
51 lbs (23 kg). If no mechanical lift is available, use three people to place it in the rack. Stabilize the Rack for Installation Use this procedure to stabilize the rack before installing Oracle Database Appliance X9-2-HA. Caution: Personal injury or equipment damage. To reduce the risk of personal injury, stabilize the rack cabinet, and extend all anti-tilt devices before installing the server. -
Page 39: Install The Storage Shelf Into A Rack
Server node 0 Storage shelf Install the Storage Shelf Into a Rack Describes how to install an Oracle Database Appliance X9-2-HA storage shelf into a rack. The Oracle Database Appliance X9-2-HA uses the Oracle Storage Drive Enclosure DE3-24C as its storage shelf. The storage shelf requires four standard mounting units (4RU) of vertical space in the cabinet. - Page 40 Chapter 4 Installing the System Into a Rack Storage shelves must be installed below the server nodes to prevent the rack from tipping. Open the storage shelf rail kit box and find the cage nut packets included with the kit, and confirm if your rack uses square or round holes.
- Page 41 Chapter 4 Installing the System Into a Rack Attach the storage shelf rails to the rack, as follows: Orient the rail so that the stamped label (LEFT or RIGHT) is facing the inside of the rack. Adjust the rail length to fit the front and rear of the rack. Note: Mark which rack rail holes you will be using to ensure the storage shelf rails are installed evenly and correctly the first time.
- Page 42 Chapter 4 Installing the System Into a Rack Install the front cage nuts. Caution: Installing the storage shelf without the front cage nuts will cause the storage shelf to be unstable. You would then need to remove the storage shelf from the rack to install the cage nuts.
- Page 43 Chapter 4 Installing the System Into a Rack Callout Description Cage nuts Cage nut installation template Cage nut tool Use the template [2] to determine cage nut placement. Retrieve a cage nut and hook one lip of the nut into the appropriate rail hole [1].
- Page 44 Chapter 4 Installing the System Into a Rack Carefully slide the shelf into the cabinet. Ensure that the shelf is fully seated within the rails. If removing the shelf to reseat it, support it at all times. Secure the front of the shelf using the four captive securing screws [1 - 4]. The following figure shows how to secure the front of the storage shelf: To secure the storage shelf in the rack for shipping, install a screw in each rear storage shelf chassis ear.
-
Page 45: Add A Storage Expansion Shelf To An Existing System
Please note the following exceptional conditions: • The storage expansion shelf normally sits at the bottom of Oracle Database Appliance, beneath the storage shelf. However, since racks should always be provisioned from the bottom up, that space might be unavailable. In these cases, to avoid re-rackmounting the entire system, it can be placed above the server nodes, or even in a different rack. -
Page 46: Install The Server Nodes Into A Rack
Describes installing Oracle Database Appliance X9-2-HA server nodes into a rack. Note: The links in the following table take you to instructions outside of the Oracle Database Appliance library to the Oracle Server X9-2 documentation library. Use your browser's Back button to return to the Oracle Database Appliance library. -
Page 47: Index
Oracle Database Appliance X9-2S/ Oracle Database Appliance X9-2S/ X9-2L, X9-2L, server node features server node features Oracle Database Appliance X9-2-HA, Oracle Database Appliance X9-2-HA, 2-13 2-10 storage shelf features storage shelf features Oracle Database Appliance X9-2-HA, Oracle Database Appliance X9-2-HA,... - Page 48 Oracle Database Appliance X9-2S/ compatibility, X9-2L, confirming compatible components how to rack Oracle Database Appliance X9-2-HA, Oracle Database Appliance X9-2S/ 4-10 X9-2L, installation sequence view of back panel Oracle Database Appliance X9-2-HA, Oracle Database Appliance X9-2S/...
- Page 49 Index shipping contents (continued) See support TLI (Top Level Identifier) Oracle Database Appliance X9-2S/X9-2L, label location Oracle Database Appliance X9-2-HA, storage 4-10 installing optional components, tools supported, required for racking storage expansion shelf , Oracle Database Appliance X9-2-HA, adding to system,...
Need help?
Do you have a question about the X9-2 and is the answer not in the manual?
Questions and answers