Lippert Components Ground Control TT Installation And Owner's Manual
Leveling onecontrol touch panel
Hide thumbs
Also See for Ground Control TT:
- Installation and owner's manual (32 pages) ,
- Owner's manual (30 pages) ,
- Master owner's manual (166 pages)
Table of Contents
Advertisement
Quick Links
Ground Control TT Leveling OneControl Touch Panel
Ground Control TT Leveling OneControl Touch Panel
Aftermarket Kit
Aftermarket Kit
Part #
Part #
Description
Description
799870
Ground Control TT Leveling OCTP
Table of Contents
. . . . . . . . . . . . . . . . . . . . . . . . . . . . . . . . . . . . . . . . . . . .
. . . . . . . . . . . . . . . . . . . . . . . . . . . . . . . . . . . . . . . . . . . . . . . . . . .
. . . . . . . . . . . . . . . . . . . . . . . . . . . . . . . . . . . . . . . . . . . . . . . .
. . . . . . . . . . . . . . . . . . . . . . . . . . . . . . . . . . . . . . . .
lci1.com
. . . . . . . . . . . . . . . . . . . . . . . . . . . . . . . . . .
. . . . . . . . . . . . . . . . . . . . . . . . . . . . . . . . . . .
. . . . . . . . . . . . . . . . . . . . .
. . . . . . . . . . . . . . . . . . . . . . . . . .
. . . . . . . . . . . . . . . . . . . . . . . . . . . . . . . .
. . . . . . . . . .
. . . . . . . . . . . . . . . . . . . . . . . . . . . .
. . . . . . . . . . . . . . . . . . . .
. . . . . . . . . . . . . . . . . . . . . .
. . . . . . . . . . . . . . . . . . . . . . . . . .
. . . . . . . . . . . . . . . . . . . . . . . .
. . . . . . . . .
. . . . . . . . . . . . . . . .
574-537-8900
Ground Control
Leveling OneControl
Touch Panel
Installation and Owner's Manual
(For Aftermarket Applications)
Ground Control
Leveling OneControl
Touch Panel
2
2
2
3
4
6
. . . . . . . . . .
7
7
. . . . . .
10
12
14
14
14
15
16
16
16
17
17
. . . . . . .
17
. . . . . . . . . . . . . . . . . . . . . . . . . . . . . . . . . . . . . . . . . . . . . . .
1
(3K-5K)
(3K-5K)
. . . . . . . . . . . . . . . . . . . .
. . . . . . . . . . . . . . . . . . . . . . . . . . . . . . . . . . . . . . . . . . .
. . . . . . . . . . . . . . . . . . . . . . . . . . . . . . . . . . . .
. . . . . . . . . . . . . . . . . . . . .
. . . . . . . . . . . . . . . . . . . . . . .
. . . . . . . . . . . . . . . . . . . . . . . . . . . . . . . . .
. . . . . . . . . . . . . . . . . . . . . . . . . . . .
. . . . . . . . . . . . . . . . . . . . . . . . . .
. . . . . . . . . . . . . . . . . . . . . .
. . . . . . . . . . . . . . . . . . . . . .
. . . . . . . . . . . . . . . . . . . . . . . . . . . .
. . . . . . . . . . . . . . . . . . . . .
. . . . . . . . . . . . . . . . . . . . . . . . . . . . . . . . . . . . . .
. . . . . . . . . . . . . . . . . . . . . . . . . . .
. . . . . . . . . . . . . . . . . . . . .
. . . . . . . . . . . . . . . . . . . . . . . . . . . . . . . .
. . . . . . . . . . . . . . . . . . . . . . . . . . . . . . . . . . . . . . .
. . . . . . . . . . . . . . . . . . . . . . . . . . . . .
CCD-0002700
TT
®
®
TT
®
®
17
18
18
19
. . . . . . . . . . . . . . . . . .
20
. . . . . . . . . . . . . . . . .
20
. . . . .
20
. . . . . . .
21
21
21
. . . . . . . . . . . . . . . . .
22
22
23
. . . . . . . . . . . . .
24
24
25
25
. .
26
. . . . . . . .
26
. . . . . . . . . .
26
. . .
27
27
. . . . . . . . . . . . . . . . . .
28
28
28
. . . . . .
29
. . . . . . . . . . . . .
29
. . . . . . . . . . .
30
31
31
. . . . . . . . . . . . . . .
31
32
33
34
35
35-36
Rev: 03.02.21
Advertisement
Table of Contents
Troubleshooting

Related Manuals for Lippert Components Ground Control TT


Summary of Contents for Lippert Components Ground Control TT
-
Page 1: Table Of Contents
OneControl Touch Panel Operation ....Ground Control TT Leveling OneControl Touch Panel Ground Control TT Leveling OneControl Touch Panel OCTP Basic Jack Operation in Standard Mode . -
Page 2: Introduction
(For Aftermarket Applications) Introduction Safety With the push of a button, the Ground Control TT Read and understand all instructions before installing Leveling System levels and stabilizes a trailer quickly and or operating this product. Adhere to all safety labels. -
Page 3: Resources Required
Ground Control ® Leveling OneControl ® Touch Panel (3K-5K) Installation and Owner’s Manual (For Aftermarket Applications) Resources Required • 1 - 2 persons, depending 9/16 • ” open end wrench on task • ” wrench THE “CAUTION” SYMBOL ABOVE IS A SIGN THAT •... -
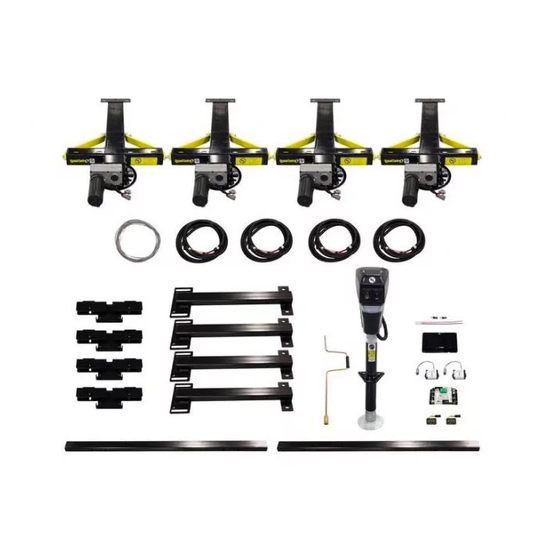
Page 4: Parts List
Ground Control ® Leveling OneControl ® Touch Panel (3K-5K) Installation and Owner’s Manual (For Aftermarket Applications) Parts List NOTE: Part numbers are shown for identification purposes only. Not all parts are available for individual sale. All parts with a link to the Lippert Store can be purchased. Callout Part# Description... - Page 5 Ground Control ® Leveling OneControl ® Touch Panel (3K-5K) Installation and Owner’s Manual (For Aftermarket Applications) Parts List Continued NOTE: Part numbers are shown for identification purposes only. Not all parts are available for individual sale. All parts with a link to the Lippert Store can be purchased. Callout Part# Description...
-
Page 6: Measuring Departure And Approach Angle
Ground Control ® Leveling OneControl ® Touch Panel (3K-5K) Installation and Owner’s Manual (For Aftermarket Applications) Measuring Departure and Approach Angle Measure 12” from the center of the rear axle hanger to the center of the rear 5K short jack footpad. This will be the Before checking ground clearance make sure the trailer is maximum allowable distance for the location of the center level front-to-back. -
Page 7: Mounting Brackets And Jack Installation
Ground Control ® Leveling OneControl ® Touch Panel (3K-5K) Installation and Owner’s Manual (For Aftermarket Applications) Mounting Brackets and Jack Installation 4. Mark the four holes on the lip of the I-beam frame with the spaces provided on the bracket (Fig.3A). Use the notches on the I-beam mounting bracket to find the center point. - Page 8 Ground Control ® Leveling OneControl ® Touch Panel (3K-5K) Installation and Owner’s Manual (For Aftermarket Applications) 7. Repeat steps 1-6 on the opposite side of the frame. ” hex cap screw bolts (Fig.7A) with 13. Insert two ” flat washer (Fig.7B) through the spacer bracket (Fig.7C) and 8.
-
Page 9: Rear Mounting Bracket And 5K Short Jack Installation
Ground Control ® Leveling OneControl ® Touch Panel (3K-5K) Installation and Owner’s Manual (For Aftermarket Applications) ” flange bolts (Fig.8A) through each set of 16. Insert six aligned I-beam mounting brackets, four at the I-beam end and two on the opposite end. ”... -
Page 10: Power Tongue Jack Installation
Ground Control ® Leveling OneControl ® Touch Panel (3K-5K) Installation and Owner’s Manual (For Aftermarket Applications) Power Tongue Jack Installation THE TRAILER MUST BE SUPPORTED PER MANUFACTURER RECOMMENDATIONS BEFORE WORKING UNDERNEATH. FAILURE TO DO SO MAY RESULT IN DEATH OR SERIOUS PERSONAL INJURY. 1. - Page 11 Ground Control ® Leveling OneControl ® Touch Panel (3K-5K) Installation and Owner’s Manual (For Aftermarket Applications) 4. Align the three holes in the Power Tongue Jack 6. Connect the 2-pin Deutsch Connector to the mounting plate (Fig.16A) with the three holes in the Power Tongue Jack wires and run the harness to the coupler (Fig.16B).
-
Page 12: Mounting Position And Installing Leveling Sensors
Ground Control ® Leveling OneControl ® Touch Panel (3K-5K) Installation and Owner’s Manual (For Aftermarket Applications) Determining the Mounting Position and Installing Installing Leveling Sensors Leveling Sensors The leveling sensors have a limited mounting area for proper performance. The front sensor must be within power 36”... - Page 13 Ground Control ® Leveling OneControl ® Touch Panel (3K-5K) Installation and Owner’s Manual (For Aftermarket Applications) 1. Dry fit the mounting plate (Fig.20C) and the leveling NOTE: To avoid cracking the mounting sensor housing, sensor (Fig.20B) to the crossmember (Fig.20A). The pre- do not over-tighten the screws.
-
Page 14: Controller Installation
Ground Control ® Leveling OneControl ® Touch Panel (3K-5K) Installation and Owner’s Manual (For Aftermarket Applications) Controller Installation OneControl Touch Panel/Pad Installation NOTE: Prior to starting this portion of the installation, double check that all of the harnesses are properly and OneControl Touch Panel securely connected to the leveling jacks, Power Tongue 1. -
Page 15: Auto Leveling Control Touch Pad
Ground Control ® Leveling OneControl ® Touch Panel (3K-5K) Installation and Owner’s Manual (For Aftermarket Applications) NOTE: It is recommended to wire the canbus power Auto Leveling Control Touch Pad connector to the controller. The canbus power connector 1. Determine where to mount the Auto Leveling Control MUST be powered from a fused power source. -
Page 16: Power Tongue Jack Operation
Ground Control ® Leveling OneControl ® Touch Panel (3K-5K) Installation and Owner’s Manual (For Aftermarket Applications) Power Tongue Jack Operation NOTE: The ON and OFF switch (Fig.29A) controls the Power Tongue Jack’s light only. If left on for an extended period of time, the light will drain the trailer’s battery. -
Page 17: Auto Leveling Control Touch Pad Diagram
Ground Control ® Leveling OneControl ® Touch Panel (3K-5K) Installation and Owner’s Manual (For Aftermarket Applications) Auto Leveling Control Touch Pad Diagram Fig.31 Callout Description Red/Green LED - Indicates the status of the system. Up Arrow - Extends the Power Tongue Jack. To turn on the touchpad, press the Up and Down Arrow buttons at the same time Down Arrow - Retracts Power Tongue Jack. -
Page 18: Auto Level
Ground Control ® Leveling OneControl ® Touch Panel (3K-5K) Installation and Owner’s Manual (For Aftermarket Applications) 9. Pull tow vehicle away and park at a safe distance. NOTE: If the auto leveling sequence does not perform as described above, locate the OneControl Touch Panel or NOTE: To utilize the Power Tongue Jack for the unhitching use the OneControl App to place the system in Manual process , see Power Tongue Jack Operation section. -
Page 19: Onecontrol Touch Panel Diagram
Ground Control ® Leveling OneControl ® Touch Panel (3K-5K) Installation and Owner’s Manual (For Aftermarket Applications) OneControl Touch Panel Diagram leveling in standard mode jack buttons in manual mode, see figure 35 Fig.32 Callout Description Jack Buttons - Select FRONT, REAR, RIGHT and LEFT jacks to be operated depending on mode. Jacks available to be operated will be highlighted in blue. -
Page 20: Onecontrol Touch Panel Operation
Ground Control ® Leveling OneControl ® Touch Panel (3K-5K) Installation and Owner’s Manual (For Aftermarket Applications) OneControl Touch Panel Operation MAKE SURE TO PARK THE TRAILER ON SOLID AND LEVEL GROUND. PRIOR TO OPERATION, CLEAR ALL JACK LANDING LOCATIONS OF DEBRIS Fig.34 AND OBSTRUCTIONS. -
Page 21: Octp Standard Mode Features
Ground Control ® Leveling OneControl ® Touch Panel (3K-5K) Installation and Owner’s Manual (For Aftermarket Applications) OneControl Touch Panel Standard Mode Features 4. Press EXTEND or RETRACT button and LEFT button (Fig.35D) to operate left jacks. 1. Press EXTEND (Fig.32I) or RETRACT button (Fig.32H) and FRONT button (Fig.32A) to extend or retract the Power NOTE: To operate jacks individually, press EXTEND or Tongue Jack. -
Page 22: Octp Auto Leveling
Ground Control ® Leveling OneControl ® Touch Panel (3K-5K) Installation and Owner’s Manual (For Aftermarket Applications) OneControl Touch Panel Auto Leveling OneControl Touch Panel Hitch Recognition 1. Prior to auto leveling, make sure the trailer is unhitched 1. Press the Power button to turn the OneControl Touch Panel on (Fig.32L). -
Page 23: Onecontrol App Touch Panel Diagram
Ground Control ® Leveling OneControl ® Touch Panel (3K-5K) Installation and Owner’s Manual (For Aftermarket Applications) OneControl App Touch Panel Diagram NOTE: The OneControl Leveling App is available on iTunes® for iPhone® and iPad® and also on Google Play™ for Android™ users. jack buttons in leveling in standard mode manual mode,... -
Page 24: Onecontrol App Operation
4. Run a canbus cable back to the existing component from which the circuit was originally disconnected. NOTE: If the use of the OneControl App is desired and the trailer is not equipped with myRV, call Lippert Components to order additional parts and instructions. Accessing the OneControl App 1. -
Page 25: Onecontrol App Jack Operation In Standard Mode
Ground Control ® Leveling OneControl ® Touch Panel (3K-5K) Installation and Owner’s Manual (For Aftermarket Applications) OneControl App Basic Jack Operation OneControl App Basic Jack Operation in Standard Mode in Manual Mode To reach Manual Mode (Fig.40) for leveling: To reach Standard Mode (Fig.36) for leveling: 1. -
Page 26: Onecontrol App In Standard Mode Features
Ground Control ® Leveling OneControl ® Touch Panel (3K-5K) Installation and Owner’s Manual (For Aftermarket Applications) OneControl App Unhitching from the Tow Vehicle OneControl App in Standard Mode Features The jacks operate in pairs. While in manual mode the 1. Press EXTEND (Fig.36J) or RETRACT (Fig.36I) buttons jacks operate individually, the Twist Protection Prevention and FRONT button (Fig.36A) to extend or retract the System has been activated to prevent frame twist. -
Page 27: Onecontrol App Auto Leveling
Ground Control ® Leveling OneControl ® Touch Panel (3K-5K) Installation and Owner’s Manual (For Aftermarket Applications) OneControl App Auto Leveling OneControl App Hitch Recognition 1. Prior to auto leveling, make sure the trailer is unhitched 1. Power on the OneControl Touch Panel App. from the tow vehicle and the tow vehicle is parked a safe 2. -
Page 28: Auto Leveling Control Touch Pad Troubleshooting
Ground Control ® Leveling OneControl ® Touch Panel (3K-5K) Installation and Owner’s Manual (For Aftermarket Applications) Auto Leveling Control Touch Pad Troubleshooting Red/Green LED Indicator What is happening? What is happening? Why? Why? Touch panel is locked. Solid Green Touch panel is active. Blinking Green Jacks are moving. -
Page 29: Octp Error Message Troubleshooting
Ground Control ® Leveling OneControl ® Touch Panel (3K-5K) Installation and Owner’s Manual (For Aftermarket Applications) OneControl Touch Panel Error Message Troubleshooting OneControl Touch Panel Error Messages Touch Panel Message Touch Panel Message Why? Why? What should be done? What should be done? Unsecured sensor. -
Page 30: Special Jack Error Codes On Onecontrol Touch Panel Or Onecontrol App
Ground Control ® Leveling OneControl ® Touch Panel (3K-5K) Installation and Owner’s Manual (For Aftermarket Applications) Special Jack Error Codes on OneControl A. Press EXTEND and FRONT buttons to extend the front jacks, if required. See OneControl Touch Panel Operation Touch Panel or OneControl App or OneControl App Operation section. -
Page 31: Manual Override
Ground Control ® Leveling OneControl ® Touch Panel (3K-5K) Installation and Owner’s Manual (For Aftermarket Applications) Manual Override C-Jacks Manual Override Power Tongue Jack Manual Override NOTE: For ease of manual override it is recommended to 1. Chock the tires of the trailer. unplug the power harness to the motor prior to performing the manual override procedure. -
Page 32: 5K-Short Jack Manual Override
Ground Control ® Leveling OneControl ® Touch Panel (3K-5K) Installation and Owner’s Manual (For Aftermarket Applications) Jack Manual Override Nut: Tools needed: ” socket wrench 1. Locate the manual override nut (Fig.45A). 2. Place ” socket wrench over the manual override nut (Fig.45A) and turn the override nut until the jack extends or retracts to desired position. -
Page 33: Zero Point Calibration
Ground Control ® Leveling OneControl ® Touch Panel (3K-5K) Installation and Owner’s Manual (For Aftermarket Applications) Zero Point Calibration The “Zero Point” is the programmed point that the trailer will return to each time the Auto Level feature is used. The “Zero Point”... -
Page 34: Wiring Diagram
Ground Control ® Leveling OneControl ® Touch Panel (3K-5K) Installation and Owner’s Manual (For Aftermarket Applications) battery Wiring Diagram power tongue jack 30 AMP fuse front leveling sensor tongue jack harness recommended 50 front leveling to 100 amp circuit front jack sensor harness protection per harness... -
Page 35: Preventive Maintenance
Ground Control ® Leveling OneControl ® Touch Panel (3K-5K) Installation and Owner’s Manual (For Aftermarket Applications) Notes Preventive Maintenance 1. For optimum performance, the system requires full battery current and voltage. The battery MUST be maintained at full capacity. 2. Check the terminals and other connections at the battery, the controller, and the jacks for corrosion, and loose or damaged connections. -
Page 36: Notes
(For Aftermarket Applications) Notes Manual information may be distributed as a complete document only, unless Lippert Components provides explicit consent to distribute individual parts. All manual information is subject to change without notice. Revised editions will be available for free download at lci1.com.
Need help?
Do you have a question about the Ground Control TT and is the answer not in the manual?
Questions and answers