Table of Contents
Advertisement
Advertisement
Table of Contents

Related Manuals for Thermo Scientific VARIOKLAV 25T


Summary of Contents for Thermo Scientific VARIOKLAV 25T
- Page 1 VARIOKLAV Steam sterilizer 25T Operating Manual Issue 03/2007...
- Page 2 ©2007 Thermo Fisher Scientific Inc. All rights reserved. ® DURAN is a registered Trademark of the SCHOTT GLASWERKE, Mainz. ® SEGO Soft is subject to trademark rights of Comcotec Messtechnik GmbH, Garching. All other trademarks are the property of Thermo Fisher Scientific Inc. and its subsidiaries. Specifications, terms and pricing are subject to change.
-
Page 3: Table Of Contents
Contents Contents 1 Safety considerations ...................7 In case of emergencies ................ 10 1.1.1 Disconnecting from mains............. 10 1.1.2 TERMINATION program............... 10 Residual sterilizing risks ............... 11 2 Short operating manual ..................12 3 Equipment description ..................13 Components ..................13 4 Function ...................... - Page 4 Contents 11 Maintenance and cleaning ................51 11.1 After-sales service and maintenance..........52 11.2 Important notes ................. 52 11.3 Inserting paper rolls into the integrated printer ......... 53 11.4 Changing the ribbon of the integrated printer ........54 12 Troubleshooting....................55 13 Technical specifications ..................
- Page 5 User considerations User considerations This operating manual is directed at users and operators (or their representatives) of VARIOKLAV Type 25 T bench-top steam sterilizers. This audience consists of three target groups: Target group 1: Trained laboratory staff Target group 2: Semi-skilled laboratory staff Target group 3: Auxiliary staff...
- Page 6 User considerations Pictographs You will find the following pictographs in this operating manual: DANGER This sign refers to hazardous situations. Hazards to human life are indicated by the word “LIFE HAZARD”. DANGER This sign refers to explosion hazards. DANGER This sign refers to dangerous voltages. CAUTION This sign indicates danger to equipment and machinery.
-
Page 7: Safety Considerations
1 Safety considerations 1 Safety considerations For your own safety, you should observe the following safety warning signs. The warning signs indicate a possible source of danger. At the same time they contain information on how correct action can avert danger. You will always find warning signs attached to points of possible danger. - Page 8 1 Safety considerations DANGER Read the detailed operating manual before switching on the sterilizer. Keep the manual in a safe place to assist other operators. DANGER No matter what the problem, never use force when opening or closing the swing door of the sterilizer. LIFE HAZARD! The system might be damaged! DANGER If problems occur that might be harmful to persons or...
- Page 9 1 Safety considerations DANGER Do not sterilize pressure-sealed vessels. Explosion hazard! Watch for broken glass! Scalding hazard! CAUTION Take note of all warning signs attached to the sterilizer. CAUTION The equipment must not be operated in hazardous locations! CAUTION When sterilizing liquids: Do not fill the vessels more than two-thirds full, as otherwise liquids may boil over.
-
Page 10: In Case Of Emergencies
1 Safety considerations In case of emergencies 1.1.1 Disconnecting from mains DANGER No matter what the problem, never use force when opening or closing the swing door of the sterilizer. LIFE HAZARD! The system might be damaged! CAUTION If problems occur that might be harmful to persons or property, the unit must be immediately disconnected from the power supply by pulling out the mains plug from the socket! INFORMATION... -
Page 11: Residual Sterilizing Risks
1 Safety considerations CAUTION If a program is interrupted, the load must be re-sterilized for safety reasons. Residual sterilizing risks The VARIOKLAV Type 25 T benchtop sterilizer ensures safe sterilization, when used as directed and if the appropriate sterilizing program has been chosen for the load to be sterilized. -
Page 12: Short Operating Manual
2 Short operating manual 2 Short operating manual INFORMATION Attach the short operating manual close to the sterilizer. 03/2007 DA0621_a/... -
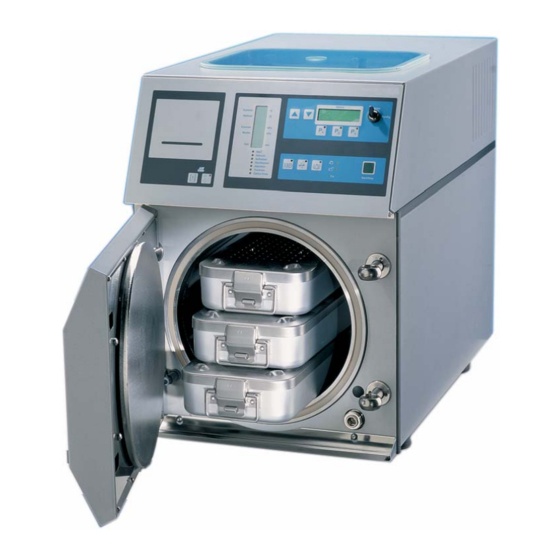
Page 13: Equipment Description
3 Equipment description 3 Equipment description Components Figure 1: VARIOKLAV 25 T 03/2007 DA0621_a/... - Page 14 3 Equipment description Zyklus Cycle Operation Betrieb Chamber Kammer °C °C Konfig. Config. Medium Liquid °C °C Chamber Kammer Mantel Jacket Time Zeit Start Start Vakuum Vacuum Aufheizen Heating Sterilisieren Sterilization Abkühlen Recooling Trocknen Drying Door Tür Start/Stop Start/Stop Zyklus Ende End of Cycle Figure 2: VARIOKLAV 25 T control panel, detail Figure 3: Printer control panel, detail...
- Page 15 3 Equipment description Feed water tank with : The feed water tank contains the feed water glass cover (deionized water) used to generate the sterile steam. The glass cover protects the feed water from contamination. (optional with spent- The spent-steam condenser (option) steam condenser) subsequently condenses the steam, which can then be disposed of separately or returned to the...
- Page 16 3 Equipment description 21 Acoustic signal key : Turns the acoustic signal (buzzer) at program end on or off. 22 Preheating key : Out of function 23 Timer key : Turns the timer on or off, and for checking the preset date or time.
-
Page 17: Function
4 Function 4 Function VARIOKLAV Type 25 T benchtop sterilizers are used to sterilize and disinfect various kinds of articles. Standard Equipment Program Items / Special Notes Instruments Solid items such as instruments, filter housings, glassware, rubber items, pipette tips and food. Destruction Used consumables, infectious or (Waste) -
Page 18: Options
4 Function minutes.Once the specified sterilizing temperature has been reached, the sterilizing time will start running. Then the sterilizer is used as a steam pot (set temperature of 98 °C), no pressure builds up in the sterilization chamber (8). When the sterilizing time has run out, the sterilizing chamber (8) cools according to the selected program: •... -
Page 19: Special Programs
4 Function Water post-feed With the Water post-feed option, water is led within the jacket space not only prior to sterilization, but more water is added as needed from the feed water tank. In this manner, it is possible to implement sterilizing and steaming times of up to 10019 minutes. -
Page 20: Thermolock
4 Function especially in maximum-containment laboratories . The entire filter housing is itself sterilized during each sterilization cycle and is therefore protected from contamination. If another sterilizer expansion option requires a sterile air filter (Types FS, FL), the sterile air filter will be present in the form of a combination filter Types FA/FS, FA/FL, or FA/FS/FL. -
Page 21: Preparing For Sterilization
5 Preparing for sterilization 5 Preparing for sterilization DANGER Only run the sterilizer for correct use. CAUTION Take note of all warning signs attached to the sterilizer. CAUTION Take care to ensure that the door seal (6) is: free from dirt, not sticking to the door (2), and not damaged. The door seal (6) must sit snugly in the groove. -
Page 22: Preparing The Sterilizing Chamber
5 Preparing for sterilization Preparing the sterilizing chamber CAUTION Before sterilization, check to see whether there is enough feed water in the feed water tank (4). Only use deionized or distilled water when topping up the feed water. Do not use tap water! ♦... -
Page 23: Practical Tips For Different Types Of Items
5 Preparing for sterilization Rack system The rack system is designed to accommodate up to 2 or 4 insert trays within the chamber by simple turning by 90°. Insert trays Trays are well suited for assembling and transporting the items to be sterilized. - Page 24 5 Preparing for sterilization Liquids in open or slightly closed vessels: Sterilize liquids in open or slightly closed vessels. DANGER Do not sterilize pressure-sealed vessels. Explosion hazard! Watch for broken glass! Scalding hazard! CAUTION When sterilizing liquids: Do not fill the vessels more than two-thirds full, as otherwise liquids may boil over.
-
Page 25: Loading The Sterilizing Chamber
5 Preparing for sterilization 5.2.3 Loading the sterilizing chamber ♦ Load the items to be sterilized into the sterilizing chamber. ♦ Close the door (2) until it touches the sterilizing chamber (8). Later, the door closes automatically as soon as a program is started. When sterilizing liquids: For sterilizing liquids, a reference temperature must be measured. -
Page 26: Programs
6 Programs 6 Programs The program keys are factory preset for complete program cycles. This means that in addition to the process itself, the sterilizing time and temperature and certain options for a sterilizing article are predefined. If you frequently sterilize the same articles, this will be very comfortable. -
Page 27: Selecting A Sterilizing Program
6 Programs Each additional time the selected program key is pressed, the cycle display shows the available parameters for the sterilization process: • Sterilizing temperature • Sterilizing time • Removal • Multiple sterilization number (option) • Batch number Parameters you can change are marked with the double-arrow symbol (see Figure 7). -
Page 28: Setting The Sterilizing Temperature
6 Programs The thermolock is activated. After sterilization, pressure is reduced step by step in very small increments. There is no danger of overboiling. The vessels will cool in a controlled manner. The sterilizing chamber is pre-aerated between 100 °C and 90 °C. -
Page 29: Setting The Sterilizing Time
6 Programs Setting the sterilizing time The selected sterilizing time is shown on the cycle display (16). Setting range: up to 121 °C 1-40 minutes from 122 °C 1-30 minutes We recommend the following sterilizing times: 20 min for sterilization at 121 °C (liquids: solutions and culture media; solids: glassware and instruments);... -
Page 30: Selecting Or Deselecting Options (Acoustic Signal Or Integrated Printer)30
6 Programs It is recommended to set the multiple sterilization number very low in the Liquids program, as otherwise a very high liquid loss by evaporation is the result. If you want to transport the VARIOKLAV Type 25T sterilizer and therefore must empty the jacket space with the Empty Jacket program, you should select 1 as the multiple sterilization number. -
Page 31: Setting The Timer
6 Programs Setting the timer If you do not want to start sterilization right away, you may set the timer. When the timer is set, the acoustic signal is automatically deactivated. You can thus perform sterilization overnight or over the weekend. When you start work the next (working) day, your sterilized items are ready and waiting for you. -
Page 32: Starting And Running A Program
7 Starting and running a program 7 Starting and running a program ♦ Check the sterilization parameters of the selected sterilizing program (program, sterilizing temperature, sterilizing time and options). ♦ Check to see that the sealing surface on the door (2) and the door seal (6) are clean. - Page 33 7 Starting and running a program In the case of the Multiple sterilization special program, the program cycle of heating, sterilizing, cooling and drying (optional) repeats itself according to the selected multiple sterilization number. In the Liquids programs, the thermolock will unlock the door (2) as soon as the reference temperature drops below 90 °C.
-
Page 34: Batch Documentation (Option)
7 Starting and running a program Batch documentation (option) Integrated printer The integrated printer (if present) logs sterilization process data. The printout is tamper-proof. The log header (1) is printed out as soon as the program is started. Chamber temperature, media temperature and chamber pressure are continuously measured during program execution. - Page 35 7 Starting and running a program SEGOSOFT ® The SEGO Soft software lets you log measurements on a PC. ® SEGO Soft displays the readings of all temperature sensors and the chamber pressure sensor in graphic mode. Measurements may be stored and archived. Usable PC interfaces: serial interface (RS232), network (Ethernet) ®...
-
Page 36: Program End And Removal
8 Program end and removal 8 Program end and removal DANGER Do not open the sterilizing chamber (8) until removal is signalled. Watch for hot steam and hot water! Scalding hazard! Follow the specified operating steps to the letter. DANGER When pressure-sealed flasks or bags are accidentally sterilized: Watch for broken glass and splitter! - Page 37 8 Program end and removal ♦ Open the door a crack. When doing so, hold the door by the lower third of its right edge. Do not put your fingers behind the door. DANGER Hot steam may escape when the door is opened. Scalding hazard! Step back when opening the sterilizer.
-
Page 38: Configuring Programs
9 Configuring programs 9 Configuring programs As delivered by the factory, each control panel program key (18) is pre-set with one program each. Depending on which programs are present, the microprocessor control may offer additional programs. Authorized operators can use the key- operated switch to change the configuration of the programs permanently within the technical limits of the unit and to reprogram program keys. - Page 39 9 Configuring programs Parameters you can change are marked with the double-arrow symbol. You can program the selected program key for a different program. For instance, if all you ever sterilize is either solids or liquids, but never waste, you might use one of the program keys for a second Solid sterilization program.
- Page 40 9 Configuring programs ♦ Press the program key P repeatedly until the cycle display shows the removal temperature (in °C). ♦ Increase or decrease the sterilizing temperature using the ▲ key (14) or the ▼ key (15). Activating or deactivating options You may, for instance, turn off the acoustic signal for the selected program permanently.
- Page 41 9 Configuring programs S: Type ST supporting pressure (Program RO) T: Sterile air stream drying (Instruments DR / Destruction (Waste) DR programs) V: Vacuum and drying with vacuum F: Type FA exhaust air filtration Z: Multiple sterilization C: Batch documentation K: Climatic chamber E: External steam Ending configuration...
-
Page 42: Initial Commissioning
10 Initial commissioning 10 Initial commissioning DANGER The supply voltage and supply frequency must be the same as given on the type plate. Only connect the sterilizer to the specified socket. CAUTION Only use deionized or distilled water when topping up feed water. -
Page 43: Scope Of Delivery
10 Initial commissioning All VARIOKLAV steam sterilizers are CE-marked based on the European Pressure Equipment Directive 97/23/EC and the Low-Voltage Directive as well as the EMC Directive. Since January 1 , 1996, the Council Directive 89/336/EEC on electromagnetic compatibility (EMC) has been in force and binding for all units with electrical or electronic components. -
Page 44: Warranty Periods
10 Initial commissioning 10.2 Warranty periods 1-year warranty for all electrical and mechanical parts. 5 years warranty for stainless steel pressure vessel. 10.3 Legal regulations 10.3.1 Free movement pursuant to European Pressure Equipment Directive 97/23/EC Starting on 30 May 2002, the VARIOKLAV Type 25 T steam sterilizers have been manufactured serially pursuant to the Pressure Equipment Directive PED 97/23/EC. -
Page 45: Connecting The Steam Sterilizer To The Disposal System
620 mm Öffnungs- winkel 95° Figure 14: Footprint and dimensions, VARIOKLAV 25T, seen from above and from the side ♦ Choose a stable and level area for deploying the sterilizer (e.g. a table or workbench). Make sure that this area is exactly level in all directions. - Page 46 10 Initial commissioning The required disposal lines for emitting steam and condensate must be laid with a gradient towards the drain. A minimum diameter of 10 mm is necessary; the lines must not exceed a length of 2 m. The lines must be free of kinks and crushes. It should also not be laid in tight bends.
-
Page 47: Connecting The Steam Sterilizer To The Supply System
10 Initial commissioning Quick-release coupling Figure 16: Condensate collector Please observe the Commissioning and Operating Manual “Condensate Collector” . There you find detailed information regarding the required connections, maintenance information, important safety warning and much more. If you wish to use your own container, please note the following: •... -
Page 48: Commissioning Of The Options
10 Initial commissioning INFORMATION The mains plug socket of the sterilizer must be freely accessible. In case of failures, it is used to disconnect the sterilizer from mains. Actuation of a current-operated e.l.c.b. system: After long shutdown periods, the resistance of the ceramic insulation in the heating elements can drop because of condensation, with the result that the actuation of a current-operated e.l.c.b. -
Page 49: Calibration, Qualification, Validation
10 Initial commissioning 10.6 Calibration, qualification, validation The operator’s quality assurance system may require that the temperature and pressure measuring points and the value displays of the sterilizer be calibrated. This can be required before commissioning or at regular intervals. In addition, it may be required that the sterilizing process be qualified or validated at regular intervals. - Page 50 10 Initial commissioning PC, and to perform validations. It also facilitates batch documentation (date, sterilization data, etc.). We recommend the SEGOsoft software by Comcotec Messtechnik GmbH for analyzing the sterilization data. Users may also control the RS 232 port to run their own programs for process control.
-
Page 51: Maintenance And Cleaning
11 Maintenance and cleaning 11 Maintenance and cleaning DANGER Repairs and interventions may only be carried out by our authorized after-sales service. DANGER If the safety valve does not react to a higher pressure than the set nominal pressure, cease using the sterilizer immediately. Do not use it again until a new and fully functional safety valve is installed. -
Page 52: After-Sales Service And Maintenance
11 Maintenance and cleaning 11.1 After-sales service and maintenance Observe the manufacturer's recommendations on service intervals for the sterilizer and periodic inspections for the pressure vessel in line with regulations covering pressure vessels. Please, check also the electrical safety of your equipment (VDE test pursuant to VBG 4, Section 5) in accordance with the regulations. -
Page 53: Inserting Paper Rolls Into The Integrated Printer
11 Maintenance and cleaning 11.3 Inserting paper rolls into the integrated printer INFORMATION Do not pull the paper out of the printer. Use the Paper feed key for this purpose. Never pull the paper backward, because this may damage the printer. -
Page 54: Changing The Ribbon Of The Integrated Printer
11 Maintenance and cleaning Figure 18: Inserting paper into the paper feeder note direction, arrow) 11.4 Changing the ribbon of the integrated printer If the printout starts to appear faded after a longer period of use, the printer ribbon should be replaced. INFORMATION Do not pull the paper out of the printer. -
Page 55: Troubleshooting
12 Troubleshooting 12 Troubleshooting The program control is equipped with a sophisticated error management system. If an error occurs during program execution, an error message is shown in the cycle display (16) or the current values display (13). If an error occurs: ♦... - Page 56 12 Troubleshooting Message in the Meaning Remedy cycle display Error 17 Heating system does not turn off. Contact after-sales Overheating service. Heating system relay defective or program control error. Error 20 Microheating system (heatable Contact after-sales Microheating temperature sensor) cannot regulate service.
-
Page 57: Technical Specifications
13 Technical specifications 13 Technical specifications VARIOKLAV steam sterilizer 25 T Dimensions (W × H × D) 380 × 530 × 680 Chamber dimensions Ø × T (mm) 255 × 500 Usable volume (dm approximately 70 Weight (kg) Rated heating capacity (Nominal heating (kW) capacity) -
Page 58: Glossary
14 Glossary 14 Glossary Actual temperature Effective temperature Bench-top sterilizer Steam sterilizer to be placed on a table Chamber That part of the sterilizing chamber designated to receive the sterilizing articles Chamber temperature Temperature in the sterilizing chamber Condensate Water vapour, which has precipitated onto a surface and liquefied To configure programs To change permanently... - Page 59 14 Glossary Metering equipment Equipment for measuring a specific quantity Recooling Cooling the sterilizing chamber and the sterilized articles after sterilization Reference flask Liquid-filled flask, in which the temperature of the liquid is measured with a temperature sensor Reference temperature Temperature at the reference point (e.g.
- Page 60 14 Glossary 03/2007 DA0621_a/...
Need help?
Do you have a question about the VARIOKLAV 25T and is the answer not in the manual?
Questions and answers