
Subscribe to Our Youtube Channel
Related Manuals for Thermo Scientific Shandon TissueWave 2


Summary of Contents for Thermo Scientific Shandon TissueWave 2
- Page 1 Shandon TissueWave 2 Microwave Specimen Processing System Operator Guide - Issue 1 B35210021 English TissueWave 2 Operator Guide...
- Page 2 Contact address Anatomical Pathology 4481 Campus Drive Kalamazoo MI 49008 Tel: 1-800-522-7270 Fax: +1 269-372-2674 www.thermo.com/shandon The Shandon TissueWave 2 meets the following CE Mark requirements: ® In Vitro Diagnostic Directive 98/79/EC Low Voltage Directive 2006/95/EC. TissueWave 2 Operator Guide...
- Page 3 Symbols Symbols The following symbols and conventions are used throughout this manual and on the instrument. THIS SYMBOL IS USED ON THE EQUIPMENT, OR IN A DOCUMENT, TO WARN THAT INSTRUCTIONS MUST BE FOLLOWED FOR SAFE AND CORRECT OPERATION. IF THIS SYMBOL APPEARS ON THE INSTRUMENT, ALWAYS REFER TO THIS OPERATOR GUIDE.
-
Page 4: Table Of Contents
Contents How to Use This Guide Safety Information 1 - Introducing the Shandon TissueWave 2 2 - Daily Operation 3 - Installation 4 - Programming 5 - Troubleshooting 6 - Maintenance and Cleaning Appendix A - Approved Reagents List Appendix B - List of Available Names... -
Page 5: How To Use This Guide
Shandon TissueWave 2. Chapter Chapter Section 1 - Introducing the Shandon TissueWave 2 This chapter identifies the components of the Shandon TissueWave 2 Microwave Summary Summary and describes their functions. Section 2 - Daily Operation This chapter explains the daily operation procedures required to run pre-defined protocols. -
Page 6: Safety Information
• Position the Shandon TissueWave 2 so that it is possible to interrupt the mains supply at the source by removing the plug from the socket. - Page 7 • The Shandon TissueWave 2 vent system interlock is designed to prevent use of the unit unless adequate air flow has been established through the microwave chamber. • Keep the exhaust hose clean and unrestricted. This provides protection against the buildup of possibly toxic or explosive fumes inside the unit.
- Page 8 Never use an additional thermometer in the unit. • Only the supplied temperature probe should be used to monitor temperature inside of the Shandon TissueWave 2. Use only qualified microwave service personnel for repairs. TissueWave 2 Operator Guide...
- Page 9 • The unit should never be adjusted or repaired by anyone except qualified microwave service personnel. The outer case of the microwave should not be removed at any time, except by a qualified service person. Use caution when the vacuum chamber is in use. •...
- Page 10 Chemical Safety Chemical Safety The Shandon TissueWave 2 as supplied, complies with EN 61010-1:2001. However, chemicals introduce potential hazards and Thermo has adopted the following position with regard to the subject of heated surfaces and volatile chemicals used in medical...
- Page 11 iv The operator is fully aware of the contents of the specification documents detailing the properties of the chemicals they are using. The operator has carried out any legally required assessment of chemicals used and is using good laboratory practice. Some chemicals used during tissue processing are flammable - do not use sources of ignition in the vicinity of this instrument when it is loaded with reagents.
-
Page 12: Introducing The Shandon Tissuewave
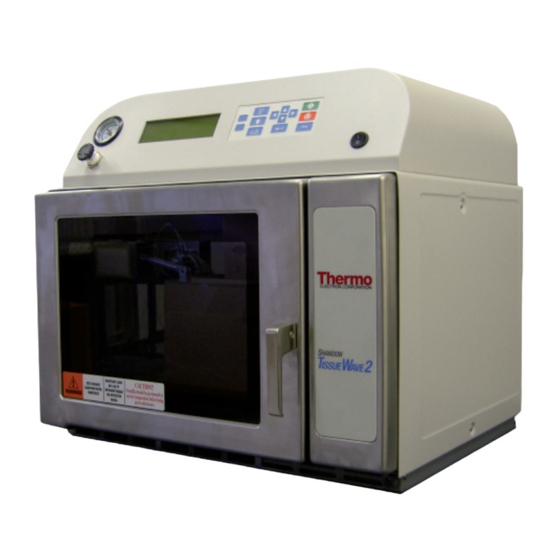
Epitope enhancement during immunohistochemistry staining. With a total capacity of 14 protocols consisting of a total of 63 steps, the Shandon TissueWave 2 is designed for greater flexibility to meet the growing laboratory workload demands. This user friendly instrument will free-up technical time for more complex procedures. - Page 13 Identifi cation Identifi cation Display Display Vacuum Vacuum Keypad Keypad Gauge Gauge of Parts of Parts Vacuum Vacuum Control Control Power Power Knob Knob Switch Switch Coolin Coolin Door Door Handle Handle 4” Chamber 4” Chamber Outlet Outlet Vacuum / Fluid Vacuum / Fluid Power Power...
- Page 14 Agitator Agitator Vacuum Vacuum Temperature Temperature Exhaust Exhaust Valve Valve Tube Tube Probe Probe Agitator Agitator Port Port Vacuum Vacuum Chamber Chamber TissueWave 2 Operator Guide...
- Page 15 START START ISSUE ISSUE SET UP SET UP LCD Display The Shandon TissueWave 2 has an interactive which directs and informs the user throughout operation. Keypad is used to perform various actions and to interact with LCD Display Keys Keypad...
- Page 16 Interior Light On / Off Agitation On / Off Function Keys* Function Keys Screen Specific Functions * The will perform LCD Display Function Keys which are noted on the adjacent to the TissueWave 2 Operator Guide...
- Page 17 Keypad In addition to those on the , there are a few other symbols Additional Additional used on this instrument. Symbols Used On Symbols Used On the Instrument the Instrument The meanings of these symbols are as follows: Power On / Off Switch Power On / Off Switch Serial Port Connector Serial Port Connector...
- Page 18 This prevents the accumulation of dangerous and toxic fumes. The vent system on the Shandon TissueWave 2 is designed to be fed Powered Exhaust System to a 4”...
- Page 19 Vacuum Accumulator The Shandon TissueWave 2 is designed to Vacuum Vacuum prevent the accidental ingestion of liquid paraffin or other Accumulator Accumulator Vacuum Pump contaminants by the system’s Vacuum System Vacuum Inlet Should liquids enter the via the Connection Processor Cavity...
- Page 20 ±1°C The probe guarantees accurate temperature measurement to most aqueous solutions. Temperature Sensor is located at the tip of the probe, although at least 1” (25 mm) of the probe must be covered by fluid. Temperature Probe Container When placing the into a , the as closely as possible to centre of the...
- Page 21 Air agitation during processing helps in eliminating cold and hot spots. Agitator Agitator The constant air flow causes the air to circulate and prevents hot and cold spots from affecting any one particular area. Air Agitator 1 l/min Nominal The total flow rate is Air Agitator Pump Air Agitator Key...
-
Page 22: Daily Operation
2 - Daily Operation Introduction Introduction This chapter explains the routine operating procedures for processing with the Shandon TissueWave 2. The procedures explained are: • Loading the Shandon TissueWave 2 • Internal Connections • Running a Protocol • Running a Manual Process •... - Page 23 Shandon TissueWave 2 Vacuum Chamber is designed to Loading the Loading the Shandon Excelsior™ Processing Baskets accept , which allow up Shandon Shandon 74 Tissue Cassettes to be processed at once. TissueWave 2 TissueWave 2 Processing Basket comprises of two sections, each capable of...
- Page 24 Vacuum Chamber • Insert the into the Shandon TissueWave 2 . TissueWave 2 Operator Guide...
- Page 25 Vacuum Chamber Once the is inside the Shandon TissueWave 2 the Internal Internal Internal Connections various need to be established. Connections Connections These connections will vary, depending on whether or not vacuum is required for the protocol. Connections for Processing With Vacuum:...
- Page 26 Note: It is possible to engage the vacuum prior to the protocol step beginning, using the Vacuum Control Key on the Keypad. This will ensure that the lid is properly seated and that a vacuum has been established before the protocol step begins. Vacuum Gauge •...
- Page 27 Running a Running a START START Protocol Protocol • After turning on the TissueWave 2 the • After turning on the TissueWave 2 the Welcome screen will appear. Welcome screen will appear. • Press the ‘Start’ Function Key. • Press the ‘Start’ Function Key. START START •...
- Page 28 Running Running a Manual a Manual Process Process • Press the Run Key. • Press the Run Key. • The Manual Run screen displays a list of • The Manual Run screen displays a list of variables and their current values. variables and their current values.
- Page 29 Power Processes The Shandon TissueWave 2 has two possible Running a Running a Power Power These are: Process Process • Manual Power Process • Protocol Power Process Manual Power Process • Press the Run Key. • Press the Run Key.
- Page 30 Protocol Power Process • Using the method described in Chapter 4 • Using the method described in Chapter 4 ‘Editing Steps’, set the Timer Mode to Power ‘Editing Steps’, set the Timer Mode to Power for all the steps in a Protocol. for all the steps in a Protocol.
-
Page 31: Installation
Port size will accept up to 3/16” (5 mm) hose. Port size will accept up to 3/16” (5 mm) hose. Locating the Locating the non-flammable The Shandon TissueWave 2 should be located on a level bench or tabletop electrical power with close proximity to Shandon... - Page 32 The specific service requirements are as follows: • 120V Model - 15A Service Minimum (20A Recommended) • 230V Model - 10A Service Minimum (15A Recommended) Ventilation Ventilation Vent System The Shandon TissueWave is designed to connect to a positively vented (powered) laboratory hood building vent Requirements Requirements...
-
Page 33: Programming
4 - Programming There are some concepts about the Shandon TissueWave 2 unit which should be understood prior to beginning programming. Control Modes The Shandon TissueWave 2 has two which can be Control Control used: Parameters Parameters • Temperature Control •... - Page 34 This allows the Shandon TissueWave 2 to provide accurate temperature control and a smooth ‘Temperature Curve’. Programming Programming The Shandon TissueWave 2 has a number of programming options available to allow it to be customized as required by the user. Features Features The Features available are: •...
- Page 35 Add Protocol Add Protocol • From the Protocol List, use the ‘Up’ and • From the Protocol List, use the ‘Up’ and ‘Down’ Arrow Keys to highlight New Protocol. ‘Down’ Arrow Keys to highlight New Protocol. SELECT SELECT • Press the ‘Select’ Function Key. •...
- Page 36 Copy Protocol Copy Protocol • From the Protocol List, use the ‘Up’ and • From the Protocol List, use the ‘Up’ and ‘Down’ Arrow Keys to highlight the protocol ‘Down’ Arrow Keys to highlight the protocol to be copied. to be copied. •...
- Page 37 Add Step Add Step • From the Protocol List, use the ‘Up’ and • From the Protocol List, use the ‘Up’ and ‘Down’ Arrow Keys to highlight the Protocol ‘Down’ Arrow Keys to highlight the Protocol to be edited. to be edited. SELECT SELECT •...
- Page 38 Edit Step Edit Step • From the Protocol List, use the ‘Up’ and • From the Protocol List, use the ‘Up’ and ‘Down’ Arrow Keys to highlight the Protocol ‘Down’ Arrow Keys to highlight the Protocol to be edited. to be edited. •...
- Page 39 Delete Step Delete Step • From the Protocol List, use the ‘Up’ and • From the Protocol List, use the ‘Up’ and ‘Down’ Arrow Keys to highlight the Protocol ‘Down’ Arrow Keys to highlight the Protocol to be modified. to be modified. •...
- Page 40 Delete Protocol Delete Protocol • From the Protocol List, use the ‘Up’ and • From the Protocol List, use the ‘Up’ and ‘Down’ Arrow Keys to highlight the Protocol ‘Down’ Arrow Keys to highlight the Protocol to be deleted. to be deleted. •...
- Page 41 Rename Protocol • From the Protocol List, use the ‘Up’ and ‘Down’ Arrow Keys to highlight the Protocol to be renamed. • Press the ‘Select’ Function Key. SELECT • Use the ‘Up’ and ‘Down’ Arrow Keys to select BACK Rename Protocol from the available options. •...
-
Page 42: Troubleshooting
5 - Troubleshooting Warning Screens Warning Screens The Shandon TissueWave 2 provides informative Audible Alert and an when certain conditions or problems occur. Warning Screens The following table lists the , their cause(s) and possible remedies for the appropriate faults. - Page 43 Turn power off and allow chamber to • Microwave chamber cool temperature too high If problems persist call ThermoFisher • Scientific Technical Support • Check fluid level is appropriate • Check power settings Check temperature probe placement and • connections Measured temperature exceeds 120°C •...
- Page 44 Warning There are also some faults which may occur, for which no Other Faults Screen is provided. The following table lists those most commonly encountered: Remedy Problem Check that the Tubing is properly connected to the • Chamber Lid Check that the Chamber Lid is securely fitted and makes •...
- Page 45 Time at Temperature When the Shandon TissueWave 2 is set to Watchdog Timer (Time @) Mode , the process is only terminated when the Countdown Timer reaches zero. Timer If the should fail to start it can cause indefinite heating of the process materials and possible loss of reagents and / or specimens.
-
Page 46: Maintenance And Cleaning
6 - Maintenance and Cleaning Before using any cleaning or decontamination method except those recommended by the manufacturer, users should check with the manufacturer that the proposed method will not damage the equipment. To avoid danger of electric shock, never remove the Outer Case of this instrument! Outer Case Authorized Service... - Page 47 PRODUCT RETURN SAFETY DECLARATION Part 1 Decontamination Certificate Any instrument or part of any instrument must be clean before being returned, and where necessary accompanied by a completed Decontamination Certificate. Should the instrument or any part of it be received in an unclean condition, or Thermo Fisher Scientific consider it to be a hazard, the instrument or part will be returned unrepaired at the expense of the customer.
-
Page 48: Appendix A - Approved Reagents List
TissueWave 2. If the use of a reagent not on this list is required, contact your Thermo Fisher agent for advice. The Shandon TissueWave 2 should not be used to heat any of the following: • Potentially explosive substances. - Page 49 Reagent List Dehydrants Isopropanol Ethanol Up to 5% Methanol in Ethanol Industrial Methylated Spirits (IMS) Reagent Alcohol Clearants Presolve™ Clearant Isopropanol Infi ltrants Paraffi n Wax Ensure proper ventilation when Fixatives Formalin 10% using Formalin based reagents Zinc Formalin Glyo-Fixx™ Epitope Sodium Citrate Buffer 0.1 mol/l...
-
Page 50: Appendix B - List Of Available Names
Appendix B - List of Available Names The following table contains the pre-programmed names available for Protocols Steps identifying POSITION NAME POSITION NAME POSITION NAME 1MM BIOPSY FIXATION 2 PLAQUE "PA SCHIFF S" HIER 1 RAPID MUCIN HIER 2 RETICULIN GOMORI TRICHROME IHC 1 ACID FAST... -
Page 51: Appendix C - Graph Of Power Output
Appendix C - Graph of Power Output Power Setting (in Watts) If a procedure uses a as opposed to a Temperature Reading Power Process Operation Method , the should be used. Power (Watts) The following graph can be used to identify the Output Duty Cycle (%). -
Page 52: Appendix D - Power Output Confidence Test
Appendix D - Power Output Confidence Test Power Output Confidence Test provides an approximate Microwave Output Performance qualitative measure of During this two minute test, the unit will monitor the percentage of power output and the wattage output. Wattage Output Influences on the include: •... - Page 53 The Power Output Confidence Test is performed using the following method: • After turning on the TissueWave 2 the Welcome screen will appear. • Hold down the Enter Key and the ‘Down’ Arrow Key simultaneously. • The Start Power Output Test screen will appear.
-
Page 54: Appendix E - Accessories
Appendix E - Accessories Description Part No. Air Agitator Tubing B35240039 Excelsior Organized Basket A78410025 Air Adjustment Screw B35240005 Fuse, 15A B35240014 AC Input Fuse Holder B35240013 Interior Lamp B35240015 Microwavable Specimen Container B1002517 Operator Guide B35210021 Temperature Probe B35240003 Vacuum Chamber B35210001 Microwavable Plastic Coplin Staining Jar... -
Page 55: Appendix F - Warranty And Declaration Of Conformity
Appendix F - Warranty and Declaration of Conformity We at Thermo Fisher Scientific are proud of our quality, reliability and of our after-sales service. We continuously strive to improve our service to our customers. Please ask your distributor or Thermo Fisher representative about Service Contracts which can keep your purchase in peak condition for many years to come. - Page 56 Declaration of Conformity This Declaration of Conformity is only valid when the instrument is used in accordance with the Operator Guide Manufacturer’s Name: Thermo Shandon Limited (Trading as Thermo Fisher Scientific) Manufacturer’s Address: Chadwick Road, Astmoor, Runcorn, Cheshire, WA7 1PR ENGLAND Product Description: Laboratory Microwave Tissue Processor...
-
Page 57: Appendix G - Technical Specifications
Appendix G - Technical Specifications 21.5” (54.6 cm) Physical Overall Width 24.5” (62.2 cm) Overall Depth 19” (48.2 cm) Overall Height 13.5” (34.3 cm) Chamber Width 15.5” (39.4 cm) Chamber Depth 9.5” (24.1 cm) Chamber Height 78 lbs (35.5 kg) Mass 120 V / 240 V Electrical... - Page 58 Environment Indoor Use Only General 5°C to 40°C Operating Temperature -25°C to 55°C (+70°C for short exposure) Storage Temperature Maximum 80% RH to 31°C Humidity decreasing linearly to 50% RH at 40°C Up to 2000 m Altitude Pollution Degree Over Voltage Category TissueWave 2 Operator Guide...
-
Page 59: Index
Index Edit Step Protocol Electrical Rating Plate Step Exhaust Port 14, 21, 26 Agitator Valve Exhaust Vent Hose 14, 18, 21, Air Agitator 25, 26, 31 16, 21 Air Agitator Key 13, 31 Air Filter Fluid Ports 13, 18, 32 16, 27 Aluminium Outlet Hose Function Keys... - Page 60 Magnetron Safety Cooling Outlet Chemical 28, 29 Manual Run Environmental Mercuric Chloride Interlock Microwave Serial Port 13, 17 Containers 7, 20 Specifi c Wattage Output Performance Sponge Biopsy Pads Output Power Step Complete Paraffi n Wax Temperature Power Control 33, 51 8, 14, 18, Control Probe...
- Page 61 Vacuum Accumulator 13, 18, 19 9, 18, 23 Chamber 13, 26 Gauge 9, 14 Line 17, 19, 25 Ports 19, 31 Pump 10, 13 Release Knob 12, 18, 26, Ventilation System Interlock 8, 10 Volatile Materials 42, 44 Warning Screen Watchdog Timer 51, 52 Wattage...
- Page 62 TissueWave 2 Operator Guide...
Need help?
Do you have a question about the Shandon TissueWave 2 and is the answer not in the manual?
Questions and answers