
Subscribe to Our Youtube Channel
Related Manuals for Thermo Scientific 2870


Summary of Contents for Thermo Scientific 2870
- Page 1 Reciprocal Shaking Water Baths Model 2870/2871 (25) and 2872/2873 (50) Operating and Maintenance Manual 3177892 Rev K Visit us online to register your warranty www.thermoscientific.com/warranty...
- Page 2 Added caution “acidic and caustic substances...” - pg 7 7/01 Updated electrical specifications - pgs 2, 18, 26, 27 3/00 Set hi-limit thermostat instructions, and updated resistance measurements for current motor - pgs 6, 12 6/99 Initial release ECR/ECN DATE DESCRIPTION Thermo Scientific Reciprocal Shaking Water Baths...
- Page 3 Thermo Fisher Scientific makes no representations or warranties with respect to this manual. In no event shall Thermo be held liable for any damages, direct or incidental, arising out of or related to the use of this manual. ©1999 Thermo Fisher Scientific. All rights reserved. Reciprocal Shaking Water Baths Thermo Scientific...
- Page 4 Always use the proper protective equipment (clothing, gloves, goggles, etc.) ✔ Always dissipate extreme cold or heat and wear protective clothing. ✔ Always follow good hygiene practices. ✔ Each individual is responsible for his or her own safety. Thermo Scientific Reciprocal Shaking Water Baths...
- Page 5 We can also provide you with a quotation on our Extended Warranty for your Thermo Scientific products. Whatever Thermo Scientific products you need or use, we will be happy to discuss your applications. If you are experiencing technical problems, working together, we will help you locate the problem and, chances are, correct it yourself...over the telephone without a service...
-
Page 6: Table Of Contents
Schematics and Diagrams ..........13-3 Thermo Scientific... -
Page 8: Introduction
This product is not intended, nor can it be used, as a sterile or patient connected device. In addition, this apparatus is not designed for use in Class I, II or III locations as defined by the National Electrical Code. Thermo Scientific Reciprocal Shaking Water Baths... -
Page 10: Unpacking And Damage
DO NOT — FOR ANY REASON — RETURN THIS UNIT WITHOUT FIRST OBTAINING AUTHORIZATION. In any correspondence to Thermo, please supply the nameplate data, including catalog number and serial number. Thermo Scientific Reciprocal Shaking Water Baths... -
Page 12: General Information
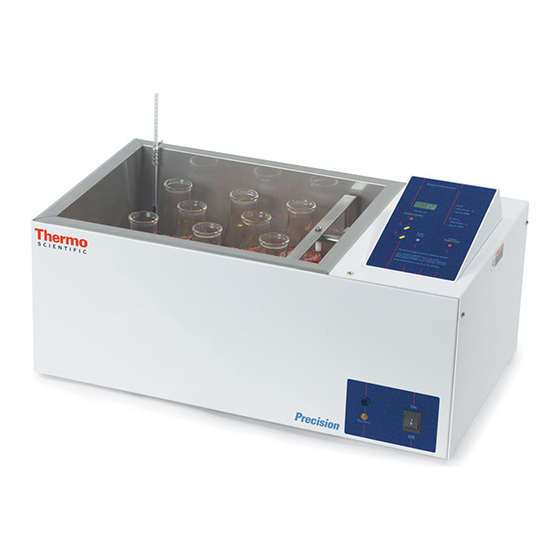
Precision Reciprocal Shaking Water Baths are ideal for applications needing constant, controlled agitation and precise temperature uniformity. Two sizes are available: 14.5 liter (Model 2870/2871) and 26.5 liter (Model 2872/2873). These instructions are applicable to all models listed in Table 1. - Page 13 A stainless steel gable cover is also provided with the bath. The 230 volt units are identical in appearance to the 120 volt units. Reciprocal Shaking Water Baths Thermo Scientific...
-
Page 14: Performance Data
Performance Data The following table identifies specifications for Models 2870/2871 and 2872/2873 Shaker Baths. Model 2870/2871 Model 2872/2873 With Cover Without Cover With Cover Without Cover 37°C ±0.05 ±0.15 ±0.1 ±0.2 Uniformity 56°C ±0.05 ±0.2 ±0.2 ±0. Thermo Scientific Reciprocal Shaking Water Baths... -
Page 16: Installation
2 Pollution Degree describes the amount of conductive pollution present in the operating environment. Pollution Degree 2 assumes that normally only non-conductive pollution such as dust occurs with the exception of occasional conductivity caused by condensation. Thermo Scientific Reciprocal Shaking Water Baths... - Page 17 1. To gain access to the motor drive hub, remove four screws in upper side panel corners, and carefully open the control panel. Once opened, the 3-position drive hub will be immediately visible at top-center of control housing. Reciprocal Shaking Water Baths Thermo Scientific...
- Page 18 The three threaded openings provide stroke lengths of 0.5", 1.0", and 1.5". 3. After selecting desired stroke length, close control panel and replace the four screws. Reconnect the bath to power source. Thermo Scientific Reciprocal Shaking Water Baths...
-
Page 20: Water Level Regulator (Optional)
1¾" of water. To raise the set water level, loosen clamp & raise Water Level Regulator to desired level (coincide with Water Line ▲ mark) and tighten clamp to hold Water Level Regulator in place. Thermo Scientific Reciprocal Shaking Water Baths... - Page 21 Bath Drain Plastic Tubing Elbow Connector Figure 1. Side View of Bath To Water Supply Gasket Clamp #380213 1/4 x 3/8 Bushing Bath Pan Bath Body Figure 2. Cutaway Front View of Dynamic Bath Reciprocal Shaking Water Baths Thermo Scientific...
-
Page 22: Explanation Of Controls
2. Heater On Lamp - The "Heater ON" lamp is illuminated when power is applied to the heater. 3. Indicator Lamps - These lamps indicate which of four parameters (Actual Temp, Actual Speed, Setpoint Temp, and Setpoint Speed) is displayed in the LED window. Thermo Scientific Reciprocal Shaking Water Baths... - Page 23 To adjust temperature or shaking speed : Offset Key Press SELECT/ENTER button to set point. Press until value is displayed. Press SELECT/ENTER again to set the new value. Press START/STOP to begin or end shaking. Figure 7-1. Controls Reciprocal Shaking Water Baths Thermo Scientific...
-
Page 24: Operation
2. Power up: Depress the power switch located at the lower right hand corner of the bath. The unit is fully operational upon application of power. The display will show the actual bath temperature. Thermo Scientific Reciprocal Shaking Water Baths... - Page 25 37°. Calibrated reference thermometer reads 37.2°. Press OFFSET and the UP key until display reads 0.2. Press ENTER while still holding OFFSET key. Release keys. Display and Setpoint will now be 37.2. Readjust setpoint to 37°. Reciprocal Shaking Water Baths Thermo Scientific...
- Page 26 Lift the gable cover by the handle only. Warning Explosion, implosion, or the release of toxic or flammable gases rising ▲ from the material being heated is the sole responsibility of the user. Thermo Scientific Reciprocal Shaking Water Baths...
-
Page 28: Maintenance
-Barium Chloride -Bichloride of Mercury -Calcium Chloride -Carbolic Acid -Chlorinated Lime -Citric Acid (boiling) -Dakin's Solution -Ferrous Chloride -Mercury Salts -Lysol -Mercuric Chloride -Potassium Permanganate -Phenol -Potassium Thiocyanate -Sodium Hypochlorite -Stannous Chloride -Tartaric Acid Thermo Scientific Reciprocal Shaking Water Baths... -
Page 29: Periodic Safety Check
As soon as rust is loosened, immediately flush with clean distilled water until all acid is removed. Periodic Safety Check Test operation of the Hi-Limit thermostat, as described in Section 7, every three months. Reciprocal Shaking Water Baths Thermo Scientific... -
Page 30: Troubleshooting
Before attempting any troubleshooting for a particular problem, it is good practice to verify power supply voltages of the POWER SUPPLY board #3176677. Read these steps before performing them to become familiar with the procedure. Thermo Scientific Reciprocal Shaking Water Baths 10-1... - Page 31 This triac is "told" to operate, when need be, by the microprocessor. There is another device known as an octo-coupler which serves as the high/low voltage isolator between the triac and the microprocessor. 10-2 Reciprocal Shaking Water Baths Thermo Scientific...
- Page 32 With a DC voltmeter, measure the supply of the temperature sensor at J302 pins 1 & 3. It should be approximately 5 volts. If it is, then continue on to Step 4c. If not, see Step 3a. Thermo Scientific Reciprocal Shaking Water Baths 10-3...
- Page 33 Measure the voltage directly across the heater. It should be line voltage 110V AC to 120 VAC. If it is not, then most likely the triac Q2 is bad, and the POWER SUPPLY board will have to be replaced. 10-4 Reciprocal Shaking Water Baths Thermo Scientific...
- Page 34 Using an ohmmeter, check the heater resistance. Appropriate heater resistance values are listed at MODEL 120 Volt 240 Volt right: 2870/2871 15 OHMS 57 OHMS If the resistance reads 0 or infinity, then replace the 2872/2873 9 OHMS 38 OHM heater.
- Page 35 2. Later versions of the POWER SUPPLY board have a jumper JP1 located near the transformer. Verify that this jumper is installed, if applicable. 3. Press the Start/Stop key. If the tray shakes violently for a few moments, then stops, replace the optical sensor. 10-6 Reciprocal Shaking Water Baths Thermo Scientific...
- Page 36 If this signal is NOT changing as mentioned above when START/STOP key is pressed, then most likely the problem is in the DISPLAY board and it will have to be replaced. Re-connect the motor back to J103 on the POWER SUPPLY board. Thermo Scientific Reciprocal Shaking Water Baths 10-7...
- Page 37 J303-Pin 1 of the CPU board. The correct reading should be approximately 1.2 volts DC. If the reading deviates considerably from this, replace the optical sensor. 10-8 Reciprocal Shaking Water Baths Thermo Scientific...
- Page 38 If the last two steps did not read correctly, then replace the optical sensor. 4. Check Display Board #3176679; Problem F, Step 6. 5. Check Power Supply Board #3166924; Problem F, Step 7. Thermo Scientific Reciprocal Shaking Water Baths 10-9...
-
Page 40: Part Replacement
4. Loosen 2 socket set screws from motor drive eccentric and remove eccentric from motor shaft. 5. Remove 4 screws holding motor bracket to wall, then remove 4 screws holding motor to bracket. 6. Reverse above procedure to install new motor. Thermo Scientific Reciprocal Shaking Water Baths 11-1... - Page 41 8. Reverse above procedure to install new Hi Limit thermostat. Use extreme care when installing new thermostat. A sharp bend in the thermostat capillary will crimp off flow of hydraulic fluid. 11-2 Reciprocal Shaking Water Baths Thermo Scientific...
- Page 42 "Select/Enter." This push-button is used to enter configuration codes and steps through the different levels of configurations. When a triangle is shown in the chart, the push-button is to be depressed once for each symbol. (continued) Thermo Scientific Reciprocal Shaking Water Baths 11-3...
- Page 43 70 - 80°C. After the unit stabilizes, match readout display to temperature on thermometer and press the top left switch. Calibration is now complete. **Note: When replacing CPU printed circuit board reprogramming may be necessary. Follow thoroughly instructions provided with the replacement circuit board. 11-4 Reciprocal Shaking Water Baths Thermo Scientific...
-
Page 44: Temperature Calibration
Press ENTER to store the new high temperature calibration value. Note Pressing OFFSET at any time during the calibration process will return unit ▲ to normal operation mode and display will show actual bath temperature. Thermo Scientific Reciprocal Shaking Water Baths 12-1... -
Page 46: Replacement Parts
Replacement Parts Model 2870/2871 Model 2872/2873 120V 230V 120V 230V Bath Pan Kit 3167154 316148 Tray Assembly 3166233 3166233 PCB Asm Kit, Power Supply 3166924 PCB Asm Kit, CPU 3167119 PCB Asm Kit, Display 3176679 Wire Harness 3176700 Temp Probe Assembly... -
Page 47: Accessory Parts List
Section 13 Replacement Parts Accessory Parts List Catalog Number Description Gable Cover, Model 2870/2871 3166565 Gable Cover, Model 2872/2873 3166208 3166223 Water Level Regulator Kit 3166250 Quarternary Ammonium Type Germicide Maximum Clip Capacity Catalog Number Description Model 2870/2871 Model 2872/2873... - Page 48 Replacement Parts Section 13 Thermo Scientific Reciprocal Shaking Water Baths 13-3...
- Page 49 Section 13 Replacement Parts 13-4 Reciprocal Shaking Water Baths Thermo Scientific...
- Page 50 SCREW PUSH ROD BRACKET ECCENTRIC SCREW METAL DISC SET SCREW THERMOSTAT SCREW BRACKET SCREW 230V VERSIONS ONLY TRANSFORMER OPTICAL DISC SCREW POWER ON/OFF SWITCH END VIEW (WITH CONTROL COVER REMOVED AND WIRING EXCLUDED) Thermo Scientific Reciprocal Shaking Water Baths 13-5...
- Page 51 CLOSEST TO PAN WALL FIRMLY WITH WRENCH -REMOVE FLEX FITTING -SLIDE RUBBER GROMMET OVER END OF TEMPERATURE PROBE -SLIDE TEMPERATURE PROBE INTO CONTROL HOUSING THERMOSTAT BULB (PART OF THERMOSTAT) LOWER VIEW TEMPERATURE PROBE ASSEMBLY DETAIL 13-6 Reciprocal Shaking Water Baths Thermo Scientific...
- Page 52 IN AREA BETWEEN PAN AND BODY INSULATION WALL -LIFT HEATER OUT OF PAN BODY BOTTOM COVER HEATER REMOVAL DETAIL BATH PAN BODY HEX NUT 'O' RING DRAIN PLUG DRAIN CUTAWAY VIEW OF DRAIN Thermo Scientific Reciprocal Shaking Water Baths 13-7...
- Page 53 Section 13 Replacement Parts CONTROL COVER DISPLAY PCB ASSY LOCATED UNDERNEATH CPU PCB ASSY CPU /PCB ASSEMBLY CONFIGURATION 13-8 Reciprocal Shaking Water Baths Thermo Scientific...
- Page 54 Replacement Parts Section 13 Thermo Scientific Reciprocal Shaking Water Baths 13-9...
- Page 55 Section 10 Troubleshooting 13-10 Reciprocal Shaking Water Baths Thermo Scientific...
- Page 56 Replacement Parts Section 13 Thermo Scientific Reciprocal Shaking Water Baths 13-11...
- Page 57 Section 13 Replacement Parts 13-12 Reciprocal Shaking Water Baths Thermo Scientific...
- Page 58 Warranty Information Section 14 Thermo Scientific Reciprocal Shaking Water Baths 14-1...
- Page 59 Section 14 Warranty Information 14-2 Reciprocal Shaking Water Baths Thermo Scientific...
- Page 60 Thermo Scientific Reciprocal Shaking Water Baths 14-3...
- Page 62 thermoscientific.com ©2014 Thermo Fisher Scientific. All rights reserved. All trademarks are the property of Thermo Fisher Scientific, Inc. and its subsidiaries. Specifications, terms and pricing are subject to change. Not all products are available in all countries. Contact your local sales respresentative for details. Thermo Fisher Scientific 81 Wyman Street Part of Thermo Fisher Scientific...
Need help?
Do you have a question about the 2870 and is the answer not in the manual?
Questions and answers