Table of Contents
Advertisement
Advertisement
Table of Contents

Related Manuals for Wood-mizer Slab-Mizer MB200


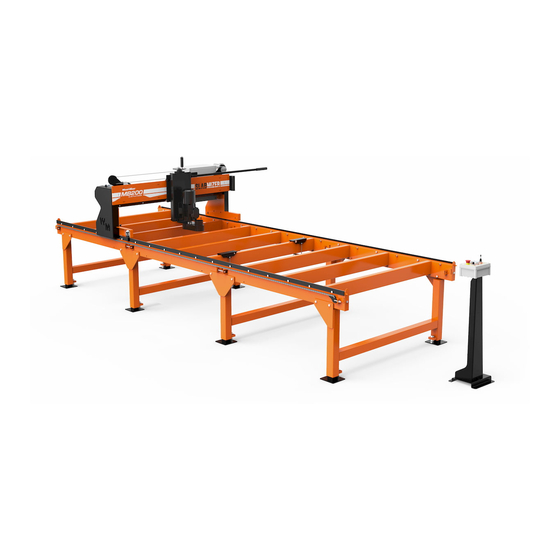
Summary of Contents for Wood-mizer Slab-Mizer MB200
- Page 1 MB200 Operations Manual...
-
Page 2: Table Of Contents
SECTION 1 INTRODUCTION Getting Service ..................2 General Contact Information........... 2 Wood-Mizer Locations............. 3 Customer and Planer Identification ............4 Specifications ....................5 MB200 Dimensions ..............6 Warranty ....................7 SECTION 2 SAFETY Safety Instructions ..................5 SECTION 3 PLANER ASSEMBLY Uncrating the Planer ..................1 Assemble the Bed Sections ...............3... - Page 3 SECTION 7 TROUBLESHOOTING GUIDE SECTION 8 PLANER ALIGNMENT Routine Alignment Procedure ..............1 Alignment Front & Rear ............2 Alignment Side to Side ............2 Adjusting the Scale..............3 Dust Head ................4 WMdoc082019...
- Page 4 The information and instructions given in this manual do not amend or extend the limited warranties for the equipment given at the time of purchase. For general information regarding Wood-Mizer and our “Forest to Final Form” products, please refer to the All Products Catalog in your support package 1.Wood-Mizer...
-
Page 5: Introduction
Introduction Getting Service Getting Service Wood-Mizer is committed to providing you with the latest technology, best quality and strongest customer service available on the market today. We continually evaluate our customers’ needs to ensure we’re meeting current wood-processing demands. Your comments and suggestions are welcome. -
Page 6: Wood-Mizer Locations
Brazilian Headquarters European, African, and Asian Headquarters Serving Brazil Serving Europe, Africa, Western Asia Wood-Mizer do Brasil Wood-Mizer Industries Sp z o.o. Rua Dom Pedro 1, No: 205 Bairro: Sao Jose Nagorna 114 Ivoti/RS CEP:93.900-000 62-600 Kolo, Poland Tel: +55 51 9894-6461/ +55 21 8030-3338/ +55 Phone: +48.63.26.26.000... -
Page 7: Customer And Planer Identification
Introduction Customer and Planer Identification Customer and Planer Identification Each Wood-Mizer MB200 Planer is identified with a model number, revision, and serial number (see the figure below). The model number includes the base model and the engine/motor configuration. The serial number contains the month and year of manufacture and a sequence number. The revision number helps identify the exact design of the equipment. -
Page 8: Specifications
Specifications Specifications Specifications Specifications Power 3HP Electric Material Capacities Min width 0” or 3” if not clamped between larger material Max width – 56” or 72” (optional) Min thickness ½” Max thickness 8” Min length22” Max length – 13’ or longer with 5’ bed extensions Min depth of cut 1/64”... -
Page 9: Mb200 Dimensions
Specifications MB200 Dimensions MB200 Dimensions WMdoc082019... -
Page 10: Warranty
Wood-Mizer Limited Product Warranty Wood-Mizer LLC (“Warrantor”), an Indiana corporation with its principal place of business at 8180 West Tenth Street, Indianapolis, IN 46214-2400 USA, warrants to the original purchaser (“Purchaser”) that for the time periods specifically stated herein and subject to... - Page 11 Introduction Warranty EXCLUSIONS FROM 90 DAY, LIMITED ONE YEAR AND TWO YEAR WARRANTY Warrantor shall have no responsibility under this warranty for any wear components, including, but not limited to: belts, cutter guides, cutters, electric motor brushes, drum switches, filters, fuses, hoses, bearings (excluding cylindrical drive bearings), bushings, cable carriers, and spark plugs.
- Page 12 Introduction Warranty LIMITATIONS AND DISCLAIMERS OF OTHER WARRANTIES EXCEPT FOR THE EXPRESS WARRANTY PROVISIONS STATED ABOVE, WARRAN- TOR DISCLAIMS ALL WARRANTIES, EXPRESS AND/OR IMPLIED, INCLUDING AND WITHOUT LIMITATION, THE IMPLIED WARRANTIES OF MERCHANTABILITY, AND FITNESS FOR A PARTICULAR PURPOSE, NONINFRINGEMENT AND TITLE. No rep- resentation or other affirmation of fact by representatives of Warrantor, whether verbal or in writing, including photographs, brochures, samples, models, or other sales aids, shall constitute a warranty, or any other basis, for any legal action against Warrantor.
- Page 13 This warranty cannot be amended, except in writing, which refers to this warranty that is signed by both Warrantor and Purchaser. © 2017 Wood-Mizer LLC – 8180 West 10 Street, Indianapolis, IN 46214 1-10...
-
Page 14: Safety
The procedures listed in this manual may not include all ANSI, OSHA, or locally required safety procedures. It is the owner/operator’s responsibility and not Wood-Mizer Products to ensure all operators are properly trained and informed of all safety pro- tocols. Owner/Operators are responsible for following all safety proce- dures when operating and performing maintenance to the Planer. - Page 15 Wood-Mizer Planer. All Wood-Mizer Planer owners are encouraged to become thoroughly familiar with these applicable laws and comply with them fully while using the Planer.
- Page 16 Safety Safety Instructions KEEP PLANER AND AREA AROUND PLANER CLEAN DANGER! Maintain a clean and clear path for all necessary movement around the planer and lumber stacking areas. Failure to follow this will result in serious injury or death. DISPOSE OF SAWING BY-PRODUCTS PROPERLY IMPORTANT! Always properly dispose of all planing by-products, including sawdust and other debris, coolant, oil, fuel, oil filters and fuel...
- Page 17 Safety Safety Instructions .DANGER! Always keep hands away from moving cutter. Failure to fol- low this will result in serious injury or death. DANGER! Stay a safe distance from rotating members and make sure that loose clothing or long hair does not engage rotating members resulting in possible injury.
- Page 18 Electrical Lockout Procedures Electrical Lockout Procedures RULES FOR USING LOCKOUT PROCEDURE The Planer shall be locked out to protect against accidental or inadvertent operation when such operation could cause injury to personnel. Do not attempt to operate any switch or valve bearing a lock. LOCKOUT PROCEDURES MUST BE USED DURING: Changing or adjusting cutters Electrical maintenance...
- Page 19 Electrical Lockout Procedures Where established lockout procedures cannot be used (electrical troubleshooting or mechanical dynamic troubleshooting), alternative effective protective techniques shall be employed which may require special skills and planning. Always follow safe operations practices in the workplace. PLANER LOCKOUT PROCEDURE Lockout procedures per OSHA regulation 1910.147, appendix A: GENERAL...
- Page 20 Electrical Lockout Procedures SEQUENCE OF LOCKOUT 1. Notify all affected personnel that servicing or maintenance is required on a machine or equipment and that the machine or equipment must be shut down and locked out to per- form the servicing or maintenance. 2.
- Page 21 Electrical Lockout Procedures 4. Remove the lockout devices and re-energize the machine or equipment. NOTE: The removal of some forms of blocking may require re-enerva- tion of the machine before safe removal. 5. Notify affected personnel that the servicing or maintenance is completed and the machine or equipment is ready for use.
-
Page 22: Planer Assembly
Planer Assembly Uncrating the Planer SECTION 3 PLANER ASSEMBLY IMPORTANT! The Planer is shipped secured to the pallet. Before starting Planer assembly, remove the shipping brackets and straps securing the Planer to the pallet. Uncrating the Planer 1. Disassemble any shipping straps from the bed sections before beginning. 2. - Page 23 Planer Assembly Uncrating the Planer REF PART # DESCRIPTION QTY. PACKING LIST, MB200 SURFACE PLANER Control Box Key Control Box Switch Key 13mm Wrench 19mm Wrench 4mm Allen Key 6mm Allen Key Cutter Head Box with T20 T Handle Wrench 8 127139 SANDING HEAD 9 127140...
-
Page 24: Assemble The Bed Sections
Planer Assembly Assemble the Bed Sections Assemble the Bed Sections NOTE: Disassemble any shipping straps from the bed sections before beginning. 1. Lay the bed sections end-to-end so the side rail bolt holes are at the top off each section. 2. -
Page 25: Install The Side Rails
Planer Assembly Install the Side Rails See Figure 3-2. Make sure the top surface of each section are flush, then tighten the fasteners com- pletely. Install the Side Rails 1. Next install the side rails to the assembled bed sections. 2. -
Page 26: Install The Leg Assembly
Planer Assembly Install the Leg Assembly Install the Leg Assembly 1. Attach the Leg Assemblies to the Bed Sections as shown in Figure 3-6 using the provided M10-70mm Hex Head Bolts and M10 Nylon Lock Washers. Note: The Leg assemblies have a left and right assembly as well as the center leg assemblies. -
Page 27: Install The Head Stops
Planer Assembly Install The Head Stops Install The Head Stops 1. Once the Leg Assemblies are attached to the bed section, next install the Head Stops at each end of the bed section (4 Stops total) See Figure 3-7 for reference. 2. -
Page 28: Leg Adjustment
Planer Assembly Leg Adjustment FIGURE 3-8 Leg Adjustment JamNut 1. The bed section leveling will be discussed thoroughly in the Setup section of the manual. legs adjusted by Loosening the Adjustment Nut upper jam nut and adjust leg height by tightening or loos- ening the lower adjustment nut. -
Page 29: Install The Gantry
Planer Assembly Install the Gantry Install the Gantry WARNING! Use a fork lift, crane, or other lifting device to remove the gantry from the packing crate. Failure to follow this may result in seri- ous injury or death. IMPORTANT! Do not attempt to set the gantry down on any surface other than the bed rails. -
Page 30: 3.10 Install The Feed Chain
Planer Assembly Install the Feed Chain 3.10 Install the Feed Chain 1. Connect the Feed Chain to the Feed Chain Tensioner located at the end of the bed assembly. 2. Run the Feed Chain under and around the drive sprockets as shown in Figure 3-10. 3. - Page 31 Planer Assembly Install the Feed Chain 3-10 WMdoc082019 Planer Assembly...
-
Page 32: Planer Setup
Planer Setup Bed Frame Setup SECTION 4 PLANER SETUP Bed Frame Setup The following setup procedure should be performed whenever the Planer is moved or reassembled. If surfacing problems occur and misalignment is suspected, See Section SECTION 8 for complete alignment instructions. See Section SECTION 3 for Planer assembly instructions. - Page 33 Planer Setup Bed Frame Setup See Figure 4-1. Measure the distance between the string and the bed rails String Matching Spacer Matching Spacer FIG. 4-1 6. Repeat the bed rail adjustment with the string at the other side of the Planer frame. LEG ADJUSTMENT 7.
-
Page 34: Electrical Hookup
Planer Setup Electrical Hookup Jam Nut Adjustment Nut FIGURE 4-2 Electrical Hookup IMPORTANT! This information is provided so that you may have your site prepared for installation of your electric planer. In order to properly install your planer, you need to: 1. -
Page 35: Electric Wiring
Planer Setup Electric Wiring Electric Wiring DANGER! Make sure all electrical installation, service and/or maintenance work is performed by a qualified elec- trician and is in accordance with applicable electrical codes. CAUTION! Make sure that the machine you have pur- chased can be powered with the provided power source before making any connections. -
Page 36: Vacuum Hose Hookup
Planer Setup Vacuum Hose Hookup See Table 4. This table lists the specifications for the planer blade motor. Electric Blade Motor Specifications MB200EA3U Horsepower 4300 Volts Full-Load Amps 1.25 NOM EFF 86.5 Frame 182E Design 40° C ENCL TEFC Code TABLE 4 Vacuum Hose Hookup 1. -
Page 37: Sanding Head
Planer Setup Sanding Head Sanding Head 1. To install the Sanding Head, fit the Orbital Balance onto the retaining washer before threading the (2) M5x18 SH Bolts. Tighten the two bolts with the provided 4mm hex wrench. as shown in Figure 4-5. 2. - Page 38 Planer Setup Sanding Head WMdoc082019 Planer Setup...
-
Page 39: Planer Operation
Planer Operation Turning on Planer SECTION 5 PLANER OPERATION Turning on Planer 1. Step one, make sure the Disconnect Switch, located on the unit’s Electrical panel is in the ON position. 2. Step two, Turn the Key Switch located on the unit’s Electrical panel to the ON Position. 3. -
Page 40: Cross Feed
Planer Operation Cross Feed E-Stop Joystick Variable Speed Control Power Feed Control Left-Right Cross Feed 1. The Planer’s Cross Feed is controlled by the Pendant. (Automatic Operation) 2. Use the Joystick (Up-Down) motion to control Cross Feed movement. The Cross Feed speed cannot be controlled by the variable speed control on the pendant. -
Page 41: Head Up & Down
Planer Operation Head Up & Down E-Stop Joystick Cross Feed Control Up-Down Head Up & Down 1. The Cutter Head Up & Down Motion is controlled manually by the Hand Turning Wheel located on the top of the gantry. Turning the hand-wheel clockwise will lower the head, while counter-clockwise turn will raise the head. -
Page 42: Start And Stop Cutter Head
Planer Operation Start and Stop Cutter Head Hand Turning Wheel Squeeze Handle To Adjust FIGURE 5 Start and Stop Cutter Head 1. The Planer’s Cutter Head is activated using the Motor Start (|) & Stop (o) buttons located on the control pendant. CAUTION: Before activating the cutter head clear the working area of any tools, debris or other obstacles that could cause... -
Page 43: Manual Operation
Planer Operation Manual Operation Cutter Head Control FIGURE 6 Manual Operation 1. The Planer can be operated manually by the user in order to target specific planing needs. To convert the planer to manual operation follow the steps below. 2. Loosen the drive Belt by loosening the Drive Belt Tensioner Knob and pivoting the Drive Motor up to loosen the belt, once loose, tighten the tensioner knob to secure the drive motor. - Page 44 Planer Operation Manual Operation Pivot Point Belt Drive Tensioner Knob FIGURE 7 Remove Cross Feed Rope FIGURE 8 4. Use the handles located on the operator side of the Gantry to manually control the Cross Feed and Power Feed of the planer. See Figure 9 WMdoc082019 Planer Operation...
- Page 45 Planer Operation Manual Operation CAUTION When operating the planer manually, use consis- tent controlled feed rates to prevent damaging the material surface and/or the cutter head. Manual Operation Handles FIGURE 9 Planer Operation WMdoc082019...
- Page 46 Planer Operation Sanding Sanding 1. Refer to section 4.4 for installing the Sanding Head. 2. Sanding Operations can be performed manually or using the automatic drive of the Pen- dant. 3. Sanding pressure can be adjusted by raising or lowering the Head no more than 1/64” Per pass.
-
Page 47: Maintenance
Maintenance Rails, Chains and Rollers SECTION 6 MAINTENANCE WARNING! Turn the key switch to the OFF (0) position and remove the key before performing service near moving parts such as cutters, pulleys, motors, belts, and chains. If the key is turned on and moving parts activated, serious injury or death may result. - Page 48 Maintenance Changing Cutter Knives See Figure 6-1. Wheel Handle & Up/Down Lead Screw Up & Down Slide Rods FIG. 6-1 3. Keep Up & Down Slide Rods free of debris, lubricate with a light weight oil. Changing Cutter Knives See Figure 6-2. Cutter Knife Insert Insert Screw, Part #...
- Page 49 Maintenance Changing Cutter Knives 1. Replace Cutter inserts as needed by removing the Insert Screw (Part 127209) using the provided T20 T-Handle wrench as shown in Figure 6-2. Place in the new insert. 2. Cutter Knives can be rotated up to 4 times to a fresh sharp cutting edge before replacing. CAUTION: Do not over torque the insert screws to prevent damage to the screws and cutter head.
-
Page 50: Troubleshooting Guide
Troubleshooting Guide Planing Problems SECTION 7 TROUBLESHOOTING GUIDE Planing Problems WARNING! Turn the key switch to the OFF (0) position and remove the key before performing service near moving parts such as cutters, pulleys, motors, belts, and chains. If the key is turned on and moving parts activated, serious injury or death may result. -
Page 51: Planer Alignment
Planer Alignment Routine Alignment Procedure SECTION 8 PLANER ALIGNMENT Two alignment procedures are available to realign the Planer if necessary. The Routine Alignment instructions should be performed as necessary to solve planing problems not related to cutter performance. The Complete Alignment procedure should be performed approximately every 1500 hours of operation or as needed. -
Page 52: Alignment Front & Rear
Planer Alignment Alignment Front & Rear Alignment Front & Rear 1. The Cutter Head is aligned front and rear by adjusting the set screws on the Up & Down Mounting Plate. See Figure 8-1. Figure 8-1 Bottom Side View. The Motor Mounting plate can pivot for- ward and backwards to align the cut- ter head. -
Page 53: Adjusting The Scale
Planer Alignment Adjusting the Scale FIGURE 8-3 Figure 8-3 ISO View - Side to side alignment cam bolts (4) are located on the Black Plate located behind the Motor Mounting Plate (2) at the top, (2) at the bottom. The Bolts have a cam action to adjust the left to right (Side to side) movement of the cutter head. -
Page 54: Dust Head
Planer Alignment Dust Head Dust Head 4. Raise or lower the up down so that cutting head is sitting on the surface of material. Adjust the dust head leaving a 1/8” gap between the surface of material and bottom of the Dust Head. - Page 55 Planer Alignment Dust Head WMdoc082019 Planer Alignment...
Need help?
Do you have a question about the Slab-Mizer MB200 and is the answer not in the manual?
Questions and answers
I’ve had two bearing/sanding studs to break on the MB200. Kept the pad in contact with the slab and on increased 1/64” at a time. The 3/8” stud just seems to weak to handle the power. Installing my 3rd set and want to check if there is anything I need to do differently. .