Table of Contents
Advertisement
Quick Links
Advertisement
Table of Contents

Related Manuals for Bresser T-Rex


Summary of Contents for Bresser T-Rex
- Page 1 WIFI 3D Printer Twin Extruder Art. No. 2010500 Instruction Manual...
-
Page 2: Table Of Contents
4.3 Unloading Filament ................... 31 Chapter 5: Build Plate Leveling .................. 33 Chapter 6: Information on the software ..............35 6.1 Software installation ..................35 6.2 Getting started with REXprint ................36 Chapter 7: Warranty and service ................64 www.bresser.de... -
Page 3: Introduction
Introduction Thank you for choosing the BRESSER T-REX Wifi 3D printer with Twin Extruder. We assure you that it has been produced according to the latest technology and safety standards. Each device is subjected to a detailed quality control before delivery, so that nothing stands in the way of trouble-free operation. -
Page 4: General Information
The User's Guide consists of the following parts: Introduction, General and Safety Information, Operation and Product Service. Please be prepared for service requests: Art. No.: 2010500 Product name: BRESSER T-REX WIFI 3D Printer with Twin Extruder technology Instruction manual: Manual_2010500_Wifi-3D-Printer-Twin-Extruder-T-REX_de_BRESSER_v012021a.docx www.bresser.de... -
Page 5: Safety Instructions
⑤ To prevent accidents, disconnect the power supply if you are not going to use the machine for a long period of time. Safety of persons ① Do not touch the nozzle or printing plate during printing. ② Do not touch the nozzle after printing is finished. www.bresser.de... - Page 6 ⑩ Do not connect the machine with a network cable longer than 3 m. Environmental conditions Temperature: Room temperature 15-30℃ Humidity: 20 %-70 Filament specifications Use filament only for the intended purpose! Use only the BRESSER filament or filament of the brands recognised by BRESSER! www.bresser.de...
- Page 7 EC DECLARATION OF CONFORMITY A "Declaration of Conformity" in accordance with the applicable directives and corresponding standards has been issued by Bresser GmbH. The full text of the EC Declaration of Conformity is available at the following Internet address www.bresser.de/download/2010500/CE/2010500_CE.pdf...
- Page 8 www.bresser.de...
- Page 9 This document contains information protected by copyright. Copyright © 2020 BRESSER GmbH. All rights reserved. No part of this documentation may be reproduced in any form (e.g. photocopying, printing, etc.) or used or distributed by means of electronic systems (e.g. image file, website, etc.) without the prior written permission of BRESSER GmbH.
-
Page 10: Chapter 1: 3D Printing Technology
3D scanner using an app. - From the cloud The most common method of obtaining a 3D model at present is to download a 3D model from a website where users can upload their own 3D models. Example: www.thingiverse.com www.bresser.de... - Page 11 3D printer via USB cable, USB stick or W-LAN. 1.1.3 Structure of the 3D model After the output file is sent to the 3D printer, the printer begins to transfer the 3D model into a physical object by applying layers of filament over each other. www.bresser.de...
-
Page 12: Chapter 2: Information On The 3D Printer
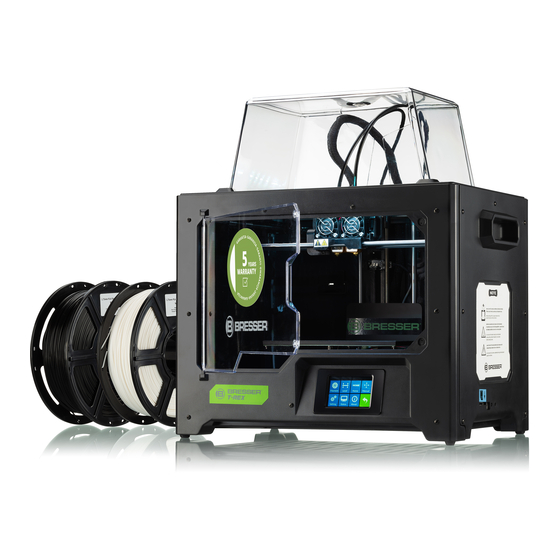
2.1 About the 3D printer 2.1.1 Package Contents Please take an inventory of the package contents to ensure you have all the items listed below. If anything is missing or damaged, please contact BRESSER GmbH Customer Service for a replacement. 3D printer... - Page 13 20. Power Switch 3. Slot 21. Spool Holder 10. Cooling Fan 16. X-Axis Guide Slot 4. Y-Axis Guide Rod 11. Spring Presser 5. Build Plate 17. Filament Guide 22. Reset Button 12. Turbofan Tube Buckle 6. Build Platform 23. USB Input www.bresser.de...
- Page 14 2.1.3 Device specifications BRESSER T-REX WIFI 3D Printer with Twin Extruder Model technology Number of Extruders Printing Technology Fused Filament Fabrication (FFF) Screen Type 3.5" color IPS touch screen Build Area 227 x 148 x 150 mm Layer Resolution 0.05 - 0.4 mm Build Accuracy ±0.1-0.2mm...
-
Page 15: Main Menu System
Touch the Print button to begin printing the uploaded print file. Touch the Copy button to copy the uploaded print file. Touch the Delete button to delete the uploaded print file. Touch the Back button to return to the previous menu. www.bresser.de... - Page 16 The default target print temperature for the extruders is 230°C and 100°C for the platform. Touch the Start button to start preheating the extruder(s) and/or platform. Touch the Back button to return to the previous menu. www.bresser.de...
- Page 17 Touch the Setting button to display the Setting Menu. Touch the Status button to display the Printer Status Screen. Touch the About button to display About Screen. Touch the Back button to return to the previous menu. www.bresser.de...
- Page 18 Touch the Factory Reset button to reset the printer settings to their factory default values. Touch the Update button to update the firmware. Touch the Pulley button to display the Pulley Type Selection Screen. Touch the Back button to return to the previous menu. www.bresser.de...
- Page 19 Touch the name of a pulley type to select it. Touch the Yes button to save changes to the selected pulley type. Touch the Cancel button to abort any changes to the selected pulley type. www.bresser.de...
- Page 20 Touch the Back button to return to the previous menu. About Screen The About Screen is displayed by touching the About button on the Tool Menu. It displays basic information about the printer. Touch the Back button to return to the previous menu. www.bresser.de...
-
Page 21: Chapter 3: Getting Started
Build Tape, a Leveling Card, and this User's Manual ② Firmly grasp the two side handles, ③ Remove the packing bag. And lift out from the carton and place it then remove the tape and platic on a stable surface. wrap www.bresser.de... - Page 22 SD card, short. tool bag, extruder’s accressory kit, one 1kg red pla filament. ⑥ Snip beltings on both sides of X-axis guide rod. ⑦ Remove lid. ⑧ Remove side protective foam sheets from inside the printer. www.bresser.de...
- Page 23 ⑨ Elevate the build plate to ist limit ⑩ Take the bottom protective foam with care from the printer and then lower the build plate back. Congratulations, you have finished unpacking your 3D printer! www.bresser.de...
-
Page 24: Chapter 4: Hardware Assembly
② Secure the extruder set onto the extruder seat with two M3x8 Bolt Hole Bolt Hole screws, from the bottom up. Hole Bolt Bolt Hole M3 x 8 bolts X-Axis Guide Rod www.bresser.de... - Page 25 Turbofan Baffle Assembly ③ Use the M2.5 Allen wrench to unscrew the two turbofan bolts. ④ Take the turbofan baffle from the extruder's accessory kit and install it onto the turbofan. www.bresser.de...
- Page 26 Place the turbofan sub- assembly beside the turbofan seat. Insert the bump on the turbofan seat to the turbofan sub-assembly. Screw in the two bolts. ⑥ Take an M3x6 bolt from the extruder's accessory kit and complete the installation. www.bresser.de...
- Page 27 To install a spool holder, level it and insert the end into one of the openings. ⑧ Turn down the spool holder to make the holder bottom cleave to the printer back. Please refer to the next page for the right method of filament mounting. www.bresser.de...
- Page 28 Filament mounted on the right spool holder when viewed from the back should always unspool clockwise and filament loaded onto the left spool holder should always unspool counterclockwise. www.bresser.de...
-
Page 29: Loading Filament
① Remove the filament guide tube from the extruder. ② If it is not already powered on, flip the power switch to the ON position. Wait for the system to stabilize, then touch the Tool button on the Top Menu. www.bresser.de... - Page 30 Continue loading to ensure that the filament is extruding in a straight line. Refer to the troubleshooting section if the filament is extruding abnormally. Touch the Done button to finish loading. Congratulations, you have successfully loaded filament into your printer! www.bresser.de...
-
Page 31: Unloading Filament
② If it is not already powered on, flip the power switch to the ON position. Wait for the system to stabilize, then touch the Tool button on the Top Menu. ③ Touch the Filament button, then touch the Unload Left button. www.bresser.de... - Page 32 ④ Wait for the extruder to heat up to the target temperature. The extruder will alert you when it is at the target temperature. ⑤ Unload the filament by gently guiding it out of the extruder, then touch the Done button to finish unloading. www.bresser.de...
-
Page 33: Chapter 5: Build Plate Leveling
Touch the Tool button on the Top Menu, then touch the Level button on the Tool Menu. The extruder and build plate will move to the starting position. ② Take out the Leveling Card. www.bresser.de... - Page 34 Touch the Next button. The nozzle will move to the center of the build plate. Slide the card through to make sure there is a slight friction. Slowly adjust all screws by the same amount if there is no friction or too much friction. Touch the Finish button to complete the leveling process. www.bresser.de...
-
Page 35: Chapter 6: Information On The Software
Method 2: Internet download Go to the 3D printer product page on the Internet via the following link: http://www.bresser.de/P2010500 The software packages can be found under the tab "Downloads" and can be downloaded from there. 6.1.2 Installing and setting up the software... -
Page 36: Getting Started With Rexprint
Machine Type. Choose the Flashforge Creator Max entry. You can also select the Machine Type from within the programme by clicking Print > Machine Type > T-REX, as shown in the screenshot below. www.bresser.de... - Page 37 See the Generating a Model section for details. Supports Enters the Support Edit mode. Print Prints directly from REXprint via a USB or wireless connection or exports a Gcode file to the SD™ card. www.bresser.de...
- Page 38 Click File > Load File, then select the file. Click File > Load Examples to load one of the sample files. Click File > Recent Files, then select the file from the list of recently used files. www.bresser.de...
- Page 39 Top Diametre: Sets the diametre for the top of tube, canister, and lamp type models. Bottom Diametre: Sets the diametre for the bottom of tube, canister, and lamp type models. The following screenshots illustrate the five basic shapes. www.bresser.de...
- Page 40 The following screenshots illustrate the five basic shapes. Plane Tube www.bresser.de...
- Page 41 Canister Lamp www.bresser.de...
- Page 42 Seal www.bresser.de...
- Page 43 Click the View button, the click it again and a submenu will appear. Select the Reset option. Show Model Outline: You can set RexPrint to show the model outline highlighted in yellow. To do so, click the View menu, then select the Show Model Outline option. www.bresser.de...
- Page 44 Click the Scale icon, then click the Reset button to reset the size of the model. Note that if the Uniform Scaling radio button is enabled, it will scale the model in proportion when changing any size value. www.bresser.de...
- Page 45 Left click and drag the cursor across the model to set the cut angle. Select the X Plane option to cut the model vertically. Select the Y Plane option to cut the model vertically. Select the Z Plane option to cut the model horizontally www.bresser.de...
- Page 46 45 degrees. Otherwise, you need to create support elements to serve as the base for adding additional layers. To edit the supports, click the Edit menu, then select the Supports entry. Alternatively, click the Supports icon. Click the Back button when finished editing the supports. www.bresser.de...
- Page 47 The supports preview will be displayed with the support highlighted. If the support surface doesn't need support or the support column angle is too large, the support will not be generated. www.bresser.de...
- Page 48 Print When Slice Done: Check the Print When Slice Done box to start the print as soon as the slice is completed. Material Type: Select the filament type in use. Supports: Enable or disable the creation of supports. www.bresser.de...
- Page 49 Fill Density: Sets the fill density in 5% increments. A 100% density results in a solid model, while a 0% density results in no infill. Fill Pattern: Allows you to select the shape of the infill structure. You can select Line, Hexagon, or Triangle. www.bresser.de...
- Page 50 Pause At Heights: Sets the height at which the print will automatically be paused. This is usually done to allow you to change filament at one or points. Click the Edit button to set the pause point(s). The print can be paused anywhere from 1 to 59.9 mm. www.bresser.de...
- Page 51 Font Size: Allows you to set the size of the font used in REXprint. You can select Small, Medium, or Large. Check for Updates after start up: Determines whether REXprint will automatically check for the existence of software or driver updates. www.bresser.de...
- Page 52 You will be prompted to set the distance between models, which can be from 1.0 to 50.0 mm. Mirror Model: Click Edit > Mirror Model to mirror the selected model(s) in the X, Y, or Z planes. www.bresser.de...
- Page 53 Back View: Sets the camera to look at the build area from the rear. Show Model Outline: Puts a yellow outline around the model. Show Steep Overhang: Highlights in red those portions of the model that require supports. www.bresser.de...
- Page 54 Centre XYZ: Click a Centre button to move the extruder or build plate to the zero position for that axis. Set X/Y Speed: Sets the speed at which the extruder moves. Set Z Speed: Sets the speed at which the build plate moves. www.bresser.de...
- Page 55 Re-runs the wizard that automatically runs the first time REXprint is run. Help Contents: Allows you to read the help files. Feedback: Allows you to submit feedback. Check For Updates: Checks for REXprint updates. About REXprint: Displays REXprint version information. www.bresser.de...
- Page 56 4. Set the Connection Mode to USB and set the Select Machine option to the printer. When the printer does not appear in the Select Machine list, click the Rescan button. If it still does not appear, reinstall the driver software. www.bresser.de...
- Page 57 The control panel will appear after successful login. 6. Click the WiFi Set tab on the left, then set the WiFi Work Mode to AP mode or STA mode, then click Restart to make the changes take effect. www.bresser.de...
- Page 58 NONE. Click the Save button and restart it. Connect your PC to the network (the name you set). Open REXprint, then click Print > Connect Machine. Select Wi-Fi as the Connect Mode and enter the IP Address, as shown on the REXprint's screen. Click Connect. www.bresser.de...
- Page 59 If you choose to use STA mode, input the SSID and password of your existing Wi-Fi® connection. If your Wi-Fi connection does not use a password, enter NONE into the password field. Then click the Save button and restart it. Restart the printer, then open the WIFI Screen. www.bresser.de...
- Page 60 Click the Yes button to cut the connection. ② Choose the corresponding printer type and firmware version, then click OK in the firmware update dialogue. After confirming that there is no printer connection, the software will automatically update the firmware. www.bresser.de...
- Page 61 Generating Gcode ① Plug the included SD™ card into an SD card reader on your computer. ② Double-click the REXprint shortcut to launch the software. ③ Click Print > Machine Type and select the Flashforge Creator Max 3D Printer entry. www.bresser.de...
- Page 62 Supports: If your model has overhanging elements, enable the Supports option. Raft: It is recommended to enable the Raft option. Resolution: It is recommended to select the Standard option. More Options: It is recommended to leave them at the default values. www.bresser.de...
- Page 63 ⑬ Touch the Print button to begin printing. The printer will begin heating the extruder and/or platform, then will begin printing once the target temperatures are reached. Touch the Stop button at any time to cancel the print. Touch the Pause button to pause the print. www.bresser.de...
-
Page 64: Chapter 7: Warranty And Service
The rights arising from the guarantee exist independently of the statutory warranty claims. The guarantor is BRESSER GmbH, Gutenbergstr. 2, 46414 Rhede, Germany. After the warranty period has expired, you also have the possibility to send a defective device for repair. Repairs after the warranty period are subject to a charge. - Page 65 Fill out the Service Form and enclose it with the proof of purchase. Service You can contact the BRESSER service team if you have problems with the 3D printer. If questions or problems are not covered in this manual, you can look for solutions on our official website or contact us by phone.
- Page 66 www.bresser.de...
- Page 67 www.bresser.de...
- Page 68 E-Mail: service@bresser.de E-Mail: sav@bresser.fr Telefon*: +49 28 72 80 74 210 Téléphone*: 00 800 6343 7000 BRESSER GmbH BRESSER France SARL Kundenservice Pôle d’Activités de Nicopolis Gutenbergstr. 2 314 Avenue des Chênes Verts 46414 Rhede 83170 Brignoles Deutschland France *Lokale Rufnummer in Deutschland (Die Höhe der Gebühren je...
Need help?
Do you have a question about the T-Rex and is the answer not in the manual?
Questions and answers