Table of Contents
Advertisement
Advertisement
Table of Contents

Related Manuals for Bresser T-REX2


Summary of Contents for Bresser T-REX2
- Page 1 WIFI 3D Printer Twin Extruder Art. No. 2010600 Instruction manual...
-
Page 2: Table Of Contents
Chapter 3: Slicing Software ..................43 3.1 Installation ....................... 43 3.2 Get to know REXprint ..................44 3.3 How do I create a .g file? ................63 3.4 Introduction to functions .................. 65 Chapter 4: Maintenance ....................72 Chapter 5: Warranty and service ................73 www.bresser.de... - Page 3 Visit our website via the following QR code or web link. Here you will find additional information, available updates or software for this product as well as suitable accessories: 3D printer Accessories www.bresser.de/P2010600 www.bresser.de/P2080210000000 After Sales Support / Service For this product we offer an individual service even after the purchase. If you have problems with this product, our customer service will be happy to help you.
-
Page 4: Introduction
Bresser GmbH would like to take this manual as an opportunity to thank both the technicians of Bresser GmbH and the users of this 3D printer for their tireless efforts and extremely important support. -
Page 5: General Information
This manual contains all necessary information for setting up and operating the device. The operating instructions consist of the following parts: Introduction, general and safety information, operation and product service. For service requests, please have ready: Item nr: 2010600 Product reference BRESSER T-REX 2 WLAN 3D Printer Instruction manual: Manual_2010600_Wifi-3D-Printer-T-REX-2_de_BRESSER_v032021a.docx www.bresser.de... -
Page 6: Safety Instructions
③ Wear suitable clothing. Do not wear loose clothing or loose-fitting jewellery. Make sure that your hair, clothing and gloves do not come into the vicinity of moving ④ Do not operate the device if you are tired or under the influence of drugs, alcohol parts. or medication. www.bresser.de... - Page 7 TEMPERATURE: Room temperature 15 to 30 °C ℃ Moisture: 20% ~ 70% Filament specifications Use the filament only for the intended purpose! Use only the BRESSER filament or a filament of the brands authorised by BRESSER! Filament storage A certain degree of decay can be observed in all polymers over time. Only unpack the filament when you need it.
- Page 8 EC DECLARATION OF CONFORMITY A "Declaration of conformity" in accordance with the applicable directives and corresponding standards has been prepared by Bresser GmbH. The full text of the EC declaration of conformity is available at the following Internet address: www.bresser.de/download/2010500/UKCA/2010500_UKCA.pdf...
- Page 9 This document contains information protected by copyright. Copyright © 2020 BRESSER GmbH. All rights reserved. The reproduction of this documentation - even in extracts - in any form (e.g. photocopy, print, etc.) as well as the use and distribution by means of electronic systems (e.g.
-
Page 10: Chapter 1: 3D Printing Technology
- From the Cloud - currently the most common method for obtaining a 3D model is to download a 3D model from a website where users can upload their own 3D models. https://cloud.sz3dp.com/ Bresser GmbH Cloud www.thingiverse.com Thingiverse is an active community for discovering, making and sharing 3D models. - Page 11 3D printer via USB cable, USB stick or W-LAN. 1.1.3 Structure of the 3D model After the output file is sent to the 3D printer, the printer begins to transfer the 3D model into a physical object by applying layers of filament over each other. www.bresser.de...
-
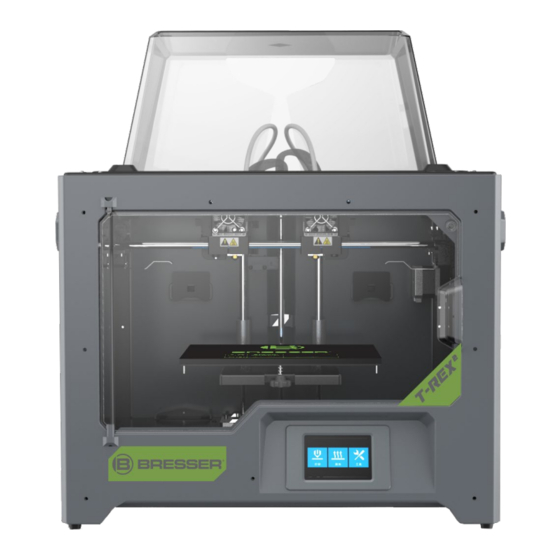
Page 12: Chapter 2: About The 3D Printer
4. LCD display 11. Cooling fan 18. Bobbin holder slot 5. Z-axis guide rod 12. Nozzle 19. Spool holder 6. Extruder cable set 13. Turbo blower plate 20. Power Input 7. X-axis guide rod 14. Extruder holder 21. Power switch www.bresser.de... - Page 13 Filament spool Top cover Service card Quickstart Guide Power cable USB cable SD Card Spool holder Build tape Screwdriver Stamping wrench Allen key Pin tool Scraper PTFE tube Guide tube Grease Glue stick Anti-oozing plate Levelling Levelling nut -map www.bresser.de...
- Page 14 www.bresser.de...
- Page 15 2.1.3 Terms and definitions Construction plate The surface on which BRESSER T-REX 2 builds an object. Construction volume The three-dimensional surface of an object after its completion. Largest construction volume of BRESSER T-REX 2: 200x148x150 mm. Levelling nuts Use the nuts under the platform to adjust the distance between the nozzle and the construction platform.
- Page 16 Supported file formats Input: 3MF/STL/OBJ/FPP/BMP/PNG/JPG/JPEG GX/G AC input voltage Entrance: 100-240 VAC, 47-63 Hz, power: 320 W Connections SD card, USB cable, Bresser GmbH Cloud Operating system Windows XP/Vista/7/8/10、Mac OS、Linux Unit dimensions 526 x 360 x 403 mm Net weight 15 kg www.bresser.de...
-
Page 17: Unpacking And Installation
It exhibits thermal insulation and high temperature resistance properties. ① Open the box and take out the foam ② Hold both handles on the two sides parts. of the printer. Lift it out of the box and place it on a stable surface. www.bresser.de... - Page 18 ⑦ Open the flap, remove the top cover ⑧ Hold both sides of the pressure of the printer and release the platform and lift the platform off the filament from the cover. floor to make it easier to remove the foam box underneath. www.bresser.de...
- Page 19 ⑨ Remove the foam from the bottom of ⑩ Now you have unpacked everything. the platform and then slowly push Keep the packing material in case the platform down with your hands. you need it again later. This simplifies the subsequent installation. www.bresser.de...
- Page 20 M3 bolts from the ③ Align the extruder with the screw holes. accessory kit. ④ Screw the extruder to the extruder mount using the M3x screws. Screw hole Screw hole www.bresser.de...
- Page 21 ② Turn the spool holder down so that the bottom gap of the holder sits at the back of the printer. ③ Take a filament roll, squeeze the top of the spool holder and insert the filament spool into the holder. www.bresser.de...
- Page 22 Attach the filament guide tube with the R-shaped clamps. Note: Please insert the guide tube fully into the spool to prevent the filament from twisting and wrapping around the outside of the spool. www.bresser.de...
- Page 23 Fix the anti-oozing plate by two M3x8 screws. The nozzles must touch the moisture-repellent plate properly after installation. The distance between nozzle and plate can be adjusted by hand. After several printings scratches on the surface of the plate are normal. www.bresser.de...
-
Page 24: The Initial Setting
③ Tap the [Unload] button. The extruder warm-up process begins. Once the target temperature has been reached, feed some of the filament out of the nozzle by hand. Then push down the spring retainer, quickly pull out the filament and finish unloading. www.bresser.de... - Page 25 ① Tap the [Tools]-[Level] button to start levelling. The device first moves back to the home position. under ② After stopping movement of extruder and platform, tighten the three nuts below the platform counterclockwise. (This procedure is important to avoid scratches on the construction plate caused by the extruder). www.bresser.de...
- Page 26 After the adjustment of the first plate is completed, repeat the procedure for the second and third nut. Note: The short distance between extruder and platform makes it difficult to remove printed objects. Greater distances lead to bonding errors or wrapping. www.bresser.de...
- Page 27 ② The extruder and the platform first move back to the zero position. Then select an extruder for calibration. If the temperature of the nozzle and platform is too high, the unit waits until the temperature has cooled down to 50 °C so that the nozzle does not burn the construction tape. www.bresser.de...
- Page 28 Now make sure that the filament has been inserted into the extruder. ② Once the warm-up phase is complete, the left and right extruders print a line one after the other. www.bresser.de...
- Page 29 Now make sure that the filament has been inserted into the extruder. ② Once the warm-up phase is complete, the left and right extruders print a line one after the other. www.bresser.de...
- Page 30 Then touch the [Verify] button. The two extruders (left and right) reprint the lines to check that they match. If they match, the Y-axis calibration is complete. Otherwise, the adjustment must be continued until conformity is established. www.bresser.de...
- Page 31 First print After mounting, loading the filament and calibrating, start your first print. ① Insert the SD card into the side of the device. ② Touch [Print]-[SD card] and select the test file for printing. www.bresser.de...
- Page 32 PVA is biodegradable and therefore the waste water can be disposed of without any problems. After the wastewater has been disposed of, wash the object with hot water for 30 minutes to remove residual PVA from the drain pipe so that www.bresser.de...
- Page 33 The water can be used several times to soak several objects in it. However, the resolution time may be extended. Therefore, it is recommended to use fresh water, because then the best effect can be achieved. www.bresser.de...
- Page 34 ABS+ABS BRESSER materials give the best results, but BRESSER T-REX 2 also supports the use of other brands of materials. All BRESSER materials have been tested. The best test results were achieved with REXprint. PVA filament is water soluble and has strong water absorbing properties. The filament may become soft after absorbing water, which may cause misprints.
-
Page 35: Touchscreen Interface - Introduction
SD card or connecting REXprint via a USB cable. Touch [Print]-[SD Card] and select the files to print. ② To change the temperature, touch the extruder or platform temperature display on the touchscreen. www.bresser.de... - Page 36 ② Touch [Stop] to stop the warm-up. Touch the black arrow to return to the main window. As soon as the desired preheating temperature is reached and if no further entries are made, the preheating process stops. www.bresser.de...
- Page 37 Tool surface The tool interface contains the Filament, Level, Home, Manual, Setting, Status, and About tabs. [Filament] Filament load and unload settings. [Level] The flatness of the platform is adjusted manually. www.bresser.de...
- Page 38 Gently move the paper and feel the friction. If the paper has only slight friction, the distance between the extruder and the platform is set correctly. After the adjustment of the first plate is completed, repeat the procedure for the second and third nut. www.bresser.de...
- Page 39 Touch the touch screen for XYZ axis movement control. Setting The "Setting" interface includes "X Calibration", "Y Calibration", "Z Calibration", "Expert Mode", "Language" and "FactoryReset". [X Calibration, [Y Calibration], [Z Calibration] For further information, please refer to chapter 2.3.3. www.bresser.de...
- Page 40 X axis, touch [X+]. When the right extruder is printing to the left on the Y axis, touch [Y-]. When the right extruder prints to the right on the X axis, touch [Y+]. Language:] Support: Chinese, English, Japanese, German, French and Spanish. www.bresser.de...
- Page 41 [Status] Under "Status" the extruder and platform temperature as well as the coordinates of the XYZ axis are displayed. Touch the light status bar. The ambient light in the chamber of the device changes according to the settings. [Info] www.bresser.de...
- Page 42 "sys" folder. Then insert the S-card into the device. Switch on the device and update the firmware. After updating the firmware, delete the "sys" folder. Method 2: Update the firmware via USB cable with REXprint. www.bresser.de...
-
Page 43: Chapter 3: Slicing Software
There are two ways to get the REXprint software: Method 1: Download the installation package from the SD card in the accessory kit. Method 2: Download the latest version from the Download Center on the Bresser product website www.bresser.de/P2010600. Getting Started Extract the zip file or run the installer. -
Page 44: Get To Know Rexprint
Attention! After starting REXPrint, you must first select the device type. A dialogue box opens when you start REXprint. Select BRESSER T-REX 2 from the list of displayed device types and tap [OK]. You can also change the machine type by touching [Print]-[Machine Type]. - Page 45 Supports (Support) Load only one file at a time Open prop editing mode. Printing (Print) View (View) Print directly with the BRESSER View FlashPoint home screen, T-REX 2 or export to a USB stick from one of six angles Move Move the model on the XY axis.
- Page 46 Width: X-value of the model Depth: Y-value of the model Bottom Thickness: Determination of the base thickness for the "Tube", "Canister", Seal" and "Lamp" moulds. Top Diametre: Determination of the upper diametre for the shapes "Tube", Canister" and "Lamp". www.bresser.de...
- Page 47 Bottom Diametre.Determination of the bottom diametre for the shapes "Tube", Canister" and "Lamp". Plane Tube/Canister Lamp (6-8) Seal (6-9) www.bresser.de...
- Page 48 There are the following two ways to reset views: Method 1: Click the [View] menu and select [Home View]. Method 2: Click the [View] button on the left, and click it again to display the display options. You may then click on [Reset]. www.bresser.de...
- Page 49 Click [Reset] to reset the distance values. Note: After adjusting the position, you should click [Centre] and [On Platform] to ensure that the models are in the print area and on the print platform. If a specific position is required, click only [On Platform]. www.bresser.de...
- Page 50 Click [Reset] to reset the size of the model. Note: If you clicked the [Uniform Scaling] radio button, the model will be scaled to scale when you change any value of the model's positioning. Otherwise, only the corresponding item value is changed. www.bresser.de...
- Page 51 3.2.8 Cutting Left-click the model to select it, then double-click the "Cut" icon to set the cut plane. You can set the direction and the position. ① Draw with mouse ② X plane ③ Y-plane www.bresser.de...
- Page 52 ④ Z-level Extruder There are right and left extruders. First select the model. Click on the extruder icon. The extruder settings menu is displayed. Before starting the printing process, the left or the right extruder must be selected. www.bresser.de...
- Page 53 If the model already has supports and you select one of the support options, the software will assess whether the existing supports need to be deleted. This decision is made on the basis of the type of support selected. You can confirm this decision in a pop-up window. www.bresser.de...
- Page 54 (the highlighted support in the preview does not create a ④ Removing supports support structure). Click on [Clear Supports]. All supports are then deleted. You can cancel this deletion processby clicking on [Undo] or by pressing the key combination Ctrl+Z. www.bresser.de...
- Page 55 Press the left mouse button to delete the highlighted support. 3.2.11 Printing Click the print icon. Now the print screen is displayed. After all parametres have been set, click [OK]. Then select the correct file format and click [Save]. www.bresser.de...
- Page 56 "Layer", "Infill", "Speed" and "Temperature". The different resolutions according to the different default settings. To restore the default settings, click [Restore Defaults]. Layer height Layer Height: Layer thickness of the print model. The smaller the value, the smoother the surface of the model. www.bresser.de...
- Page 57 Note: The parameter settings can be adjusted accordingly for different models. Temperature Extruder temperature: Recommended extruder temperature: 220°C Note: The different temperatures influence the printing process. The temperature must be adapted to the prevailing conditions in order to achieve a good printing result. www.bresser.de...
- Page 58 Determination of the platform temperature. Others Cooling Fan Control: Setting up the time period until the cooling fan is switched on. You can set the value in advance, then the cooling fan will be activated when this point is reached. www.bresser.de...
- Page 59 OBJ format. With the STL and OBJ file formats, the models are integrated into a single model (including the supports). When re-loading these file formats, only the position of the model is saved, but not the print parametres. www.bresser.de...
- Page 60 The following two options are available to restore the last undone change to the model file. Method 1: Click to [Edit] > [Redo]. Method 2: Press the key combination Ctrl+Y. ③ Empty Undo Stack You can use this function to delete the stored processing steps to free up memory space. www.bresser.de...
- Page 61 After you have selected the model, you can use the following procedure to place the model surface on the platform. Click [Edit] > [Surface to Platform] to switch to Surface to Platform mode (as shown in the following figure). www.bresser.de...
- Page 62 ③ Check for updates Clicking [Help]-[Help Contents] displays the help contents. ③ About REXprint Clicking [Help]-[Check for Updates] will check for available online updates. Clicking [Help]-[About REXprint] displays the software info window. The current software version and copyright notices are displayed here. www.bresser.de...
-
Page 63: How Do I Create A .G File
By default, the left extruder is used as the material extruder; the right extruder is the printing extruder. When printing a monochrome model, the right extruder is automatically set as the print extruder unless this setting is changed by the user. ① Click [Print]-[Machine Type] for the printer model selection. www.bresser.de... - Page 64 ② Click the [Load] icon to load an STL model file. The object is displayed in the construction area. Preview: Check the function recommend. Machine type: BRESSER T-REX 2. Materials: Select the desired materials. Supports: Recommended setting [Enable]. Raft: Recommended setting [Enable].
-
Page 65: Introduction To Functions
The expert mode supports the selection of soluble materials. Click on it and set the feed for the left extruder. It depends on the material properties whether the feed has to be adjusted. The feed setting can reduce drawings. www.bresser.de... - Page 66 The distance between supports and model and the support density can be adjusted in the [Supports] setting tabs. www.bresser.de...
- Page 67 In "mirroring" or "duplicating" mode, two extruders print the models simultaneously. Note: The size of the X-axis of the model should be less than 80 mm in mirror or duplicate mode. ① Select Model and click [Extruder] to start setting the extruder. www.bresser.de...
- Page 68 ② After the executed mirroring or duplicating, the models are displayed in the build area. Tap [Print]. Due to the difference in height of the two extruders in mirroring mode, a compensation layer may be printed. Therefore, it is recommended to add "Raft" in the mirror mode. www.bresser.de...
- Page 69 Adding supports for off/on structures for a good print result. ① Click the [Supports] icon to make the settings for the supports. The prop settings can be made automatically. Click [Delete] on the left side to delete the supports manually. www.bresser.de...
- Page 70 ② Under [Support Options], select ③ Click [Auto Supports] to create tree shape or linear supports. supports automatically. Overhang threshold refers to the angle of the up/down suspended model. If the angle is exceeded, the support is generated. www.bresser.de...
- Page 71 Dimensional adjustments For dimensional deviations, click [Others] to open the dimensional adjustment functions. Positive adjustments of values produce enlargements, negative adjustments produce reductions. The Z-axis height is adjusted according to the percentage value. www.bresser.de...
-
Page 72: Chapter 4: Maintenance
Return the extruder to the home the exact extruder position and position recalibrate cannot build. BRESSER T-REX 2. Abort your object, empty the construction platform, send the extruder to the home position and restart your object. No PLA extrusion or adhesion to... -
Page 73: Chapter 5: Warranty And Service
The rights from the guarantee exist independently of the legal warranty claims. The guarantor is BRESSER GmbH, Gutenbergstr. 2, 46414 Rhede, Germany. After the warranty period has expired, you also have the possibility to send a defective device for repair. Repairs after the warranty period are subject to a charge. - Page 74 Fill out the Service Form and enclose it with the proof of purchase. Service You can contact the BRESSER service team if you have problems with the 3D printer. If questions or problems are not covered in this manual, you can search for solutions on our official website or contact us by phone.
- Page 75 E-Mail: service@bresser.de E-Mail: sav@bresser.fr Telefon*: +49 28 72 80 74 210 Téléphone*: 00 800 6343 7000 BRESSER GmbH BRESSER France SARL Kundenservice Pôle d’Activités de Nicopolis Gutenbergstr. 2 314 Avenue des Chênes Verts 46414 Rhede 83170 Brignoles Deutschland France *Lokale Rufnummer in Deutschland (Die Höhe der Gebühren je...
- Page 76 Bresser GmbH Gutenbergstraße 2 46414 Rhede · Germany www.bresser.de @BresserEurope...
Need help?
Do you have a question about the T-REX2 and is the answer not in the manual?
Questions and answers