Table of Contents
Advertisement
Advertisement
Table of Contents

Related Manuals for Bresser RAPTOR


Summary of Contents for Bresser RAPTOR
- Page 1 WIFI 3D Printer Art. No. 2010400 Instruction Manual...
- Page 2 1.1 Procedure ....................... 10 Chapter 2: Information on the 3D printer ..............12 2.1 About the 3D printer ..................12 Chapter 3: Getting started ..................15 3.1 OSD Menu map ....................19 3.2 WiiBuilder Slicing Software ................39 Chapter 4: Warranty and service ................43 www.bresser.de...
- Page 3 Introduction Thank you for choosing the BRESSER RAPTOR Wifi 3D printer. We assure you that it has been produced according to the latest technology and safety standards. Each device is subjected to a detailed quality control before delivery, so that nothing stands in the way of trouble-free operation.
- Page 4 This manual contains all the information required for setting up and operating the machine. The User's Guide consists of the following parts: Introduction, General and Safety Information, Operation and Product Service. Please be prepared for service requests: Art. No.: 2010400 Product name: BRESSER RAPTOR WLAN 3D printer Instruction manual: Manual_2010400_Wifi-3D- Printer_Raptor_de_BRESSER_v012021a.docx www.bresser.de...
- Page 5 ③ Wear suitable clothing. Do not wear loose clothing or loose-fitting jewellery. Be ④ Do not operate the machine if you are tired or under the influence of drugs, careful not to let your hair, clothing and gloves get near the moving parts. alcohol or medication. www.bresser.de...
- Page 6 Temperature: Room temperature 15-30℃ Humidity: 20 %-70 Filament specifications Use filament only for the intended purpose! Use only the BRESSER filament or filament of the brands recognised by BRESSER! Filament storage A certain degree of decay can be observed in all polymers over time. Only unpack the filament when you need it.
- Page 7 Furthermore, BRESSER GmbH assumes no liability for errors contained in this manual, for incidental consequential damages in connection with the delivery, performance or use of this material. EC DECLARATION OF CONFORMITY A "Declaration of Conformity" in accordance with the applicable directives and corresponding standards has been issued by Bresser GmbH.
- Page 8 www.bresser.de...
- Page 9 No part of this documentation may be reproduced in any form (e.g. photocopying, printing, etc.) or used or distributed by means of electronic systems (e.g. image file, website, etc.) without the prior written permission of BRESSER GmbH. The designations and brand names of the respective companies used in this documentation are generally protected by trademark and/or patent law in Germany, the European Union and/or other countries.
- Page 10 3D printer. REXprint is the slicer software for this 3D printer. With REXprint, STL files can be converted into G or GX files for printing. These are then transferred to the 3D printer via USB cable, USB stick or W-LAN. www.bresser.de...
- Page 11 1.1.3 Structure of the 3D model After the output file is sent to the 3D printer, the printer begins to transfer the 3D model into a physical object by applying layers of filament over each other. www.bresser.de...
- Page 12 2.1 About the 3D printer 2.1.2 Package Contents Please take an inventory of the package contents to ensure you have all the items listed below. If anything is missing or damaged, please contact BRESSER GmbH Customer Service for a replacement. 3D Printer...
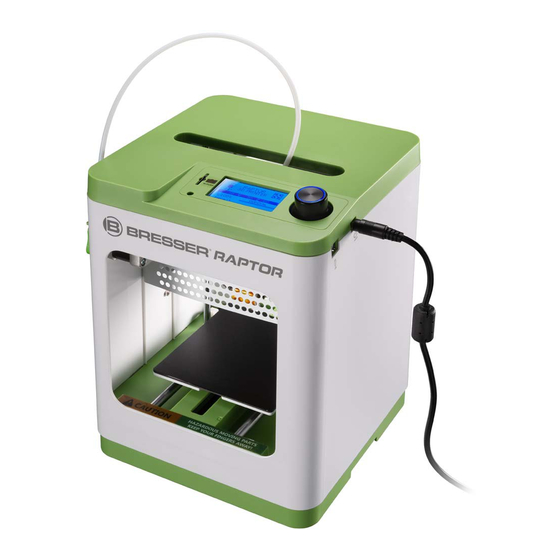
- Page 13 1. Magentic print bed 2. Nozzle 3. SD card port 4. LCD screen 5. Knob 6. Power port 7. USB port 8. Extruder 9. Filament holder www.bresser.de...
- Page 14 2.1.3 Device specifications Model RAPTOR Printing Technology Fused Filament Fabrication (FFF) Supported Filament Types PLA, PLA Pro Filament Diameter 1.75mm Nozzle Diameter 0.4mm Maximum Nozzle Temperature 250°C Build Volume 100 x 105 x 100 mm Printing Accuracy 0.1 - 0.4 mm...
- Page 15 (3-4) Rotate the Coupling Screw clockwise to lift the Magnetic Print Bed, then remove the foam block from under the print bed. www.bresser.de...
- Page 16 (3-8) Using a pair of scissors or side cutters, cut about an inch off the end of the filament, then gently straighten the end of the filament. Squeeze the lever on the Extruder, insert the filament into the bottom until you encounter resistance, then release the lever. www.bresser.de...
- Page 17 Knob to begin printing the highlighted model. 3-11 (3-12) Once the print is finished, remove the Magnetic Print Bed from the metal print platform, then bend it to remove the model. Replace the Magnetic Print Bed on the metal print platform. www.bresser.de...
- Page 18 3-12 www.bresser.de...
- Page 19 Auto Home Move Z Level Bed Extruder Disable Steppers Wizard Main Temperature Show IP Z Offset Settings Wifi Device Info Control Wifi Network Connect to Wifi Language Wifi OTA Update Machine Info Restore Default Print from SD Gcode File List www.bresser.de...
- Page 20 - Auto Home: Moves the Extruder and the X, Y, and Z axes to their "home" positions. - Level Bed: Levels the Print Bed. - Disable Steppers: Disables the Stepper Motors. To re- engage the motors, turn the printer off, then back on again. - Wizard: Starts the Initial Setup Wizard. www.bresser.de...
- Page 21 - Move 1mm: Displays the Move Screen, which allows you to adjust the X/Y/Z/Extruder position by 1mm each time the Knob is turned. - Move 0.1mm: Displays the Move Screen, which allows you to adjust the X/Y/Z/Extruder position by 0.1mm each time the Knob is turned. www.bresser.de...
- Page 22 Note that reducing the speed too much can cause clogs in the Nozzle. - Z Offset Setting: Displays the Z Offset Setting Screen, which allows you to adjust the Z offset on the fly. www.bresser.de...
- Page 23 Rotate the Knob to highlight the file you want to print, then press the Knob to start printing the file. Note that files stored on the microSD card are limited to 20 characters, not counting the .gcode file extension. www.bresser.de...
- Page 24 Extruder, insert the filament into the bottom until you encounter resistance, then release the lever. ④ Press the Knob to start loading filament. Once filament starts extruding from the Nozzle, press the Knob again to stop extrusion. Clean the extruded filament, then press the Knob to select the Continue option. www.bresser.de...
- Page 25 ① On the Main Menu, rotate the Knob until the Prepare option is highlighted, then ② Rotate the Knob until the Auto Home option is highlighted, then press the Knob. The press the Knob to enter the Prepare Menu. Nozzle and Print Bed will move to the "home" positions. www.bresser.de...
- Page 26 Knob to enter the Move X, Move Y, Move Z, or Move ⑤ Rotate the Knob until the Move 10mm, Move 1mm, or Move 0.1mm option is Extruder Menu. highlighted, then press the Knob to move the selected axis by the indicated amount. www.bresser.de...
- Page 27 Knob to enter the Prepare Menu. Knob to disable the Stepper Motors. The X, Y, and Z axes can now be independently moved by hand. To re-enable the Stepper Motors, turn the printer off, then turn it back on. www.bresser.de...
- Page 28 Nozzle and the Print Bed. If you changed the Z Offset prior to printing, turn the printer off and then back on to save the setting as the default. www.bresser.de...
- Page 29 ④ Download and install the PoloPrint app from the microSD card. During installation, Knob to display the Connect to Wi-Fi Screen. the app will ask for permissions to access Storage and Location information. Slide the controls to the right to allow access, then touch DONE to continue. www.bresser.de...
- Page 30 ⑤ Open the PoloPrint app on your mobile device. The app will display a wizard interface, which will introduce you to its features. Touch Next to go through the tutorial pages, then touch Finish on the last page. www.bresser.de...
- Page 31 Wi-Fi SSID and password, but do not touch OK yet. Note that 5G networks are not supported. ⑦ Press the Knob on the printer. The printer will connect to your Wi-Fi network. ⑧ Once the connection has been successfully made, touch OK in the app. www.bresser.de...
- Page 32 Knob to enter the Control Menu. ③ Rotate the Knob until the Show IP option is highlighted, then press the Knob to to enter the Wi-Fi® Network Menu. ④ Press the Knob to return to the Wi-Fi Network Menu. display the network IP address. www.bresser.de...
- Page 33 Wi-Fi® Network Menu. Knob. The OTA Update Screen will display. If new firmware has been found, press the Knob to begin updating the printer firmware. If no new firmware is available, press the Knob to return to the Wi-Fi Network Menu. www.bresser.de...
- Page 34 The printer will finish the current layer, then will pause printing. option is highlighted, then press the Knob to resume the print. The printer will heat the Nozzle to the target temperature, extrude a small amount of filament, then display the Resume Options Menu. www.bresser.de...
- Page 35 Knob to start the Loading Filament function. The Nozzle will heat to the target temperature, if necessary, then will load the filament and extrude a small amount. Clean the extruded filament. ⑦ Rotate the Knob until the Continue option is highlighted, then press the Knob to continue printing with the new filament. www.bresser.de...
- Page 36 ① Turn the printer on. The Power Loss Recovery Menu will display. interrupted print. ② Rotate the Knob until the Resume Print option is highlighted, then press the Knob to continue the print. The printer will heat the Nozzle to the target temperature, then will resume printing www.bresser.de...
- Page 37 ② If you want to view the files on the microSD™ card, touch the SD FILES tab at the top of the screen. The app will display the files on the microSD card. To print a file, touch the "card", then touch the icon in the bottom right corner of the "card“. www.bresser.de...
- Page 38 ③ While the model is printing, you can see the progress of the print by touching the STATE tab at the top of the screen. www.bresser.de...
- Page 39 ③ The installer will prompt you to select the components you want to install. If you are unsure of which components you need, select all components. Click the Install button to start the installation process. If you already have a component installed, the installer will inform you and skip installation of that component. www.bresser.de...
- Page 40 Finish button to close the installer and launch WiiBuilder. ⑥ Once WiiBuilder launches, it will launch a wizard that will display a series of six animated pages that show how to perform several common functions. Click the www.bresser.de...
- Page 41 If you want to see a previous page, click the last button. Once all six pages have been displayed, click the finish button to close the wizard. www.bresser.de...
- Page 42 OK button to continue. ⑧ WiiBuilder is now configured and ready for use! If you want to see the wizard again, click Help > RunWizard. If you want to read the product manual, click Help > Manual. www.bresser.de...
- Page 43 Fill out the Service Form and enclose it with the proof of purchase. Service You can contact the BRESSER service team if you have problems with the 3D printer. If questions or problems are not covered in this manual, you can look for solutions on our official website or contact us by phone.
- Page 44 Email:service.3d-printer@bresser.de You can reach the BRESSER service team by phone or e-mail from Monday to Saturday, 8:30-15:30 (CET). If you contact us outside these business hours, we will answer your request on the following working day.
- Page 45 www.bresser.de...
- Page 46 www.bresser.de...
- Page 47 www.bresser.de...
- Page 48 E-Mail: service@bresser.de E-Mail: sav@bresser.fr Telefon*: +49 28 72 80 74 210 Téléphone*: 00 800 6343 7000 BRESSER GmbH BRESSER France SARL Kundenservice Pôle d’Activités de Nicopolis Gutenbergstr. 2 314 Avenue des Chênes Verts 46414 Rhede 83170 Brignoles Deutschland France *Lokale Rufnummer in Deutschland (Die Höhe der Gebühren je...
Need help?
Do you have a question about the RAPTOR and is the answer not in the manual?
Questions and answers