Felix printers Pro L Quick Start Manual
Hide thumbs
Also See for Pro L:
- Troubleshooting manual (21 pages) ,
- Calibration manual (15 pages) ,
- Firmware update (12 pages)

Related Manuals for Felix printers Pro L


Summary of Contents for Felix printers Pro L
- Page 1 Quick Start Guide FELIX Pro L / XL www.FELIXprinters.com/support support@felixprinters.com Zeemanlaan 15 3401MV IJsselstein The Netherlands...
-
Page 2: Safety
Never try to print without a buildplate in the machine, this can cause damage to the machine and heated bed. Printer placement Place the FELIXprinter on a stable surface. Page 1 Quick Start Guide FELIX Pro L / XL... -
Page 3: Table Of Contents
? ........... 22 HAT DOES THE CALIBRATION DO 11.2 ? ........24 OW TO DO THE AUTOMATIC CALIBRATION FELIX PRO L / XL AT A GLANCE ............. 4 11.3 ..............26 RRORS DURING LEVELING WHAT’S IN THE BOX? ................5 Z CALIBRATION .................. -
Page 4: Printer Specifications
Diameter nozzle: 0.5 mm (L) 0.5 (XL) (optional 0.35 and Wired Ethernet 0.7mm) Software Nozzle temperature: max. 275 °C Full metal hot-ends Simplify3D Filament flow detection Open source Repetier-Host for FELIXprinters. Page 3 Quick Start Guide FELIX Pro L / XL... -
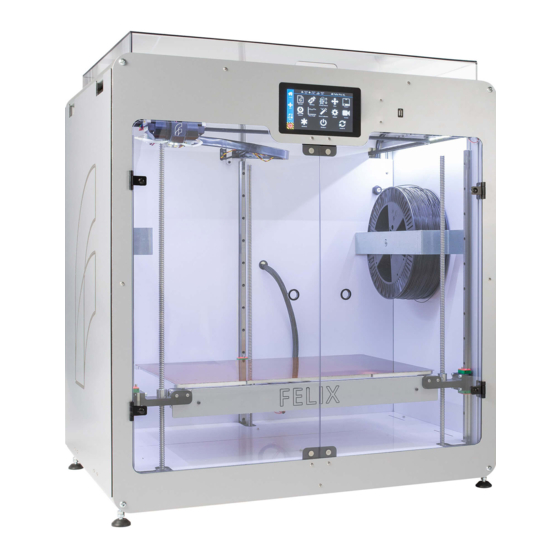
Page 5: Felix Pro L / Xl At A Glance
5 FELIX Pro L / XL at a glance Display unit USB port Extruder Filament guide Filament roll Power switch Power plug LAN port Page 4 Quick Start Guide FELIX Pro L / XL... -
Page 6: What's In The Box
1x MicroSD card + USB 1x Allen key set reader 2x Teflon tubes 1x Premium PLA roll 1x Wrench 14mm Recommended tools: NB: The box could contain extra materials like filament you have ordered. Page 5 Quick Start Guide FELIX Pro L / XL... -
Page 7: Installing Teflon Tubes And Top Cover
NOTE: When using PLA or PETG it is recommended to leave the top cover off. The top cover is only needed for materials that are sensitive to temperature changes like ABS and ASA or other materials that are prone to warping. Page 6 Quick Start Guide FELIX Pro L / XL... - Page 8 Remove the shipping clips from the belts so that the coreXY can move freely. Page 7 Quick Start Guide FELIX Pro L / XL...
-
Page 9: Power On
NOTE: When this switch is on, the battery will charge itself until full even when the power switch is turned off. Flip ON the power switch. The lights of the print-head turn on immediately The screen boots up in about 40 seconds. Page 8 Quick Start Guide FELIX Pro L / XL... -
Page 10: Display Overview
Shutdown button: To properly shutdown the printer. First press the shutdown button before turning the power switch off. This ensures proper shutting down of the operating system on the Display unit. Page 9 Quick Start Guide FELIX Pro L / XL... -
Page 11: Preparation For Printing
Never leave printer unattended if you are not sure if first layer is printed correctly 8.2 Print bed Calibration. IMPORTANT: Only PERFORM BED LEVELING after unboxing. The printer is already fully factory calibrated. Page 10 Quick Start Guide FELIX Pro L / XL... - Page 12 Other calibrations are described in chapter.11. In general calibration is only required when there has something physically changed. Replacing/changing a hot-end After transport New buildplate When you can see the printer is not printing properly Page 11 Quick Start Guide FELIX Pro L / XL...
-
Page 13: Clean The Print Surface
Use an adhesive like Magigoo, Pritt Powerstick, 3DLac or similar (Especially recommended for larger prints). Note: When using a spray adhesives ensure the flex plate is removed from the printer. The spray can damage the linear motion components of the machine. Page 12 Quick Start Guide FELIX Pro L / XL... -
Page 14: Load Filament
Open up the sides of the machine to place the filament spool, the spool holders themselves are adjustable for tension with the bolt in the middle. This can be used to make the filament feeding smoother for larger spools for example, clockwise for more tension counterclockwise for less. Page 13 Quick Start Guide FELIX Pro L / XL... - Page 15 For abrasive filaments like carbon fiber filled, it’s better to take the dust filters out. Press the change filament button in the home menu. Page 14 Quick Start Guide FELIX Pro L / XL...
- Page 16 Now continue by pressing start. While inserting the filament, help the printer by pushing it downwards in the extruder until you feel the printer has gripped the filament. Continue extruding until filament comes out of the printhead. Remove the deposited filament with the supplied tweezer. Page 15 Quick Start Guide FELIX Pro L / XL...
-
Page 17: Printing
Clean/prepare the print bed before starting a print. ✓ Never leave the printer before visually seeing that first layer is printed ok ✓ ✓ Always use filament accessories for proper filament guiding and long lifetime of hot-end. Page 16 Quick Start Guide FELIX Pro L / XL... -
Page 18: Print And Control Printer Via Wifi Or Lan
Insert an ethernet cable on the back of the printer. Ensure that you are connected to the same network otherwise you are not able to access the printer. Press the Network button in the settings menu to find the IP-address. Page 17 Quick Start Guide FELIX Pro L / XL... -
Page 19: Connecting To Wifi Or Wlan
Then click the WLAN icon in the left column. Select in the list your WIFI access point and enter the password. If required also match the other settings to your access point. Page 18 Quick Start Guide FELIX Pro L / XL... -
Page 20: Print Via Web Interface
QR code on the device which is connected to the same network 9.3 Print via web interface. Overview of the dashboard Click Go to printer. Page 19 Quick Start Guide FELIX Pro L / XL... - Page 21 Navigate to the webcam tab for further information 1.1.5 Time-lapse You can create a time lapse video of your print you can find this option under the webcam tab in the browser Page 20 Quick Start Guide FELIX Pro L / XL...
-
Page 22: Power Loss Recovery
10 Power loss recovery The Pro L and XL feature a power loss recovery system that helps safe prints due to power failure or blackouts. In case of a power loss, please follow the next steps to save your print-job. If you see below message the printer has entered to a power loss recovery state, to release the printer from this state press the rescue print button. -
Page 23: Printer Calibration
So, when one of the above systems is not working properly, the printer will not be able to calibrate. 11.1 What does the calibration do? For the FELIX Pro L/XL to properly operate the calibrations described in this chapter need to be performed. 1.1.6 Software based leveling the build plate. - Page 24 When to do this? After exchanging/servicing a hot-end When adjacent features printed with both extruders are not properly aligned Page 23 Quick Start Guide FELIX Pro L / XL...
-
Page 25: How To Do The Automatic Calibration
Now the machine should be ready to go. If you see the first layer being too far away from the bed you can adjust it, follow these steps. Page 24 Quick Start Guide FELIX Pro L / XL... - Page 26 Touchscreen Follow these steps to adjust the height of the first layer. Page 25 Quick Start Guide FELIX Pro L / XL...
-
Page 27: Errors During Leveling
If this happens first check if the machine can home normally if the machine refuses to go up check our Z-sensor triggered manual and bed calibration manual Page 26 Quick Start Guide FELIX Pro L / XL... -
Page 28: Calibration
2 probes which probe at different strengths which leads to them not being calibrated correctly, this is easily adjusted see the instructions. This can only be done in the touchscreen or when connected to the machine by USB/web. Page 27 Quick Start Guide FELIX Pro L / XL... - Page 29 To make it easier – is further away + is closer to the bed so if we were to change the value of -0.908 with 0.05 to make it -0.858 it would print 0.05 closer than before Page 28 Quick Start Guide FELIX Pro L / XL...
-
Page 30: Xy Calibration
It is recommended to perform this twice as extra verification that the offsets are correct. The middle point or 5 in this case should match, press the number that best matches, into the screen and repeat the process if it’s not 5. Page 29 Quick Start Guide FELIX Pro L / XL... -
Page 31: Bigger Nozzles
This can be done by extruding some hard filament and then fully retract it again. Easy way is to do it via the display unit. Then slowly extrude the fila flex into the hot-end. Page 30 Quick Start Guide FELIX Pro L / XL... -
Page 32: Maintenance
Check if there is still filament loaded in the hot-end. If there is no filament loaded, then go to step 4. If yes, from the display unit or PC interface select the correct extruder and heat it up. Retract the filament from the hot-end. Let it cool down. Turn off the printer. Page 31 Quick Start Guide FELIX Pro L / XL... - Page 33 Please do the following two extruder calibrations, if you wish to properly print with dual head. Z-height calibration XY calibration TIP: Clean hot-end exterior from filament before starting a print, to prevent blobs of plastic on your printed object. Page 32 Quick Start Guide FELIX Pro L / XL...
-
Page 34: Dust Cleaners
Caution: There is a potential risk of burning, as the nozzle can reach temperatures of up to 275° TIP: Clean hot-end exterior from filament before starting a print, to prevent blobs of plastic on your printed object. Check the maintenance manual for more info. Page 33 Quick Start Guide FELIX Pro L / XL... -
Page 35: Display Messages
Heated bed: please check if the contact pins under the bed look ok. Leveling failed The z-sensor triggered falsely during the leveling routine or measured probe values are out of their boundaries. Go to www.felixprinters.com/support and look for the ‘z-sensor triggered’ topic. Page 34 Quick Start Guide FELIX Pro L / XL... - Page 36 (a small reward is waiting for you) Manuals & tutorials FELIX Community www.felixprinters.com/support www.felixprinters.com/community V8- 2021 Quick Start Manual FELIX Pro L/XL www.felixprinters.com/support Zeemanlaan 15 support@felixprinters.com 3401MV IJsselstein The Netherlands Page 35 Quick Start Guide FELIX Pro L / XL...
Need help?
Do you have a question about the Pro L and is the answer not in the manual?
Questions and answers