Table of Contents
Advertisement
Quick Links
Advertisement
Table of Contents

Related Manuals for Optimum OPTImill MT 60


Summary of Contents for Optimum OPTImill MT 60
- Page 1 Operating Manual Version 1.0.4 Milling machine Part no. 3336090...
-
Page 2: Table Of Contents
Table of contents Safety Glossary of symbols ..........................6 Rating plate...............................6 Safety instructions (warning notes)......................7 1.3.1 Classification of hazards .......................7 1.3.2 Other pictograms ...........................7 Intended use .............................8 Reasonably foreseeable misuse.......................9 1.5.1 Avoiding misuse ..........................9 Possible dangers caused by the milling machine ...................10 Qualification of personnel ........................10 1.7.1 Target group..........................10 1.7.2 Authorized persons ........................11... - Page 3 3.6.2 Requirements regarding the installation site ................24 Machine mounting ..........................25 3.7.1 Anchor-free mounting........................25 3.7.2 Anchored mounting ........................25 First commissioning..........................27 One-component paint ..........................27 3.10 Cleaning the machine..........................27 3.10.1 Lubrication and oil levels......................28 3.11 Warming up the machine ........................
- Page 4 5.9.1 Entering the parameters......................51 5.9.2 Positioning to a Coordinate Point on the Arc................53 5.10 Tool Data Function ..........................54 5.10.1 Recall of tool data........................54 Maintenance Safety..............................55 6.1.1 Preparation..........................55 6.1.2 Restarting ............................55 Overview of lubrication points.........................56 Inspection and maintenance........................57 Repair ..............................61 6.4.1 Customer service technician .......................61 Cooling lubricants and tanks........................62 6.5.1 Inspection plan for water-mixed cooling lubricants..............63 Ersatzteile - Spare parts...
- Page 5 Dear customer, Thank you very much for purchasing a product made by OPTIMUM. OPTIMUM metal working machines offer a maximum of quality, technically optimum solutions and convince by an outstanding price performance ratio. Continuous enhancements and prod- uct innovations guarantee state-of-the-art products and safety at any time.
-
Page 6: Safety
Safety This part of the operating instructions explains the meaning and use of the warning notes included in these operating instructions, defines the intended use of the milling machine, points out the dangers that might arise for you or others if these instructions are not ... -
Page 7: Safety Instructions (Warning Notes)
Safety instructions (warning notes) 1.3.1 Classification of hazards We classify the safety warnings into different categories. The table below gives an overview of the classification of symbols (ideogram) and the warning signs for each specific danger and its (possible) consequences. Symbol Alarm expression Definition / consequence... -
Page 8: Intended Use
We expressly point out that the guarantee or CE conformity will expire, if any constructive, tech- nicalor procedural changes are not performed by the company Optimum Maschinen Germany GmbH. It is also part of the intended use that you the limits of performance of the milling machine are observed, ... -
Page 9: Reasonably Foreseeable Misuse
Reasonably foreseeable misuse Any other use other than that specified under "Intended use" or any use beyond the described use shall be deemed as non-intended use and is not permissible. Any other use has to be discussed with the manufacturer. It is only permissible to process metal, cold and non-inflammable materials with the milling machine. -
Page 10: Possible Dangers Caused By The Milling Machine
Possible dangers caused by the milling machine The milling machine has been tested for operational safety. The construction and type are state of the art. Nevertheless, there is a residual risk, as the milling machine operates with rotating parts, electrical voltage and currents, ... -
Page 11: Authorized Persons
Operator The operator has been instructed by the operating company regarding the assigned tasks and possible risks in case of improper behaviour. Any tasks which need to be performed beyond the operation in standard mode must only be performed by the operator, if so indicated in these instructions and if the operator has been expressively commissioned by the operating com- pany. -
Page 12: User Positions
Obligations of the user have obtained a training regarding the handling of the milling machine, Obligations of the operator keep an operator‘s log, before taking the machine in operation - have read and understood the operating manual, - be familiar with all safety devices and instructions. -
Page 13: 1.9.1 Lockable Main Switch
1.9.1 Lockable main switch In the "0" position, the lockable main switch can be secured against accidental or non-author- ised switching on by means of a padlock. The power supply is cut off when the master switch is in the off position. Except for the areas marked by the pictogram in the margin. -
Page 14: Safety Check
1.10 Safety check Check the milling machine at least once per shift. Inform the person responsible immediately of any damage, defects or changes in the operating function. Check all safety devices at the beginning of each shift (when the machine is operated continuously), ... -
Page 15: Safety During Operation
1.12 Safety during operation WARNING! Before switching the milling machine on, make sure that there is no risk of personal injury or damage to property. Avoid any unsafe work methods: The instructions mentioned in these operating instructions have to be strictly observed dur- ... -
Page 16: Using Lifting Equipment
Check if they are working properly! 1.17 Accident report Inform your supervisors and Optimum Maschinen Germany GmbH immediately in the event of accidents, possible sources of danger and any actions which almost led to an accident (near misses). There are many possible causes for "near misses". -
Page 17: Inspection Deadlines
The inspection prior to initial commissioning is not required if the operator receives confirma- tion from the manufacturer or installer that the electrical systems and operating equipment com- ply with the accident prevention regulations, see conformity declaration. Permanently installed electrical systems and operating equipment are considered constantly monitored if they are continually serviced by qualified electricians and inspected by means of measurements in the scope of operation (e.g. -
Page 18: Technical Specification
Technical specification The following information represents the dimensions and indications of weight and the manu- facturer‘s approved machine data. Electrical connection Total connection 3 x 400V ~ 50Hz (60 Hz) Fusing performed by the operator 16 A Vertical spindle Drive motor 2.2 kW Speed 90 - 2000 rpm... -
Page 19: Horizontal Spindle
Capacity cooling lubricant tank [ L ] Delivery height [ meter ] Environmental conditions Temperature 19 - 21 °C (for an optimum milling result) permissible range + 10° to + 35°C Admissible relative humidity 5...90 % no condensation 30% to 90% at 35°C 90 % at 21°C... -
Page 20: Emissions
2.10 Emissions Measurement in operating conditions in accordance with DIN ISO 8525 with surface areas Measurement methods in accordance with DIN 45635. The generation of noise emitted by the machine is 80 dB(A) on no-load running at 80% of max. spindle speed and activated automatic feed on no-load running at 80% of the possible feed speed, measured at a distance of one meter from the machine and at a height of 1.6m. -
Page 21: Delivery, Interdepartmental Transport, Assembly And Commissioning
Delivery, interdepartmental transport, assembly and commissioning Notes on transport, installation, commissioning Improper transport, installation and commissioning is liable to accidents and can cause damage or malfunctions to the machine for which we do not assume any liability or guarantee. Transport the scope of delivery secured against shifting or tilting with a sufficiently dimen- sioned industrial truck or a crane to the installation site. -
Page 22: Unpacking The Machine
Unpacking the machine INFORMATION The milling machine is delivered pre-assembled. It is delivered in a transport box. After the unpacking and the transportation to the installation site it is necessary to mount and assemble the individual components of the milling machine. Install the machine close to its final position before unpacking. -
Page 23: Load Suspension Point
Load suspension point WARNING! Before lifting the milling machine, check that all clamping screws of the milling table and the spindle head are tightened. The milling machine is lifted with a forklift on the machine base. The clamping screws of the milling table and the spindle head bearing must be tightened. Img.3-1: Load suspension point MT60 Version 1.0.4 - 2020-08-04... -
Page 24: Set-Up And Assembly
Set-up and assembly 3.6.1 Installation plan 220 ~ 550 1028 1280 Center of gravity 3.6.2 Requirements regarding the installation site Keep a work area of at least one metre around the machine free for operation and mainte- nance. In order to achieve sufficient safety against falls by slipping, the accessible area in the mechani- cal machining zone of the machine must be equipped with a slip resistance. -
Page 25: Machine Mounting
The device must only be installed and operated in a dry and well-ventilated place. Avoid places close to machines which cause chips or dust. The installation site must be vibration-free, i.e. located away from presses, planing machines, etc. The foundation must be suitable for the milling machine. - Page 26 DIN 529 M12 x 320 4 - 80x80 1300 Img.3-2: Foundation plan Drilled core holes with a diameter of 80mm and a depth of 250mm to 300mm are provided in the foundation. Raise the machine from the floor and centre in the inner drill holes with the anchor screws. ...
-
Page 27: First Commissioning
This process is not reversible, i.e. the binding agent can- not be re-softened. The company Optimum Maschinen Germany GmbH does not assume any guarantee for sub- sequent damages due to unsuitable cooling lubricants. -
Page 28: 3.10.1 Lubrication And Oil Levels
against rust in the period before commissioning. Remove all wrappings and clean all surfaces with a degreaser to soften and remove protective greases and coatings. Wipe all surfaces with a clean cotton cloth and lubricate the milling machine in accordance with ... -
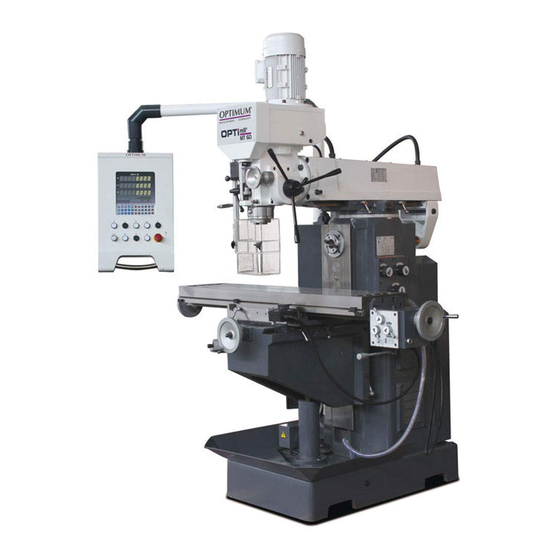
Page 29: Operation
Operation Overview Pos. Designation Item Designation Control panel with DRO Table feed gear X axis Spindle vertical milling Table feed engaging lever Spindle horizontal milling Vertical milling spindle gear Y axis handwheel for cross table Horizontal milling spindle gear Coupling lever feed Y axis Milling table height adjustment hand crank Spindle sleeve lever vertical spindle Quill fine feed... -
Page 30: Control Panel
4.1.1 Control panel Img.4-1: Control panel Pos. Designation Item Designation Digital position indicator Control "On" Vertical spindle "Left-handed rotation" Horizontal spindle "Left-handed rotation" Vertical spindle "Rotation off" Horizontal spindle "Rotation off" Vertical spindle "Right-handed rotation" Horizontal spindle "Right-handed rotation" Coolant "On" Emergency stop button Coolant "Off"... -
Page 31: Switching The Milling Machine Off
Switching the milling machine off Press the push button "Off" for vertical milling or horizontal milling. For a long-term standstill of the milling machine switch it off at the master switch. Inserting tool The milling spindle is equipped with a SK40 capture and draw bar M16. ... -
Page 32: Standard Values For Cutting Speeds
Standard values for cutting speeds [m/min] with high-speed steel and hard metal for upcut milling. Al alloy Tool Steel Grey cast iron case-hard- ened Plain milling cutters and shell end mills 10 - 25 10 - 22 150 - 350 [m/min] Relieved milling cutters [m/min] 15 - 24... -
Page 33: Spindle Sleeve Feed
Spindle sleeve feed 4.7.1 Manual spindle sleeve feed Actuate the quill lever in order to manually lift respectively lower the quill. You can set the spindle sleeve to a given height using the tightening lever. ATTENTION! For all movements of the spindle sleeve you must first loosen the tightening lever! 4.7.2 Automatic spindle sleeve feed 0.08 │... -
Page 34: Moving The Cross Table Up / Down
Moving the cross table up / down Manual movement on the Z axis The height adjustment of the milling table is carried out with the hand crank. Loosen the clamping lever. Engage the hand crank by pressing into the coupling. ... -
Page 35: 4.10.3 Switching On The Rapid Taverse
4.10.3 Switching on the rapid taverse ATTENTION! The rapid traverse is used exclusively to reach a position quick. The rapid traverse must not be used as milling feed. Set the selection lever for the table feed into the position. "Rapid traverse"... -
Page 36: 4.10.4 Switching The Feed
4.10.4 Switching the feed Set the feed rate. ~ 50Hz mm/min mm/min inch/min inch/min Set the selection lever for the table feed into the position "Rapid traverse" position Neutral position "Milling feed" position Selection lever Img.4-9: Selector lever ... -
Page 37: Swivelling The Milling Head
4.12 Swivelling the milling head ATTENTION! If the milling head is slewn too far oil might escape from the gear. Therefore, we recom- mend to slew the milling head only as far as no oil escapes while the vertical spindle is running. -
Page 38: Cooling
Mount the thrust bearing. INFORMATION If the spindle head carrier is not exactly plugged in to "Zero" it is almost not possible to fix the thrust bearing. Therefore if required release the clamping screws by slightly turning the spindle head carrier before plug-in the thrust bearing. Retighten the clamping screws after plugging them in. -
Page 39: Operation
Operation When the device is switched on, the digital position indicator starts a self-check. After the self-check is completed, the position indicator changes to the normal indicator status. The digital position indicator displays the last data before it is switched off. The selected coordinates and the selected tool. -
Page 40: 5.1.1 Explanation Of The Parameters
5.1.1 Explanation of the Parameters Meanings of parameters and settings. Parameters Axis Description P -- 07 X axis Accuracy of representations on the display: When a higher representational accuracy value than the actual counting P --– 08 /Y axis resolution is set on the display, the representational accuracy value will P --–... -
Page 41: Description Of The Keys
Factory Settings: In applied delivery state with machine tool. Where delivered as a standalone device. Please record the values before making any changes. P -- 13 = 50 P -- 07 = P -- 14 = 50 P -- 08 = P -- 15 = 50 P -- 09 = P -- 10 =... - Page 42 For input of negative or positive signs Plus and minus signs with numerical keys and decimal For numeric entry point For input of decimal places; decimal point To clear displayed value of a specific axis or Delete key to jump back to coordinate points. Enter key To confirm the data input Radius or...
- Page 43 Addition Subtraction Calculator function on page 45 Multiplication Division Coordinate points along a Coordinate points along a diagonal line diagonal line on page 46 Coordinate Points on a Circle or Arc on Coordinate points on a circle page 47 ...
-
Page 44: Reference Marker Function
Reference marker function Set a zero point with preset axis values Set a relative coordinate system based on current machine position Press the button to activate the reference marker function. The LED flashes. Press the button to exit from the Reference Marker function. ... -
Page 45: Calculator Function
Calculator function Add, subtract, multiply and divide. Press button to start the calculator. The LED lights up. The number field of the rotation speed indicator is used as the input- and result field. To exit from the Calculator function, press the button. -
Page 46: Coordinate Points Along A Diagonal Line
Coordinate points along a diagonal line Creates a line within a coordinate system, along which a specified number of uniformly spaced coordinate points are defined. The parameters are displayed in the Rotation Speed field. The last value entered for each parameter is displayed in the X axis row. ... -
Page 47: Positioning The Coordinate Points
5.6.2 Positioning the Coordinate Points Parameters Description 1LHo Coordinate point no.: X-Y 2LHo Coordinate point no.: Y-Z 3LHo Coordinate point no.: X-Z To select the desired coordinate point, press the button. To select the previous coordinate point, press the button. The machine axes proceed until the positions of the selected coordinate point read 0.000. -
Page 48: Entering The Parameters
5.7.1 Entering the parameters Parameter Description 1 - 1 CCE Coordinate plane of the circle: X-Y 2 - 1 CCE Coordinate plane of the circle: Y-Z 3 - 1 CCE Coordinate plane of the circle: X-Z To select X-Y, Y-Z or X-Z as the coordinate plane, press the key. -
Page 49: Positioning To Coordinate Points
Parameter Description 1 - 5 E_A End angle: X-Y 2 - 5 E_A End angle: Y-Z 3 - 5 E_A End angle: X-Z To enter the end angle on the coordinate plane, use the numeric keys and confirm with the key. -
Page 50: Inclined Plane
Inclined Plane Creates an inclined plane in a coordinate system such that processes can be carried out on said inclined plane. The parameters are displayed in the Rotation Speed field. The last entered value of each parameter is shown in the row of the X axis. ... -
Page 51: Arc
Creates an arc in a coordinate system such that processes can be carried out on said arc. The parameters are displayed in the Rotation Speed field. The last entered value of each parameter is shown in the row of the X axis. ... - Page 52 Parameter Description 1 - 3 0U_S Machining mode of the arc on the coordinate plane: X-Y 2 - 3 0U_S Machining of the arc on the coordinate plane: Y-Z 3 - 3 0U_S Machining of the arc on the coordinate plane: X-Z To set machining mode of the arc, use the numeric keys 0 or 1.
-
Page 53: Positioning To A Coordinate Point On The Arc
Parameter Description 1 - 6 E_Po End position: X-Y 2 - 6 E_Po End position: Y-Z 3 - 6 E_Po End position: X-Z To enter the end position, use the numeric keys and confirm with the key. Parameters Description 1 - 7 CUF Machining depth: X-Y 2 - 7 CUF Machining depth: Y-Z... -
Page 54: Tool Data Function
5.10 Tool Data Function Creates up to 99 tool data sets in relation in the coordinate system. Usage of the tool data function makes it possible to establish a specific relationship between the tool data in the coordinate system and the displayed values. INFORMATION ... -
Page 55: Maintenance
Maintenance In this chapter you will find important information about Inspection Maintenance Repair of the milling machine. ATTENTION! Properly performed regular maintenance is an essential prerequisite for operational safety, failure-free operation, a long working life of the milling machine and ... -
Page 56: Overview Of Lubrication Points
Overview of lubrication points Pos. Designation Item Designation Vertical spindle gear Guide track Fine feed Y axis Spindle sleeve Guide track Horizontal spindle gear Guide track Guide track Feed gear Coolant "Off" Surface of cross table Maintenance MT60 Translation of original instruction Version 1.0.4 - 2020-08-04... -
Page 57: Inspection And Maintenance
Inspection and maintenance The type and level of wear depends to a large extent on the individual usage and operating conditions. Any indicated intervals therefore are only valid for the corresponding approved con- ditions. Technical specification on page 18 Interval Where? What? - Page 58 Interval Where? What? How? The oil level must at least attain the centre resp. top marking of the oil sight glass. The oil level must at least attain the centre resp. top Oil level control marking of the oil sight glass. Start of work, after every maintenance or...
- Page 59 Interval Where? What? How? For oil change use an appropriate collecting tray of suffi- cient capacity. Travel the table in the rapid mode back and forth, the oil heats up and easily penetrates from the drain opening. Unscrew the screw from the drain hole.
- Page 60 Interval Where? What? How? Readjust the guides by means of the corresponding V- ledge. If necessary disassemble the wipers in order to attain the readjusting screws of the corresponding V-ledges. Use a screwdriver to turn the adjusting screw clockwise until the movement in the respective guideway is still easily possible.
-
Page 61: Repair
If the repairs are carried out by qualified technical personnel, they must follow the indications given in these operating instructions. Optimum Maschinen Germany GmbH accepts no liability nor does it guarantee against damage and operating malfunctions resulting from failure to observe these operating instructions. -
Page 62: Cooling Lubricants And Tanks
Cooling lubricants and tanks CAUTION! The cooling lubricant can cause diseases. Avoid direct contact with cooling lubricant or parts covered in cooling lubricant. Cooling lubricant circuits and tanks for water-cooling lubricant mixtures must be completely emptied, cleaned and disinfected as needed, but at least once per year or every time the coo- ling lubricant is replaced. -
Page 63: Inspection Plan For Water-Mixed Cooling Lubricants
6.5.1 Inspection plan for water-mixed cooling lubricants Company: No.: Date: used cooling lubricant size to be checked Inspection methods Inspection Procedure and comment intervals noticeable Appearance, odour daily Find and rectify causes, changes e.g. skim off oil, check filter, ventilate cooling lubricant system pH value Laboratory techniques... -
Page 64: Ersatzteile - Spare Parts
Ersatzteile - Spare parts Ersatzteilbestellung - Ordering spare parts Bitte geben Sie folgendes an - Please indicate the following : Seriennummer - Serial No. Maschinenbezeichnung - Machines name Herstellungsdatum - Date of manufacture Artikelnummer - Article no. ... -
Page 65: Maschinenfuß Und Säule - Base & Column
Maschinenfuß und Säule - Base & Column MT60 DE | EN Version 1.0.4 - 2020-8-4 Originalbetriebsanleitung... - Page 66 DE | EN MT60 Originalbetriebsanleitung Version 1.0.4 - 2020-8-4...
- Page 67 MT60 DE | EN Version 1.0.4 - 2020-8-4 Originalbetriebsanleitung...
- Page 68 DE | EN MT60 Originalbetriebsanleitung Version 1.0.4 - 2020-8-4...
- Page 69 MT60 - Ersatzteilliste Maschinenfuß und Säule - Base & Column part list Menge Grösse Artikelnummer Bezeichnung Designation Qty. Size Item no. Grundplatte Base 03336090101 Säule Column 03336090105 Kreuzschlitzschraube Phlp Hd Scr M6x16 Abdeckung Cover 03336090107 Abdeckung Cover 03336090108 Rückseitiger Zugang Rear Access Panel 03336090109 Knopf...
- Page 70 Welle Shaft 03336090145 Kreuzschlitzschraube Plph Hd Scr M6-1x10 Abdeckung Cover 03336090147 Abdeckung Cover 03336090148 Fräskopfausleger 03336090149 Leiste Ausleger Ram Gib 03336090150 Einstellschraube Leiste Gib Adjusting Screw 03336090151 Sicherungsbuchse Lock Bushing 03336090152 Griff Handle 03336090153 Buchse Bushing 03336090154 Zahnradwelle Gear Shaft 03336090155 Gradskala Graduated Scale...
- Page 71 Abdeckung Cover 03336090191 Innensechskantschraube Cap Screw M5x12 Horizontale Anzugsstange Horizontal Spindle Drawbar 03336090193 Stiftschraube Set Screw M6x10 Verschlusskappe Plug 03336090195 Kugellager Ball Bearing 6205 0406205 Welle Shaft 03336090197 Passfeder 10x10x36 03336090198 Sicherungsring Ext Retaining Ring 35mm 042SRW Zahnrad Gear 033360901100 Spezieller Halter Special Retainer 033360901101...
-
Page 72: Frästisch - Milling Table
Frästisch - Milling table Img.7-1: Frästisch - Mill table DE | EN MT60 Originalbetriebsanleitung Version 1.0.4 - 2020-8-4... - Page 73 MT60 - Ersatzteilliste Frästisch - Milling table Menge Grösse Artikelnummer Bezeichnung Designation Qty. Size Item no. Griffwelle Handle Spindle 03336090201 Kegelknopf Taper Knob 03336090202 Sechskantmutter Hex Nut M12-1.75 Sicherungsscheibe Lock Washer 12mm Handrad Hand Wheel 03336090205 Buchse Bush 03336090206 Feder Spring 03336090207 Anschluss...
- Page 74 Schraube Screw M6x25 Buchse Bush 03336090245 Skalenring Scale ring 03336090246 Spannmutter Clamping nut 03336090247 Ring Ring 03336090248 Schraube Screw M6x16 Buchse Bushing 03336090250 DE | EN MT60 Originalbetriebsanleitung Version 1.0.4 - 2020-8-4...
-
Page 75: Frästischverstellung - Milling Table Adjusting
Frästischverstellung - Milling table adjusting Img.7-2: Frästischverstellung - Milling table adjusting MT60 DE | EN Version 1.0.4 - 2020-8-4 Originalbetriebsanleitung... - Page 76 MT60 - Ersatzteilliste Frästischverstellung - Milling table ajusting part list Menge Grösse Artikelnummer Bezeichnung Designation Qty. Size Item no. Tischträger Knee 03336090301 Wegschiene klein Way slide small 03336090302 Wegschiene mittel Way slide medium 03336090303 Säule Tischträger Knee column 03336090304 Sicherungsscheibe Lock Washer 10mm 042SR10W...
- Page 77 Verschlusshülse Lock Sleeve 03336090341 Kegelstift Taper Pin 5x40 03336090342 Klemmgriff Lock Handle 03336090343 Kugelknopf Ball Knob 03336090344 Stiftschraube Set Screw M8x12 MT60 DE | EN Version 1.0.4 - 2020-8-4 Originalbetriebsanleitung...
-
Page 78: Fräskopf - Milling Head
Fräskopf - Milling head Img.7-3: Fräskopf - Milling head DE | EN MT60 Originalbetriebsanleitung Version 1.0.4 - 2020-8-4... -
Page 79: Fräskopf - Milling Head
Fräskopf - Milling head Img.7-4: Fräskopf - Milling head MT60 DE | EN Version 1.0.4 - 2020-8-4 Originalbetriebsanleitung... -
Page 80: Fräskopf - Milling Head
Fräskopf - Milling head DE | EN MT60 Originalbetriebsanleitung Version 1.0.4 - 2020-8-4... - Page 81 Img.7-5: Fräskopf - Milling head MT60 DE | EN Version 1.0.4 - 2020-8-4 Originalbetriebsanleitung...
-
Page 82: Fräskopf - Milling Head
7.10 Fräskopf - Milling head Img.7-6: Fräskopf - Milling head DE | EN MT60 Originalbetriebsanleitung Version 1.0.4 - 2020-8-4... -
Page 83: Fräskopf - Milling Head
7.11 Fräskopf - Milling head Img.7-7: Fräskopf - Milling head MT60 DE | EN Version 1.0.4 - 2020-8-4 Originalbetriebsanleitung... - Page 84 Ersatzteilliste Fräskopf - Milling head part list Menge Grösse Artikelnummer Pos. Bezeichnung Designation Qty. Size Item no. Spindelstock Headstock 033360904501 Rechteckiger Block Rectangular Block 033360904502 Innensechskantschraube Cap Screw M6-1x16 Gradskala Graduated Scale 033360904504 Niet Rivet 033360904505 Sicherungsbuchse Lock Bushing 033360904506 506-1 Sicherungsbuchse Lock Bushing...
- Page 85 Gewindestift Threaded Pin M6-1x16 Gewindestift Threaded Pin M5-0.8x14 Anschlussstange Connecting Rod 033360904544 Stift 5x20 033360904545 Innensechskantschraube Cap Screw M5-0.8x40 Niedrige Sechskantmutter Thin Hex Nut M6-1 Stiftschraube Set Screw M6-1x14 Abdeckung Cover 033360904549 Anzeigeplatte Indicator Plate 033360904550 Stiftschraube Set Screw M8-1.25x5 Druckfeder Compression Spring 033360904552...
- Page 86 Manschette Collar 033360904586 Kugellager Ball Bearing 6055ZZ O-Ring O-Ring 56x2.65 033360904588 Manschette Collar 033360904589 Stiftschraube Set Screw M6-1x6 Zahnradwelle Gear Shaft 033360904591 Passfeder 8x8x20 042P8820 Abdeckung Cover 033360904593 Kugellager Ball Bearing 6304ZZ 0406304ZZ Zahnrad Gear 033360904595 Passfeder 6x6x16 042P6616 Sicherungsring Retainer 033360904597 Zahnrad...
- Page 87 Vertikale Anzugsstange Vertical Drawbar 033360904632 Keilbuchse Spline Bushing 033360904633 Passfeder 4x4x8 042P4410 Flansch Flange 033360904635 Kugellager Ball Bearing 6208ZZ 0406208ZZ Zahnrad Gear 033360904637 Passfeder 12x12x28 033360904638 Zahnrad Gear 033360904639 Stiftschraube Set Screw M8-1.25x8 Manschette Collar 033360904641 Kugellager Ball Bearing 6009 0406009R Öldichtung Oil Seal...
- Page 88 Innensechskantschraube Cap Screw M3-0.5x10 Passfeder 033360904679 Kupplung Clutch 033360904680 Zahnrad Gear 033360904681 Manschette Collar 033360904682 Manschette Collar 033360904683 Stiftschraube Set Screw M8-1.25x10 Kugellager Ball Bearing 61805 04061805R Stift 033360904686 flache Spiralfeder Flat Coil Spring 033360904687 Sicherungsring Ext Retaining Ring 30mm 042SR30W Kugellager Ball Bearing...
- Page 89 Griff Handle 033360904724 Nabe Handgriff Handle Hub 033360904725 Stiftschraube Set Screw M8-1.25x10 Buchse Bushing 033360904727 O-Ring O-Ring 11.8x1.8 033360904728 Kegelstift Taper Pin 4x45 033360904729 Welle Shaft 033360904730 Kegelstift Taper Pin 4x30 033360904731 Wippe Rocker Ram 033360904732 Schaltgabel Shifting Fork 033360904733 Buchse Bushing 033360904734...
-
Page 90: Vorschubgetriebe X-Achse - Feed Gear X-Axis 1 - 3
7.12 Vorschubgetriebe X-Achse - Feed gear X-Axis 1 - 3 Abb.7-8: Vorschubgetriebe X-Achse - Feed gear X-Axis 1 - 3 DE | EN MT60 Originalbetriebsanleitung Version 1.0.4 - 2020-8-4... -
Page 91: Vorschubgetriebe X-Achse - Feed Gear X-Axis 2 - 3
7.13 Vorschubgetriebe X-Achse - Feed gear X-Axis 2 - 3 Abb.7-9: Vorschubgetriebe X-Achse - Feed gear X-Axis 2 - 3 MT60 DE | EN Version 1.0.4 - 2020-8-4 Originalbetriebsanleitung... -
Page 92: Vorschubgetriebe X-Achse - Feed Gear X-Axis 3 - 3
7.14 Vorschubgetriebe X-Achse - Feed gear X-Axis 3 - 3 Abb.7-10: Vorschubgetriebe X-Achse - Feed gear X-Axis 3 - 3 DE | EN MT60 Originalbetriebsanleitung Version 1.0.4 - 2020-8-4... - Page 93 MT60 - Ersatzteilliste Vorschubgetriebe X-Achse - Spare parts list feed gear X-Axis Menge Grösse Artikelnummer Bezeichnung Designation Qty. Size Item no. Anzeige Indicator drop 03336090801 Gewindestift Grub screw 03336090802 Feder Spring 03336090803 Stahlkugel Steel ball 03336090804 Nabe Handle seat 03336090805 Kegelstift Taper pin 5x35...
- Page 94 Lagerbock Bearing housing 03336090843 Welle Spline shaft 03336090844 Kugellager Ball bearing 6000-2Z 0406000R Sicherungsring Retaining ring 042SR15W Zahnrad Gear 03336090847 Zahnrad Gear 03336090848 Kugellager Ball bearing 61906-2Z 04061906R Zahnrad Gear 03336090850 Kugellager Ball bearing 6003-2Z 0406003ZZ Lagerbock Bearing housing 03336090852 Skalenring Dial 03336090853...
-
Page 95: Fräsfutterschutz - Milling Chuck Cover
7.15 Fräsfutterschutz - Milling chuck cover Fräsfutterschutz - Milling chuck cover MT60 - Teileliste Fräsfutterschutz - Parts list milling chuck cover Menge Grösse Artikelnummer Bezeichnung Description Qty. Size Item no. Rändelschraube Knurled screw 033360907 Halterung Fixture 0302024149CPL Mikroschalter Microswitch Platte Plate Alu- Profil Aluminium profile... - Page 96 Lagerübersicht - Bearing overview MT60 - Ersatzteilliste Lager - Bearing part list Menge Grösse Artikelnummer Bezeichnung Designation Qty. Size Item no. Lager Bearing 6009-/P5 0406009R Lager Bearing 6009/P5 0406009R Lager Bearing 32010/P5 04032010 Lager Bearing 6204/P5 0406204 Lager Bearing 32011/P5 04032011 Lager Bearing...
-
Page 97: Schaltplan - Wiring Diagram 1 - 2
7.16 Schaltplan - Wiring diagram 1 - 2 MT60 DE | EN Version 1.0.4 - 2020-8-4 Originalbetriebsanleitung... - Page 98 7.17 Schaltplan - Wiring diagram 2 - 2 DE | EN MT60 Originalbetriebsanleitung Version 1.0.4 - 2020-8-4...
- Page 99 oil-compare-list.fm Viskosität Schmierstoffe Viskosity Kennzeich- Lubricant nung nach Viscosité ISO VG DIN 51502 Lubrifiant DIN 51519 mm²/s (cSt) Aral Degol BG BP Energol SPARTAN Klüberoil Mobilgear Shell Omala VG 680 CLP 680 Meropa 680 GR-XP 680 EP 680 GEM 1-680 Aral Degol BG BP Energol SPARTAN...
- Page 100 Techno Service GmbH ; Detmolder Strasse 515 ; D-33605 Bielefeld ; (++49) 0521- 924440 ; www.metaflux-ts.de haute vitesse Schneidöl Aquacut C1, 10 L Gebinde, Artikel Nr. 3530030 Kühlschmiermittel EG Sicherheitsdatenblatt Cooling lubricants Chevron Aral Emusol BP Sevora Esso Kutwell Mobilcut Shell Adrana http://www.optimum-daten.de/ Soluble Oil B Lubrifiants de refroidisse- data-sheets/Optimum-Aqua- ment cut_C1-EC-datas- heet_3530030_DE.pdf oil-compare-list.fm...
-
Page 101: Malfunctions
Malfunctions Malfunction Cause/ Solution possible effects Noise during work. Spindle runs dry. Grease spindle Tool blunt or incorrectly clamped. Use new tool and check clamping. Tool "burnt". Incorrect speed. Choose a different speed, excessive feed. Chips are not coming out of the Retract tool more often during work. - Page 102 Malfunction Cause/ Solution possible effects Rattle the spindle if the Excessive slack in bearing. Readjust the bearing slack or replace workpiece surface is the bearing. Spindle moves up and down. rough. Readjust bearing slack (fixed Adjustment strip loose. bearing). Adjust strip to the correct slack using Chuck loose.
-
Page 103: Appendix 9.1 Copyright
Beside the legal liability claims for defects of the customer towards the seller, the manufacturer of the product, OPTIMUM GmbH, Robert-Pfleger-Straße 26, D-96103 Hallstadt, does not grant any further warranties unless they are listed below or were promised in the framework of a sin- gle contractual provision. -
Page 104: Storage
V-belts, ball bearings, lighting, filters, seals, etc. - Non reproducible software errors Any services, which OPTIMUM GmbH or one of its agents performs in order to fulfil any additional warranty are neither an acceptance of the defects nor an acceptance of its obli- gation to compensate. -
Page 105: Advice For Disposal / Options Of Re-Use
Advice for disposal / Options of re-use Please dispose of your machine in an environmentally friendly way, not by disposing of the waste not in the environment, but by acting in a professional way. Please neither throw away the packaging nor the used machine later on, but dispose of them according to the guidelines established by your city council/municipality or by the corresponding waste management enterprise. -
Page 106: Disposal Of Lubricants And Coolants
As the machine operator, you should obtain information regarding the authorised collection or disposal system which applies for your company. Please make sure that the electrical components are disposed of professionally and according to the legal regulations. Please only throw depleted batteries in the collection boxes in shops or at municipal waste management companies. -
Page 107: Terminology/Glossary
Terminology/Glossary Term Explanation Cross table Supporting surface, clamping surface for the workpiece with traverse in X and Y directions Taper mandrel Tool housing taper, drill taper, drill chuck taper. Workpiece piece to be milled, drilled or machined. Draw bar Threaded rod to fix the taper mandrel in the quill. Drill chuck Drill bit adapter Collet... - Page 108 EC Declaration of Conformity according to Machinery directive 2006/42/EC, Annex II 1.A Optimum Maschinen Germany GmbH The manufacturer / distributor Dr.-Robert-Pfleger-Str. 26 D - 96103 Hallstadt, Germany hereby declares that the following product Hand-controlled milling machine Product designation: MT 60...
- Page 109 Index Accessories ............22 Obligations Accident report ............16 of the operating company ........ 11 Anchored mounting ..........25 of the operator ..........12 Arc ..............47 Operation ............29 operator's log ............55 Calculator ..............45 Circle ..............47 Panels .............29 Clamping the tool ..........31 Parameter Settings ..........39 Commissioning .............27 Personal protective equipment ......
- Page 110 Quellenverzeichnis von Ihrem Fachhändler Metallbau Mehner Optimum Fräsmaschinen und CNC Fräsmaschinen: Optimum MT 60 Übersicht OPTImill MT 60 • ◦ OPTImill MT 60 Ersatzteile ◦ OPTImill MT 60 Zubehör OPTImill Zubehör • Ihr Ersatzteil nicht in den Listen? Direkt zum >>Formular Download<<. Tragen sie Ihr Maschinenmodell, samt Bauteil und Artikelnr.
Need help?
Do you have a question about the OPTImill MT 60 and is the answer not in the manual?
Questions and answers