Table of Contents
Advertisement
Quick Links
Advertisement
Table of Contents

Related Manuals for Optimum Optimill MT 50


Summary of Contents for Optimum Optimill MT 50
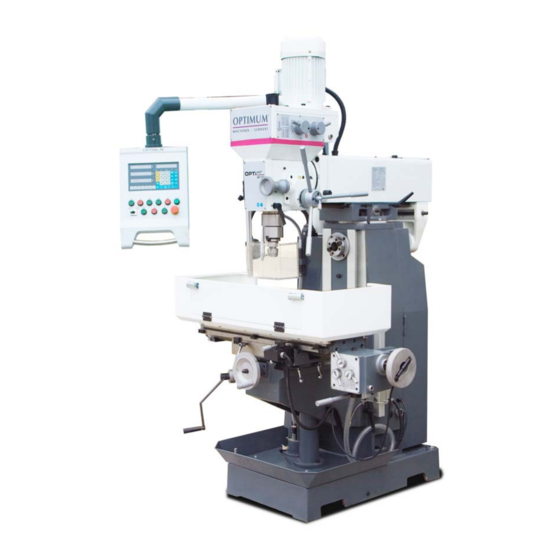
- Page 1 Operating manual Version 1.2.8 Milling-machine 3336005...
-
Page 2: Table Of Contents
Table of contents Safety Rating plate..............................6 Safety instructions (warning notes)........................ 7 1.2.1 Classification of hazards ........................8 1.2.2 Other pictograms..........................8 Intended use ..............................8 Reasonably foreseeable misuses........................9 1.4.1 Avoiding misuses ..........................9 Possible dangers caused by the milling-machine..................10 Qualification of personnel .......................... - Page 3 4.3.8 Refill coolant lubricant........................27 Electrical connection ............................27 First commissioning............................27 4.5.1 Warming up the machine ........................28 Operation Safety ................................29 Control and indicating elements ........................29 5.2.1 Control panel ..........................30 5.2.2 Switching elements .........................30 Switching on the milling-machine .........................31 Switching off the milling-machine .........................31 Inserting a tool..............................31 Speed variation vertical-/ horizontal milling ....................32 5.6.1...
- Page 4 7.13 Schaltplan - wiring diagram 2-2 ........................77 Malfunctions Appendix Copyright ..............................84 Terminology/Glossary..........................84 Liability claims for defects / warranty ......................84 Change information operating manual......................85 Storage ................................ 86 Product follow-up ............................86 Note regarding disposal / options to reuse: ....................87 9.7.1 Decommissioning...........................
- Page 5 Dear customer, Thank you very much for purchasing a product made by OPTIMUM. OPTIMUM metal working machines offer a maximum of quality, technically optimum solutions and convince by an outstanding price performance ratio. Continuous enhancements and product innovations guarantee state-of-the-art products and safety at any time.
-
Page 6: Safety
Safety Glossary of symbols gives further advice calls on you to act enumerations This part of the operating instructions explains the meaning and use of the warning notices included in these operating instruc- tions, defines the intended use of the milling-machine. ... -
Page 7: Safety Instructions (Warning Notes)
INFORMATION If you are unable to solve a problem using these operating instructions, please contact us for advice: Optimum Maschinen Germany GmbH Dr. Robert-Pfleger-Str. 26 D- 96103 Hallstadt Email: info@optimum-maschinen.de Safety instructions (warning notes) Warning danger of slipping! Warning risk of stumbling! -
Page 8: Classification Of Hazards
1.2.1 Classification of hazards We classify the safety warnings into various levels. The table below gives an overview of the classification of symbols (ideogram) and the warning signs for each specific danger and its (possible) consequences. Ideogram Warning alert Definition / consequence DANGER! Threatening danger that will cause serious injury or death to people. -
Page 9: Reasonably Foreseeable Misuses
We expressly point out that the guarantee or CE conformity will expire due to any constructive technical or procedural changes which had not been performed by the company Optimum Maschinen Germany GmbH. -
Page 10: Possible Dangers Caused By The Milling-Machine
Clamp and mills by means of the collet chuck and the corresponding collets. Clamp end face mills by means of shell end mill arbors. When drilling make sure that the suitable speed is set depending on the diameter of the drill, ... -
Page 11: Qualification Of Personnel
Qualification of personnel 1.6.1 Target group This manual is addressed to • the operating companies, • the operators, • the personnel for maintenance works. Therefore, the warning notes refer to both, operation and maintenance personnel of the milling- machine. Determine clearly and explicitly who will be responsible for the different activities on the machine (operation, maintenance and repair). -
Page 12: Obligations Of The Operating Company
1.6.3 Obligations of the operating company The operator must instruct the staff at least once per year regarding all safety standards that apply to the milling-machine, the operation, accredited technical guidelines. The operator must also check the knowledge of the staff, ... -
Page 13: Safety Devices
Safety devices Use the milling-machine only with properly functioning safety devices. Stop the milling-machine immediately if there is a failure on the safety device or if it is not func- tioning for any reason. It is your responsibility! If a safety device has been activated or has failed, the milling-machine must only be used if you ... -
Page 14: Lockable Main Switch
1.9.1 Lockable main switch WARNING! Dangerous voltage even if the main switch is switched-off. In the areas marked by the ideogram in the margin, there might be voltage, even if the main switch is switched off. In the position "0FF" the lockable main switch can be secured against accidental or non-authorized switching-on by means of a padlock. -
Page 15: Safety Check
1.10 Safety check Check the milling-machine at least once per shift. Inform the person responsible immediately of any damage, defect or change in operating function. Check all safety devices at the beginning of each shift (with the machine stopped), ... -
Page 16: Personnel Protective Equipment
1.11 Personnel protective equipment For some works you need personnel protective equipment as protective equipment. Wear a safety helmet with facial protection when performing works where your face and eyes are exposed to hazards. Use protective gloves when handling pieces with sharp edges. Use safety shoes when you assemble, disassemble or transport heavy components. -
Page 17: Switching-Off And Securing The Milling-Machine
Check if they are working properly! 1.14 Accident report Inform your superiors and Optimum Maschinen Germany GmbH immediately in the event of accidents, possible sources of danger and any actions which almost led to an accident (near misses). There are many possible causes for "near misses". -
Page 18: Electrical System
1.15 Electrical system Have the machine and/or the electric equipment checked regularly. Immediately eliminate all defects such as loose connections, defective wires, etc. A second person must be present during work on live components to disconnect the power in the event of an emergency. Disconnect the Drehmaschine immediately if there is a malfunction in the power supply! Comply with the required inspection intervals in accordance with the factory safety directive, operating equipment inspection DGUV, formerly BVG. -
Page 19: Technical Data
Technical data The following information are the dimensions and indications of weight and the manufacturer‘s approved machine data. Electrical connection Total connected load 4.5 KW / 400V / 50Hz Motor power horizontal spindle 1.5 kW Motor power vertical spindle 1.1 / 2.2 kW Dimensions Spindle seat (horizontal milling, vertical milling) Taper SK 40... -
Page 20: Speeds / Feeds
Speeds / feeds Spindle speed (vertical milling) ~ 50Hz 115 rpm - 1750 rpm connection Spindle speed (vertical milling) ~ 60Hz 140 rpm - 2100 rpm connection Gear stages (vertical milling) Spindle speed (horizontal milling) ~ 50Hz 60 rpm - 1350 rpm connection Spindle speed (horizontal milling) ~ 60Hz 70 rpm - 1600 rpm... -
Page 21: Emissions
Emissions Maximum sound pressure level at 1 m distance from the machine and 1.60 m above the ground according to DIN ISO 8525 is 74 to 79 dB(A). If the milling machine is installed in an area where various machines are in operation, the noise exposure (immission) on the operator of the milling machine at the working place may exceed 80dB(A). -
Page 22: Installation Plan
2.10 Installation plan MT50 Translation of original operating manual Version 1.2.8 - 2020-08-03... -
Page 23: Delivery, Interdepartmental Transport, Assembly And Commissioning
Delivery, interdepartmental transport, assembly and commissioning Notes on transport, installation, commissioning Improper transport, installation and commissioning is liable to accidents and can cause damage or malfunctions to the machine for which we do not assume any liability or guarantee. Transport the scope of delivery secured against shifting or tilting with a sufficiently dimen- sioned industrial truck or a crane to the installation site. -
Page 24: Assembly
Assembly Unpacking the machine Install the machine close to its final position before unpacking. If the packaging shows signs of having possibly been damaged during transport, take the appropriate precautions to prevent the machine being damaged when unpacking. If damage is discovered, the carrier and/or ship- per must be notified immediately so the necessary steps can be taken to register a complaint. -
Page 25: Load Attachment Points
4.3.2 Load attachment points The milling-machine can be lift by means of a sling or on the recess in the mounting foot with the help of a forklift truck. WARNING! Check if all clamping screws of the spindle head carrier are tightened before lifting the machine. -
Page 26: Installation
4.3.3 Installation The milling-machine is fixed to the floor by four anchor screws which are past through the machine foot. Optionally, 4 vibration damping elements can be used. hinten vorne 4.3.4 Cleaning and lubricating Remove the anti-corrosive agents on the milling machine which had been applied for trans- portation and storage. -
Page 27: Functional Test
4.3.6 Functional test Check if all fixing screws of the milling-machine are tightened. Check if the clamping screw for slewing as well as the fixing screw of the milling head is well tightened. Check if all spindles are running smoothly. 4.3.7 Check the filling level of the gear oil The milling-machine is delivered with gear oil. -
Page 28: Warming Up The Machine
Only use the tool holders (e.g. drill chuck) which were delivered with the machine or which are offered as optional equipment by OPTIMUM. Only use tool holders in the intended admissible speed range. Tool holders may only be modified in compliance with the recommendation of OPTIMUM or the clamping device manufacturer. 4.5.1... -
Page 29: Operation
Operation Safety Commission the milling-machine only under the following conditions: The milling-machine is in proper working order. The milling-machine is used as intended. The operating manual is followed. All safety devices are installed and activated. All failures should be eliminated immediately. Stop the milling-machine immediately in the event of any abnormality in operation and make sure it cannot be started up accidentally or without authorisation. -
Page 30: Control Panel
5.2.1 Control panel Position display DPA2000 Vertical milling Push button spindle "forward" Push button spindle "OFF" Push button coolant pump "ON" Push button spindle "reverse" Push button coolant pump "OFF" Step switch "HIGH/ LOW" (For a description please see below) Push button "Control ON"... -
Page 31: Switching On The Milling-Machine
Push button coolant pump "ON" Switches the coolant pump on. Push button coolant pump "OFF" Switches the coolant pump off. Push button control "ON" and "Operating control lamp" Switches the control on. Main switch Interrupts or connects the power supply to the machine control. Switching on the milling-machine ATTENTION! Wait until the milling machine has come to a complete halt before changing the rotation... -
Page 32: Speed Variation Vertical-/ Horizontal Milling
Speed variation vertical-/ horizontal milling 5.6.1 Horizontal milling WARNING! Only remove the protective cover when the mains plug of the milling machine is disconnected from the electrical supply. Close and screw down the protective cover after each change of speed. ... -
Page 33: Speed Table Horizontal Milling
5.6.2 Speed table horizontal milling Use an open-end wrench in order to be able to open the cover. Img.5-4: Speed table horizontal milling ~ 50Hz connection 5.6.3 Vertical milling ATTENTION! Wait until the milling machine has come to a complete halt before changing the speed using the gear switch. -
Page 34: Speed Table Vertical Milling
5.6.4 Speed table vertical milling Img.5-6: Speed table vertical milling ~ 50Hz connection Standard values for cutting speeds [ m/min ] with high-speed steel and hard metal in upcut milling Al alloy Tool Steel Grey cast iron age-hardened Plain mill and side milling cutters [ m/ 10 - 25 10 - 22 150 - 350... -
Page 35: Manual Spindle Sleeve Feed
Cured Al alloy Steel Grey cast iron Tool diameter 150 - 250 15 - 24 m/min 10 - 20 m/min [ mm ] m/min form cutters Speed [ 1194 - 1911 796 - 1592 11937 - 19894 955 - 1529 637 - 1274 9549 - 15916 796 - 1274... -
Page 36: Fine Adjustment
INFORMATION For all movements you must first loosen the tightening lever! Spindle sleeve lever Spindle sleeve tightening lever Img.5-7: Spindle sleeve lever 5.8.2 Fine adjustment Turn the lever clockwise. The spindle sleeve lever moves in direction of the drilling-milling head and activates the coupling of the fine feed. -
Page 37: Set Milling Head To The Zero Position
The milling head may be swivelled to the right and to the left. Release the two nuts in order to clamp the rotary disc. Turn the square box spanner in order to slew the milling head. Use the scale at the turnta- ble to set the angle. -
Page 38: Moving The Spindle Head-Holder Forward Or Back
Make sure to tighten the tightening lever again once you have completed the operation. Crank handle 5.11 Moving the spindle head-holder forward or back You can move the spindle head-holder forward or back. Proceed as follows: Loosen the tightening lever. ... -
Page 39: Switch On / Off The Automatic Table Feed (X Axis)
Loosen the tightening lever. Clamping lever Clamping lever (not visible in the picture) Img.5-11: Move cross table in X direction - clamping lever Engage the crank handle by pushing it towards the clutch. Crank handle Img.5-12: Move cross table in X direction - crank-handle ... -
Page 40: Switch To The Rapid Mode
5.12.3 Switch to the rapid mode ATTENTION! The rapid mode only serves to rapidly travel to a position. The rapid mode must not be used as milling feed. Switch the selection lever for the table feed to the position Position "Rapid mode"... -
Page 41: Switching The Feed
5.12.4 Switching the feed Adjust the feed speed. ~ 50Hz mm/min mm/min inch/min 15/16 1 1/2 7 1/5 11 1/5 inch/min 2 1/2 18 1/2 ~ 50Hz connection Switch the selection lever for the table feed to the position Position "Rapid mode"... -
Page 42: Moving The Cross Table Forward / Back (Y Axis)
Set the position of the mechanic built-in limit switch. Mechanic built-in limit switch (2x) Direction lever Img.5-16: Direction lever Set the direction lever (X axis) for the table feed to the desired feed direction. Position the direction lever to the neutral centre position if you switch off the "Feed". 5.13 Moving the cross table forward / back (Y axis) ... -
Page 43: Turning The Spindle Head-Holder
5.14 Turning the spindle head-holder It is possible to rotate the spindle head carrier by ± 180°. The spindle head support must be turned by 180 ° for horizontal milling to be able to mount the thrust bearing. Proceed as follows: ... - Page 44 Milling spindle (Illustration without side mill- ing cutter) Slide bearing Img.5-19: Milling spindle horizontal milling Fix the milling spindle by means of the draw-in rod Draw-in rod Img.5-20: Draw-in rod horizontal milling Mount counterbearing. INFORMATION If the spindle head carrier is not exactly plugged in to "Zero" it is almost not possible to fix the counterbearing.
-
Page 45: Cooling
Img.5-18: „Turn spindle head carrier“ on page 43 Clamping screw counter- bearing Counterbearing Milling spindle Img.5-21: Counterbearing horizontal milling Select speed and position the V-belt at the required position. Speed table horizontal milling on page 33 5.16 Cooling WARNING! Ejection and overflowing of coolants and lubricants. - Page 46 Follow the manufacturer’s disposal instructions. MT50 Translation of original operating manual Version 1.2.8 - 2020-08-03...
-
Page 47: Maintenance
Maintenance Properly-performed regular maintenance, cleaning and repair is an essential prerequisite for safe operation, fault-free operation, a long service life of the multifunctional drilling-milling machine and the quality of the products manufactured with it. Safety WARNING! The consequences of incorrect maintenance and repair work may include: ... -
Page 48: Inspection And Maintenance
Inspection and maintenance The type and level of wear depends to a large extent on the individual usage and operating conditions. For this reason, all the intervals are only valid for the intended operating conditions. Interval Where? What? How? Start of work, after every ... - Page 49 Interval Where? What? How? The oil level must at least attain the centre resp. top mark- ing of the oil sight glass. Oil sight glass Start of work, Img.6-3: Oil sight glass gear vertical milling Checking the after every oil level maintenance or ...
- Page 50 Interval Where? What? How? For oil change use an appropriate collecting tray of suffi- cient capacity. Have the milling spindle run for a few minutes the oil will heat up and easily penetrate from the opening. Unscrew the screw from the drain hole. Drain hole First after 3 months then...
- Page 51 Interval Where? What? How? For oil change use an appropriate collecting tray of suffi- cient capacity. Travel the table in the rapid mode to-and-fro the oil heats up and easily penetrates from the drain opening. Unscrew the screw from the drain hole. Drain hole First after 3 months then...
- Page 52 Interval Where? What? How? Readjust the guides by means of the corresponding V- ledge. If necessary disassemble the wipers in order to attain the readjusting screws of the corresponding V-ledges. Turn the readjusting screw clockwise using a screw- driver until it is only possible to to move the guideway only slightly by means of the handwheel V-ledge...
-
Page 53: Cooling Lubricants
There is a potential danger of explosion. Repair Request for a service technician of the company Optimum Maschinen Germany GmbH for all repairs or send us the milling- machine. If the repairs are carried out by qualified technical staff, they must follow the indications given in these operating instructions. -
Page 54: Cooling Lubricants And Tanks
Cooling lubricants and tanks CAUTION! The cooling lubricant can cause diseases. Avoid direct contact with cooling lubricant or parts covered in cooling lubricant. Cooling lubricant circuits and tanks for water-cooling lubricant mixtures must be completely emptied, cleaned and disinfected as needed, but at least once per year or every time the coo- ling lubricant is replaced. -
Page 55: Inspection Plan For Water-Mixed Cooling Lubricants
6.6.1 Inspection plan for water-mixed cooling lubricants Company: No.: Date: used cooling lubricant size to be checked Inspection methods Inspection Procedure and comment intervals noticeable Appearance, odour daily Find and rectify causes, changes e.g. skim off oil, check filter, ventilate cooling lubricant system pH value Laboratory techniques... -
Page 56: Ersatzteile - Spare Parts
Ersatzteile - Spare parts Ersatzteilbestellung - Ordering spare parts Bitte geben Sie folgendes an - Please indicate the following : Seriennummer - Serial No. Maschinenbezeichnung - Machines name Herstellungsdatum - Date of manufacture Artikelnummer - Article no. Die Artikelnummer befindet sich in der Ersatzteilliste. -
Page 57: Säule Und Fuß - Column And Base
Säule und Fuß - Column and Base Abb.7-1: Säule und Fuß - Column and Base MT50 DE | EN Version 1.2.8 - 2020-08-03 Originalbetriebsanleitung... - Page 58 Ersatzteilliste Säule und Fuß - Spare parts list column and base Menge Grösse Artikelnummer Bezeichnung Designation Qty. Size Item no. Maschinenfuss Base 03336005101 Säule Column 03336005102 Hubgehäuse Elevating Screw Housing 03336005103 Sicherungsscheibe Lock Washer 10mm 042SR10W Sechskantschraube Hex Bolt M10-1.5 x 45 Anschlussrohr Connect Tube Innensechskantschraube...
- Page 59 Schraube Cap Screw M5 x 12 Hülse Sleeve Schraube Screw M6 x 18 Leiste 03336005146 Öler Billiard Oil Cup Abstreiferplatte Wiper Plate 03336005148 Abstreiferplatte Wiper Plate 03336005149 Kopfschraube Cap Screw M6 x 25 Tischträger Knee 03336005151 Ölwanne Oil Pan 03336005152 Kopfschraube Cap Screw M6 x12...
-
Page 60: Frästisch - Milling Table
Frästisch - Milling table Abb.7-2: Frästisch - Milling table DE | EN MT50 Originalbetriebsanleitung Version 1.2.8 - 2020-08-03... - Page 61 Ersatzteilliste Frästisch - Spare parts list milling table Menge Grösse Artikelnummer Bezeichnung Designation Qty. Size Item no. Schraube Handgriff Handle Spindle 03336005201 Kegelknopf Taper Knob 03336005202 Sechskantmutter Hex Nut M12-1.75 Sicherungsscheibe Lock Washer 12mm 042SR12W Handrad Hand Wheel 03336005205 Buchse Bush 03336005206CPL Feder...
- Page 62 Scheibe Washer T-Schraube T Bolt M12 x 1.75 x 42 Abstreiferplatte Wiper Plate 03336005243 Abdeckung Abstreiferplatte Way Cover 03336005244 Innensechskantschraube Phlp Hd Scr M5-.8 x 12 Schraubbügel Screw Bracket Anschlag Kopfschraube Cap Screw M6-1 x 16 Welle Shaft 03336005249 Scheibe Washer Schraube Screw...
-
Page 63: Schaltgetriebe Vertikalfräsen - Transmission Gear Vertical Milling
Schaltgetriebe Vertikalfräsen - Transmission gear vertical milling Abb.7-3: Schaltgetriebe Vertikalfräsen - Transmission gear vertical milling MT50 DE | EN Version 1.2.8 - 2020-08-03 Originalbetriebsanleitung... - Page 64 Ersatzteilliste Schaltgetriebe Vertikalfräsen- Spare parts list transmission gear vertical milling Menge Grösse Artikelnummer Bezeichnung Designation Qty. Size Item no. Getriebegehäuse Gear Case 03336005301 Ring Collar Öldichtung Oil Seal Fb45 x 62 x 8 Kugellager Ball Bearing 6009 0406009R Sicherungsring Ex Retaining Ring 042SR48W Zahnrad Gear...
- Page 65 Gummiring Rubber Ring 12 x 2 Gummiring Rubber Ring 20 x 2 Schraube Screw 5 x 12 Abdeckung Cover 03336005345 Griff Handle 03336005346 Stift 5 x 50 Griffsitz Handle Seat 03336005348 Stahlkugel Steel Ball 042KU06 Feder Spring Gewindestift Set Screw Ölschauglas Oil Pointer Abdeckung...
-
Page 66: Riementrieb Horizontalfräsen - Belt Drive Horizontal Milling
Riementrieb Horizontalfräsen - Belt drive horizontal milling Abb.7-4: Riementrieb Horizontalfräsen - Belt drive horizontal milling DE | EN MT50 Originalbetriebsanleitung Version 1.2.8 - 2020-08-03... - Page 67 Ersatzteilliste Riementrieb Horizontalfräsen - Spare parts list belt drive horizontal milling Menge Grösse Artikelnummer Bezeichnung Designation Qty. Size Item no. Kopfschraube Cap Screw M8-1.25 x 25 Öler Oil Cup Abdeckung Cover Spindel Spindle 03336005404 Kegelrollenlager Tapered roller bearing 32011 04032011 Ring Collar 03336005406...
- Page 68 schmale Welle Small Shaft 03336005442 Anschluss Connect Kugellager Ball Bearing 6003 0406003 Ring Collar Collar Sicherungsring Int Retaining Ring 35mm 042SR35W Sicherungsring Ext Retaining Ring 17mm 042SR17W Riemenscheibe Pulley 03336005448 Keilriemen V-Belt A800 03336005449 Motor Motor 03336005450 Passfeder 8 x 45 Motorscheibe Motor Wheel 03336005452...
-
Page 69: Universal Schwenkkopf - Universal Swiveling Head
7.10 Universal Schwenkkopf - Universal swiveling head Abb.7-5: Universal Schwenkkopf - Universal swiveling head MT50 DE | EN Version 1.2.8 - 2020-08-03 Originalbetriebsanleitung... - Page 70 Ersatzteilliste Universal Schwenkkopf - Spare parts list universal swiveling head Menge Grösse Artikelnummer Bezeichnung Designation Qty. Size Item no. Spindelgehäuse Spindle Box 03336005501 Zahnrad Gear 03336005502 Schraube Screw M6 x 75 Schraube Screw M6 x 16 Nutenstein Fixed Key Spindel Spindle 03336005506 Kegelrollenlager...
- Page 71 Kopfschraube Cap Screw M6-1 x 16 Skalenring Scale Ring 03336005544 Schraube Screw M6-1 x 12 Handrad Handle Wheel 03336005546 Handgriff Handle 03336005547 Klemmblock Clamp Block 03336005548 Klemmblock Clamp Block 03336005549 Klemmhebel Clamp Handle 03336005550 Gewindestift Set Screw M10 x 10 Abdeckung Baffle Schraube...
-
Page 72: Vorschubgetriebe X Achse - X Axis Feed Gear
7.11 Vorschubgetriebe X Achse - X axis feed gear Abb.7-6: Vorschubgetriebe - Feed gear DE | EN MT50 Originalbetriebsanleitung Version 1.2.8 - 2020-08-03... - Page 73 Ersatzteilliste Vorschubgetriebe - Spare parts list feed gear Menge Grösse Artikelnummer Bezeichnung Designation Qty. Size Item no. Anzeigeplatte Indicator plate 03336005601 Stiftschraube Set screw M6 x 6 Druckfeder Compression spring GB/T2089 1x4x12 Stahlkugel Steel ball GB/T308 5 042KU47 Griff Sitz Handle seat 03336005605 Elastischer zylindrischer Stift...
- Page 74 Informationsplatte Information plate 03336005642 Niet Rivet GB/T827 2.5x4 Schnecke Worm m=1.5 z=3 03336005644 Elastischer zylindrischer Stift Elastic cylindrical pin GB/T879.1 5x24 Dichtring Seal ring 03336005646 Elektromotor Electromotor 370W 2800rpm 03336005647 Unterlegscheibe Washer Federscheibe Spring washer Innensechskantschraube Hex Socket head bolt M8x20 Lagergehäuse B Bearing housing B...
- Page 75 Zahnrad Gear m=2 z=29 03336005688 Zahnrad V2 Gear V2 03336005688V2 Lager Bearing GB/T276 6002 0406002R Lagergehäuse Bearing housing Lagergehäuse Bearing housing Lager Bearing GB/T276 6001 0406001 Nutenwelle (D) Spline shaft (D) 03336005693 Zahnrad Gear m=2 z1=13 z2=23 03336005694 Sicherungsring für Welle Circlip for shaft GB/T894.1 18 042SR18W...
-
Page 76: Schaltplan - Wiring Diagram 1-2
7.12 Schaltplan - Wiring diagram 1-2 DE | EN MT50 Originalbetriebsanleitung Version 1.2.8 - 2020-08-03... -
Page 77: Schaltplan - Wiring Diagram 2-2
7.13 Schaltplan - wiring diagram 2-2 MT50 DE | EN Version 1.2.8 - 2020-08-03 Originalbetriebsanleitung... - Page 78 Ersatzteilliste elektrische Bauteile- Spare part list electrical components Menge Grösse Artikelnummer Bezeichnung Designation Qty. Size Item no. Sicherungsautomat Automatic fuse TECHNI DZ163-63/D10A Maschinenlampe Machine lamp Schalter Maschinenlampe Machine lamp switch Transformator Transformer JBK5-250 Lampe Steuerung Ein Control On lamp Hauptsteuerrelais Main control relays SIEMENS 3TB41-24V Spindle CW rotation...
- Page 79 SQ2-2 Wechsler Two-way contact SQ2-3 Wechsler Two-way contact Steuerung Ein Control On ZheJiang LA125H-BD21 Sicherheitsschalter Electrical cabinet safety ZheJiang KW7-0 Schaltschrank switch Sicherheitsschalter Spindle safety switch Omron V-152-1C25 Fräsfutterschutz Sicherheitsschalter Belt cover safety switch ZheJiang LXW5-11Q1 Riemenabdeckung MT50 DE | EN Version 1.2.8 - 2020-08-03 Originalbetriebsanleitung...
- Page 80 Viskosität Schmierstoffe Viskosity Kennzeich- Lubricant nung nach Viscosité ISO VG DIN 51502 Lubrifiant DIN 51519 mm²/s (cSt) Aral Degol BG BP Energol SPARTAN Klüberoil Mobilgear Shell Omala VG 680 CLP 680 Meropa 680 GR-XP 680 EP 680 GEM 1-680 Aral Degol BG BP Energol SPARTAN Klüberoil...
- Page 81 Techno Service GmbH ; Detmolder Strasse 515 ; D-33605 Bielefeld ; (++49) 0521- 924440 ; www.metaflux-ts.de haute vitesse Schneidöl Aquacut C1, 10 L Gebinde, Artikel Nr. 3530030 Kühlschmiermittel EG Sicherheitsdatenblatt Cooling lubricants Chevron Aral Emusol BP Sevora Esso Kutwell Mobilcut Shell Adrana http://www.optimum-daten.de/ Soluble Oil B Lubrifiants de refroidisse- data-sheets/Optimum-Aqua- ment cut_C1-EC-datas- heet_3530030_DE.pdf...
-
Page 82: Malfunctions
Malfunctions Malfunction Cause/ Solution possible effects Noise during work Spindle turning dry Grease spindle Tool blunt or incorrectly secured Use new tool and check securing (fixed setting of the bit, bit-holder and conical chuck). Tool "burnt". Incorrect speed. Select another rate, feed too high. Retract tool more often during machining. - Page 83 Malfunction Cause/ Solution possible effects Working spindle rattling Excessive slack in bearing. Readjust bearing slack or replace on rough work-piece bearing Working spindle goes up and surfaces down. Readjust bearing slack (fixed bearing) Adjustment strip loose Adjust strip to the correct slack using the adjusting screw Chuck loose Check, re-tighten.
-
Page 84: Appendix 9.1 Copyright
Beside the legal liability claims for defects of the customer towards the seller the manufacturer of the product, OPTIMUM GmbH, Robert-Pfleger-Straße 26, D-96103 Hallstadt, does not grant any further warranties unless they are listed below or had been promised in the frame of a individual contractual agreement. -
Page 85: Change Information Operating Manual
- Non reproducible software errors Any services which OPTIMUM GmbH or one of its agents performs in order to fulfill in the frame of an additional guarantee are neither an acceptance of the defects nor an accept- ance of its obligation to compensate. Such services do neither delay nor interrupt the war- ranty period. -
Page 86: Storage
Example: not stackable - do not stack a second packing case on top of the first one. Consult Optimum Maschinen Germany GmbH if the machine and accessories are stored for more than three months or are stored under different environmental conditions than those given here. -
Page 87: Note Regarding Disposal / Options To Reuse
Note regarding disposal / options to reuse: Please dispose of your device environmentally friendly by disposing of scrap in a professional way. Please neither throw away the packaging nor the used machine later on, but dispose of them according to the guidelines established by your city council/municipality or by the corresponding waste management enterprise. -
Page 88: Disposal Of Lubricants And Coolants
Being the machine operator you should obtain information regarding the authorized collection or disposal system which applies for your company. Please make sure that the batteries and/or accumulators are disposed of in a professional way according to the legal regulations. Please only throw discharged batteries in the collection boxes in shops or at municipal waste management companies. - Page 89 EC Declaration of Conformity according to Machinery directive 2006/42/EC, Annex II 1.A The manufacturer / distributor Optimum Maschinen Germany GmbH Dr.-Robert-Pfleger-Str. 26 D - 96103 Hallstadt, Germany hereby declares that the following product Product designation: Hand-controlled milling machine Type designation:...
- Page 90 Index Quill feed ...............35 Accident report ............. 17 Refill coolant lubricant ..........27 Clamping a tool ............ 31 Requirements Cleaning and lubricating ........26 regarding the installation site ......24 Connection electrical ............19 Conversion Safety Horizontal milling ..........43 during maintenance .........16 Coolant lubricant during operation ..........16 tank capacity ...........
- Page 91 Quellenverzeichnis von Ihrem Fachhändler Metallbau Mehner Optimum Fräsmaschinen und CNC Fräsmaschinen: Optimum MT 50 Übersicht OPTImill MT 50 • ◦ OPTImill MT 50 Ersatzteile ◦ OPTImill MT 50 Zubehör OPTImill Zubehör • Ihr Ersatzteil nicht in den Listen? Direkt zum >>Formular Download<<. Tragen sie Ihr Maschinenmodell, samt Bauteil und Artikelnr.
Need help?
Do you have a question about the Optimill MT 50 and is the answer not in the manual?
Questions and answers