Table of Contents
Advertisement
Advertisement
Table of Contents

Related Manuals for Car-O-Liner CTR9


Summary of Contents for Car-O-Liner CTR9
- Page 1 CTR9 Spot welder Instruction Manual (49023, rev 4) 2020-01, EN...
- Page 2 CTR9. It is recommended that you use your authorized The spot welder CTR9 is used by body shops to Car-O-Liner Distributor for maintaining and servicing duplicate the welding procedure used by the car your products.
- Page 3 Below an example of how the EC Declaration of Conformity for the CTR9 is outlined. A signed and dated copy of the EC Declaration of Conformity, including serial number, is included in the documentation for the CTR9. Please contact your distributor if you need a new copy of the Declaration of Conformity.
-
Page 4: Table Of Contents
Car-O-Liner Group AB CTR9 Contents Introduction ............... 7 General ....................7 Welder overview .................. 8 Marking ....................9 Safety ................10 General ..................... 10 Warnings and important notices ............10 ... - Page 5 Pre pulse - for burning off coatings ............ 72 Using edge welding caps ..............74 WeldLogger (in CTR9 welder and optional PC software) ....75 6.7.1 Activate WeldLogger ............75 6.7.2 Vehicle sections list ............
- Page 6 460V ....................115 Electrical diagram ............116 Spare Parts and Accessories ........118 12.1 Multi Function Gun and Accessories Box ........118 CTR9 Electrodes Chart ..........120 49023, EN - rev. 4, 2020-01...
-
Page 7: Introduction
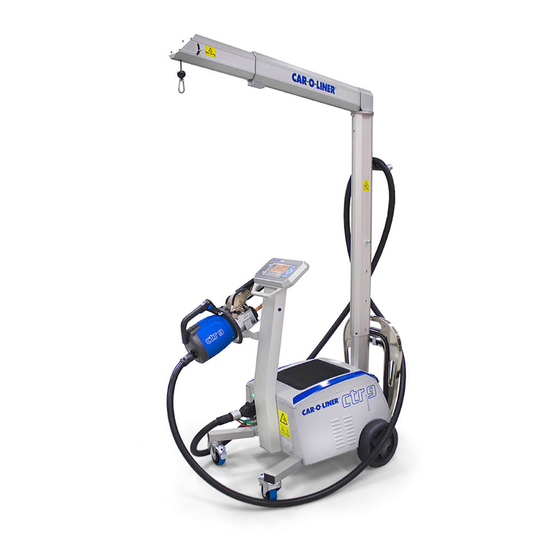
Car-O-Liner Group AB 1 Introduction General The CTR9 is a medium frequency spot welder, designed for body shops to Support arm [3] replicate the welding procedure used by car manufacturers. It consists of a welder unit [1] fitted with a C-Tong [2], a support arm [3] that suspends the C-Tong and holds the electrode yokes [4], a control panel with display for welder settings [5]. -
Page 8: Welder Overview
Car-O-Liner Group AB CTR9 Welder overview The CTR9 consists of a welder unit fitted with a C-Tong. An external multi-function gun is also available as option. The welder is furnished with the following voltage and frequency combination: 208 V -5 % +10%, 50-60 Hz, 3-phase ... -
Page 9: Marking
The name plates are located at the front of the welder unit and on the right side of the C-Tong. Name plate for CTR9 208V, art.no 49081 Name plate for CTR9 400V, art.no 49083 Name plate for CTR9 C-Tong, art.no 48918 Figure 1.3... -
Page 10: Safety
Great effort has been placed on the design and manufacture of the CTR9 so that it will comply with all applicable safety aspects for this type of equipment. - Page 11 CTR9 Car-O-Liner Group AB Warning Warns of risks for personal injuries and or damages to equipment. The following warnings and important notices are used in the instruction manual: WARNING Warning (in bold type) is used in this manual to indicate a possible danger that could lead to personal injury.
- Page 12 Car-O-Liner Group AB CTR9 WARNING! Sparks and welding spatter from the spot welder can damage your eyes and face. To avoid risk for personal injuries, always use a visor. WARNING! Make sure that you know where the fire extinguishing equipment is. Risk for injuries.
- Page 13 CTR9 Car-O-Liner Group AB WARNING! Electromagnetic field may damage pacemaker, watches, magnetic strip cards and magnetic data carriers. WARNING! Appropriate protection (protective gloves, visor, clothing and shoes) must be worn when using this equipment. WARNING! Do not fill the water tank with anything but water (and antifreeze agent, if needed).
- Page 14 IMPORTANT! Do not turn off the welder while cooling is activated! IMPORTANT! If the thermal breaker has switched off the welder, please contact Car-O-Liner authorized service personnel. IMPORTANT! It is the responsibility of the owner to ensure that the equipment has been installed as specified in the instructions provided.
- Page 15 CTR9 Car-O-Liner Group AB IMPORTANT! The recommended air pressure shall not normally be changed! IMPORTANT! It is important to ground the welding object to obtain quality weld nuggets. IMPORTANT! When not in use, be sure to place the multi-function gun and the ground connector so that they do not make electrical contact.
- Page 16 If there is any uncertainity regarding the quality of the water, use destilled water. IMPORTANT! If the heater is used in temperatures below freezing point, Car-O-Liner´s recommended antifreeze agent must be used. If the machine is used in temperatures below -10°C, a higher concentration of High-Tech Protection Fluid must be used.
-
Page 17: Safety Signs
CTR9 Car-O-Liner Group AB Safety signs Undamaged safety signs shall always be attached at the indicated places (see section 2.3.1 "Placement of safety signs"). If any signs are damaged or miss- ing, the user is responsible for their immediate replacement. The following... -
Page 18: Placement Of Safety Signs
Car-O-Liner Group AB CTR9 2.3.1 Placement of safety signs The safety signs are placed as follows: Art no. 48913 Art no. 43712 Art no. 46002 Art no. 99786 Art no. 43720 Figure 2.1 Placement of safety signs. 49023, EN - rev. 4, 2020-01... -
Page 19: Safety Devices
To prevent the welder from malfunctioning due to overheating, it is continuously cooled during operation. 2.4.1 Cooling The fan starts when you press the C-Tong trigger button. The CTR9 is equipped with water cooling of electrodes, yokes and transformer/rectifier. 2.4.2 Overheat protection The CTR9 has an overheat protection system which monitors the welder when the C-Tong is used. -
Page 20: Hazards From Elecromagentic Disturbances
Car-O-Liner Group AB CTR9 2.4.3 Hazards from elecromagentic disturbances WARNING! This Class A equipment is not intended for use in residential locations where the electrical power is provided by the public low-voltage supply system. There may be potential difficulties in ensuring electro- magnetic compatibility in those locations, due to conducted as well as radiated disturbance. - Page 21 CTR9 Car-O-Liner Group AB standard cables are not modified further technical modification is only carried out by qualified staff being able to check afterwards that the machine still complies with the EMC regulations existing interference suppression elements and filters as well as shielded cables are only replaced by identical parts.
-
Page 22: Installation
Check the delivery against the packing list, consignment note, or other delivery documentation to verify that everything is included and in the correct quantity. Check the CTR9 carefully to make sure that no damage has occurred during transport. If any part is damaged or missing, the welder may not be used until the part is repaired or replaced. -
Page 23: Welder Assembly
CTR9 Car-O-Liner Group AB Welder assembly Before use, the welder must be assembled as follows: Fit the control panel column [a] onto the welder unit by tightening hex/allen screw (b) to engage the four hooks [c] into the column. Be careful with the electric cables [d] when fitting the column! Lock the column with the two hex/allen screws [e]. -
Page 24: C-Tong Holder Assembly
Car-O-Liner Group AB CTR9 3.3.1 C-Tong holder assembly Fit the C-Tong holder as follows: Fit the C-Tong holder [a] onto the panel column by inserting rod [b] and tightening the two hex/allen screws [c]. 49023, EN - rev. 4, 2020-01... -
Page 25: Connection Of Electrical Supply
CTR9 Car-O-Liner Group AB Connection of electrical supply The CTR9 requires the following voltage/frequency combination: 208 V -5 % +10%, 50-60 Hz, 3-phase 230 V -5 % +10%, 50-60 Hz, 3-phase 400 V -5 % +10%, 50-60 Hz, 3-phase ... - Page 26 Car-O-Liner Group AB CTR9 The spot welder consequently may only be connected to public low-voltage mains for industrial environment. Only qualified staff being familiar with the safety instructions is allowed to install the welding machine. Optionally, the spot welder may be designed for special voltage.
-
Page 27: Grounding Risk
Car-O-Liner Group AB 3.4.1 Grounding risk CTR9 has a grounded welding tong. Therefore the welding object must be isolated from ground. All other work with grounded equipment shall not be performed at the same time as welding. Always use Ground Fault Circuit Interruptor (GFCI) to avoid stray current damages on the welder. -
Page 28: Connection Of Air Supply
CTR9 Connection of air supply The CTR9 shall be connected to a compressed air network. 1. Connect the welder to the pneumatic air network via the screw socket at the rear of the welder unit using a standard compressed air connector. -
Page 29: Connection And Disconnection Of The Welding Cable
CTR9 Car-O-Liner Group AB Connection and disconnection of the welding cable The welding cable is connected to the welder by a quick connector with separate water and air outlet hoses. Connecting: 1. Connect water hose A (blue) to water outlet by pushing it into coupling [1]. - Page 30 Car-O-Liner Group AB CTR9 WARNING! Water must not come in contact with electrical contacts of the welder when disconnecting the welding cable water hoses. Risk of material damage. 49023, EN - rev. 4, 2020-01...
-
Page 31: Filling Of Cooling Liquid
Use Car-O-Liner High-Tech Protection Fluid (art no 33944). Mix 3 litres of concentrate with 17 litres of decalcified water, see water quality information below (the CTR9 tank has a volume of 20 litres). Freezing point -10°C. WARNING! Do not fill the water tank with anything but water (and antifreeze agent, if needed). -
Page 32: Draining The Cooling System
Car-O-Liner Group AB CTR9 Draining the cooling system 1. Turn off the water flow, see section 6.8 Turning off cooling water. 2. Remove the cylinder electrode [a] from the C-Tong, see section 4.5.2 Changing the C-Tong electrodes. 3. Place a bucket under the C-Tong to collect the cooling liquid. -
Page 33: C-Tong Transformer Gun
CTR9 Car-O-Liner Group AB C-Tong transformer gun The C-Tong on the CTR9 features transformer gun technology for greater working range, and includes a number of features: 1. Rotating handle 2. Trigger button 3. Rotating attachment for Support arm 4. Cylinder electrode 5. -
Page 34: Rotating The C-Tong Gun
Car-O-Liner Group AB CTR9 3.9.1 Rotating the C-Tong gun To facilitate welding, the C-Tong gun can be rotated to desired position. This can be performed in two ways: 1. Rotating complete C-Tong gun 360 continuously, when suspended in the Support arm, see 3.12 Support arm: 1. - Page 35 CTR9 Car-O-Liner Group AB 2. Rotating C-Tong body, without rotating handle: 1. Push button (left or right side of handle) to rotate C-Tong body. 2. Rotate C-Tong body to desired position. 3. Release button to lock C-Tong body. 49023, EN - rev. 4, 2020-01...
-
Page 36: Rotating The C-Tong Handle
Car-O-Liner Group AB CTR9 3.9.2 Rotating the C-Tong handle To further facilitate welding, the C-Tong handle can also be rotated 355 independently of the C-Tong body. 1. Push button (left or right side of handle) to rotate C-Tong handle. 2. Rotate C-Tong handle to desired position. -
Page 37: C-Tong Accessories: Electrode Yokes
Car-O-Liner Group AB 3.10 C-Tong accessories: electrode yokes In addition to the standard 80 mm yoke, there are three different electrode yokes available for the CTR9: 1. 40 mm throat depth, water cooled 2. 350 mm throat depth, water cooled 3. -
Page 38: C-Tong Accessory: A-Tong (Optional)
Car-O-Liner Group AB CTR9 3.11 C-Tong accessory: A-Tong (optional) The C-Tong can be converted to an A-Tong. The A-Tong has two moving electrode arms which increases the range of the welder. The A-Tong is also fully rotatable to further increase access. -
Page 39: Multi Function Gun (Optional)
CTR9 Car-O-Liner Group AB 3.12 Multi function gun (optional) The optional Multi Function Gun can be fitted with a number of tools to further widen the areas of use for the CTR9: Single spot Dent puller Zig zag wire ... -
Page 40: Support Arm
Car-O-Liner Group AB CTR9 3.13 Support arm The CTR9 can be equipped with a Support arm for suspension of the C-Tong. For more extensive information regarding installation of the Support arm, see separate Support arm Installation instruction. Maximum weight on the suspension cord is 20 kg (44 lbs). -
Page 41: Working With The C-Tong Hanging From The Support Arm
CTR9 Car-O-Liner Group AB 3.13.1 Working with the C-Tong hanging from the support arm WARNING! Please note, that the support arm is designed only for a limited sideways rotation angle (fig 1). Do not exceed this angle by pulling the hanging C-Tong sideways. -
Page 42: Moving The Machine With Support Arm
Car-O-Liner Group AB CTR9 3.13.2 Moving the machine with support arm WARNING! Always use the handle to move the welder. Do not pull the cable or the tong to move the welder. The welder might tip, causing personal injuries or serious damage to the welder. When moving the machine, the C-Tong must be fixed at the intended holder (on the side of the machine) and must not hang on the support arm. -
Page 43: Transport
CTR9 Car-O-Liner Group AB 3.14 Transport When moving the machine to a new workplace, release the roll brakes (1) and then pull or push the machine by the handle (2). Pay attention to obsta- cles such as dispersed cables and unevenness of the floor! When transporting the welding machine to another location, power supply and compressed air supply must first be disconnected. -
Page 44: Storage
* The minimum temperature of –15°C (+5°F) only applies to machines with empty tank. Before storing machines that are filled with clean water (accord- ing to the water quality information in section 3.6) and Car-O-Liner High- Tech Protection Fluid at temperatures below -10°C, completely drain the cooling liquid. -
Page 45: Operation
Be sure to follow the car manufactur- ers instructions as well, for example welding parameters. With the CTR9, a high current is applied through the work piece. When the current is transferred through the work piece, the resistance in the metals heats the metal and fuses the metals together to a weld nugget. -
Page 46: Starting The Welding Machine
After the machine has been switched on, it takes a few seconds for the weld- ing control system to start the machine. During this time, the Car-O-Liner logo is displayed on the screen. The C-Tong mode and Full Auto mode will then be displayed on the screen. -
Page 47: Using The C-Tong Trigger Button
CTR9 Car-O-Liner Group AB Using the C-Tong trigger button When pressing the trigger button [1] on the C-Tong, the cylinder electrode [2] moves out against the work piece and the welding cycle starts. The welding cycle can be cut off before the welding current is activated (approximately 0.5 sec) by releasing the trigger button. -
Page 48: Calibrating The Welder
Car-O-Liner Group AB CTR9 4.3.1 Calibrating the welder Calibration must always be performed at Startup and with necessary inter- vals. To calibrate welder, push C-Tong trigger button [1] and weld without anything between the electrodes [2]. The ”Calibration” message below is shown on the Control panel display when calibration is necessary. -
Page 49: C-Tong Led Indicators And Reset Button
CTR9 Car-O-Liner Group AB C-Tong LED indicators and reset button Status [1]: Green LED indicates that welding machine is ok and spot weld is ok. Green LED will flash during weld and returns to steady green if spot weld is ok. -
Page 50: Preparing The C-Tong For Welding Operation
Car-O-Liner Group AB CTR9 Preparing the C-Tong for welding operation When carrying out the operations described in section 4.5, it is recommend- ed to keep the C-Tong in the C-Tong holder of the welding machine. 4.5.1 Changing the C-Tong electrode yoke Change the electrode yoke by following the instructions below: 1. - Page 51 CTR9 Car-O-Liner Group AB 4. Release the electrode yoke by pulling the safety knob. Remove the yoke. 6. To fit a yoke, insert the connection shank [a] into the yoke holder [b] of the C-Tong body. WARNING! The tools or electrodes may be hot. Risk for burning injuries.
- Page 52 Car-O-Liner Group AB CTR9 7. Tighten the yoke locking lever fully to ensure correct locking of the yoke. 8. Reassembly is the reversal of the foregoing instructions. WARNING! Tighten the yoke locking lever fully to ensure correct locking of the yoke. Risk of personal injuries or material damage.
-
Page 53: Changing The C-Tong Electrodes
CTR9 Car-O-Liner Group AB 4.5.2 Changing the C-Tong electrodes Change the electrodes by following the instructions below: 1. Release the cylinder electrode with a 17 mm wrench placed at the flat area of the electrode. 2. When reassembling, ensure that the bevelled end [b] of the electrode inner tube is pointing to the electrode. - Page 54 Car-O-Liner Group AB CTR9 3. To remove the yoke electrode [a], release the hex/allen screw [b] and pull out the electrode. When inserting a new electrode, fit flat side of the electrode brim to the yoke edge [c]. Yoke electrode IMPORTANT! All straight electrodes have an inner tube that must be fitted to provide sufficient cooling.
-
Page 55: Changing The C-Tong Electrode Caps
CTR9 Car-O-Liner Group AB 4.5.3 Changing the C-Tong electrode caps Change the electrode caps by following the instructions below: 1. Electrode cap must be changed BEFORE the rounded tip becomes flat. The standard cap radius is R15. 2. To remove the old electrode caps, use for example locking pliers. - Page 56 Car-O-Liner Group AB CTR9 4. To clean the electrode caps from impurities, use Scotch-Brite hand pads. The ”Caps Service” message below is shown on the Control panel display when cleaning or changing electrode caps is necessary. IMPORTANT! The shape of the caps is essential and the electrode caps must be changed regularly to maintain good welding results! The radius of a new cap is R15.
-
Page 57: Converting C-Tong To A-Tong
CTR9 Car-O-Liner Group AB 4.5.4 Converting C-Tong to A-Tong Convert C-Tong to A-Tong by following the instructions below: (Before mounting the A-Tong, the C-Tong electrode yoke must be demounted, see section 4.5.1 Changing the electrode yoke.) 1. Connect the by-pass hose to the cooling liquid couplings to bridge the cooling liquid flow. - Page 58 Car-O-Liner Group AB CTR9 IMPORTANT! The A-Tong adapter connection shank and the yoke holder must be greased with a small amount of copper paste before assembling to prevent sticking and to maintain proper electrical conductivity. 3. Grease the A-tong adapter connection shank [a] and the yoke holder [b] with a small amount of copper paste.
- Page 59 CTR9 Car-O-Liner Group AB 5. Insert and tighten the A-Tong adapter electrode. 6. Push button to rotate the A-Tong adapter 180 Release button to lock the A-Tong adapter. 49023, EN - rev. 4, 2020-01...
- Page 60 Car-O-Liner Group AB CTR9 8. Fit the A-Tong to the A-Tong adapter electrode. Push in the A-Tong completely [a]. 9. Lock the A-tong by tightening the A-Tong handle. 10. Pull A-Tong electrodes apart [a] and push in the adapter electrode completely [b].
- Page 61 CTR9 Car-O-Liner Group AB 11. Lock the electrode by tightening the locking screw. The A-Tong is now ready for action! 49023, EN - rev. 4, 2020-01...
-
Page 62: Changing And Aligning The A-Tong Electrodes
Car-O-Liner Group AB CTR9 4.5.5 Changing and aligning the A-Tong electrodes Change the A-Tong electrodes by following the instructions below: 1. Release the two locking screws and detach the electrode. IMPORTANT! After electrodes are changed they must be aligned to maintain optimal performance. -
Page 63: Changing The A-Tong Electrode Caps
CTR9 Car-O-Liner Group AB 4.5.6 Changing the A-Tong electrode caps Change the electrode caps by following the instructions below: 1. Electrode cap must be changed BEFORE the rounded tip becomes flat. The standard cap radius is R15. 2. To remove the old electrode caps, use for example a welding tong. - Page 64 Car-O-Liner Group AB CTR9 4. To clean the electrode caps from impurities, use a rasp. IMPORTANT! The shape of the caps is essential and the electrode caps must be changed regularly to maintain good welding results! The radius of a new cap is R15.
-
Page 65: Setting The A-Tong In Horizontal Or Vertical Position
CTR9 Car-O-Liner Group AB 4.5.7 Setting the A-Tong in horizontal or vertical position The A-Tong can be set in either horizontal or vertical position for optimal working angle. You can rotate the A-Tong stepless to desired position either by using the A-Tong handle or the swivel ring. - Page 66 Car-O-Liner Group AB CTR9 3. Tighten the A-Tong handle. 4. Alternate rotating method: Push button [a] and rotate [b] the A-Tong to desired position. 49023, EN - rev. 4, 2020-01...
-
Page 67: Welding Menu
CTR9 Car-O-Liner Group AB 5 Welding menu General The following welding programs are available on the CTR9 welder: Two sided spot welding Multi-function gun applications: Dent puller, Welding of clip rivets, Welding of screws and Carbon rod for shrinking, Welding of nuts, Stich welding. -
Page 68: Welding Modes
Car-O-Liner Group AB CTR9 6 Welding modes Having switched on the spot welder, you have to select and determine the type of welding process first. You may choose one of the following processes: "Auto 1" , "Auto 2" or "Manual" ("Fully Automatic" is default mode). -
Page 69: Auto 1 Mode
CTR9 Car-O-Liner Group AB Auto 1 mode In Auto 1 mode all values are automatically set, except the total material thickness which has to be manually set. 1. Set the "Auto 1" mode by pressing the "Auto/Man" button. With this button you can toggle between "Auto 1", "Auto 2"... -
Page 70: Auto 2 Mode
Car-O-Liner Group AB CTR9 Auto 2 mode In the "Auto 2" mode you can individually set number of metal sheets, type of material and total material thickness. In the "Auto 2 " mode tool selection and pre pulse function similar to "Auto 1"... -
Page 71: Manual Mode
CTR9 Car-O-Liner Group AB Manual mode In the "Manual" mode all settings are the same as in "Auto 2" except for the settings of welding time, welding current and electrode force that can be manually set. 1. Set the "Manual" mode by pressing the "Auto/Man" button. -
Page 72: Pre Pulse - For Burning Off Coatings
Car-O-Liner Group AB CTR9 Pre pulse - for burning off coatings Pre pulse (a short time welding) is necessary when Zn (zinc plated), Ed coating (electrolytic dipped) or dry glue needs to be burned off to achieve approved welding result. - Page 73 CTR9 Car-O-Liner Group AB 3. In Full Auto there are two selections for pre pulse: Auto and Auto Dry Glue. 49023, EN - rev. 4, 2020-01...
-
Page 74: Using Edge Welding Caps
Car-O-Liner Group AB CTR9 Using edge welding caps Recommended start setting value when using edge welding cap (part no 45785) in standard mode is CURRENT/kA: 6.0 and TIME/ms: 500 (Weld parameters may vary depending on sheet thickness). Attention: If the welding spots are placed on the edge of the heat moulded... -
Page 75: Weldlogger (In Ctr9 Welder And Optional Pc Software)
CTR9 Car-O-Liner Group AB WeldLogger (in CTR9 welder and optional PC software) 6.7.1 Activate WeldLogger In the "WeldLogger" you can create work orders and all your welding work is documented in log files. These log files may be printed using the optional PC software. -
Page 76: Vehicle Sections List
Car-O-Liner Group AB CTR9 6.7.2 Vehicle sections list 1 Left Front Inner Wing 17 Left B post 2 Right Front Inner Wing 18 Right B post 3 Front Cross member 19 Boot Floor 4 Front Panel 20 Left C post 5 Left Front Fender 21 Right C post 6 Right Front Fender 22 Left Rear Inner Wing 7 Left Front Upper Chassis Leg ... -
Page 77: Check Previous Log Files From The "Weldlogger
CTR9 Car-O-Liner Group AB 6.7.3 Check previous log files from the "WeldLogger" In the "WeldLogger" menu you can open and check previous log files. 1. Open the "Weld logger" log files menu by pressing the "Menu" button 2. Select log file by pressing the "up/down" button. -
Page 78: Delete Unsatisfactory Welding
Car-O-Liner Group AB CTR9 6.7.4 Delete unsatisfactory welding If one or more weldings are unsatisfactory you can remove them. 1. When in "scroll" mode, press "right" button. 2. Box with "Delete weld?" is displayed. For "No" press the "left" button, for "Yes" press the "right" button. -
Page 79: Save Log Files To Usb Memory
CTR9 Car-O-Liner Group AB 6.7.5 Save log files to USB memory In the "WeldLogger" log file menu you can save log files to USB memory. This allows you to transfer the log files to a PC. 1. Select requested log file from menu 2. -
Page 80: Optional: Print From Weldlogger Pc Software
Car-O-Liner Group AB CTR9 6.7.6 Optional: Print from WeldLogger PC software The optional WeldLogger PC Software allows you to document, save and print your log files transferred from the USB memory. 1. Work orders saved on the computer. 2. Basic information form. Here you can edit your work order. -
Page 81: Turning Off Cooling Water When Changing Electrodes
CTR9 Car-O-Liner Group AB Turning off cooling water when changing electrodes When you change electrodes you need to turn off the cooling water pump in order to prevent water from pouring out from the yoke. 1. Press the "Water flow" button to turn OFF the cooling water pump. -
Page 82: User Settings
Car-O-Liner Group AB CTR9 User settings In "User settings" you can do set up for: Weld counters - shows number of total spots (successful and failed). Language option Units Date and clock Save weld logs - Saving ALL existing Weld Logs. -
Page 83: Multi Function Gun Settings
CTR9 Car-O-Liner Group AB 6.10 Multi function gun settings 1. Select Multi function gun by pressing the "Change tool" button. 2. The Multi function gun is displayed. 3. Yellow box with "Add block" is shown. 4. Multi function gun must now be installed. -
Page 84: Installing The Multi-Function Gun
Car-O-Liner Group AB CTR9 6.10.1 Installing the multi-function gun Installing the multi-function gun cable to the C-Tong: 1. Fit the current cable adapter between the electrodes. 2. Follow the polarity shown on the label. 3. Press the trigger button on the C-Tong once. The gun closes, contacts the adapter and stays closed. -
Page 85: Fitting The Multi-Function Gun
CTR9 Car-O-Liner Group AB 6.10.2 Fitting the multi-function gun The multi-function gun can be fitted with a number of tools. The most common tools are shown below. Tool holder Multi function gun Dent puller with lock nut Stamp electrode Carbon rod... -
Page 86: Grounding The Welding Object When Using Tools (Except Single Spot)
Car-O-Liner Group AB CTR9 NOTE: The threads of the multi-function gun can be greased with a small amount of copper paste to reduce friction of the lock nut. 6.10.3 Grounding the welding object when using tools (except single spot) The welding object must be grounded by doing as follows: 1. -
Page 87: Select Required Tool
CTR9 Car-O-Liner Group AB 6.10.4 Select required tool When Multi function gun is installed you can select the required tool. 1. Select tool by pressing the "up/down" button. 2. Selected tool is displayed. 3. Set welding time and current by pressing the "right/left"... -
Page 88: Single Spot Welding
Car-O-Liner Group AB CTR9 6.10.5 Single spot welding The maximum electrode-side sheet thickness is 1.5 mm; the thickness of the sheet on the opposite side should however be higher. Prior to welding, en- Single spot electrode sure that the sheets are perfectly clean and close lying. - Page 89 CTR9 Car-O-Liner Group AB IMPORTANT! Single sided spot welding is not permitted on supporting frameworks of a vehicle. It is only permitted for cosmetic purposes. IMPORTANT! The outer sheet must be the thinnest sheet when performing single sided spot welding. The thickness of the outer sheet to be welded must be less than 1.5 mm, and the thickness of the inner sheet must...
- Page 90 Car-O-Liner Group AB CTR9 Changing the single spot electrode To change the single spot electrode: 1. Make sure that the elctrode holder is fitted correctly to the multi- function gun with the lock nut fully tightened. 2. Grip the electrode with a set of pliers.
- Page 91 CTR9 Car-O-Liner Group AB Grounding the welding object when performing single sided spot welding 1. To achieve a good contact, remove paint, primer and rust by grinding the area on the inner body sheet onto which the ground connector shall be connected.
-
Page 92: Dent Puller - For Washers And Triangular Pulling Eye
Car-O-Liner Group AB CTR9 6.10.6 Dent puller - for washers and triangular pulling eye When using the dent puller, standard procedures are welding of washers or triangular pulling eye. Locking nut Holder Triangular Dent puller pulling eye Holder for washer... -
Page 93: Screw 6 Mm
CTR9 Car-O-Liner Group AB 6.10.7 Screw 6 mm The screw tool is a multi-function gun application for fastening trim and Lock nut clips. 1. Select "Screw 6mm" tool by pressing the "up/down" button. 2. Set welding time and current. Screw... -
Page 94: Screw 5 Mm
Car-O-Liner Group AB CTR9 6.10.8 Screw 5 mm The screw tool is a multi-function gun application for fastening for example Lock nut trim, electric cables and brake pipes. 1. Select "Screw 5mm" tool by pressing the "up/down" button. 4. Set welding time and current. -
Page 95: Clip Rivet
CTR9 Car-O-Liner Group AB 6.10.9 Clip rivet The clip rivet tool is a multi-function gun application for fastening clips. Lock nut 1. Select "Clip rivet" tool by pressing the "up/down" button. 2. Set welding time and current. Clip rivet Clip rivet holder... -
Page 96: Stitch Welding And Welding Of Zig Zag Wire
Car-O-Liner Group AB CTR9 6.10.10 Stitch welding and welding of Zig zag wire The stitch weld electrode is a multi-function gun application for producing a Zig zag wire Lock nut seam weld and for welding Zig zag wire. 1. Select "Stitch weld" tool by pressing the "up/down" button. -
Page 97: Carbon Rod And Stamp Electrode Shrinking
CTR9 Car-O-Liner Group AB 6.10.11 Carbon rod and stamp electrode shrinking Carbon rod is a multi-function gun application for shrinking metal. Use rod for larger area and stamp electrode for smaller area. (Break off carbon rod to desired length.) 1. Select "Carbon rod" tool by pressing the "up/down" button. -
Page 98: Ending The Multi-Function Gun Program
Car-O-Liner Group AB CTR9 6.10.12 Ending the multi-function gun program 1. Select C-Tong by pressing the "Change tool" button. 2. The C-Tong is displayed. 3. Yellow box with "Remove block" is shown. 4. Push the C-Tong trigger button to release the block [a]. -
Page 99: A-Tong Settings
CTR9 Car-O-Liner Group AB 6.11 A-Tong settings When A-Tong is selected there are three available modes: Auto 1, Auto 2 and Manual (Fully Automatic is not available). NOTE: For mounting of the A-Tong, see section 4.5.4 Converting C-Tong to A-Tong. -
Page 100: Auto 2 Mode
Car-O-Liner Group AB CTR9 6.11.2 Auto 2 mode 1. Select A-Tong by pressing the "Change tool" button. 2. The A-Tong is displayed. For all functions, see section 6.3 C-Tong Auto 2 mode. 6.11.3 Manual mode 1. Select A-Tong by pressing the "Change tool" button. -
Page 101: Performing Nugget Strength Tests
CTR9 Car-O-Liner Group AB 6.12 Performing nugget strength tests It is important that the weld nuggets have sufficient quality. The quality of the weld nuggets are checked with strength tests. When performing these tests, you are ensured that the set weld current and weld time is sufficient. -
Page 102: Service And Maintenance
IMPORTANT! Never use water jet, detergents, solvents, thinners or benzene when washing the welder since they can damage the welder. Service Service must be performed by authorized Car-O-Liner service personnel under the following conditions: When the power cord is damaged or frayed. -
Page 103: Maintenance
CTR9 Car-O-Liner Group AB Maintenance The amount of use and the working environment should be taken into con- sideration when planning the frequency of maintenance for the welder. Careful use and preventive maintenance will help you to ensure trouble-free operation. - Page 104 Car-O-Liner Group AB CTR9 WARNING! Do not remove any covers when cleaning the welder. Risk for electrical shock. IMPORTANT! Never use water jet, detergents, solvents, thinners or benzene when washing the welder since they can damage the welder. Figure 7.1 Air filter by the fan.
-
Page 105: Troubleshooting
CTR9 Car-O-Liner Group AB 8 Troubleshooting The troubleshooting instructions in this chapter will help you to quickly find and correct the most common faults that may occur when using the welder. The error message list is useful in interpreting any error messages shown on the display of the welder (red display background), see 8.1. -
Page 106: Fault Tracing Table Welder Unit
- Blown fuse(s) Connection error Communication error between front display - Cable to the front display is broken or - Contact authorized Car-O-Liner service and the welder. disconnected. personnel. - Cable to C-Tong is broken or disconnected. - Page 107 - Wait and try again when “Over tempera- ture” message disappears. - Check cooling water level. Add cooling water if level is low. Control voltage error - Contact authorized Car-O-Liner - Missing supply voltage or value below service personnel. specified level. Fan error - Contact authorized Car-O-Liner - Fan malfunction.
- Page 108 Car-O-Liner Group AB CTR9 Sensor error - Contact authorized Car-O-Liner - Sensor malfunction. service personnel. 3 phase error - One or more phases are missing. - Check fuses in main supply system. Pump error - Contact authorized Car-O-Liner - Pump malfunction.
-
Page 109: Display Information Messages
CTR9 Car-O-Liner Group AB Display information messages Messages with yellow background gives you important information in cer- tain situations, for example when installing/removing Multi Function Gun or when electrode caps service is necessary. ”Calibration” is always shown at Startup and with necessary intervals. - Page 110 “Thickness too low” is shown when metal sheet thickness is below 0,8 mm. ”Invalid parameter” is shown when a material is not supported by the welding process. ”Low Battery” is shown when the clock battery needs to be replaced. Contact authorized Car-O-Liner service personnel. 49023, EN - rev. 4, 2020-01...
-
Page 111: Dismantling And Salvage
CTR9 Car-O-Liner Group AB 9 Dismantling and Salvage IMPORTANT! For the sake of the environment, it is important that the equipment is dismantled in an environmentally friendly way. To limit strain on the environment and its natural resources, it is important that the various parts of the welder are recycled. -
Page 112: Technical Specifications
Weight approximately (with support arm, 20 l water and 80 mm yoke): 135 kg (298 lbs) Weight C-Tong, with 80 mm yoke, approximately: 11,4 kg (25.2 lbs) Cable length: 6 m (19.7 ft) Table 10.1 Technical specifications for CTR9 208V welding machine. 49023, EN - rev. 4, 2020-01... - Page 113 Weight approximately (with support arm, 20 l water and 80 mm yoke): 135 kg (298 lbs) Weight C-Tong, with 80 mm yoke, approximately: 11,4 kg (25.2 lbs) Cable length: 6 m (19.7 ft) Table 10.2 Technical specifications for CTR9 230V welding machine. 49023, EN - rev. 4, 2020-01...
- Page 114 Weight approximately (with support arm, 20 l water and 80 mm yoke): 135 kg (298 lbs) Weight C-Tong, with 80 mm yoke, approximately: 11,4 kg (25.2 lbs) Cable length: 6 m (19.7 ft) Table 10.3 Technical specifications for CTR9 400V welding machine. 49023, EN - rev. 4, 2020-01...
- Page 115 Weight approximately (with support arm, 20 l water and 80 mm yoke): 135 kg (298 lbs) Weight C-Tong, with 80 mm yoke, approximately: 11,4 kg (25.2 lbs) Cable length: 6 m (19.7 ft) Table 10.4 Technical specifications for CTR9 460V welding machine 49023, EN - rev. 4, 2020-01...
-
Page 116: Electrical Diagram
Car-O-Liner Group AB CTR9 11 Electrical diagram 49023, EN - rev. 4, 2020-01... - Page 117 CTR9 Car-O-Liner Group AB Essential parts list Item Description Capacitor D1,D2,D3 Rectifier diode Welding diode D4,D5 D6,D7,D8,D9 D10,D11 Bi-Color LED Contactor Water pump Fan for water cooler USB connector R1,R2 Resistors Trigger button Main switch Thermal switch for over temperature protection...
-
Page 118: Spare Parts And Accessories
Car-O-Liner Group AB CTR9 12 Spare Parts and Accessories 12.1 Multi Function Gun and Accessories Box 49023, EN - rev. 4, 2020-01... - Page 119 CTR9 Car-O-Liner Group AB Parts no Description Multi Function Gun kit, including MF Gun, workpiece cable with connector, 41889 ground cable and pulling hammer 41888 Complete Multi Function Gun kit, including MF Gun, workpiece cable with connector, ground cable, delivery plate, pulling hammer and accessories box kit...
-
Page 120: Ctr9 Electrodes Chart
Car-O-Liner Group AB CTR9 13 CTR9 Electrodes Chart Electrode combinations for 500 mm yoke: 48251 with 48250. 48252 with 48249. 49023, EN - rev. 4, 2020-01... - Page 121 For more than forty years, we have supplied the industry with innovative solutions, technical development, training and customer support. Car-O-Liner is located in Gothenburg, Sweden, with manufacturing facilities, subsidiaries and distributors located around the world.
Need help?
Do you have a question about the CTR9 and is the answer not in the manual?
Questions and answers