
Related Manuals for Car-O-Liner CTR12000


Summary of Contents for Car-O-Liner CTR12000
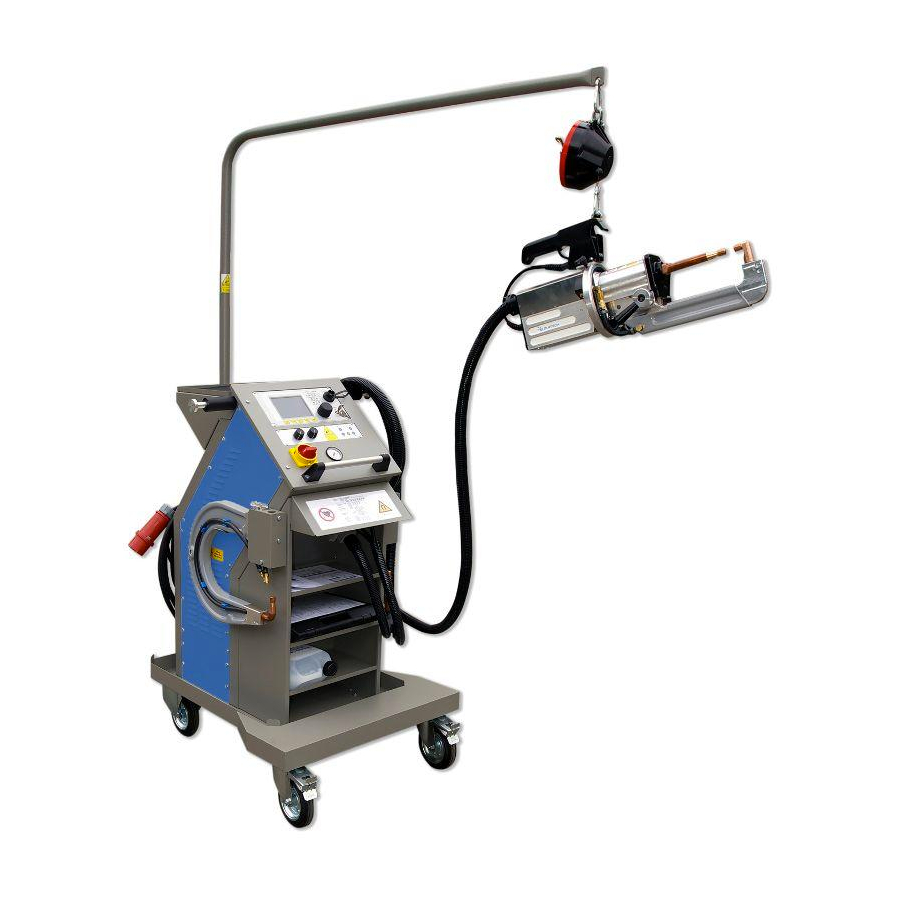
- Page 1 CTR12000 Part 2 - Welding menus and settings Instruction Manual (ORIGINAL) (41644, rev 2) 2012-10, EN...
- Page 2 Foreword This instruction manual provides advice as well as instructions for installation, operation, maintenance The Spot Welder CTR12000 is used by body shops to duplicate the welding procedure used by the car and troubleshooting. manufacturers. All other use of the equipment, or...
- Page 3 Below an example of how the EC Declaration of Conformity for the CTR12000 is outlined. A signed and dated copy of the EC Declaration of Conformity, including serial number, is included in the documentation for the CTR12000. Please contact your distributor if you need a new copy of the Declaration of Conformity.
-
Page 4: Table Of Contents
Car-O-Liner Group AB CTR12000 Contents Operation ................. 5 General ....................5 1.1.1 Display (1) ................5 1.1.2 Key-operated switch (2) ............6 1.1.3 Soft keys (3) ................6 1.1.4 Rotary encoder (4) ..............6 ... -
Page 5: Operation
CTR12000 Car-O-Liner Group AB 1 Operation General Your welding machine offers multiple functions and a large range of differ- ent settings though the number of control elements is quite reduced. This “economy of switches“ results from the high-tech microprocessor control system. -
Page 6: Soft Keys (3)
Car-O-Liner Group AB CTR12000 1.1.2 Key-operated switch (2) The key lock switch allows access and selection of the operating modes “AUTO“(Automatic operation) and “EDIT“(Edit//Program). The standard mode for welding operation is “AUTO”. Service menus are only accessible while the key lock switch is in position “EDIT“. -
Page 7: Usb- Device (11)
CTR12000 Car-O-Liner Group AB QS-RED: Indicates that spot weld is faulty or not weldable, or faulty current tong calibration or that the tong used is not suitable. QS-YELLOW: Indicates heating phase for preparing the spot weld or warning limit for current tong calibration. -
Page 8: Selector Switch For "Welding Power" I/Ka (18)
Car-O-Liner Group AB CTR12000 LED for “Tool” (12) Indicates incorrect calibration of the current tong or that the tong is not suit- able, or – the LED’s Tool and Electrode being flashing – that calibration of the current tong is necessary LED for “Electrode”... -
Page 9: Selector Switch "Time" T/S (19)
CTR12000 Car-O-Liner Group AB 1.1.9 Selector switch “Time“ t/s (19) While in the STANDARD welding mode (conventional spot welding), this potentiometer is used to preset the welding time on a scale in t/s. For all the other operating modes, this potentiometer has no function. -
Page 10: Welding Menus
Car-O-Liner Group AB CTR12000 2 Welding menus General Basic screen Programs, selection menus and parameters are selected from and displayed on the basic screen. Display button (F5) is used to indicate and display pro- grams, set points and actual values. -
Page 11: Starting The Welding Machine
After the machine has been switched on, it takes about 5 – 10 seconds until the welding control system has performed a self-test. During this time, the Car-O-Liner logo is displayed on the screen. After that, the selected synergic welding program or the last program used is displayed on the screen. - Page 12 Car-O-Liner Group AB CTR12000 If you are interested in the Expert operating mode, please contact your local Car-O-Liner distributor which will be pleased to offer you instructions and, if necessary, more detailed information about this mode. 41644, EN - rev. 2, 2012-09...
-
Page 13: Welding Processes
CTR12000 Car-O-Liner Group AB 3 Welding processes Having switched on the spot welder, you have to select and determine the type of welding process first. You may choose one of the following processes: VISION, VISION ED coat, ELMAQS, STANDARD, specific automaker program OPEL and OPEL-VP for Opel. - Page 14 Car-O-Liner Group AB CTR12000 Before starting with the fully automatic welding process, you have to do the following adjustment: 1. Choose „CHECK-EL“ in the task menu. 2. Choose the connected tong and electrode arm. The following adjustments are possible. Attention: C-40 is not used in VISION/VISION EDcoat mode! 3.
- Page 15 CTR12000 Car-O-Liner Group AB 4. Choose the MODE „ AUTOMATIC“ In operation mode AUTOMATIC the EDIT- key should be switched to AU- TO because otherwise the puls- sonar system which is integrated in the tong, could not collect the total thickness of the material and the right parameters that are needed are locked.
- Page 16 Car-O-Liner Group AB CTR12000 The result of the calibration is displayed with the LED’ s of the QS- “traffic light” and the LED’ s “tool” and “electrode” in the lower control panel. If the machine has performed the CHECK-EL successfully change the adjustment to menu task „...
- Page 17 Instead you can adjust the thickness of material you want to weld manually by turning the “Power” potentiometer. The CTR12000 is equipped with a quality control system (QS), which give a statement about every single spot during the welding process. The in particu-...
- Page 18 Car-O-Liner Group AB CTR12000 ceed, the red light signals an error (Error code 3). If the process was success- ful the green light is shown. The process is controlled in the welding segment either with the current for normal steel or with a lower current for high strength steel. The decision cri- terion has been created in the segment “pre pulse”.
- Page 19 CTR12000 Car-O-Liner Group AB Error code list Error 11 F11‐ Check (Resistance‐ ZERO) Error 12 F12‐ Check Distance (Position‐ Zero) Error 13 F13‐ Check value Distance out of tolerance Error 14 F14‐ Check‐Resistance too high Error 15 F15‐ Check‐Resistance too low Error 16 F16‐ Total‐Isolation Error 17 F17‐ Measured value out of Tolerance Error 18 F18‐ Key switch on EDIT Setting Error 19 F19‐ Starting energy too low Error 20 ...
- Page 20 After the process stops, the yellow light is replaced usually by the green light, if the CTR12000 control system finish the process successfully. Intermediate messages, yellow, could appear if, e.g. to breakthrough a part wise isolation or the resistance characteristic is higher than generally ex- pected.
- Page 21 CTR12000 Car-O-Liner Group AB upper position. Please make sure that leaking water is collected e.g. with a drapery. Please also pay attention with the arm- connection surface. At the connection surface up to 12 000 A could be transferred. Any impurities on the connection surface should be removed with a fine sandpaper, to prevent any interference in the current flow.
-
Page 22: Semi Automatic: Elma-Qs
Car-O-Liner Group AB CTR12000 Semi automatic: ELMA-QS The welding process called ELMA-QS designates the ELMA spot welding procedure that allows for the energy applied and observes the welding time by means of the QS (quality assurance) supervision system. This process be- ing selected, the following screen appears: If both LEDs “Tool”... - Page 23 CTR12000 Car-O-Liner Group AB QS-RED/YELLOW/GREEN Faulty calibration (upper limit) or unsuitable tong QS-YELLOW/GREEN Calibration okay, (upper alarm limit) QS-GREEN Calibration okay QS-YELLOW Calibration okay, (lower alarm limit) QS-RED Faulty calibration (lower limit) or unsuitable tong Steadily flashing LEDs “Tool” and “Electrode” on the lower control panel indicate that the calibration was not successful or that the gun used is not suitable.
- Page 24 Car-O-Liner Group AB CTR12000 Furthermore you shall adjust the thickness of the OUTER SHEET to more than 1 mm or less. If you wish to return to the display screen, simply press the right soft key be- low the field DISPLAY or activate this field by using the rotary encoder.
- Page 25 The pro- gram branches automatically for deciding in favour of a welding procedure developed by Car-O-Liner that produces reliable welding spots. At the end of each spot weld, the welding result is indicated as follows: QS-GREEN Welding operation was successful.
-
Page 26: Pre Spot Operation Program
Car-O-Liner Group AB CTR12000 achieved from the test weld(s), and, if necessary, adapt individual welding parameters to suit the requirements. In case of faulty welding operation (indicated by QS-RED or QS YEL- LOW/RED), the LED “Spot error“ on the lower control panel lights up too and the welder is automatically locked until the fault occurred is acknowl- edged by pressing the “RESET“... -
Page 27: Optional Settings
CTR12000 Car-O-Liner Group AB After the service parts have been fitted into the vehicle, the final spot welds are exactly welded on the pre-welded spots. 3.2.2 Optional settings Back on the selection screen (by pressing the soft key END), further optional settings can be performed. -
Page 28: Manual: Standard (Conventional Resistance Spot Welding)
Car-O-Liner Group AB CTR12000 Manual: STANDARD (conventional resistance spot welding) This chapter explains how to proceed for Manual (STANDARD) welding. Now the process selected is conventional resistance spot welding. Welding current and time are adjusted afterwards exclusively by means of the two po- tentiometers “Power”... -
Page 29: Using Edge Welding Caps
CTR12000 Car-O-Liner Group AB 3.3.1 Using edge welding caps Recommended start setting value when using edge welding cap (part no 45785) in standard mode is CURRENT/kA: 6.0 and TIME/ms: 500 (Weld parameters may vary depending on sheet thickness). Attention: If the welding spots are placed on the edge of the heat moulded... -
Page 30: Multi-Function Welding Gun (Optional Tool): Single
Car-O-Liner Group AB CTR12000 Multi-function welding gun (optional tool): SINGLE The multi-function gun is to be used for SINGLE welding operation. The Single- side- gun adapter for the C/X- Gun should be clamped between the electrodes of the gun, by pressing the... - Page 31 CTR12000 Car-O-Liner Group AB (C-tong) (Multi function gun) Setting parameters (recommended values) are also indicated on the decal on the front cover of the welder. The multifunction gun is exclusively designed for repair work on car bodies. Since the gun is not water-cooled, an overheat protection device (thermostat) has been fitted that is triggered at thermal overload and prevents the machine from being restarted.
-
Page 32: Special Automaker Programs
Car-O-Liner Group AB CTR12000 Special automaker programs To access special automaker programs, for example select OPEL or OPEL VP for Pre-spot operation from the menu “Welding process”. The following screen is then displayed: The different special automaker programs can be selected from the field to the right of the parameter PROGRAM and generally run under Welding. - Page 33 CTR12000 Car-O-Liner Group AB Having selected OPEL VP (PSO Pre Spot Operation) the screen below ap- pears: After having switched to the DISPLAY mode, settings for welding operation are made by adjusting the material thickness. Same procedure as with stand- ard spot welding procedure ELMA-QS.
-
Page 34: Further Adjustments
Car-O-Liner Group AB CTR12000 Further adjustments 3.6.1 Description of settings in the "ELMA QS" mode The menu item FURTHER ADJUSTMENTS contains the sub-menus to the individual program segments: Menu 2 Menu 1 The sub-menus allow the following parameters and synergic parameters (see also chapter “Editing synergic characteristics“) to be adjusted:... -
Page 35: Welding Process Segments In Elma-Qs Mode
CTR12000 Car-O-Liner Group AB 3.6.2 Welding process segments in ELMA-QS mode The welding process is divided into individual segments that are displayed on the screen. The figure below shows their chronology during welding op- eration. Time (t) 3.6.3 Welding process segments in the "VISION" mode... -
Page 36: Editing Synergy Characteristics In The "Elma Qs" Mode
Car-O-Liner Group AB CTR12000 3.6.4 Editing synergy characteristics in the "ELMA QS" mode Definition of “welding power characteristics“ Welding power characteristics are created from a family of characteristics assigned to several parameters. In case of spot welding, these parameters are... - Page 37 CTR12000 Car-O-Liner Group AB Entry of points for welding characteristics in ELMA-QS mode As already described in chapter 3.6 Further Adjustments, you can select and edit individual data fields by using the rotary encoder. Values being outside the corresponding MIN/MAX limits are not accepted for entry.
- Page 38 Car-O-Liner Group AB CTR12000 Saving points After you have modified data in the mask for synergic and other parameters and wish to quit this mask, the system asks whether the modification should be saved. The display normally offers to you the customized program X01.
-
Page 39: Editing Synergy Characteristics In The "Vision" Mode Definition Of "Welding Power Characteristics
CTR12000 Car-O-Liner Group AB 3.6.5 Editing synergy characteristics in the "VISION" mode Definition of “welding power characteristics" Optimising of parameters in the EDIT- mode the OPERATION MODE, MANUAL should adjusted. It is recommended that no new Synergic param- eters are set, because a correct adjustment between the %- parameters vab and the value THICKNESS is required. -
Page 40: Options
If such an automatic welding program is selected, the microprocessor control system of the CTR12000 ensures that the welding operation is exactly performed with “the selected working point“ – i.e. with the optimum welding energy deter- mined and the associated synergic parameters. -
Page 41: Working With "Jobs
CTR12000 Car-O-Liner Group AB 3.7.2 Working with “Jobs” a) How to call an existing Job? Activate the menu field besides SELECTION to check whether the memory AUTO already contains jobs or X programs. With the key lock switch in position “AUTO”, a window opens up and shows the existing programs that can be... - Page 42 Car-O-Liner Group AB CTR12000 b) How to create or modify a Job? In order to create or modify a special job and save the corresponding set- tings, first activate the field “SELECTION“ and select a synergic program from the right menu field.
- Page 43 CTR12000 Car-O-Liner Group AB Remember that the option of saving is only available after having modified one or more than one parameter in the menu “FURTHER ADJUST- MENTS“. Any modification is marked in the program selection field with * * . You only have to modify and re-modify one parameter.
-
Page 44: Usb- Drive
Car-O-Liner Group AB CTR12000 USB- Drive The USB device of your machine has various functions: Backup of personalized welding programs. Backup of the complete data stock of the machine. Cloning of the machine data base. Error analysis and remote maintenance in case of malfunction. -
Page 45: Welding Program Management
CTR12000 Car-O-Liner Group AB Welding program management The following function can be selected and called from the MEMORY screen. DELETE welding programs Attention: The use of this function is only possible in EDIT- mode! It is necessary that an USB- key is in the USB- device! - Page 46 Car-O-Liner Group AB CTR12000 Export of data After entering the field Export, following window appears on the screen: In that menu you can export the individual welding programs with the modi- fied parameters to an USB-stick. If you want to store your individual pro- grams, choose UserDB.
- Page 47 After activating the field “EXPERT/SERVICE RELEASE“, the user has ac- cess to further possibilities of program editing but only qualified users that have been trained by Car-O-Liner should make use of them. For this reason, the access to the EXPERT mode is protected by a password.
-
Page 48: Machine Shut-Down
While in the AUTO or EDIT mode, parameters are displayed, but cannot be modified. Modifications are only allowed while in the expert mode. Only skilled users who have been trained by Car-O-Liner should modify parameter fields. ENTRY OF DATE/TIME Activate the field “DATE/TIME ENTRY“ to set date and time. Move the cursor onto the corresponding field or use the rotary encoder. -
Page 49: Troubleshooting
CTR12000 Car-O-Liner Group AB 4 Troubleshooting The tests and procedures stated in the table below facilitate diagnosing the causes of the most frequent troubles and ease self-remedy where appropriate. Possible cause Solution The welding machine cannot be started Mains fuses Check fuses, and replace, if necessary. - Page 50 Car-O-Liner Group AB CTR12000 Fault Possible cause Solution Gun is closed after the start button has The current tong has not been calibrated yet Select CHECK-EL and perform tong been pressed, but there is no welding (CHECK-EL), LEDs Tool and Electrode flash.
- Page 51 CTR12000 Car-O-Liner Group AB Fault Possible cause Solution Workpieces stick to the electrodes. Excessive welding current. Reduce welding power. Unsuitable electrode caps. Use correct caps. Insufficient electrode pressure. Increase contact pressure. Poor welding spot. Insufficient welding current, welding time and/or Increase welding current and/or time, energy applied.
- Page 52 Car-O-Liner Group AB CTR12000 41644, EN - rev. 2, 2012-09...
- Page 53 Leading Global Provider of Assured and Profitable Alignment Processes to the Automotive Industry, including Technical Development, Training and Service. Over 55 000 Car-O-Liner Collision Repair Systems are in use worldwide. Car-O-Liner runs operations of its own in Scandinavia, USA, UK, France, Germany, Singapore, India and China and sells through local distributors in more than 60 countries.
Need help?
Do you have a question about the CTR12000 and is the answer not in the manual?
Questions and answers
F14 electric to high-s4 is the error code we get, can you give me some insight onto what I need to do to correct this issue.
The F14 error code on the Car-O-Liner CTR12000 indicates "Check–Resistance too high." This means the electrical resistance in the welding circuit is above acceptable limits.
To resolve this error:
- Check and clean the electrodes.
- Reshape or replace electrode caps if needed.
- Ensure proper electrode pressure.
- Check for proper sheet positioning and contact.
- Inspect connections for dirt, oxidation, or loose fittings.
Correcting these issues should reduce resistance and clear the error.
This answer is automatically generated