Table of Contents
Advertisement
Quick Links
Download this manual
See also:
Manual
Advertisement
Table of Contents

Related Manuals for Vidicode Octo


Summary of Contents for Vidicode Octo
- Page 1 Version 1.018 ©Vidicode 2005 International VIDICODE Datacommunicatie BV Headquarters Blauwroodlaan 140, 2718 SK Zoetermeer The Netherlands Tel. +31 79-3617181 Fax +31 79-3618092 vidicode@vidicode.nl www.vidicode.nl...
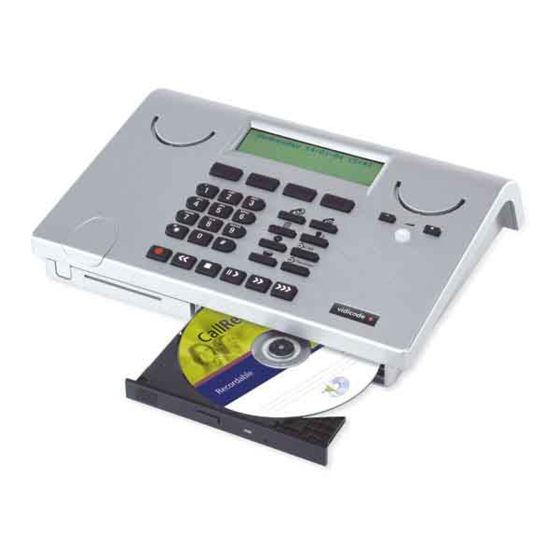
- Page 2 The Call Recorder Octo and Quarto Menu keys Backlight Display Function keys Speaker Alfa-Numerical keys CryptoCard reader CD Drive Recorder keys Speakerphone key Volume adjustment Call Recorder manual © Vidicode 2005...
- Page 3 8 channel Start-Stop / RS 232 Serial Ethernet/LAN 4 stereo audio input 8 telephone line input Connections Call Recorder Quarto Power Loudspeaker 4 channel Start-Stop / RS 232 Serial Ethernet/LAN 2 stereo audio input 4 telephone line input Call Recorder manual © Vidicode 2005...
- Page 4 If no recording or playback is taking place these keys always have an Up/Down or Left/Right function. The key will always exit the current operation. Function-keys Call Recorder manual © Vidicode 2005...
- Page 5 Alfa-numerical functions Call Recorder manual © Vidicode 2005...
- Page 6 Keep the Call Recorder away from excessive dust and dirt that can cause premature wear of parts. Do not use harsh chemicals, cleaning solvents or strong detergents to clean the Call Recorder. Call Recorder manual © Vidicode 2005...
-
Page 7: Table Of Contents
Reset all values ............26 Line settings............27 The telephone line menu's ........27 5.1.1 Input source ..............28 5.1.2 Start Method..............28 5.1.3 Fax Recording...............29 5.1.4 Amplification..............29 5.1.5 Automatic Gain Control ..........30 5.1.6 Compression ..............30 5.1.7 Notification ..............31 Call Recorder manual © Vidicode 2005... - Page 8 The CryptoCard and its PIN and PUC code.... 54 10.3 Making an encrypted recording ....... 55 10.4 Playing an encrypted recording....... 56 The Ethernet interface........57 11.1 Network active............57 11.2 FTP active ............... 57 11.3 FTP user ..............57 Call Recorder manual © Vidicode 2005...
- Page 9 The Access and Monitor software ...... 79 13.1 The Call Recorder Access System software ... 79 13.1.1 Playing recordings .............80 13.1.2 Queries ..............80 13.1.3 Fax viewing ..............80 13.2 The RTR Call Monitor software ....... 80 Call Recorder manual © Vidicode 2005...
- Page 10 Technical specifications ........83 Acknowledgements ..........87 15.1 Privacy ..............87 15.2 Guarantee ............... 87 15.3 Liability ..............88 Index ..............89 Call Recorder manual © Vidicode 2005...
-
Page 11: Introduction
CD. A special version of the Call Recorder Access System allows for fax image recovery of recorded fax transmissions. The Ethernet connection also Call Recorder manual © Vidicode 2005... -
Page 12: Configuration
Monitor function. The volume of the internal speaker can easily be adjusted. The Call Recorder also allows for the connection of a headset. The headset can be used to listen to recordings. Call Recorder manual © Vidicode 2005... -
Page 13: The Call Recorders
2 The Call Recorders The various models of the Call Recorder Quarto and Octo are: Call Recorder Quarto HD 6900 hours Call Recorder Quarto HD 10350 hours Call Recorder Quarto HD 6900 hours (CD + software) Call Recorder Quarto HD 10350 hours (CD + software) -
Page 14: Connecting The Power Supply
First connect the mains of the adapter to the wall socket. Then connect the connector of the adapter to the Power connection on the back side of the Call Recorder. Call Recorder manual © Vidicode 2005... -
Page 15: Connecting The Telephone Lines
For details on the connection of audio sources please refer to the Technical specifications in Chapter 14. The “Start/Stop” switch connection is used to connect eight separate start/stop switches. For details please refer to the Technical specifications in Chapter 14. Call Recorder manual © Vidicode 2005... - Page 16 The figure below is an example of a possible setup of the Call Recorder. Call Recorder manual © Vidicode 2005...
-
Page 17: Operating The Call Recorder
MENU in the display indicates the presence of an underlying menu Press MENU to open the underlying menu NEXT in the display indicates the presence of more menu items Press NEXT to jump to the following menu item Call Recorder manual © Vidicode 2005... -
Page 18: Save Changes
During initialization the display will show: Initialising CD At this point the Call Recorder cannot be used for any other functions. The initialization of the CD may take up to 30 seconds. Call Recorder manual © Vidicode 2005... -
Page 19: Recorder Settings
• Press the function key and scroll through the menu by pressing NEXT until the following display appears: Speaker: On NEXT CHANGE STOP The Speaker setting • Press CHANGE to disable or enable the Speaker. Call Recorder manual © Vidicode 2005... -
Page 20: Volume
The Numberlist is used to include or exclude the numbers from recording. See the description of the numberlist in Chapter 7. The setting Numberlist determines whether the numberlist is used as blacklist or whitelist. Call Recorder manual © Vidicode 2005... -
Page 21: Cd Copy
NEXT until the following display appears: CD Copy: Single NEXT CHANGE STOP Press CHANGE to select Single or Double or turn “CD Copy” Off. • Call Recorder manual © Vidicode 2005... -
Page 22: Cd Copy Time
With the Use CryptoCard function enabled all recordings will be encrypted and is it no longer possible to make recordings without a CryptoCard. • Press the function key and scroll through the menu by pressing NEXT until the following display appears: Call Recorder manual © Vidicode 2005... -
Page 23: Protect The Call Recorder With A Password
When password protection has been enabled all actions that change the operation of the Call Recorder are blocked until the correct password has been entered. • Press the function key and scroll through the menu by pressing NEXT until the following display appears: Call Recorder manual © Vidicode 2005... -
Page 24: Remove Password Protection
4.9 Remove Password protection • Press the function key and scroll through the menu by pressing NEXT until the following display appears: Password: NEXT CHANGE STOP Disable the Password. • Press CHANGE to disable the password. Call Recorder manual © Vidicode 2005... -
Page 25: Set The Clock
• Press NEXT to continue in the menu with the Language setting of the Call Recorder or press STOP to exit the configuration menu. 4.11 Set the Language To set the Language do the following: Call Recorder manual © Vidicode 2005... -
Page 26: Reset All Values
• Press CHANGE to enable the Reset all values operation. Reset all values: CHANGE STOP Reset all values enabled. • Press STOP to execute the Reset all values operation. Reset all values operation will disable password protection. Attention: Call Recorder manual © Vidicode 2005... -
Page 27: Line Settings
Install Line 1 Input Source: Line NEXT CHANGE BACK Line installation menu of line 1. • Press NEXT repeatedly or use the keys to scroll through the menu items. The following menu items will pass. Call Recorder manual © Vidicode 2005... -
Page 28: Input Source
Some digital phones have a switch connection for this purpose. If Switch is selected as start method the next item in the menu will be "Switch type". One can choose between Make or Break indicating opening or closing the switch to start a recording. Call Recorder manual © Vidicode 2005... -
Page 29: Fax Recording
• Press CHANGE to disable or enable Amplification. • Press NEXT to move on to the next menu item or press the line number to move to the Amplification setting of the corresponding line. Call Recorder manual © Vidicode 2005... -
Page 30: Automatic Gain Control
Off the G.711 A-law standard is used. • Press NEXT to move on to the next menu item or press the line number to move to the Speech compression setting of the corresponding line. Call Recorder manual © Vidicode 2005... -
Page 31: Notification
• When "Auto" is selected the message is played automatically for incoming calls. For outgoing calls the message is played when a DTMF tone is received. Recording of the outgoing call is started directly after that. Call Recorder manual © Vidicode 2005... -
Page 32: Caller Id
• Press NEXT multiple times to select the Installation menus of the other lines or press STOP to exit the configuration menu. The following paragraph gives a description of the setting of the signal levels for Voice activated recording. Call Recorder manual © Vidicode 2005... -
Page 33: Signal Settings
Call Recorder is supposed to stop on. For the Call Recorder to actually stop recording the audio level needs to fall below the set stop level for a certain amount of time. This amount of time is called the Silence Period. Call Recorder manual © Vidicode 2005... - Page 34 In order to keep the call in one recording a larger Silence Period is suggested. For the recording of radio communication it is preferred to keep the Silence period small to prevent consecutive communications in one recording. Call Recorder manual © Vidicode 2005...
-
Page 35: Search, Playback, Cd Copy And Monitoring
The display shows the remote number between brackets. Next to that is the duration of the call, the arrow indicating incoming or outgoing call. Below that is the date and time of the call, the line number and the current playback position. Call Recorder manual © Vidicode 2005... -
Page 36: Search Stored Recordings
It is also possible to refine the search according to remote telephone number or line number. In that case continue to read on § 6.2.1. Call Recorder manual © Vidicode 2005... -
Page 37: Refined Search According To Remote Number
Remember that the entered date will always be incorporated in the search. • Press NUMBER to enter a number to search for. Call Recorder manual © Vidicode 2005... - Page 38 (0352860560) 0:01:14 14-7-02 18:46 0:00:01 Display during playback. The display shows the remote number between brackets. Next to that is the duration of the call, the arrow indicating incoming or outgoing call. Below that Call Recorder manual © Vidicode 2005...
-
Page 39: Refined Search According To Line Number
The display will show: 14-07-02 12:11 SEARCH DATE LAST STOP The search has resulted in two recordings found. The first of the two recordings is selected for playback, the date and time of the call is displayed Call Recorder manual © Vidicode 2005... -
Page 40: Copy Recordings To Cd
Copy recording to CD Start? Copy recordings to CD. • Press YES to start copying the recording. When the recording has been copied the display will show: Copy completed. STOP • Press STOP to finish. Call Recorder manual © Vidicode 2005... -
Page 41: Copy A Selection Of Recordings
Beware: After copying the recording the CD is not yet usable for the PC. To make the CD usable for the PC a directory has to be made. Please see § 8.3 for a description. Call Recorder manual © Vidicode 2005... -
Page 42: Monitoring
Stop the monitor by pressing soft-key STOP or pressing the key. function key toggles the monitor On and Off for the selected line. Pressing keys 1-4 or 1-8 will change the monitor and the Line status display to the selected line. Call Recorder manual © Vidicode 2005... -
Page 43: Notification Message And Numberlist
• Press key when you are finished. • Press the key to listen to the recorded message. When you are satisfied with the recording press STOP. When you want to record again press DELETE. Call Recorder manual © Vidicode 2005... -
Page 44: View The Numberlist
7.4 Remove a number from the list To remove a number from the numberlist you need to view the list first as described above. Select the number you want to remove from the list. The display will show: Call Recorder manual © Vidicode 2005... - Page 45 The display will show: Blacklist - 1/200 12345 Delete? Remove a number from the numberlist Press YES to remove the number from the list. Press STOP to leave the numberlist-menu and acknowledge to save the changes. Call Recorder manual © Vidicode 2005...
- Page 46 Call Recorder manual © Vidicode 2005...
-
Page 47: Using The Cd Drive And The Cd Menu
Creating a directory on the CD is done to make the CD usable for the PC. • Press the function key to enter the disk menu and press NEXT once. The display will show: Create CD Directory NEXT EJECT START STOP Call Recorder manual © Vidicode 2005... -
Page 48: Erase Cd Re-Writable
The display will show: Erase CD Re-Writable? NEXT EJECT START STOP Press START to proceed erasing the CD The display will show: Erase CD Re-Writable? QUICK FULL BACK Press QUICK or FULL to proceed Call Recorder manual © Vidicode 2005... -
Page 49: Software Update
START STOP Place the CD with the software update in the CD drive and press START It may take a few seconds for the Call Recorder to recognize the CD. The display will show: Call Recorder manual © Vidicode 2005... - Page 50 Call Recorder! When the Call Recorder is finished the display will show: Update finished STOP • Press STOP to finish. The recordings in memory and your settings will remain intact after the software update. Call Recorder manual © Vidicode 2005...
-
Page 51: The Hard Disk Menu
Press NEXT to continue with the Total number of recordings The display will show: Total recordings: 648 STOP Total recordings in the disk menu The total number of recordings is displayed. Press STOP to leave the disk menu. Call Recorder manual © Vidicode 2005... - Page 52 Call Recorder manual © Vidicode 2005...
-
Page 53: Encrypted Recording
Recorder settings menu. See § 4.4 to enable the use of a CryptoCard. 10.1 Insert CryptoCard into Call Recorder Insert the CryptoCard into the Call Recorder as shown in the figure below. Call Recorder manual © Vidicode 2005... -
Page 54: The Cryptocard And Its Pin And Puc Code
• Press CHANGE to change the card code. First enter the original card code. • Press CONTINUE. Enter the new card code. • Press CONTINUE. Repeat the new card code for confirmation. • Press CONTINUE. Call Recorder manual © Vidicode 2005... -
Page 55: Making An Encrypted Recording
Pc with the Call Recorder Access System software, however, they cannot be played on the Pc without a CryptoCard matching the card used when the recording was made. See the following section for a detailed explanation. Call Recorder manual © Vidicode 2005... -
Page 56: Playing An Encrypted Recording
System has the ability to remove the encryption. Encrypted recordings can be exchanged with other Pc's just as any other recording. Encrypted recordings can be played on any Pc with Call Recorder Access System on it and with the original or matching CryptoCard. Call Recorder manual © Vidicode 2005... -
Page 57: The Ethernet Interface
• Press NEXT to save and move on to the next menu item. 11.3 FTP user The Ftp user is the user name of the Call Recorder. It is used by the Archive software to log on to the Call Recorder. Call Recorder manual © Vidicode 2005... -
Page 58: Ftp Password
Set the Ftp password • Press CHANGE to change the Ftp password. FTP pwd: ▓ CANCEL Enter the Ftp password Use the numerical keys to enter the Ftp password. • Press STORE to save the Ftp password. Call Recorder manual © Vidicode 2005... -
Page 59: Ftp Server Port
In case a DHCP server is not used on the network the Use DHCP server option must be disabled. Use DHCP server: NEXT CHANGE STOP Enable DHCP server • Press CHANGE to enable DHCP server. Call Recorder manual © Vidicode 2005... -
Page 60: Ip Address
11.8 IP subnet mask The IP subnet mask is used by the Call Recorder if access from outside the network is required. In this case the Gateway will need to be entered as well. Call Recorder manual © Vidicode 2005... -
Page 61: Gateway
Use the numerical keys to enter the Gateway of the Call Recorder. • Press STORE to save the Gateway of the Call Recorder. • Press NEXT to save and move on to the next menu item. Call Recorder manual © Vidicode 2005... -
Page 62: Ip Name
E-mail address. E-mail: NEXT CHANGE STOP Set the E-mail address. • Press CHANGE to enter an E-mail address. E-mail: ▓ STORE CANCEL Enter the E-mail address. Use the numerical keys to enter the E-mail address. Call Recorder manual © Vidicode 2005... -
Page 63: Reply Address
Subnet Mask need to be set later on. SMTP srv: 0:0:0:0 NEXT CHANGE STOP Set the IP address of the SMTP server. • Press CHANGE to enter the IP address of the SMTP server. Call Recorder manual © Vidicode 2005... -
Page 64: Smtp Server Port
Sometimes SMTP servers are set up to require a login. In this case SMTP Login should be enabled. When SMTP Login is enabled the next questions in the menu will aks for SMTP User name and Password. Call Recorder manual © Vidicode 2005... -
Page 65: Domain Name
Use the numerical keys to enter the domain of the SMTP server. • Press STORE to save the domain of the SMTP server. • Press NEXT to move on to the next menu item. Call Recorder manual © Vidicode 2005... -
Page 66: Dns Server
Network Time Server. NTP srv: 0:0:0:0 NEXT CHANGE STOP Set the IP address of the NTP server. • Press CHANGE to enter the IP address of the NTP server. Call Recorder manual © Vidicode 2005... -
Page 67: Ntp Server Port
• Press NEXT to save and to move on to the next menu item. 11.20 GMT correction GMT correction property is used to identify the time zone. NTP server normally issues GMT. GMT correction can be set in half hours from -15:00 to + 15:00. Call Recorder manual © Vidicode 2005... -
Page 68: Service Timer
Call Recorder. This is done with the RTR Call Monitor software, which connects with the Call Recorder over the network. This option enables this recorder to be accessible to the RTR Call Monitor software. Call Recorder manual © Vidicode 2005... - Page 69 Recorder. This password is also set in the RTR Call Monitor software. Monitor pwd: 0000 CHANGE STOP Enabling Monitor • Press CHANGE to enter a password • Press BACK to exit the network setting menu Call Recorder manual © Vidicode 2005...
- Page 70 Call Recorder manual © Vidicode 2005...
-
Page 71: Call Recorder Quick Cd Access System
Follow the instructions on the screen. 12.2 Start Click “Start“ in the lower left corner on your desktop. Go to Programs/Vidicode and click on “Call Recorder Quick CD Access System”. The application will start right away. The main dialog looks like this:... -
Page 72: View Recordings On Cd
The software will now start to read the recordings on the CD and create a list. Every row in the list represents a recording on the CD. The recording properties are displayed in the various columns. • Recording properties are: • Date and Time, • Duration, Call Recorder manual © Vidicode 2005... -
Page 73: Create An Archive On Hard Disk
Default the hard disk archive is located in the Archive folder in the directory where the program was installed. Default the program is installed in C:\Program Files\Vidicode\Quick CD Access. To view an Archive on HD: Select File in the menu, Select Archive on hard disk. -
Page 74: Recycle Bin
The program will now generate a list of recordings in the recycle bin. key is a shortcut to the above described function. In the recycle bin recordings can be selected to be removed or restored. Both options are available in the Action menu. 12.6 Export recordings Call Recorder manual © Vidicode 2005... -
Page 75: On Line Software Update
Line update. You need an open internet connection for this feature to work. Select Information in the menu Select Update product on Line The following dialog appears: Click Check for updates to check for available updates. The available update will be listed. Call Recorder manual © Vidicode 2005... -
Page 76: Search Recordings
Check Use Calendar to select a date range within the calendars. Select the starting date in the left calendar Select the end date in the right calendar. Click OK to execute the selected query. Call Recorder manual © Vidicode 2005... -
Page 77: Software Settings
Other settings include: Fax conversion settings in the Fax Conversion tab CryptoCard settings in the CryptoCard tab Password protection in the Security tab The Language tab will allow you to select a desired language. Call Recorder manual © Vidicode 2005... - Page 78 For a detailed description of the settings we refer to the help-files of the program. These are always in compliance with the software version and the available settings. Call Recorder manual © Vidicode 2005...
-
Page 79: The Access And Monitor Software
This can be usefull to save the storage capacity of your PC. The thought behind it is that the CD drive is used for backup and archiving applications. Call Recorder manual © Vidicode 2005... -
Page 80: Playing Recordings
This way it is possible to listen in on all lines of the Call Recorder with only a couple of seconds delay. The RTR Call Monitor application can be used to listen in on calls on all the Call Recorders connected to the network. Call Recorder manual © Vidicode 2005... - Page 81 The RTR Call Monitor For the communication between the RTR Call Monitor application and the Call Recorder it is essential that the network settings of the Call Recorder have been properly configured. See Chapter 7 for details. Call Recorder manual © Vidicode 2005...
- Page 82 Call Recorder manual © Vidicode 2005...
-
Page 83: Technical Specifications
Four mini-jack can be connected. 1. Odd Audio channels, from left to right 1, 3, 5 and 7 2. Even Audio channels, from left to right 2, 4, 6 and 8 3. Ground Call Recorder manual © Vidicode 2005... - Page 84 Start/Stop channel 6 Start/Stop channel 8 Power standard 5.5 mm power plug with - on outside ring and + pin on inside. Speech compression Algorithm data-rate in bytes/sec G.711 A-law 8000 G.711 µ-law 8000 Call Recorder manual © Vidicode 2005...
- Page 85 (including the ability to draw 1mA from the line to trigger Caller- ID). AGC circuit for leveling of recording levels of remote and local speaker Audio level detector to be used for speech triggered recording ( trigger level is software controllable) . Call Recorder manual © Vidicode 2005...
- Page 86 Other Features Battery backed real time clock Graphical LCD with back-lighting Keyboard with 32 keys Extensive PC software is available to create a database of recordings using the 10/100 Mb Ethernet interface. Call Recorder manual © Vidicode 2005...
-
Page 87: Acknowledgements
Call Recorder. The further configuration options concern all aspects of operation. In our experience most people are interested in configurations related to user’s access. Call Recorder manual © Vidicode 2005... -
Page 88: Liability
Vidicode assumes no liability regarding incorrect notification of call recording. Vidicode is not a source of official interpretation of laws of any country or state and shall not be construed as a source for making decisions. Call Recorder manual © Vidicode 2005... -
Page 89: Index
E-mail address Menu keys Fax Server Menu-key indicators Encrypted recording Monitor Erase CD Re-Writable Monitoring 35, 42 Ethernet interface Export Network Fax Recording gateway Free time left IP address Service timer password subnet mask Call Recorder manual © Vidicode 2005... - Page 90 Technical specifications Telephone line menu Recorder keys Recorder settings 19, 27 User interface Recycle bin Reply address Reset all values Voice activated recording RTR Call Monitor Volume Search Wildcard line number recordings Wizard remote number Call Recorder manual © Vidicode 2005...
Need help?
Do you have a question about the Octo and is the answer not in the manual?
Questions and answers