
Subscribe to Our Youtube Channel
Summary of Contents for RSscan footscan
- Page 1 Installation Guide and User Manual footscan ® System footscan ® with rs scan RS-PRD-00562-016...
- Page 2 Information in this guide is subject to change without notice. No part of this document may be reproduced or transmitted in any way without the express written permission of rs scan. ©rs scan ® footscan is a registered trademark. Windows is a registered trademark of Microsoft Corporation in the United States and other countries. RS-PRD-00562-016...
-
Page 3: Table Of Contents
4.8 Drivers are not working under Windows® 7 4.9 Program fails to start 4.10 Connection with device is lost 4.11 Migration from footscan® 8 gait to footscan® 9 fails Part 2 User Manual Chapter 5 Main Window Chapter 6 Home Screen 6.1 Weight Calibration... - Page 4 12.9 Personalization Chapter 13 Checkout Screen Chapter 14 Orders Screen Chapter 15 Report Screen Part 3 Migrate from footscan® 7 or 8 gait Chapter 16 General Information Chapter 17 Migration Wizard 17.1 Migration Start Page 17.2 Select Import File Page 17.3 Download Export Tool Page...
- Page 5 18.3 Entry Level 1m heavy duty plate 18.4 Entry Level 1.5m plate 18.5 Interface box 18.6 0.5m footscan plate for interface box 18.7 1m footscan plate for interface box 18.8 2m footscan plate for interface box Chapter 19 Risk analysis and the gait ratios graphs.
-
Page 6: Introduction
The user manual ® provides you with an overview of all functions of the footscan 9 software. The remainder of this introductory chapter covers general information about rs scan and its products, as well as conventions used throughout this document. -
Page 7: About Rs Scan
About rs scan rs scan offers professional solutions for highly accurate dynamic pressure measurements in all kind of set-ups, using our renowned footscan systems. Our ® primary aim is to offer the customer an affordable pressure measurement system with the best specifications to obtain an accurate result, combined with the clearest and easiest hardware and software user interface. -
Page 8: Products Overview
1m entry level heavy duty system Footscan interface box systems also come in three sizes: 0.5m, 1m and 2m. They ® ® consist of a footscan interface box and a plate, as well as the cables to connect them: RS-PRD-00562-016... - Page 9 USB cable A-B 5m Power supply unit Power cord (Specific country version according to order). A footscan security dongle is a USB2 hardware dongle which can be used to run the ® ® ® footscan 9 software without a footscan plate being plugged in.
- Page 10 The 3D scanners can be used for making a three dimensional representation of a foot, please refer to the manual included with your 3D scanner for more information. RS-PRD-00562-016...
-
Page 11: Conventions In This Document
Conventions in this Document The following typestyle conventions are used throughout this guide: Warning. Read these instructions carefully. Tip or note. The text applies to a specific module. Button Refers to a button in the software's user interface. Checkbox Refers to a checkbox in the software's user interface. Radiobutton Refers to a radiobutton in the software's user interface. -
Page 12: Part 1 Installation Guide
Installation Guide RS-PRD-00562-016... -
Page 13: Chapter 1 General Information
This chapter provides important information on your footscan product. It contains recommendations for safe usage and maintenance of the product, as well as information about its warranty terms and conditions. The minimum system requirements and the End-User License Agreement (EULA) of the footscan 9 software conclude this ® chapter. -
Page 14: Symbols
1.1 Symbols The following symbols may appear on the product, packaging or documentation: Caution, read these instructions carefully. If used on the product label: consult accompanying documentation. Tip or note. Marking according to the European directive 2002/96/EC on Waste Electrical and Electronic Equipment (WEEE). Serial number. - Page 15 Keep away from rain. Packed storage temperature limitation. Recyclable packaging. Recyclable packaging, cardboard material. RS-PRD-00562-016...
-
Page 16: Intended Use
1.2 Intended Use ® The footscan state-of-the-art pressure measurement system is intended for human beings, to measure static and dynamic plantar pressure and the analysis of balance and gait patterns. Operation and interpretation of the measurements as well as prescription of treatment or orthotic corrections should be done by trained professionals. -
Page 17: Contra-Indications
1.3 Contra-indications Clients with stability issues when walking or running might require assistance during the measurement. RS-PRD-00562-016... -
Page 18: General Safety Information
® supported and the entire client runway is non-skid. ® Install the footscan plate in a runway which is long enough to allow the client to walk or run in a natural gait pattern. ® To eliminate the height difference between the floor and the footscan plate, either recess the footscan plate in the floor or use a raised runway (available from rs scan ®... -
Page 19: Safety Inspections
This section contains important instructions regarding safety. Please read them carefully. Prior to each measurement session, visually inspect the measurement surface of the footscan plate, do not use the footscan plate if the protective sticker or rubber ® ® is loose or damaged to such an extent that the client could trip or get injured. -
Page 20: Care Of The Measurement Surface
The measurements surface can be cleaned and disinfected with a suitable disinfectant or a mild detergent. ® Do not pour or spray the cleaning or disinfectant product directly on the footscan plate, use a damp cloth to clean and remove contamination. ®... -
Page 21: Calibration And Repair
RMA (Return Material Authorization) procedure. Save the original packaging of the footscan system, it can be used to ship the ® ® footscan system to rs scan for repair or replacement of the Pressure Sensitive Layer (PSL). -
Page 22: European Union (Eu) Customer Information
1.8 European Union (EU) Customer Information ® Footscan products are marked according to the European directive 2002/96/EC on Waste Electrical and Electronic Equipment (WEEE). This symbol on the product or the documentation indicates that this product may not be treated as household waste. Instead it shall be handed over to the applicable collection point for the recycling of electrical and electronic equipment. -
Page 23: Limited Warranty Terms And Conditions
® Use of the footscan system for any purpose other than the intended use. Repairs, alterations or disassembly carried out by unauthorized parties or agents. Products damaged during transit to rs scan due to insufficient or improper packaging. -
Page 24: Minimum System Requirements
1.10 Minimum System Requirements ® ® Footscan 9 runs on the following versions of Microsoft Windows : 7, 8 and 10. rs scan tests and validates its software on 32-bit and 64-bit PC systems. The minimum system requirements are: Microsoft Windows 7. -
Page 25: Internet Access
1.11 Internet Access ® Footscan 9 needs an active internet connection for correct operation. So in case of a restricted internet access (firewall, ...), make sure that the following url's are accessible: Automatic software updates and migration wizard download: ftp.rsscan.com ®... -
Page 26: Software End-User License Agreement
Software installation and use. You may install an unlimited number of copies of the SOFTWARE PRODUCT on computers or network servers within your company. ® One software license is required for each footscan system, enabling the use of the ® SOFTWARE PRODUCT on only one footscan system, indicated by the serial number of the footscan system. - Page 27 The rs scan website http://www.rsscan.com Your regional distributor. If you cannot locate a regional distributor, contact the rs scan support department at support@rsscan.com. 5. LIMITED WARRANTY AND DISCLAIMER The manufacturer of the SOFTWARE PRODUCT warrants that the media on which...
- Page 28 with any other programs), even if the manufacturer of the SOFTWARE PRODUCT has been advised of the possibility of such damages. This Limited Warranty is void if failure of the SOFTWARE PRODUCT has resulted from accident, abuse, misapplication, abnormal use or a virus. 6.
-
Page 29: Chapter 2 Installation
Chapter Installation ® This chapter describes the installation and setup of the footscan system. It guides you ® through all steps needed to obtain a fully functional footscan system. Most steps in the installation procedure outlined in this chapter apply to all footscan ®... -
Page 30: Prerequisites
(Section 1.10). to have all necessary hardware parts. For a 1.5m entry level system there should be a detachable USB A-A cable included with the footscan system. ® to have obtained a medium (USB stick) containing the application installer and a license and factory calibration file. -
Page 31: Attach The Usb Cable To The Device
2.2 Attach the USB Cable to the Device This section applies only to 1.5m Entry Level Systems. Proceed to Section if not applicable. The 1.5 entry level plate uses a detachable USB cable A-A. Flip the rubber lid to access the plate connector. Position one of the two identical connectors of the supplied USB cable A-A in front of the plate connector. -
Page 32: Install The Interface Box
Align the positioning notches Align the connectors in a straight line and insert carefully. Do not use excessive force. Connect the analog coaxial cable (XLR end) to the analog footscan connector on ® t h e footscan ® interface box. Align the positioning key and insert until the latch locks. - Page 33 ® Connect the footscan interface box to your computer using the supplied USB 2.0 compliant cable. Connect the USB-B side of the cable (square connector) to the USB socket on the footscan ® interface box. Match orientation connectors. When the hardware setup is completed, ®...
-
Page 34: Install The Software
2.4 Install the Software ® Do not connect the footscan system to your computer yet. This is part of the installation procedure later on in this section. Insert the installation medium containing the installer in your computer. The installation procedure starts automatically. If not, start autorun.hta manually. - Page 35 ® Windows may ask for permission to install the driver. Click Install to continue. ® The footscan USB device driver is installed successfully. Click Finish to continue. Place the plate on the floor, the measurement surface facing up (serial number label facing down).
- Page 36 Click Finish to finish the software installation. To start footscan ® after installation leave Launch footscan 9 checked. The installation of the footscan system is now complete. Proceed to Chapter ® perform your first measurement. RS-PRD-00562-016...
-
Page 37: Database Upgrade
In case of an error, the installation will revert itself to the footscan 9 version from which you were ®... -
Page 38: Replace The License And Calibration File During Installation
2.6 Replace the license and calibration file during installation ® When the installer includes a new license and calibration file for your footscan system, the installer will ask for confirmation to replace it. Click on Yes to replace the license and calibration file or click on No to keep working with your existing license and calibration file. -
Page 39: Installing The Software On Windows Versions Below
It is still possible for users with older Windows versions to update their license and ® calibration file. This may be required after the footscan pressure plate has received a ® PSL replacement. The license and calibration file can be installed by executing the installer as follows: 1. -
Page 40: Chapter 3 Your First Measurement
At startup, footscan 9 shows the Home screen (Figure 1). ® If you have not already plugged in the footscan system, plug it in now. A notification ® balloon will pop up, informing you that the footscan device needs weight calibration. -
Page 41: Weight Calibration
3.1 Weight Calibration Weight calibration uses a measurement of a subject with known weight to scale the pressure data appropriately. rs scan recommends performing a weight calibration regularly to assure accurate measuring. Refer to Section for more information. Fill in the Weight and Shoe size of the measurement subject. -
Page 42: Create A New Subject
3.2 Create a New Subject ® If there was no footscan database present during the installation of ® footscan 9, the installer has copied a demo database. To record a new measurement the application needs information of the subject being measured. -
Page 43: Create A New Recording
3.3 Create a New Recording The Record wizard is responsible for creating new measurements. It consists of five stages: Record Setup, 3D Scanner Recording, Static Recording, Balance Recording and Dynamic Recording. Other screens are inactive while going through the Record wizard. - Page 44 The Dynamic Recording shows the activity on the plate in a preview. The recording is initiated by clicking Start recording. Walk over the plate in the gait direction (Section 2.4). The timeline shows all feet recognized during the measurement as thumbnails. The wizard displays the latest left and right feet on the right.
-
Page 45: Chapter 4 Troubleshooting
Troubleshooting ® This chapter discusses details about the footscan system that might be relevant to some users during the installation process. Please refer to this chapter if the installation does not proceed as described in this document. For unforeseen problems please contact the rs scan support department at support@rsscan.com. -
Page 46: Licensing
® To prevent unauthorized usage, footscan 9 only runs when a licensed device is plugged into your computer. A licensed device may be either a footscan plate, 3D ® scanner or a USB2 hardware dongle. License information of the footscan device(s) is ®... - Page 47 choose Manage configuration to open the software package and modules dialog. Consult section for more information. RS-PRD-00562-016...
-
Page 48: Configuration File
Footscan 9 will try to automatically download the latest configuration file for your system. This is done automatically in the background when the software is starting up. Should a new configuration file be available, footscan 9 will ® ask you if you want to proceed to replace your current configuration file with the updated version. - Page 49 Figure 6: The software package and modules dialog can be opened in the security dialog. 2. By clicking the Software package and modules button in the Homescreen (Figure 7). More information about the home screen can be found in section 6. Figure 7: The software package and modules dialog can be opened in the home screen.
-
Page 50: Calibration File
Footscan 9 will try to automatically download the latest calibration file(s) for your system. This is done automatically in the background when the software is starting up. Should a new calibration file be available, footscan 9 will ask ® you if you want to proceed to replace your current calibration file with the updated version. - Page 51 Figure 10: The license and hardware calibration dialog can be opened in the home screen. RS-PRD-00562-016...
-
Page 52: Automatic Download Of Configuration And Calibration Files Fails
4.4 Automatic download of configuration and calibration files fails ® Footscan 9 will try to automatically download the latest configuration and calibration file(s) for your system. Check the following should this download fail: Make sure there is an active internet connection. -
Page 53: Pressure Sensitive Layer (Psl) Replacement
The PSL replacement and factory calibration will be performed by rs scan and a new calibration file will be made available on the rs scan calibration server. As soon as you start the footscan 9 software with the pressure plate ®... -
Page 54: Important Files
When contacted, rs scan's support department might ask for additional information about the current problem. Such information might include the contents of files of the footscan system. This section includes the location and a description of some of the ®... -
Page 55: Program Fails To Install
4.7 Program fails to install ® ® The footscan 9 software installer requires that certain Windows updates are present on your system. In most cases the required updates will be automatically selected by Windows before the installation continues. However, some Windows configurations ®... -
Page 56: Drivers Are Not Working Under Windows
® 4.8 Drivers are not working under Windows 7 ® The footscan drivers for the pressure plate and 3D scanner require that certain updates are present on your Microsoft Windows 7 system in order to work. See section ® for more information about updating your system. -
Page 57: Program Fails To Start
4.9 Program fails to start ® The footscan 9 software depends on external software components in order to function correctly. All necessary components are installed automatically during the installation of the footscan 9 software. In case critical external components are removed afterwards ®... -
Page 58: Connection With Device Is Lost
If this happens frequently, the following may fix the problem: ® Check if the USB connector from the footscan USB device fits correctly into the USB port. Removing and reinserting the USB connector might be enough to resolve the problem Try using a different USB port. -
Page 59: Migration From Footscan 8 Gait To Footscan 9 Fails
® support@rsscan.com if you want to migrate footscan 8 gait data to the new footscan 9 software. ® ® More information about migrating footscan 7 or 8 gait to footscan 9 can be found in ® ® section 3. RS-PRD-00562-016... -
Page 60: Part 2 User Manual
User Manual RS-PRD-00562-016... -
Page 61: Chapter 5 Main Window
It holds icons to view and manipulate the state of the software. Next to the full version of your system there is an icon related to automatic updates. footscan 9 automatically checks online for available updates on a daily basis, and will ®... - Page 62 Figure 14: The Status Bar A calibration icon and notification balloon will appear when a connected device should be calibrated. rs scan recommends regular weight calibration to maintain optimal accuracy. Go to the Settings dialog to modify the calibration frequency. RS-PRD-00562-016...
-
Page 63: Chapter 6 Home Screen
Chapter Home Screen ® At startup footscan 9 shows the Home screen (Figure 15). The Home screen is the portal from which you can access all functions of the application. Figure 15: ® At startup, footscan 9 shows the Home screen. The Home screen guides you to the other screens of the application. -
Page 64: Weight Calibration
The values of the footscan device are proportionate to the pressure on each sensor, up to a factor. This weight calibration factor is identical for all sensors but might vary in time due to wear. Footscan 9 relies on an up-to-date value of the weight calibration ®... -
Page 65: Software Package And Modules
® The dialog shows for each footscan module if it is activated and provides a short description of the functionality that they unlock. To upgrade your package or purchase additional footscan modules, contact rs scan's sales department at ®... -
Page 66: License And Hardware Calibration
6.3 License and hardware calibration ® ® To prevent unauthorized usage footscan 9 only runs when a licensed footscan plate, 3D scanner or hardware dongle is plugged into your computer. Figure 18: ® The license and hardware calibration dialog lists all footscan devices connected to your system. -
Page 67: Settings
6.4 Settings ® The Settings dialog holds settings to customize footscan 9. Modify any of these settings and click Save to save or Cancel to discard the changes. Footscan 9 sorts customizable settings in tabs: Customization, Language & Units, ®... - Page 68 ® ® Shoe size unit Controls the unit of the shoe size used in footscan 9. The toe allowance (in millimeter) parameter is used to Toe allowance in mm: calculate an estimation of the shoe size of a 3D scanned foot (see 10.1).
- Page 69 (Section 4.5). Figure 22: Settings affecting data export Export ® holds settings which affect how footscan 9 exports data: Displays the folder where footscan ® 9 saves data from Destination folder for exported sessions (See Chapter 8). Click Browse...
- Page 70 Modifies the dots per inch (dpi) of the exported plantar plantar surface photo surface photos. export Displays the folder where footscan 9 saves the text exports ® Destination folder for (See Chapter 8.2). Click Browse... to choose a different text export folder.
- Page 71 Enter the url of the custom design wizard. More information about using the custom design wizard can be found in the installation ® directory of footscan 9 (see 4.6), in the subfolder "webplugin". Figure 24: ® Settings regarding technical aspects of footscan 9.
- Page 72 RS-PRD-00562-016...
-
Page 73: Chapter 7 Database Screen
If there was no footscan database present during the installation of ® footscan 9, the installer has copied a demo database. ® The Database screen (Figure 25) lists all clients stored by footscan 9. Figure 25: ® The Database screen lists all clients stored by footscan 9. - Page 74 The search text field at the top right of the client table filters out clients not matching its contents. As a result the table only shows clients passing the filter. A match is possible with any of the personal information stored, even with dates and phone numbers. Clear the filter text to view all clients.
-
Page 75: List Export Dialog
7.1 List Export Dialog The "ABCD ratios" option in the list export is available in the Scientific package(s). All other list export options don't require a special package. The list export dialog (Figure 26) allows you to export all clients as text into a csv file. Figure 26: The list export dialog allows exporting all clients as text into a csv file. - Page 76 The exported csv file can easily be imported into any currently available spreadsheet software. The list export takes the user locale of the operating system into account so that there are no conversion errors between footscan 9 and the spreadsheet software. ®...
-
Page 77: Chapter 8 Client Screen
Personal Information ® For each client, footscan 9 stores name, address, birth date, gender, phone numbers, e-mail, and free-form remarks. Optionally the application may hold client photographs. The Client screen displays the personal information for the current client. Modify this information in the appropriate text fields. - Page 78 (L for left, R for right). ® Footscan 7 gait compatible text exports of the selected session(s) Text exports (Chapter 8.2). The text export is available in the Scientific package(s).
-
Page 79: Edit Session Dialog
The edit session dialog allows to change the session data. The following fields can be modified: Name Weight and weight unit (the selected weight unit will be used in the entire footscan ® 9 application) Shoe size and shoe size unit (the selected shoe size unit will be used in the entire ®... -
Page 80: Text Export Dialog
The text exports are available in the Scientific package(s). The text export dialog (Figure 29) allows you to export the measurement data in human readable text format. These text exports are compatible with the footscan 7 gait ASCII ® exports. - Page 81 Include header Add header information to the text export. This information includes information in the the session name, person name, measurement date and scanning text export speed. Use .xls as file Use xls as the file extension for the text export, this allows easy extension for the opening in Microsoft Excel.
-
Page 82: Custom Web Plugin
API so it can be used inside the custom web plugin panel. ® More information about installing the custom web plugin and using the footscan API ® can be found in the installation directory of footscan 9 (see 4.6), in the subfolder "webplugin". RS-PRD-00562-016... -
Page 83: Chapter 9 Record Wizard
Record wizard. Furthermore the foot recognition algorithms used during the measurements need accurate Weight * and Shoe size * of the client for optimal results. footscan 9 ® remembers the values of the client's latest measurement session and uses them initially. - Page 84 Figure 31: The 3D scanner recording creates a 3D representation and makes a plantar surface photo of the client's feet. The 3D Scanner Recording stage shows a preview window for the 3D model and plantar surface photo of the scanned left and right foot. The 3D Scan Recording is performed on each foot separately and can be initiated by clicking the Scan left foot Scan right foot buttons.
- Page 85 Figure 32: The Static recording takes snapshots of the pressure distribution under the client's feet while standing on the plate. The Static recording stage (Figure 32) consists of a large canvas displaying the activity on the plate. Click Take snapshot (F5) to make a snapshot of the current pressure distribution.
- Page 86 ® the foot roll-off. footscan 9 recognizes left and right feet automatically. The client should walk or run in their natural gait pattern. A few practice runs might be useful before taking the final measurement.
- Page 87 It highlights the ® selected feet in blue. Footscan 9 requires at least one foot for analysis. The D3D analysis (Section 11) even needs two left and two right feet. The Dynamic recording stage displays the selected feet on the right.
-
Page 88: Chapter 10 Analyze Screen
Chapter Analyze Screen The Analyze screen (Figure 35) shows analyses of the measurement sessions created with the Record wizard. It either analyzes a single measurement session (Figure 35a), or it compares different measurement sessions (Figure 35b). Single measurement session analysis Comparison of measurement sessions Figure 35: The Analyze screen... - Page 89 Impulse Impulse analysis of the current foot selection (Section 10.9). Zones Anatomical zones of the current foot selection (Section 10.10). Pressure in user-defined areas of the current foot selection Probes (Section 10.11). Load rate Load rate of the current foot selection (Section 10.12). Footprint size Footprint size of the current foot selection (Section 10.13).
- Page 90 If toggled time is expressed as a percentage of contact duration, otherwise the replay is in real-time. ® Footscan 9 saves the state of the button, which is shared among all analyses. Feet Selection Most analyses apply to a single left and/or right foot.
- Page 91 the selected pair. Change the selection by clicking the thumbnails. The Analyze screen updates its analyses instantaneously. Click Select feet again to hide the timeline. When comparing two pair of feet the Analyze screen also displays a Select feet for the second measurement (Figure 35b).
-
Page 92: Both Feet 3D Scanner
10.1 Both Feet 3D Scanner The both feet 3D scanner analysis (Figure 37) shows the scanned left and/or right foot. Figure 37: The Both Feet 3D scanner analysis shows the scanned left and/or right foot. The scanned foot can be manipulated by clicking and dragging inside the view. A number of predefined measurements are performed and made visible on the 3D scan of each foot and as numerical values (in millimeter) in the measurement table underneath it:... - Page 93 Please note that when the object was scanned using scan type "Foambox" girths and other predefined measurements will not be available. A scanned foot can be shown in full screen by clicking the View left foot in fullscreen or View right foot in fullscreen button (Figure 38). Note that only a selected girth will show up in the measurements overview.
-
Page 94: Plantar Surface Photo
10.2 Plantar Surface Photo The plantar surface photo analysis (Figure 39) shows the plantar surface photo of the 3D scanned left and/or right foot. Figure 39: The plantar surface photo analysis shows the left and/or right plantar surface photo. The plantar surface photo analysis allows to manually adjust the cropping area: The size can be changed by clicking and dragging the corner points of the crop rectangle The location can be changed by clicking and dragging the center of the crop... -
Page 95: Static
The center of these quadrants indicates the center-of-pressure of the measurement. ® The percentages in the boxes on the left express how the pressure on the footscan plate is spread across the different areas defined by the quadrants. Drag the center and/or lines to modify the relative positions of the quadrants. The analysis updates the percentages in the boxes accordingly. -
Page 96: Balance
The ® percentages in the boxes express how the force on the footscan plate is spread across the different areas defined by the areas (left/right, front/rear and four quadrants). - Page 97 axis in red). The possibilities are: Division cross coordinates: the coordinate system is centered around the point of intersection of the frame division cross. Plate coordinates: the coordinate system uses the same coordinate system as reported by the pressure plate. The position of the frame division cross is adjustable in the Division cross position combobox.
-
Page 98: Interval Balance
10.5 Interval Balance The interval balance analysis is available in the Clinical, Scientific package(s). The Interval Balance analysis (Figure 42) evaluates a balance measurement divided into different time intervals. Figure 42: The interval balance analysis screen. The interval balance analysis shows the balance measurement divided into several intervals, each interval displays the following: An image of the maximum pressure values of the balance measurement present in the interval. - Page 99 Clear all intervals: click on the button to remove all the intervals. It is always possible to manually add, move, delete or remove the intervals. When done the Divide intervals combobox will switch to "Manual". The used coordinate system and the force division cross origin are adjustable by using the comboboxes Coordinate system and Division cross position.
-
Page 100: Center Of Pressure (Cop) Per Foot Balance
10.6 Center of Pressure (COP) per Foot Balance The COP per foot balance analysis is available in the Clinical, Scientific package(s). The center of pressure (COP) per foot balance analysis (Figure 43) shows the progression of the center of pressure, deconstructed in several detailed analyses. Figure 43: The COP per foot balance analysis screen. - Page 101 Minimum: The minimum x and y value of the center of pressure position for the left and right foot. Maximum: The maximum x and y value of the center of pressure position for the left and right foot. Traveled distance: The length of the center of pressure line of the left and right foot in millimeter.
- Page 102 10.7 2D Information about the exorotation and subtalar joint angles is available in the Clinical, Scientific package(s). The 2D analysis replays the roll-offs of the current foot selection. Figure 44: The 2D analysis replays the roll-offs of the current pair of selected feet. The 2D analysis shows the current pair of selected feet.
- Page 103 When playing, the 2D analysis loops through the roll-offs. A large white dot on the center-of-pressure line shows the current center-of-pressure. When stopped the analysis shows the maximum sensor values of both feet. RS-PRD-00562-016...
- Page 104 Use the mouse's scroll wheel to zoom in and out. Click and drag the height maps to change the point-of-view. Some older computer systems might not support 3D rendering adequately. The 3D analysis is not available on such systems. Review the minimum system requirements of footscan 9 for more information. ® RS-PRD-00562-016...
-
Page 105: Impulse
10.9 Impulse The Impulse analysis (Figure 46) displays the total impulse applied on each sensor of the current foot selection. The color scale expresses impulse in Figure 46: The Impulse analysis shows the total impulse applied on the current foot selection as an image. -
Page 106: Zones
10.10 Zones ® Footscan 9 automatically recognizes feet when recording the dynamic measurement (Chapter 9). During feet detection the application determines the location of ten anatomical zones. Some analyses need these zones to compute parameters, such as the foot axes. -
Page 107: Probes
® Initially footscan 9 places each probe on the sensor at the center of its corresponding zone. Click and drag any of the corners of a probe to resize it in that direction. Click and drag the middle of the probe to reposition it. Note that the application updates the graphs instantaneously when the probes change. -
Page 108: Load Rate
10.12 Load rate The Load rate analysis (Figure 49) evaluates the rate at which the force applied on each anatomical zone changes. More specifically it displays the derivative of the force applied on each zone (expressed in Figure 49: The Load Rate analysis displays the rate of change of the force applied on each anatomical zone. -
Page 109: Footprint Size
10.13 Footprint size The Footprint size analysis (Figure 50) measures the width and height of the selected pair of feet. Figure 50: The Footprint Size analysis shows the general dimensions of the current foot selection. The cyan lines depict the length of each of the footprints. The pink lines span the total width of the metatarsal heads. -
Page 110: Risk Analysis
10.14 Risk analysis The Risk analysis (Figure 51) gives more information about the risk of the feet in a dynamic measurement. Figure 51: The risk analysis screen. The Risk analysis screen gives a global and local risk of the feet in a dynamic measurement. -
Page 111: Gait Ratios Analysis
10.15 Gait Ratios analysis The gait ratios analysis is available in the Clinical, Scientific package(s). The gait ratios analysis (Figure 52) gives a comparison for the selected left and/or right foot and the average for all measured left and/or right feet for specific calculations. Figure 52: The gait ratios analysis screen. - Page 112 A positive value indicates a higher load on the first toe, a negative value indicates a higher load on M1. Foot balance (Mediolateral foot distribution) Mediolateral foot balance is defined as the mediolateral pressure distribution of the entire foot during stance phase. The mediolateral foot balance is calculated by comparing the pressure underneath the medial aspect of the foot (M1+M2+MH) with the pressure underneath the lateral aspect of the foot (M3+M4+M5+LH).
- Page 113 T1: the force under the toe 1 zone. Zavrg: the average total force under the foot. RS-PRD-00562-016...
-
Page 114: Center Of Pressure Graphs
10.16 Center of pressure graphs The center of pressure graphs are available in the Clinical, Scientific package(s). The center of pressure graphs (Figure 53) shows the distance between the center of pressure and the foot axis. The distance is defined as the mediolateral (x) component of the center of pressure expressed in foot axis coordinates. -
Page 115: Single Foot Timing
10.17 Single Foot Timing The single foot timing analysis is available in the Clinical, Scientific package(s). The single foot timing analysis (Figure 54) shows the different events and phases during a foot roll-off for the selected left and right foot. Figure 54: The single foot timing analysis screen. -
Page 116: Full Plate
10.18 Full Plate The Full plate analysis (Figure 55) replays the full dynamic measurement, regardless of the foot selection. Figure 55: The Full plate analysis replays the full dynamic measurement. When playing, the analysis loops through the entire dynamic measurement. When stopped it shows the maximum sensor values of the first foot. -
Page 117: Multi Step
10.19 Multi Step The multi step analysis is available in the Clinical, Scientific package(s). The multi step analysis (Figure 56) shows information about steps and strides in a dynamic measurement. Figure 56: The multi step analysis screen. All consecutive feet with the same orientation can be divided into steps and strides: A step contains two feet of different type. - Page 118 the step table. For each step and stride some parameters are calculated and shown in the corresponding step and stride table. Steps and strides can be annotated by toggling the toolbar button. Steps will be shown using dark blue dimension lines, while strides will be shown using dark green dimension lines.
-
Page 119: Compare: 2D
10.20 Compare: 2D The 2D comparison (Figure 57) compares the current foot selection to any other pair of feet. Figure 57: The 2D comparison compares the current foot selection to any other pair of feet. The comparison draws both pairs with the same color scale, displayed in the middle. The color scale uses the pressure value range of the current dynamic measurement as reference. -
Page 120: Compare: Impulse
10.21 Compare: Impulse The Impulse comparison (Figure 58) displays two impulse analyses next to each other. Figure 58: The Impulse comparison compares two impulse analyses. Both analyses share the same color scale. The comparison sets the minimum- and maximum impulse value of the current foot selection as its value range. RS-PRD-00562-016... -
Page 121: Compare: Areas
10.22 Compare: Areas The Areas comparison (Figure 59) compares the pressure applied on the major foot areas (mid-, fore- and rearfoot) of two pairs of feet. Figure 59: The Areas comparison compares the pressure applied on the major foot areas of two pairs of feet. The Areas comparison is almost identical to the 2D comparison. -
Page 122: Chapter 11 Design Screen - D3D
Chapter Design Screen - D3D The D3D analysis proposes an orthotic support based on the current dynamic measurement. D3D stands for Dynamic three-Dimensional. It is the result of years of extensive pressure measurement research by rs scan. The D3D analysis needs at least two left and/or right feet to make a reliable proposal. -
Page 123: Start Panel
11.1 Start panel The start panel (Figure 61) gives an overview of some important messages the user must read before proceeding. Click START to initiate the D3D wizard. Figure 61: Start panel. RS-PRD-00562-016... -
Page 124: Usage
11.2 Usage The Usage panel allows to choose the main usage for the orthotic support. It is possible to specify a sport if needed. The Usage controls the main usage for the orthotic support. The Sport controls the sport, if needed. Figure 62: Usage and sport. -
Page 125: Insole Base Layer
11.3 Insole base layer The insole base layer panel controls the base part of the D3D orthotic support. The D3D analysis makes a base type suggestion, it is possible to modify the proposed values. Base type controls the type of the base layer. Base size controls the size of the base layer. -
Page 126: Insole Top Layer
11.4 Insole top layer The insole top layer panel controls the top cover of the D3D orthotic support. The D3D analysis makes a top type suggestion, it is possible to modify the proposed values. Top type controls the type of the top layer. Top size controls the size of the top layer. -
Page 127: Insole Height
11.5 Insole height The insole height panel controls the the height of the D3D orthotic support. The D3D analysis proposes the heights for the left and the right foot, it is possible to modify these values. The insole height can adopt to the following values: : insole model for flat feet : insole model for high arched feet : insole model for normal feet... -
Page 128: Left Foot Correction
11.6 Left foot correction ® The left foot correction page shows the four orthotic parameters computed by footscan 9 next to their corresponding corrections. Select the desired corrections for the left foot. The insole profile on the right depict the current configuration. Specify the thickness or the inclination if checked. -
Page 129: Right Foot Correction
11.7 Right foot correction The right foot correction page shows the four orthotic parameters computed by footscan 9 next to their corresponding corrections. Select the desired corrections for ® the right foot. The insole profile on the left depict the current configuration. Specify the thickness or the inclination if checked. -
Page 130: Checkout
11.8 Checkout Click the PROCEED TO REPORT to advance to the checkout overview. Figure 68: Checkout. RS-PRD-00562-016... -
Page 131: Chapter 12 Design Screen - Phits
Chapter ™ Design Screen - Phits The RS Print wizard calculates and proposes the design of the insoles based on the subject-specific plantar pressure measurements. The underlying mathematical algorithms use the average dynamic pressure profile of each footprint to calculate the foot-specific properties and consequently the foot-specific insole designs. -
Page 132: Start Panel
12.1 Start panel The start panel (Figure 70) gives an overview of some important messages the user must read before initiating the insole design. Click Start to initiate the insole design. Figure 70: Start panel. RS-PRD-00562-016... -
Page 133: General Info
12.2 General Info The general info panel (Figure 71) requires general information about the shoe type. Size controls the shoe size. By default, the value will correspond to the value that was entered in the record wizard. Shoe sizes are in UK sizes. Usage controls the usage the insole will be used for (Daily use or Sports). -
Page 134: Insole Composition
12.3 Insole Composition The insole composition panel (Figure 72) allows setting the properties of the top layer and the printed base layer. Top layer Thickness controls the thickness of the top layer. The default thickness is dependent on the previously chosen Usage in the general info panel. -
Page 135: General Corrections
12.4 General Corrections In the general correction panel (Figure 73), the stiffness direction and the navicular support can be modified. Stiffness Direction controls the amount of pronation/supination correction. Positive values indicate anti-pronation stiffness. Negative values indicate anti-supination stiffness. Use the arrows to modify the orientation of the stiffness. -
Page 136: Local Stiffness
12.5 Local Stiffness In the local stiffness panel (Figure 74), the local stiffness of the base layer of the insole can be adjusted. The base layer is divided in five predefined zones. The stiffness ranges from 1 (i.e. more flexible = light blue) to 5 (i.e. more stiff = dark blue). Hovering over a zone activates the local stiffness controller, which allows the user to set the local stiffness for each zone. -
Page 137: Heel Corrections
12.6 Heel Corrections Heel pad controls the inclusion of a soft heel pad (PU soft) for fat pad syndrome, heel spur or plantar fasciitis. The heel pad option is only available in combination with a 6 mm EVA top layer and only for non-cycling insoles. Heel Offset controls the flat increase of the heel (ranging from 1 to 6 mm in steps of 1 mm). -
Page 138: Meta Corrections
12.7 Meta Corrections The meta corrections panel (Figure 76) allows including an additional meta bar or meta pad. Meta Bar Left/Right enables the inclusion of a meta bar. This option is only available if an ortho base type insole has been chosen in the insole composition panel. -
Page 139: Forefoot Corrections
12.8 Forefoot Corrections The forefoot corrections panel (Figure 77) allows including additional forefoot corrections. Shape controls the shape of the forefoot correction. For this feature, a differentiation is made between regular insoles (i.e. comfort, narrow, running and soccer) and cycling insoles. -
Page 140: Personalization
12.9 Personalization In the personalization panel (Figure 78), a customized personalization can be added to the insole. Personal ID controls the personal ID that is added to the rear of the insoles. By default, the personal ID is set to the subject’s first name (limited to 8 alphanumerical characters). -
Page 141: Chapter 13 Checkout Screen
Chapter Checkout Screen In the checkout window (Figure 79), an overview of the subject information is displayed. Delivery Address controls the desired delivery address. Remarks gives the opportunity to add additional comments about the delivery address or insole finishing. Click confirm order button to submit the order and upload it to the cloud. Figure 79: Checkout screen. -
Page 142: Chapter 14 Orders Screen
Chapter Orders Screen In the order summary (Figure 80), an overview of the essential information of the order is displayed, such as the subject information, unique order ID (e.g. RS15-ENA-MUS), the order status, expected shipping date and delivery address. Figure 80: Order summary. -
Page 143: Chapter 15 Report Screen
By default the footer refers to rs ® scan and footscan 9. Both sections support customization to some degree (Section 6.4). Check the following boxes to add their corresponding content to the current report:... - Page 144 Real size plantar surface photo Shows the plantar surface photo scaled 1:1. This content adds one page for each 3D scanned foot to the report. Static Adds the results of the static analysis (Section 10.3). Shows maximum sensor values registered during the static measurement as well as the four quadrants and the relative distribution of force among those quadrants.
- Page 145 Standard Shows the maximum pressure values of the dynamic measurement's foot selection. Additionally it displays the foot axes and center-of-pressure (Section 10.7). Real size foot depicts the maximum pressure measured under foot selection scaled 1:1. This content adds one page for each foot to the report. Numeric prints the foot selection with the numerical value of the maximum pressure ) for each sensor outlined in a grid.
- Page 146 Roll off Lists a sequence of images from the roll-offs of the foot selection, the timing each image indicated milliseconds. Adds one page for each foot to the report. Foot axis Shows the maximum pressure values of the dynamic measurement's foot selection with the foot axes, center-of- pressure line and subtalar joint angles.
- Page 147 Total force per zone Plots the graphs of the force (N) applied on each zone of the foot selection (Section 10.10). Pressure per probe Plots the graphs of the pressure ( ) applied on each probe of the foot selection (Section 10.11). Total force per probe Plots the graphs of the force (N) applied on each probe of the foot selection (Section 10.11).
- Page 148 Footprint dimensions Adds the results of the Footprint Size analysis to the report (Section 10.13). Single foot timing Shows the events and phases during the foot roll-off of the foot selection (Section 10.17). The single foot timing report is available in the Clinical, Scientific package(s).
- Page 149 Multi image combines static, standard and roll-off report content. Remarks Shows the remarks of current session and person. Footscan 9 saves the last report selection. ® RS-PRD-00562-016...
-
Page 150: Part 3 Migrate From Footscan® 7 Or 8 Gait
® Migrate from footscan 7 or 8 gait RS-PRD-00562-016... -
Page 151: Chapter 16 General Information
Part 1: footscan 7 or 8 gait measurement data ® The migration wizard helps you in migrating all footscan 7 or 8 gait data for use in the ® footscan 9 series software. There are two scenarios: ®... - Page 152 ® ® Run the footscan 7/8 gait export tool to export all your footscan 7 or 8 gait data, the result of the export (the intermediate database file) needs to be copied to the ® computer containing the footscan 9 installation. Depending on where you copied the intermediate file, the footscan 9 software will either detect the intermediate file ®...
- Page 153 ® ® Once a footscan 7 pressure plate is converted to work with footscan 9, it ® can no longer be used with your old footscan 7 software! It is necessary to properly calibrate your device to obtain correct measurement values. If the calibration procedure as described in the footscan 7 manual, was not regularly performed, the absolute pressure ®...
-
Page 154: Chapter 17 Migration Wizard
Chapter Migration Wizard Upon starting the migration, the first screen shown is the introduction page. Figure 85: Migration introduction page. The following buttons may appear on the bottom off the screen, they have the following function: < Back Go back to the previous screen. Next >... -
Page 155: Migration Start Page
This option will start a database import. The intermediate database file containing ® the export of the footscan 7 or 8 gait data needs to be available on your computer, clicking the Next > button will guide you to a page where you can select which intermediate database file you wish to import. -
Page 156: Select Import File Page
® If the intermediate database file is not located in the import folder of the footscan 9 software, you can use the Browse... button to select the intermediate database file. When a valid intermediate database file is chosen, the Custom location radio button will be checked. -
Page 157: Download Export Tool Page
17.3 Download Export Tool Page ® If during a full migration the footscan 7/8 gait export tool software is not installed on your computer, footscan 9 will download and install this software. ® Figure 88: Migration download export tool page. -
Page 158: Export Tool Running Page
17.4 Export Tool Running Page ® When the footscan 7/8 gait export tool software is running it will be shown on top of the following screen. Figure 89: Migration export tool running page. More information about the footscan 7/8 gait export tool can be found in the manual of ®... -
Page 159: Importing Page
Figure 90: Migration importing page. Details about the data that is being imported is listed in the screen. Please note that depending on the size of your footscan 7 or 8 database, migration ® could take several hours. After the import is finished the Next > button will be enabled. Click the Next > button to continue. -
Page 160: Upgrade Plates Page
Figure 91: Migration upgrade plates page. If there is a footscan 7 or 8 device connected to the computer which can be upgraded ® to be compatible with the footscan 9 software, there will be a Upgrade to footscan 9... -
Page 161: Migration Done Page
17.7 Migration Done Page When the migration is finished, the following screen will be shown. Figure 92: Migration done page. Click the Finish button to finish the migration and close the wizard. RS-PRD-00562-016... -
Page 162: Upgrade Plate
Please contact support@rsscan.com if you have questions about your license or calibration. ® If you start an upgrade and you have a valid footscan 9 license and calibration, then RS-PRD-00562-016... - Page 163 Upgrade plate dialog intro. Please read the following warnings carefully before upgrading your device: ® Upgrading a device is permanent. It can no longer be used with the footscan ® 7 software, only with footscan 9. Never disconnect a device during the upgrade! This will damage the device and make it unusable.
- Page 164 Click the Done button to finish the upgrade. If there was an error during the upgrade of your device, there will be an error screen. You need to close the dialog by clicking the Done button. Please contact support@rsscan.com if problems during plate conversion persist. RS-PRD-00562-016...
-
Page 165: Part 4 Appendices
Appendices RS-PRD-00562-016... -
Page 166: Chapter 18 System Specifications
Chapter System specifications ® This appendix contains the technical specifications of all entry level footscan plates, as well as all interface box setups. RS-PRD-00562-016... -
Page 167: Entry Level 0.5M Plate
18.1 Entry Level 0.5m plate Figure 98: Dimensions entry level 0.5m plate Dimensions (length x width x height) 578mm x 418 mm x 12mm Weight 4.2kg Number of sensors 4096 (arranged in a 64x64 matrix) Sensor dimensions 7.62mm x 5.08mm Active sensor area 488mm x 325mm Sensor technology... -
Page 168: Entry Level 1M Plate
18.2 Entry Level 1m plate Figure 99: Dimensions entry level 1m plate Dimensions (length x width x height) 1068mm x 418 mm x 12mm Weight 8.3kg Number of sensors 8192 (arranged in a 128x64 matrix) Sensor dimensions 7.62mm x 5.08mm Active sensor area 975mm x 325mm Sensor technology... -
Page 169: Entry Level 1M Heavy Duty Plate
18.3 Entry Level 1m heavy duty plate Figure 100: Dimensions entry level 1m heavy duty plate Dimensions (length x width x height) 1118mm x 469 mm x 18mm Weight 16.5kg Number of sensors 8192 (arranged in a 128x64 matrix) Sensor dimensions 7.62mm x 5.08mm Active sensor area 975mm x 325mm... -
Page 170: Entry Level 1.5M Plate
18.4 Entry Level 1.5m plate Figure 101: Dimensions entry level 1.5m plate Dimensions (length x width x height) 1605mm x 469 mm x 18mm Weight 24kg Number of sensors 12288 (arranged in a 192x64 matrix) Sensor dimensions 7.62mm x 5.08mm Active sensor area 1463mm x 325mm Sensor technology... -
Page 171: Interface Box
20% to 80% non-condensing Connection to PC USB2.0 (standard USB cable A-B 5m) Power 12V DC Power consumption ® with footscan 0.5m plate: 8.24W ® with footscan 1m plate: 10.95W with footscan 2m plate: 13.65W ® Protection class IP code... -
Page 172: M Footscan Plate For Interface Box
18.6 0.5m footscan plate for interface box Figure 103: Dimensions 0.5m footscan plate for interface box Dimensions (length x width x height) 578mm x 418 mm x 12mm Weight 4.2kg Number of sensors 4096 (arranged in a 64x64 matrix) Sensor dimensions 7.62mm x 5.08mm... -
Page 173: 1M Footscan Plate For Interface Box
18.7 1m footscan plate for interface box Figure 104: Dimensions 1m footscan plate for interface box Dimensions (length x width x height) 1068mm x 418 mm x 12mm Weight 7.7kg Number of sensors 8192 (arranged in a 128x64 matrix) Sensor dimensions 7.62mm x 5.08mm... -
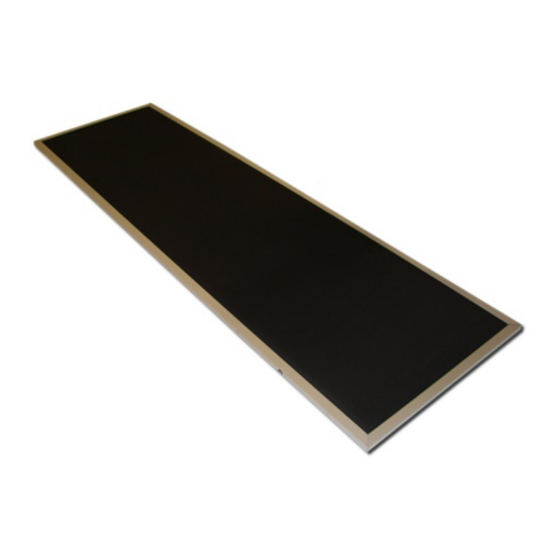
Page 174: 2M Footscan Plate For Interface Box
18.8 2m footscan plate for interface box Figure 105: Dimensions 2m footscan plate for interface box Dimensions (length x width x height) 2093mm x 469 mm x 18mm Weight 28.8kg Number of sensors 16384 (arranged in a 256x64 matrix) Sensor dimensions 7.62mm x 5.08mm... - Page 175 +15 °C to +30 °C Storage temperature range +0 °C to +40 °C Relative humidity 20% to 80% non-condensing Plate cable length 300mm ± 50mm (integrated cable) Total cable length to footscan ® 6000mm ± 50mm interface box Protection class IP code IP40 RS-PRD-00562-016...
-
Page 176: Chapter 19 Risk Analysis And The Gait Ratios Graphs
The footscan risk analysis algorithm was scientifically validated in a prospective cohort ® ® study [1] that aimed to identify the ability of footscan to predict the injury risk in 200 ® male subjects from a military population. Participants were graded using the footscan risk analysis as to high (≥... - Page 177 ® Footscan 9 software allows to compare the gait ratios graphs of a new subject to those of the group of subjects with a very low injury risk profile. This low risk injury profile is made visible in the gait ratios graphs as a solid area in the graphs.
-
Page 178: Chapter 20 Declaration Of Conformity
Chapter Declaration of Conformity RS-PRD-00562-016... -
Page 179: Chapter 21 Fda Declaration Of Conformity
Chapter FDA Declaration of Conformity RS-PRD-00562-016...
Need help?
Do you have a question about the footscan and is the answer not in the manual?
Questions and answers