
Related Manuals for KaVo MASTERtorque Mini LUX M4500L


Summary of Contents for KaVo MASTERtorque Mini LUX M4500L
- Page 1 Instructions for use MASTERtorque Mini LUX M4500 L - 1.007.1700 GENTLEmini LUX 4500 BR - 1.007.1700...
- Page 2 Distributed by: Manufacturer: KaVo Dental Corporation Kaltenbach & Voigt GmbH 11729 Fruehauf Drive Bismarckring 39 Charlotte, NC 28273 USA D-88400 Biberach Tel.: 847 550 6800 www.kavo.com Fax: 847 550 6825...
-
Page 3: Table Of Contents
Contents 3 / 78 Contents 1 User instructions............................7 2 Safety................................ 9 2.1 Description of safety instructions....................... 9 2.2 Safety instructions........................... 12 3 Description of the device......................... 19 3.1 Intended use............................ 20 3.2 Technical Specifications........................23 3.3 Transportation and storage conditions.................... 23 4 Start up and shut down........................... - Page 4 Contents 4 / 78 5 Operation..............................34 5.1 Mount the medical device........................ 35 5.2 Remove the medical device......................37 5.3 Inserting the cutter or grinder......................37 5.4 Removing the cutter or grinder......................41 6 Troubleshooting............................43 6.1 Changing the O-rings on the coupling of the supply hose............... 43 6.2 Cleaning the spray nozzle.......................
- Page 5 Machine disinfection - external and internal............... 56 7.3.3 7.4 Drying.............................. 57 7.5 Care products and systems - Servicing................... 58 Servicing with KaVo Spray....................60 7.5.1 Servicing with KaVo QUATTROcare 2104 / 2104A............62 7.5.2 Servicing with KaVo QUATTROcare Plus................64 7.5.3 7.6 Packaging............................68...
- Page 6 Contents 6 / 78 7.7 Sterilisation............................69 7.8 Storage............................71 8 Tools............................... 72 9 Warranty terms and conditions....................... 74...
-
Page 7: User Instructions
1 User instructions 7 / 78 1 User instructions Dear user, KaVo hopes that you enjoy your new high-quality product. Following the in‐ structions below will allow you to work smoothly, economically and safely. © Copyright by KaVo Dental GmbH Symbols... - Page 8 1 User instructions 8 / 78 Disinfectable with heat Sterilizable in steam up to 135 C (275 Action request Target group This document is intended for dentists and their assistants. The section on starting up is also intended for service technicians.
-
Page 9: Safety
2 Safety 9 / 78 2 Safety 2.1 Description of safety instructions Warning symbol Structure DANGER The introduction describes the type and source of the dan‐ ger. This section describes the possible consequences of misuse. ▶ The optional step contains necessary measures for avoiding hazards. - Page 10 2 Safety 10 / 78 Description of hazardous steps The safety instructions cited herein with the three levels of danger will help avert property damage and injury. CAUTION CAUTION indicates a hazardous situation that can lead to property damage or minor to moderate injury.
- Page 11 2 Safety 11 / 78 WARNING WARNING indicates a hazardous situation that can lead to serious injury or death. DANGER DANGER indicates a maximum hazardous situation that can directly cause serious injury or death.
-
Page 12: Safety Instructions
2 Safety 12 / 78 2.2 Safety instructions WARNING Hazard to the care provider and patient. Damage, irregular noise during operation, excessive vibration, unusual build-up of heat or if the cutter or grinder cannot be firmly held. ▶ Stop work and seek service support. - Page 13 2 Safety 13 / 78 WARNING Hazard from contraindication. If the soft tissue in the oral cavity becomes damaged, septic substance may enter the tissue from compressed air. ▶ If soft tissue in the oral cavity becomes damages, treatment with pneu‐ matically operated instruments must stop.
- Page 14 2 Safety 14 / 78 CAUTION Premature wear and malfunctioning from improper storage during long periods of nonuse. Reduced production time. ▶ The instrument must be cleaned, serviced and stored dry if it has not been used for a long period.
- Page 15 2 Safety 15 / 78 CAUTION Hazard from improperly putting away instruments. Injury and infection caused by chucked cutters or grinders. Damage to the chucking system when the instrument fails. ▶ After treatment, place the cutter or grinder properly in the cradle with‐ out the tool.
- Page 16 2 Safety 16 / 78 CAUTION Burning hazard from hot instrument head and instruments cover. If the instrument overheats, burns may arise in the oral area. ▶ Never contact soft tissue with the instrument head.
- Page 17 Do not use the device as a light probe since the rotating cutter grinder can cause injury. ▶ For additional illumination of the oral cavity or preparation site, use a suitable light probe such as the KaVo DIAlux 2300L. Note For safety reasons, we recommend that the tool holder system be...
- Page 18 ▪ Technicians specially trained by KaVo To ensure proper function, the medical device must be set up according to the methods described in the KaVo instructions for use, and the care prod‐ ucts and methods described therein must be used. KaVo recommends specifying a service interval at the dental office for a licensed shop to clean, service and check the functioning of the medical device.
-
Page 19: Description Of The Device
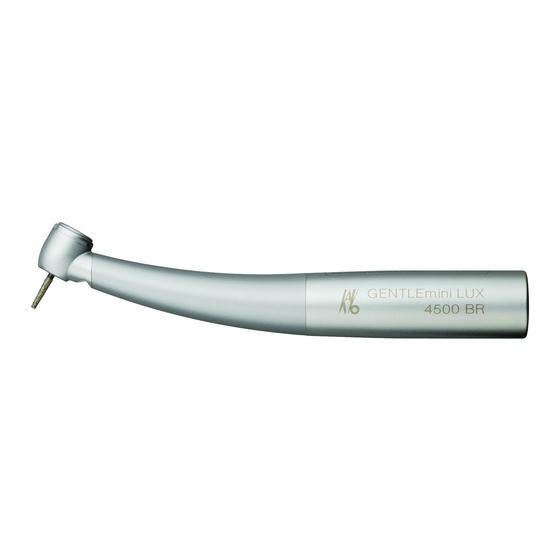
3 Description of the device 19 / 78 3 Description of the device MASTERtorque Mini LUX M4500 L (Mat. no. 1.007.1700) -
Page 20: Intended Use
3 Description of the device 20 / 78 GENTLEmini LUX 4500 BR (Mat. no. 1.007.1700) 3.1 Intended use Purpose: This medical device is:... - Page 21 3 Description of the device 21 / 78 ▪ Only intended for dental treatment. Any other type of use or alteration to the product is impermissible and can be hazardous. The medical device is intended for the following use: Removal of carious material, cavities and crown preparations, removal of fillings, processing of tooth and restoration surfaces.
- Page 22 3 Description of the device 22 / 78 According to these regulations, the user is required to: ▪ only use properly operating equipment ▪ use the equipment for the proper purpose ▪ to protect himself, the patient and third parties from danger. ▪...
-
Page 23: Technical Specifications
3 Description of the device 23 / 78 3.2 Technical Specifications Minimum pressure 2.1 (30) bar (psi) Drive pressure 2.1 (30) to 4.2 (60) bar (psi) Recommendation 2.8 (40) bar (psi) Air consumption 49 to 55 Nl/min. Idle speed 380,000 to 450,000 rpm Recommended operating pressure 2 to 3 N Return air... - Page 24 3 Description of the device 24 / 78 CAUTION Hazard starting up the medical device after it has been stored refrigerated. This can cause the medical device to malfunction. ▶ The temperature of very cold products must be raised to a range of C (68 F) to 25 C (77...
- Page 25 3 Description of the device 25 / 78 Air pressure: 700 hPa to 1060 hPa (10 psi to 15 psi) Protect from moisture.
-
Page 26: Start Up And Shut Down
4 Start up and shut down 26 / 78 4 Start up and shut down WARNING Hazard from non-sterile products. Infection hazard for care provider and patient. ▶ Before first use and after each use, reprocess and sterilise the medical device properly. - Page 27 ▶ Always make sure that the supply of cooling air is dry, clean and un‐ contaminated according to ISO 7494-2. Note After each treatment, KaVo recommends turning on the spray for at least 20 seconds with the instrument attached to rinse the air and water chan‐ nels.
-
Page 28: Mounting The Multiflex (Lux) / Multiflex Led Coupling
4 Start up and shut down 28 / 78 4.1 Mounting the MULTIflex (LUX) / MULTIflex LED coupling WARNING Medical device releasing during treatment. If the medical device is not properly locked in place, it can release from the MULTIflex (LUX) coupling during treatment. ▶... - Page 29 4 Start up and shut down 29 / 78 ▶ Rotate the spray ring on the MULTIflex (LUX) / MULTIflex LED cou‐ pling in order to regulate the fraction of water.
-
Page 30: Check The Amount Of Water
4 Start up and shut down 30 / 78 4.2 Check the amount of water CAUTION Overheating of the tooth due to insufficient amount of cool‐ ing water. Insufficient spray water can cause the medical device to overheat and damage the pulp and tooth. ▶... - Page 31 4 Start up and shut down 31 / 78 ▶ Adjust the water amount for the spray cooling to a minimum of 50 /min (3.1 inch...
-
Page 32: Check The Pressure
4 Start up and shut down 32 / 78 4.3 Check the pressure CAUTION Compressed air connection on devices. Contaminated and humid compressed air leads to premature wear and tear. ▶ Supply dry, clean and uncontaminated compressed air according to ISO 7494-2 only. -
Page 33: Check O-Rings
4 Start up and shut down 33 / 78 4.4 Check O-rings CAUTION Missing or damaged O-rings If the O-rings are missing and damaged, malfunctions and premature fail‐ ure can occur. ▶ Check if all O-rings are on the coupling and undamaged. Number of available O-rings: 5... -
Page 34: Operation
5 Operation 34 / 78 5 Operation Note At the beginning of each workday, the water-conducting systems should be rinsed for at least 2 min. without the instruments being attached. If there is a risk of contamination from reflux or back suction, the systems should be rinsed for 20-30 seconds. -
Page 35: Mount The Medical Device
5 Operation 35 / 78 5.1 Mount the medical device WARNING Medical device releasing during treatment. If the medical device is not properly locked in place, it can release from the MULTIflex (LUX) coupling during treatment. ▶ Pull on it before each treatment to ensure that the medical device is securely locked in the MULTIflex (LUX) coupling. - Page 36 5 Operation 36 / 78 CAUTION Damage from imprecise coupling Imprecise coupling especially during the afterglow period can destroy the MULTIflex LUX or reduce its life. ▶ Check if the turbine seat on the coupling is secure by pulling on it. ▶...
-
Page 37: Remove The Medical Device
5 Operation 37 / 78 5.2 Remove the medical device ▶ Firmly grip the coupling and pull off the medical device while twisting it slightly. 5.3 Inserting the cutter or grinder Note Only use carbide cutters or diamond grinders that comply with ISO 1797-1 type 3, are made of steel or hard metal and meet the following criteria: - Shaft diameter: 1.59 to 1.60 mm - Overall length: max. - Page 38 5 Operation 38 / 78 WARNING Use of impermissible cutters or grinders. Injury to the patient or damage to the medical device. ▶ Observe instructions for use, and use the cutter or grinder properly. ▶ Only use cutters or grinders that do not deviate from the indicated da‐ CAUTION Injury from using worn cutters or grinders.
- Page 39 5 Operation 39 / 78 CAUTION Injury hazard from cutters or grinders. Infections or cuts. ▶ Wear gloves or fingerstalls.
- Page 40 5 Operation 40 / 78 CAUTION Hazard from defective chuck system. The cutter or grinder could fall out and cause injury. ▶ Pull on the dental burr or rips abrasives to check if the clamping sys‐ tem is functioning properly and that the tool is firmly clamped. Wear gloves or a thimble to check, insert, or remove the bits to prevent injury and infection.
-
Page 41: Removing The Cutter Or Grinder
5 Operation 41 / 78 ▶ Check that the cutter or grinder is seated by pulling on it. 5.4 Removing the cutter or grinder WARNING Do not press the pushbutton while the cutter or grinder is rotating. If you press the pushbutton when the cutter or grinder is rotating, it can damage the chucking system and cause injury. - Page 42 5 Operation 42 / 78 CAUTION Hazard from rotating cutters or grinders. Lacerations. ▶ Avoid inadvertently touching rotating cutters or grinders. ▶ After the cutter or grinder has stopped rotating, press the push button with your thumb and pull out the cutter or grinder.
-
Page 43: Troubleshooting
6 Troubleshooting 43 / 78 6 Troubleshooting 6.1 Changing the O-rings on the coupling of the supply hose CAUTION Hazard from improper care of O-rings. The medical device can malfunction and completely fail if the O-rings do not receive proper care. ▶... - Page 44 6 Troubleshooting 44 / 78 Note The O-ring on the coupling may only be lubricated with cotton ball wet with KAVOspray. ▶ Press the O-ring between your fingers to form a loop. ▶ Shove the O-ring to the front, and remove it. ▶...
-
Page 45: Cleaning The Spray Nozzle
6 Troubleshooting 45 / 78 6.2 Cleaning the spray nozzle. CAUTION Hazard from insufficient spray water. Overheating of the medical device and damage to the tooth. ▶ Check the spray water channels and clean the spray nozzles with the nozzle needle Mat. no. 0.410.0921 if necessary. ▶... -
Page 46: Change The Water Filter
6 Troubleshooting 46 / 78 WARNING Hazard from nonsterile products. Infection danger to the care provider and patient. ▶ Reprocess and sterilise the medical device properly before the next use. 6.3 Change the water filter ▶ Unscrew the sleeve ① anticlockwise from the insert ② and pull off. ▶... - Page 47 6 Troubleshooting 47 / 78 ▶ Use tweezers to remove the water filter ③ from the insert ②. ▶ Insert a new water filter. ▶ Pull back the insert ② slightly. ▶ Place the sleeve ① on the insert ②, and screw it tight clockwise.
- Page 48 6 Troubleshooting 48 / 78 WARNING Hazard from nonsterile products. Infection danger to the care provider and patient. ▶ Reprocess and sterilise the medical device properly before the next use.
-
Page 49: Preparation Methods According To Iso 17664
7 Preparation methods according to ISO 17664 49 / 78 7 Preparation methods according to ISO 17664 7.1 Preparations at the site of use WARNING Hazard from nonsterile products. An infection hazard exists from contaminated medical devices. ▶ Observe suitable personal protective measures. ▶... -
Page 50: Cleaning
7 Preparation methods according to ISO 17664 50 / 78 ▶ The medical device should be prepared as close to the treatment time as possible. ▶ Remove the hard metal cutter or diamond bur from the medical de‐ vice. 7.2 Cleaning CAUTION Malfunctions from cleaning in the ultrasonic unit. -
Page 51: Manual Cleaning - External
7 Preparation methods according to ISO 17664 51 / 78 7.2.1 Manual cleaning - external Required accessories: ▪ Tap water 30 C ± 5 C (86 F ± 41 F) or a 60 to 70% alcohol solution ▪ Brush such as a medium hard toothbrush ▶... -
Page 52: Automated External Cleaning
"VARIO-TD", cleaning agent "neodisher® mediclean", neutralisa‐ tion agent "neodisher® Z" and rinsing agent "neodisher® mielclear" and only applies to the compatibility of materials with KaVo products). ▶ For program settings as well as cleansers and disinfectants to be used, please refer to the Instructions for Use of the thermodisinfector (complying with max. -
Page 53: Manual Cleaning Of The Inside
"VARIO-TD", cleaning agent "neodisher® mediclean", neutralisa‐ tion agent "neodisher® Z" and rinsing agent "neodisher® mielclear" and only applies to the compatibility of materials with KaVo products). ▶ For program settings as well as cleansers and disinfectants to be used, please refer to the Instructions for Use of the thermodisinfector... -
Page 54: Disinfection
▶ In order to prevent negative effects on the medical device, make sure that the interior and the exterior of the medical device are dry after completion of the cycle, and then grease it immediately with servicing agents from the KaVo care system. 7.3 Disinfection CAUTION Malfunctioning from using a disinfectant bath or chlorine- containing disinfectant. -
Page 55: Manual Disinfection - External
7 Preparation methods according to ISO 17664 55 / 78 7.3.1 Manual disinfection - external KaVo recommends the following products based on material compatibility. The microbiological efficacy must be ensured by the disinfectant manufac‐ turer. ▪ CaviCide by Metrex Required tools: Cloths for wiping down the medical device. -
Page 56: Manual Disinfection - Internal
10 (e.g. Miele G 7781/G 7881 – Validation was carried out with pro‐ gramme "VARIO-TD", cleaning agent "neodisher® mediclean", neutralisa‐ tion agent "neodisher® Z" and rinsing agent "neodisher® mielclear" and only applies to the compatibility of materials with KaVo products). -
Page 57: Drying
▶ In order to prevent negative effects on the medical device, make sure that the interior and the exterior of the medical device are dry after completion of the cycle, and then grease it immediately with servicing agents from the KaVo care system. 7.4 Drying Manual drying ▶... -
Page 58: Care Products And Systems - Servicing
7 Preparation methods according to ISO 17664 58 / 78 Machine drying The drying process is usually part of the cleaning program of the thermodi‐ sinfector. ▶ Follow the instructions for use of the thermodisinfector. 7.5 Care products and systems - Servicing WARNING Sharp cutters or grinders in the medical device. - Page 59 Reduced production time. ▶ Regularly perform proper care. Note KaVo only guarantees that its products will function properly when the care products are used that are listed as accessories since they were test‐ ed for proper use on our products.
-
Page 60: Servicing With Kavo Spray
7 Preparation methods according to ISO 17664 60 / 78 7.5.1 Servicing with KaVo Spray KaVo recommends servicing the project twice daily (at noon and in the evening after hours), after each time the machine is cleaned, and before each sterilization. - Page 61 7 Preparation methods according to ISO 17664 61 / 78 Care of clamping chuck KaVo recommends cleaning and maintaining the chucking system once a week. ▶ Remove the cutter or grinder, place the spray nipple tip in the open‐ ing and spray.
-
Page 62: Servicing With Kavo Quattrocare 2104 / 2104A
May reduce the service life of the product. Cleaning and care unit with expansion pressure for thorough cleaning and care. KaVo recommends servicing the product after each time it is used, i.e. af‐ ter each automatic cleaning and before each sterilisation. - Page 63 63 / 78 ▶ Remove the cutter or grinder. ▶ Servicing the product. Servicing the clamping chuck KaVo recommends cleaning and maintaining the chucking system once a week. See also: 2 Instructions for use KaVo QUATTROcare 2104 / 2104A ▶ Remove the cutter or grinder, place the spray nipple tip in the open‐...
-
Page 64: Servicing With Kavo Quattrocare Plus
Defective or missing O-rings on the service couplings. May reduce the service life of the product. KaVo recommends servicing the product after each time it is used, i.e. af‐ ter each automatic cleaning and before each sterilisation. ▶ Remove the cutter or grinder. - Page 65 ▶ Servicing the product in QUATTROcare PLUS. See also: 2 Instructions for Use KaVo QUATTROcare PLUS 2124 A Servicing the clamping chuck KaVo recommends cleaning and maintaining the chucking system once a week. See also: 2 Instructions for Use KaVo QUATTROcare PLUS 2124 A...
- Page 66 7 Preparation methods according to ISO 17664 66 / 78 Note Handpieces must be taken off the service couplings before the chuck service can be started and performed. ▶ Remove the service coupling chuck from the side hatch of the QUAT‐ TROcare PLUS and attach it to coupling service point four, on the far right.
- Page 67 Option 1: Place the dental handpieces in the QUATTROcare PLUS 2124 A, close the front door and start theservice procedure. Option 2: After three minutes with no service procedure running, the de‐ vice automatically switches back to normal service mode. See also: 2 Servicing with KaVo QUATTROcare PLUS...
-
Page 68: Packaging
7 Preparation methods according to ISO 17664 68 / 78 7.6 Packaging Note The sterilization bag must be large enough for the instrument so that the bag is not stretched. The quality and use of the sterilized product packaging must satisfy appli‐ cable standards and be suitable for the sterilization procedure. -
Page 69: Sterilisation
69 / 78 7.7 Sterilisation Sterilisation in a steam steriliser (autoclave) in accordance with ISO 17665-1 CAUTION Premature weary and malfunctions from improper servicing and care. Reduced production time. ▶ Before each sterilization cycle, treat the medical device with KaVo care products. - Page 70 Damage to product ▶ After the sterilization cycle, immediately remove the product from the steam sterilizer . The KaVo medical device has a maximum temperature resistance up to 138 ℃ (280.4 °F). Select a suitable procedure (depending on the available autoclave) from the following sterilisation processes: ▪...
-
Page 71: Storage
7 Preparation methods according to ISO 17664 71 / 78 – Drying time: 20 min. ▪ Autoclave using the gravity method: - at least 10 minutes at 134 °C -1 °C / +4 °C (273 °F -1.6 °F / +7.4 °F) –... -
Page 72: Tools
8 Tools 72 / 78 8 Tools Available from dental suppliers. Material summary Mat. no. Replacement turbine with key 1.006.5535 Replacement turbine without key 1.006.4564 Water filter with nipple 1.000.4823 Instrument stand 2151 0.411.9501 Insert for turbines 0.411.9902 Cleanpac 10 units 0.411.9691 MULTIflex spray head (nozzle) 0.411.9921... - Page 73 8 Tools 73 / 78 Only for the USA Material summary Mat. no. KAVOspray America 2113 A 0.411.9660 QUATTROcare plus Spray America 1.005.4524 2141 P...
-
Page 74: Warranty Terms And Conditions
24 months from data of invoice, subject to the following conditions: In case of justified complaints, KaVo will honor its warranty with a repair or free replacement. Other claims of any nature whatsoever, in particular with respect to compensation, are excluded. - Page 75 9 Warranty terms and conditions 75 / 78 tions for use or other manufacturer specifications. The warranty does not usually cover lamps, light conductors made of glass and glass fibers, glassware, rubber parts and the colorfastness of plastic parts. No liability is assumed when defects or their consequences are derived from manipulations or changes to the product by the customer or a third party.
- Page 76 9 Warranty terms and conditions 76 / 78...
Need help?
Do you have a question about the MASTERtorque Mini LUX M4500L and is the answer not in the manual?
Questions and answers