Table of Contents
Advertisement
Advertisement
Table of Contents

Related Manuals for GE ReadyToProcess WAVE 25


Summary of Contents for GE ReadyToProcess WAVE 25
- Page 1 ReadyToProcess WAVE ™ Operating Instructions Original instructions...
- Page 2 Page intentionally left blank...
-
Page 3: Table Of Contents
Hardware installation ......................... 4.2.1 Unpack the system units ......................4.2.2 Connect the system components ................... Software installation ........................... 4.3.1 Install UNICORN software ......................4.3.2 Configure an e-license ......................... 4.3.3 Define the system .......................... ReadyToProcess WAVE 25 Operating Instructions 29009597 AD... - Page 4 ReadyToProcess WAVE 25 system ....................ReadyToProcess WAVE 25 rocker ....................ReadyToProcess CBCU ........................ReadyToProcess Pump 25 ........................ UNICORN System Control ......................... Reference information ..................Chemical resistance ..........................Health and Safety Declaration Form ................... Index ........................ReadyToProcess WAVE 25 Operating Instructions 29009597 AD...
-
Page 5: Introduction
WAVE 25, description of safety notices, and regulatory information. In this chapter This chapter contains the following sections: Section See page 1.1 About this manual 1.2 Important user information 1.3 Regulatory information 1.4 Important concepts 1.5 User documentation ReadyToProcess WAVE 25 Operating Instructions 29009597 AD... -
Page 6: About This Manual
The Operating Instructions provide you with the information needed to install, operate and maintain the product in a safe way. Scope of this document This manual covers the entire ReadyToProcess WAVE 25 system, including the main unit (rocker), CBCU and pump, as well as accessories. Typographical conventions Software items are identified in the text by bold italic text. -
Page 7: Important User Information
If you do, you may be exposed to hazards that can lead to personal injury and you may cause damage to the equipment. Intended use The ReadyToProcess WAVE 25 system is intended to be used as laboratory and manu- facturing equipment for cell cultivation. The system may not be used for clinical or diag- nostic purposes. - Page 8 Notes and tips Note: A note is used to indicate information that is important for trouble-free and optimal use of the product. Tip: A tip contains useful information that can improve or optimize your procedures. ReadyToProcess WAVE 25 Operating Instructions 29009597 AD...
-
Page 9: Regulatory Information
1 Introduction 1.3 Regulatory information Regulatory information Introduction This section lists the regulations and standards that apply to ReadyToProcess WAVE 25. Manufacturing information The table below summarizes the required manufacturing information. Requirement Information Name and address of manufacturer GE Healthcare Bio-Sciences AB, Björkgatan 30, SE 751 84 Uppsala, Sweden... -
Page 10: Eu Directives
Operating Instructions or user manuals, and • used in the same state as it was delivered from GE, except for alterations described in the Operating Instructions or user manuals. ReadyToProcess WAVE 25 Operating Instructions 29009597 AD... -
Page 11: Eurasian Customs Union
GE Healthcare Life Sciences Presnenskaya nab., 10C, 12th floor RU-123 317 Moscow, Russian Federation Telephone 1: + 7 495 411 9714 Fax nr: + 7 495 739 6932 Email: LSrus@ge.com ReadyToProcess WAVE 25 Operating Instructions 29009597 AD... -
Page 12: Regulations For Usa And Canada
The user is cautioned that any changes or modifications not expressly approved by GE could void the user’s authority to operate the equipment. This equipment has been tested and found to comply with the limits for a Class A digital device, pursuant to part 15 of the FCC Rules. -
Page 13: Other Regulations And Standards
NOTICE This equipment is not intended for use in residential environments and may not provide adequate protection to radio reception in such environments. ICES-001/NMB-001 Industrial, Scientific and Medical (ISM) Radio Frequency Generators (Canada) ReadyToProcess WAVE 25 Operating Instructions 29009597 AD... - Page 14 UNICORN 6.3, 7.0 and later versions are technically compatible with all relevant sections of FDA 21 CFR Part 11. A part 11-system assessment checklist is available on request from your local GE repre- sentative. ReadyToProcess WAVE 25 Operating Instructions 29009597 AD...
-
Page 15: Important Concepts
The entire bioreactor system, including rocker, CBCU(s), and pump(s), together with Cellbag bioreac- The ReadyToProcess WAVE tor(s) and filter heater(s). 25 system The bioreactor system UNICORN The software used for controlling and monitoring the system. ReadyToProcess WAVE 25 Operating Instructions 29009597 AD... -
Page 16: User Documentation
1 Introduction 1.5 User documentation User documentation The table below describes the user documentation for ReadyToProcess WAVE 25, which is available from the Help menu in UNICORN or on the user documentation CD. Document Main contents ReadyToProcess WAVE 25 Instructions needed to install, operate and maintain Operating instructions ReadyToProcess WAVE 25 in a safe way. -
Page 17: Safety Instructions
In this chapter This chapter contains the following sections: Section See page 2.1 Safety precautions 2.2 Labels 2.3 Emergency procedures 2.4 Recycling information 2.5 Declaration of Hazardous Substances (DoHS) ReadyToProcess WAVE 25 Operating Instructions 29009597 AD... -
Page 18: Safety Precautions
2.1 Safety precautions Safety precautions Introduction ReadyToProcess WAVE 25 is powered by mains voltage and handles materials that may be hazardous. Before installing, operating or maintaining the system, you must be aware of the hazards described in this manual. Follow the instructions provided to avoid personal injuries, damage to the cell cul- tures, to the product, or to other personnel and equipment in the area. - Page 19 2 Safety instructions 2.1 Safety precautions WARNING Do not use ReadyToProcess WAVE 25 if it is not working properly, or if it has suffered any damage, for example: • damage to the power cord or its plug • damage caused by dropping the equipment •...
- Page 20 Due to the size and weight of Tray 50, at least two persons are recommended for installing the tray. CAUTION Falling equipment. Do not stack more than one ReadyToProcess CBCU and/or ReadyToProcess Pump 25 unit on top of each other. ReadyToProcess WAVE 25 Operating Instructions 29009597 AD...
- Page 21 The power cord with plug must always be easy to disconnect. WARNING Disconnect power. Always disconnect power from the equipment before connecting the ReadyToProcess WAVE 25 units to any other instrument. ReadyToProcess WAVE 25 Operating Instructions 29009597 AD...
- Page 22 Visually inspect the inlet tubing regularly. CAUTION Only Cellbag bioreactors approved by GE for ReadyToProcess WAVE 25 may be used together with the equipment. CAUTION Heavy object. The filled Cellbag bioreactor is heavy and must be lifted with care.
- Page 23 CAUTION Falling equipment. To prevent the bioreactor system units from accidentally being pulled from the bench, make sure that all tubing is kept inside the bench area. ReadyToProcess WAVE 25 Operating Instructions 29009597 AD...
- Page 24 WARNING Use only approved parts. Only spare parts and accessories that are approved or supplied by GE may be used for maintaining or servicing the product. ReadyToProcess WAVE 25 Operating Instructions 29009597 AD...
- Page 25 CAUTION Hazardous substances. Before maintenance, service and decom- missioning, clean the ReadyToProcess WAVE 25 system with an appropriate cleaning agent to remove any hazardous substances. ReadyToProcess WAVE 25 Operating Instructions 29009597 AD...
-
Page 26: Labels
For information about marking of the client computer equipment, refer to the manufacturer's instructions. In this section Section See page 2.2.1 Instrument labels 2.2.2 Safety labels 2.2.3 Additional labels ReadyToProcess WAVE 25 Operating Instructions 29009597 AD... -
Page 27: Instrument Labels
The following illustration shows an example of the label attached to the filter heater. 29044471 Filter Heater Voltage: 32 V Code no: 29036750 Mfg Year: YYYY/MM Max Power: 4 W GE Healthcare Bio-Sciences AB 751 84 Uppsala Sweden Made in Sweden ReadyToProcess WAVE 25 Operating Instructions 29009597 AD... - Page 28 The instrument label on the CBCU is located on the underside of the unit. The illustration below is an example of the label attached to a CBCU with full configuration. Corresponding labels are attached to the CBCU units with alternative configurations. ReadyToProcess WAVE 25 Operating Instructions 29009597 AD...
- Page 29 Certain Hazardous Substances in Electrical and Electronic Products. This symbol indicates that the system complies with applicable European directives. This symbol indicates that the system complies with applicable requirements for Australia and New Zealand. ReadyToProcess WAVE 25 Operating Instructions 29009597 AD...
- Page 30 Eurasian Customs Union. This symbol indicates that ReadyToProcess WAVE 25 has been certified by a Nationally Recognized Testing Laboratory (NRTL). This product Conforms to UL 61010-1, and is Certified to CAN/CSA-C22.2 No.
-
Page 31: Safety Labels
Safety labels on filter heater The following symbols can be found on the filter heater. Label Description Warning! Indicates a hot surface and that care must be exer- cised to prevent injury. ReadyToProcess WAVE 25 Operating Instructions 29009597 AD... - Page 32 LEFT indicates the left side of the tray. Warning! Indicates a hot surface and that care must be exer- cised to prevent injury. RIGHT indicates the right side of the tray. ReadyToProcess WAVE 25 Operating Instructions 29009597 AD...
-
Page 33: Additional Labels
The following image is an example of the label attached to the cellbag. Illustration of DO sensor label The following image is an example of the DO sensor label attached to the cellbag next to the DO sensor. ReadyToProcess WAVE 25 Operating Instructions 29009597 AD... - Page 34 The following image shows the label to be attached to the optical fiber cable of the pH sensor. Illustration of pump head label The following image shows the label attached to the pump head. The label indicates the pumping direction of the pump. ReadyToProcess WAVE 25 Operating Instructions 29009597 AD...
-
Page 35: Emergency Procedures
• Switch off power by pressing the Power button on the rocker front panel. Result: The run is interrupted. The light in the Power button is turned off. ReadyToProcess WAVE 25 Operating Instructions 29009597 AD... - Page 36 Power failure to... will result in... ReadyToProcess WAVE 25 The run is interrupted immediately. • The data collected before the power failure is • stored in the instrument and can be saved when power returns. ReadyToProcess WAVE 25 Operating Instructions 29009597 AD...
- Page 37 A UPS can postpone power failure, which allows time for a controlled shut-down of the bioreactor system and prevents data loss. For UPS power requirements, see the system specifications in ReadyToProcess WAVE 25 System Handbook. Take the specifications for the client computer and monitor into ac- count.
-
Page 38: Recycling Information
Waste electrical and electronic equipment must not be disposed of as unsorted municipal waste and must be collected separately. Please contact an authorized representative of the manufacturer for information concerning the decommissioning of the equipment. ReadyToProcess WAVE 25 Operating Instructions 29009597 AD... -
Page 39: Declaration Of Hazardous Substances (Dohs)
EFUP shall be done in accordance with the Product Maintenance Procedures. This product must not be disposed of as unsorted municipal waste, and must be collected separately and handled properly after decommissioning. ReadyToProcess WAVE 25 Operating Instructions 29009597 AD... - Page 40 Indicates that this hazardous substance contained in at least one of the homogeneous materials used for this part is above the limit requirement in GB/T 26572. Data listed in the table represents best information available at the time of publication. • ReadyToProcess WAVE 25 Operating Instructions 29009597 AD...
-
Page 41: System Description
3 System description System description About this chapter This chapter gives a brief overview of ReadyToProcess WAVE 25. For more detailed infor- mation, refer to ReadyToProcess WAVE 25 System Handbook. In this chapter This chapter contains the following sections: Section See page 3.1 System overview... -
Page 42: System Overview
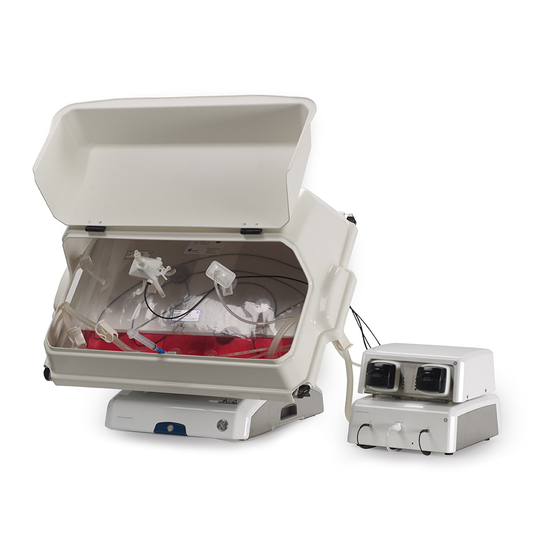
System overview Introduction ReadyToProcess WAVE 25 is intended for cell cultivation. A disposable Cellbag bioreactor is placed on a rocker and filled with gas, partially filled with culture medium, and inoculated with cells. Gas transfer and mixing of culture is accomplished by wave-induced agitation, performed by the rocker unit. - Page 43 Cellbag bioreactors independently. Both single and dual modes can support up to three ReadyToProcess Pump 25 units. Part Description Hatch Filter heater Cellbag bioreactor ReadyToProcess Pump 25 ReadyToProcess CBCU ReadyToProcess WAVE 25 rocker Tray ReadyToProcess WAVE 25 Operating Instructions 29009597 AD...
-
Page 44: Readytoprocess Wave 25 Rocker
The rocker also contains an embedded microprocessor, which allows the system to be controlled independently of the performance of the connected network and client computer. For specifications of the rocker, refer to the ReadyToProcess WAVE 25 System Handbook or the data file for ReadyToProcess WAVE 25, available for download from www.gelifesciences.com/wave. - Page 45 The power is ON and the rocker is opera- tional. Red flashing light The rocker failed to connect to other components in the system. Red steady light Indicates an error of the rocker. ReadyToProcess WAVE 25 Operating Instructions 29009597 AD...
- Page 46 15-pin D-sub connector, used for digital and analog I/O signals Filter heater connectors Tray connector UniNet-9 ports USB ports Ethernet connector Power connector Note: The rocker is fitted with internal electrical fuses that are not user-replaceable. ReadyToProcess WAVE 25 Operating Instructions 29009597 AD...
- Page 47 Bag clamp (upper) Bag clamp opener (one in each upper corner) Bag clamp opener (one in each lower corner) Bag clamp (lower) The illustration below shows the rocker with Tray 50 and Lid 50 mounted. ReadyToProcess WAVE 25 Operating Instructions 29009597 AD...
- Page 48 3 System description 3.2 ReadyToProcess WAVE 25 rocker Part Description Rocker base Tray Tubing exit Hatch ReadyToProcess WAVE 25 Operating Instructions 29009597 AD...
- Page 49 Take care when tilting the rocker tray with full Cellbag bioreactor(s) attached. Step Action Prepare for tilt as described above or select the largest possible angle in UNICORN. Do not tilt the tray from an angle lower than 12°. ReadyToProcess WAVE 25 Operating Instructions 29009597 AD...
- Page 50 Hold the textured grip area on each side of the tray and pull the tray towards you. The illustration below shows the tilt position: Filter heater The filter heater prevents condensation and clogging of the outlet vent filter on the Cellbag bioreactor. ReadyToProcess WAVE 25 Operating Instructions 29009597 AD...
- Page 51 3 System description 3.2 ReadyToProcess WAVE 25 rocker Part Description Filter heater Connector for connection to the rocker Filter heater stand ReadyToProcess WAVE 25 Operating Instructions 29009597 AD...
-
Page 52: Readytoprocess Cbcu
DO. • ReadyToProcess CBCU Full: CO , pH and DO. For specifications of the CBCU, refer to the ReadyToProcess WAVE 25 System Handbook or the data file for ReadyToProcess WAVE 25, available for download from www.gelifesciences.com/wave. Front view of ReadyToProcess CBCU The illustration below shows the front panel of a fully configured CBCU. - Page 53 Indicates an internal error, but the CBCU is still operating. Steady red light Indicates an internal error, and the CBCU is not operating. Rear view of ReadyToProcess CBCU The illustration below shows the rear panel of a fully configured CBCU. ReadyToProcess WAVE 25 Operating Instructions 29009597 AD...
- Page 54 147.6" (375 cm) Silicone 3/16" (4.8 mm) 3/8" (9.5 mm) 7.9" (20 cm) Connectors Item Inner diameter Reducer connector, gas tubing 1/8" to 3/16" (3.2 to 4.8 mm) Connector, CBCU 1/8" (3.2 mm) ReadyToProcess WAVE 25 Operating Instructions 29009597 AD...
-
Page 55: Readytoprocess Pump 25
The function of a given pump head is set in the UNICORN software. Up to three pump units are supported in both single and dual mode. For specifications of the pump, refer to the ReadyToProcess WAVE 25 System Handbook or the data file for ReadyToProcess WAVE 25, available for download from www.gelifesciences.com/wave. - Page 56 The illustration below shows the rear panel of the pump. Part Component Description UniNet-9 port Power connection to the rocker. CAN indicator LED Indicates system connection status. CAN ID switch Shows the unit number of the pump for recognition by the system. ReadyToProcess WAVE 25 Operating Instructions 29009597 AD...
- Page 57 1 for the first pump, position 2 for the second pump and so on. Tip: The pumps are identified in UNICORN by their CAN ID. Label each pump unit with its CAN ID to simplify identification of the physical pump. ReadyToProcess WAVE 25 Operating Instructions 29009597 AD...
-
Page 58: Cellbag Bioreactor
The Cellbag bioreactors are available in different configurations, of varying sizes and equipped with various ports. Cellbag bioreactors with internal cell retention filters are available for perfusion culture. If required, it is possible to customize the Cellbag biore- actors. The following bag sizes are available for ReadyToProcess WAVE 25: • •... - Page 59 DO bag sensor port, located on the underside of the bag Cellbag rod Clave™ sampling port Addition port Addition/harvest port Note: The inlet and outlet vent filters are distinguished by the pressure control valve on the outlet filter. ReadyToProcess WAVE 25 Operating Instructions 29009597 AD...
- Page 60 The optical lens of the fiber cable is located in the center of the sensor adapter. The fiber cable is connected to a sensor reader in the CBCU. The fiber cable is connected to the pH or DO port on the CBCU front panel. ReadyToProcess WAVE 25 Operating Instructions 29009597 AD...
-
Page 61: Unicorn Software Overview
This section contains the following subsections: Section See page 3.6.1 General UNICORN operation 3.6.2 Administration 3.6.3 System control 3.6.4 Evaluation Note: Software illustrations in these instructions are examples, and may differ from your software in some details. ReadyToProcess WAVE 25 Operating Instructions 29009597 AD... -
Page 62: General Unicorn Operation
Taskbar button of the module of interest, • choose the module of interest in the Tools menu in any of the other software modules. The illustration below shows the Tools menu of the Evaluation module. ReadyToProcess WAVE 25 Operating Instructions 29009597 AD... - Page 63 (see illustration above) in the TOC pane, expand the heading UNICORN 7.0 • online documentation portal and select Documenta- tion overview in the PDF manuals section, click one of the text links • ReadyToProcess WAVE 25 Operating Instructions 29009597 AD...
- Page 64 • In the System Control module: select Manual:Execute Manual Instructions • expand a heading and select the instruction of interest • press the F1 key • click the Help icon in the dialog ReadyToProcess WAVE 25 Operating Instructions 29009597 AD...
-
Page 65: Administration
UNICORN and System Log provides the system administrator with records of usage and activity. System Properties is used to define the system and edit system properties. Database Management is used for maintenance of the database. ReadyToProcess WAVE 25 Operating Instructions 29009597 AD... -
Page 66: System Control
Data to open the Run Data pane which presents current data in numerical values. Items in the process picture reflect the components included in the system (for example, the illustration above shows a system in single mode equipped with three pumps). ReadyToProcess WAVE 25 Operating Instructions 29009597 AD... - Page 67 In dual mode, pump roles for the left and right Cellbag bioreactors are labelled L and R respectively. Examples: Pump 25: 1B refers to the right-hand pump head on the pump unit with CAN ID 1. ReadyToProcess WAVE 25 Operating Instructions 29009597 AD...
- Page 68 Reading off if Control is on. Activate or deactivate Click on the right-hand side of the button. The text on the other functions button shows the current value of the function. ReadyToProcess WAVE 25 Operating Instructions 29009597 AD...
- Page 69 Click on the left-hand side of the button. function The example below shows the settings for dissolved oxy- gen, DO. Adjust the settings Enter appropriate values in the Settings dialog and click OK or press enter. ReadyToProcess WAVE 25 Operating Instructions 29009597 AD...
- Page 70 It is possible to interact manually with an ongoing run using Manual instructions. Follow the instructions below to perform manual instructions. Note: It is also possible to interact with the system manually directly from the Process Picture. ReadyToProcess WAVE 25 Operating Instructions 29009597 AD...
- Page 71 To change the Run Data display, select View:Run Data, right click in the Run Data pane and: • select Run Data Groups:Detailed to show more details • select Customize to customize the appearance of the Run Data pane. ReadyToProcess WAVE 25 Operating Instructions 29009597 AD...
-
Page 72: Evaluation
3.6 UNICORN software overview 3.6.4 Evaluation 3.6.4 Evaluation The Evaluation module is used to evaluate the results from bioreactor runs. Evaluation is described in detail in the ReadyToProcess WAVE 25 System Handbook and UNICORN Online Help. ReadyToProcess WAVE 25 Operating Instructions 29009597 AD... -
Page 73: Installation
UNICORN 7.0 software • edit system properties Read the entire installation chapter before starting to install ReadyToProcess WAVE 25. NOTICE The rocker contains load cells for weight measurements and should be handled with extra care. Do not place the rocker on any parts that may move. -
Page 74: 4.1 Site Preparation
About this section This section describes the site planning and the preparations necessary before installation of ReadyToProcess WAVE 25. The purpose is to provide planners and technical staff with the data needed to prepare the laboratory for the installation. In this section... -
Page 75: Delivery And Storage
When you receive the delivery boxes • Record on the packing slip if there is any apparent damage on the delivery boxes. Inform your GE representative of any such damage. • Move the delivery boxes to a protected location indoors. Storage requirements The delivery boxes should be stored in a protected location indoors. -
Page 76: Site Requirements
Do not place soft material, paper sheets or similar under the system, as this may block the ventilation inlet. WARNING Access to power cord. Do not block access to the power cord. The power cord must always be easy to disconnect. ReadyToProcess WAVE 25 Operating Instructions 29009597 AD... - Page 77 Illustration of system setup, dual mode In dual mode, place the ReadyToProcess CBCU and ReadyToProcess Pump 25 units on either side of the rocker to correspond with the L and R designations in the software. ReadyToProcess WAVE 25 Operating Instructions 29009597 AD...
- Page 78 Environmental requirements Parameter Requirement Allowed location Indoor use only Ambient temperature, operation 15°C to 32°C Relative humidity, operating 20% to 80%, noncondensing Atmospheric pressure 800 to 1060 mbar Altitude, operation Up to 2000 m ReadyToProcess WAVE 25 Operating Instructions 29009597 AD...
- Page 79 Protective ground. The product must always be connected to a grounded power outlet. Noise level • The noise level of the operating bioreactor system is below 65 dBA. • Audio warning signals have a higher noise level than the operating system. ReadyToProcess WAVE 25 Operating Instructions 29009597 AD...
- Page 80 The table below lists the gas supply required for each installed CBCU. Pressure (bar) Flow (L/min) Flow (L/min) Normal mode Fast fill mode Compressed air/N 1.0 to 1.5 1.0 to 1.5 1.0 to 1.5 ReadyToProcess WAVE 25 Operating Instructions 29009597 AD...
-
Page 81: Client Computer Specifications
The table below lists client computer specifications for a UNICORN 7.0 system for use with ReadyToProcess WAVE 25. ReadyToProcess WAVE 25 is supplied with UNICORN 7.0, which requires Windows 7. If you wish to use ReadyToProcess WAVE 25 with an earlier version of UNICORN, contact GE for assistance. General computer specifications Installation is supported for Windows 7 Professional, 32-bit or 64-bit, with Service Pack 1 or Windows 10 Professional 64-bit. - Page 82 The interface scale must remain at 100% to avoid issues with clipping and misaligning of parts of the UNICORN user interface. Normally, the scale is set at 100% by default. ReadyToProcess WAVE 25 Operating Instructions 29009597 AD...
-
Page 83: Hardware Installation
4 Installation 4.2 Hardware installation Hardware installation About this section This section describes the installation procedure for ReadyToProcess WAVE 25. In this section Section See page 4.2.1 Unpack the system units 4.2.2 Connect the system components ReadyToProcess WAVE 25 Operating Instructions 29009597 AD... -
Page 84: Unpack The System Units
WAVE 25 rocker, assistance from another person is highly recom- mended when lifting or moving the equipment. Use the handles on the sides of the rocker when possible, and do not lift ReadyToProcess WAVE 25 rocker with tray attached. ReadyToProcess WAVE 25 Operating Instructions 29009597 AD... - Page 85 Technical manual, Appendix D for instructions on how to change these settings. NOTICE Any computer used with the equipment shall comply with IEC 60950 and be installed and used according to the manufacturer's instruc- tions. ReadyToProcess WAVE 25 Operating Instructions 29009597 AD...
-
Page 86: Connect The System Components
CBCU units, set the CAN ID switches on the two CBCU units to positions 1 and 2 respectively. Tip: In dual mode, label the CBCU units with their respective CAN ID to simplify identification in the UNICORN software. ReadyToProcess WAVE 25 Operating Instructions 29009597 AD... - Page 87 Ethernet or wireless connection. Follow the appropriate instruction in the table below. Connection Instruction Stand-alone computer Connect a network cable between the Ethernet connector on the rear panel of the rocker and the Ethernet port on the computer. ReadyToProcess WAVE 25 Operating Instructions 29009597 AD...
- Page 88 The 15-pin D-sub connector on the rear panel of the rocker provides two analog inputs, four digital inputs and four digital outputs for controlling and monitoring additional equipment. See the ReadyToProcess WAVE 25 System Handbook for details. Connect to mains power...
- Page 89 Insert a CPC™ tubing connector into one end of each piece. For the tubing used to connect the CBCU to the Cellbag bioreactor, connect the end without the CPC connector to the silicone tubing using the supplied reducer connector. ReadyToProcess WAVE 25 Operating Instructions 29009597 AD...
-
Page 90: Software Installation
Note: For other types of installations, contact your GE representative for support. This includes network installations when you want to access the ReadyToProcess WAVE 25 system from several client computers or control more than one system from a single computer, or to run the system from a third-party controller. -
Page 91: Install Unicorn Software
UNICORN database, necessary to operate UNICORN and a connected local system. The UNICORN software installed on the client computer must correspond to the version provided in the ReadyToProcess WAVE 25 rocker. Contact your GE representative in case of uncertainty. The installation includes the components described in the table below. - Page 92 Read and accept the license agreement. Type of installation You should normally choose to perform a Full installation. Perform a Custom installation only if advised to do so by a GE representative. Type of system Select Cell cultivation as the type of system. If you install UNICORN for Chromatography, you will not be able to use the software with ReadyToProcess WAVE 25.
- Page 93 Before the system can be used, you will need to configure an e-license and define a system. These functions are accessed from the Configure eLicense and Define System buttons in the Installation completed dialog, and are described in the following sections in this chapter. ReadyToProcess WAVE 25 Operating Instructions 29009597 AD...
-
Page 94: Configure An E-License
Configure an e-license Introduction An e-license is a licensing file retrieved from the GE e-licensing web site and stored on the local computer. This section describes how to retrieve and configure an e-license. To configure an e-license directly after installing the software, click Configure eLicense in the final dialog of the installation procedure. - Page 95 In Windows 7, click the Windows icon and choose All Programs:Accessories:Command Prompt. You can also press and hold the Windows key and then press the letter R. Type ' ' in the input field and click OK or press Enter. ReadyToProcess WAVE 25 Operating Instructions 29009597 AD...
- Page 96 When activating additional licenses, always use the Ethernet address for the network card on the computer where the license server software is in- stalled. Do not use the Ethernet addresses on additional client computers. ReadyToProcess WAVE 25 Operating Instructions 29009597 AD...
- Page 97 Step Action Click the hyperlink in the dialog to access the e-licensing web site. Result: The GE Healthcare software elicensing web site opens in your web browser. Enter your access code (see Access Code, on page 94) and click Login.
- Page 98 Check whether you want to receive software updates and information • about related products. Click the Next button to proceed to the next page. • Click Add New Host under the heading Nodelocked Hosts. Result: The create license host dialog opens. ReadyToProcess WAVE 25 Operating Instructions 29009597 AD...
- Page 99 On the License summary page, select the check-box for your license and click Save to File. Save the license file in a safe location. Click Complete and Logout to close the software e-licensing web site. ReadyToProcess WAVE 25 Operating Instructions 29009597 AD...
- Page 100 Open to transfer the search path to the file into the e-License Configuration dialog. Click the Configure e-License button. Result: A confirmation dialog opens, showing that the configuration has been successful. Click OK in the confirmation dialog, then close the Configure e-License dialog. ReadyToProcess WAVE 25 Operating Instructions 29009597 AD...
-
Page 101: Define The System
The Define System dialog changes and the Connect by option differs de- pending on the chosen Instrument Configuration. Enter a name in the System name field. Note: Name your system carefully. The name cannot be changed after the system has been defined. ReadyToProcess WAVE 25 Operating Instructions 29009597 AD... - Page 102 System Properties dialog as an active system. It is recommended that you restart the rocker before the system is used. Note: Before the UNICORN client can connect to the system, the rocker LED must show a steady green light. ReadyToProcess WAVE 25 Operating Instructions 29009597 AD...
-
Page 103: Operation
5 Operation Operation About this chapter This chapter describes how to operate ReadyToProcess WAVE 25. In this chapter This chapter contains the following sections: Section See page 5.1 Set up the system 5.2 Start and configure the system 5.3 Prepare for cultivation 5.4 Perform cultivation... -
Page 104: Set Up The System
5.1.1 Select the tray and Cellbag bioreactor 5.1.2 Attach and detach tray 5.1.3 Prepare pH and DO sensors 5.1.4 Attach the Cellbag bioreactor 5.1.5 Prepare the pump 5.1.6 Connect gas to the system ReadyToProcess WAVE 25 Operating Instructions 29009597 AD... -
Page 105: Select The Tray And Cellbag Bioreactor
DO control. The temperature, pH, and DO sensors need to be submerged in liquid throughout the complete rocking cycle to function correctly. ReadyToProcess WAVE 25 Operating Instructions 29009597 AD... -
Page 106: Attach And Detach Tray
Tilt position is recommended, as described in the instructions below. Step Action Tilt the rocker platform by pulling the upper edge towards you. Lift the tray into the same angle as the rocker platform. ReadyToProcess WAVE 25 Operating Instructions 29009597 AD... - Page 107 Make sure that the holes for the temperature sensors on the rocker platform fit into the holes in the tray. Make sure that the connector on the tray is plugged into the tray connector on the back of the rocker platform. ReadyToProcess WAVE 25 Operating Instructions 29009597 AD...
- Page 108 Pull the tray towards you. Note: If the tray is detached with the rocker in normal position, you will need to lift the tray by the upper edge before sliding it away from you. ReadyToProcess WAVE 25 Operating Instructions 29009597 AD...
-
Page 109: Prepare Ph And Do Sensors
The optical sensor spots have different colors. The spot on the pH sensor bag port is white/yellow and the spot on the DO sensor port is pink/black. If both pH and DO sensors are used, a separate fiber cable is needed for each sensor. ReadyToProcess WAVE 25 Operating Instructions 29009597 AD... - Page 110 Rotate the sensor adapter clockwise to fix the pins on the sensor port to the adapter. A distinct "click" will indicate that the adapter is securely fastened. Note: When rotating the sensor adapter, make sure not to exert any force on the fiber cable. ReadyToProcess WAVE 25 Operating Instructions 29009597 AD...
- Page 111 47. Connect the pH sensor cable to the pH port on the CBCU front panel. Connect the DO sensor cable to the DO port on the CBCU front panel. ReadyToProcess WAVE 25 Operating Instructions 29009597 AD...
-
Page 112: Attach The Cellbag Bioreactor
For a Cellbag bioreactor that covers the whole tray, open both bag clamps. In dual mode or with a bioreactor that covers only half the tray, only one clamp needs to be opened. Insert the upper Cellbag rod into the opened bag clamp. ReadyToProcess WAVE 25 Operating Instructions 29009597 AD... - Page 113 Cellbag bioreactor on the tray. Mount the lid on top of the tray. NOTICE Keep the Cellbag bioreactor covered with the lid throughout the cultivation to protect the optical sen- sors from excessive light exposure. ReadyToProcess WAVE 25 Operating Instructions 29009597 AD...
-
Page 114: Prepare The Pump
The wall thickness of the tubing should be 1.6 mm (1/16"). Note: Pump tubing is not supplied with the system. Suitable tubing must be pur- chased separately. ReadyToProcess WAVE 25 Operating Instructions 29009597 AD... - Page 115 Make sure that the pump is not running. Open the flip top of the pump head completely. Place the pointed tool in the small depression in the tubing holder on one side of the pump head. ReadyToProcess WAVE 25 Operating Instructions 29009597 AD...
- Page 116 Load tubing Follow the instructions below to load tubing in the pump head and connect tubing to the Cellbag bioreactor. Step Action Make sure that the pump is switched off. ReadyToProcess WAVE 25 Operating Instructions 29009597 AD...
- Page 117 Check that the tubing holder is adjusted to the correct position for your size of tubing. See instructions above. Place the tubing between the rotor rollers and the track, pressed against the inner wall of the pump head. ReadyToProcess WAVE 25 Operating Instructions 29009597 AD...
- Page 118 Lower the flip top until it clicks into its fully closed position. Connect inlet and outlet tubing to the Cellbag bioreactor, for example acid, base, feed and harvest. Note: The pumping direction is indicated by the arrow on the pump head. ReadyToProcess WAVE 25 Operating Instructions 29009597 AD...
-
Page 119: Connect Gas To The System
In dual mode, be careful to connect the air and gas for the left and right Cellbag bioreactors to the correct CBCU. This is easier if the respective CBCU units are placed on the left and right sides of the rocker respectively. ReadyToProcess WAVE 25 Operating Instructions 29009597 AD... - Page 120 (indicated by an arrow in the illustration below). Do not at- tach the filter heater to the inlet vent filter. The image below shows the filter heater mounted on the stand on the Cellbag bioreactor. ReadyToProcess WAVE 25 Operating Instructions 29009597 AD...
- Page 121 1.0 to 1.5 bar to CO2 IN on the CBCU rear panel. If applicable, connect the O gas source at at 1.0 to 1.5 bar to O2 IN on the CBCU rear panel. ReadyToProcess WAVE 25 Operating Instructions 29009597 AD...
- Page 122 Make sure to keep the inlet pressures within the stated limits (1.0 to 1.5 bar). Excessive pressure may cause internal tubing to loosen. NOTICE An unsteady inlet pressure will affect the speed of the gas flow and also the gas mix. ReadyToProcess WAVE 25 Operating Instructions 29009597 AD...
-
Page 123: Start And Configure The System
UNICORN and configure the system in the software. In this section Section See page 5.2.1 Start the system and log on to UNICORN 5.2.2 Connect to the system 5.2.3 Configure system properties 5.2.4 Configure system settings 5.2.5 Start a run ReadyToProcess WAVE 25 Operating Instructions 29009597 AD... -
Page 124: Start The System And Log On To Unicorn
If Use Windows Authentication is checked, you may log on using your Win- dows username and password. Press the Power switch to start the rocker. Result: The Power button flashes green during start-up, and then lights steadily when the rocker is operational. ReadyToProcess WAVE 25 Operating Instructions 29009597 AD... -
Page 125: Connect To The System
Action When the indicator light on the rocker front panel shows a steady green light, click the Connect to Systems icon in the System Control module. Result: The Connect to Systems dialog opens. ReadyToProcess WAVE 25 Operating Instructions 29009597 AD... - Page 126 The detailed appearance of the process picture will vary according to your system setup. Tip: If UNICORN is unable to connect to the selected system, see Section 7.5 UNICORN System Control, on page 163. ReadyToProcess WAVE 25 Operating Instructions 29009597 AD...
-
Page 127: Configure System Properties
Instrument Configuration of the system. The Instrument Configuration is the system specific control software. It is provided on a DVD with the system, and is also available for download. Contact your GE rep- resentative if you need help to download the Instrument Configuration. - Page 128 All available components are shown in the Component selection list. Click the check-boxes to select or de-select components. • Make sure the components selected match the units connected to the • system. Click OK to apply the changes. ReadyToProcess WAVE 25 Operating Instructions 29009597 AD...
-
Page 129: Configure System Settings
Step Action Select System:Settings in the System Control module. Select Pump setup from the list and click the + symbol to view the available pump heads. ReadyToProcess WAVE 25 Operating Instructions 29009597 AD... - Page 130 Check the assignment of all pump heads to make sure that there are no conflicts before clicking OK. To return to the default values defined in the instrument configuration, click Set Parameters To Strategy Default Values. ReadyToProcess WAVE 25 Operating Instructions 29009597 AD...
-
Page 131: Start A Run
This section describes how to start a manual or method-controlled run. Data collection begins when the run starts. For further information on methods, refer to ReadyToProcess WAVE 25 System Handbook. Note: Pressing the Power button on the rocker while the rocker is switched on will shut down the system and stop any ongoing run. - Page 132 2 If pH and/or DO control will be used, enter the appropriate calibration data (printed on the Cellbag label). 3 Click OK. Result: The Start Protocol dialog for the manual run opens. ReadyToProcess WAVE 25 Operating Instructions 29009597 AD...
- Page 133 Open the System Control module and click the icon Open Method Navigator. Result: The Method Navigator pane opens. Select the method to run, and click the Run icon. Result: The Start Protocol dialog for the method run opens. ReadyToProcess WAVE 25 Operating Instructions 29009597 AD...
- Page 134 An ended method cannot be continued. permanently end the run click the End icon. Note: When you end a method run prematurely, you will be prompted to save or discard the partial result. ReadyToProcess WAVE 25 Operating Instructions 29009597 AD...
-
Page 135: Prepare For Cultivation
Chapter 3 System description, on page 41. In this section Section See page 5.3.1 Inflate the Cellbag bioreactor 5.3.2 Adjust pump parameters 5.3.3 Add and equilibrate culture medium 5.3.4 Prepare the sensors ReadyToProcess WAVE 25 Operating Instructions 29009597 AD... -
Page 136: Inflate The Cellbag Bioreactor
Enable Fast fill. This will maximize the gas flow during the first 20 minutes. Note: Fast fill is disabled in the illustration below. Turn on Gas flow from the Process Picture by pressing the right-hand side of the Gas flow button. Result: The Cellbag is inflated. ReadyToProcess WAVE 25 Operating Instructions 29009597 AD... -
Page 137: Adjust Pump Parameters
Molarity parameter to the equivalent molarity of NaOH or HCl for optimal pH control. If you are preparing a perfusion cultivation, enable auto-calibration or cali- brate the feed and harvest pumps to reach optimal precision. ReadyToProcess WAVE 25 Operating Instructions 29009597 AD... -
Page 138: Add And Equilibrate Culture Medium
Adjustable foot, on page 46. Make sure that the lid and all other equipment that will be used during the run is placed on the tray, and that no tubing weighs down the tray. Click Tare. ReadyToProcess WAVE 25 Operating Instructions 29009597 AD... - Page 139 0.5 units from a reference measurement. Equilibrate to operating conditions Follow the instructions below to equilibrate the medium to operating conditions. For recommendations on operating conditions, refer to ReadyToProcess WAVE 25 System Handbook. ReadyToProcess WAVE 25 Operating Instructions 29009597 AD...
- Page 140 CO2 button in the Process Picture. Set the required temperature setpoint. Click the right-hand side of the Temp button to start heating. Equilibrate the medium for at least 2 hours. ReadyToProcess WAVE 25 Operating Instructions 29009597 AD...
-
Page 141: Prepare The Sensors
Select DO sensor in the Monitor to calibrate drop down menu. Enter percentage of air saturation (90% to 100% depending on CO concen- tration) in the Enter reference DO field. Click Calibrate. Close the Calibration dialog. Select Settings:DO in the Process Picture. ReadyToProcess WAVE 25 Operating Instructions 29009597 AD... - Page 142 Select System:Calibrate in System Control. Select pH sensor in the Monitor to calibrate drop down menu. Enter the actual pH value in the Enter reference pH field. Click Calibrate. Close the Calibration dialog. ReadyToProcess WAVE 25 Operating Instructions 29009597 AD...
- Page 143 5.3.4 Prepare the sensors Step Action Select Settings:pH in the Process Picture. Enter the desired values for Control and Setpoint. Check the Deviation Alarm and set the alarm limits if desired. Click OK. ReadyToProcess WAVE 25 Operating Instructions 29009597 AD...
-
Page 144: Perform Cultivation
This section describes the basics of performing a cultivation. During the cultivation, key parameters are monitored and the settings can be adjusted. In this section Section See page 5.4.1 Inoculate the culture 5.4.2 Monitor the run 5.4.3 End a run ReadyToProcess WAVE 25 Operating Instructions 29009597 AD... -
Page 145: Inoculate The Culture
ReadyMate™ connector. Unclamp the inlet tubing and inoculum container tubing. Transfer the desired volume of inoculum into the bag using a pump or gravity flow. ReadyToProcess WAVE 25 Operating Instructions 29009597 AD... -
Page 146: Monitor The Run
An example of the Process Picture is shown in the illustration below. Details vary according to the system configuration. The button colors indicate the current state of the respective function as shown in the table below. ReadyToProcess WAVE 25 Operating Instructions 29009597 AD... - Page 147 The function needs attention. Click on the button to open the related settings and to see more information. The function is not working properly. Click on the button to open the related settings and to see an explanation of the problem. ReadyToProcess WAVE 25 Operating Instructions 29009597 AD...
-
Page 148: End A Run
Disconnect the tubing from the inlet vent filter on the Cellbag bioreactor. Disconnect any other tubing and cables still connected to the Cellbag bioreactor. Release and remove the empty Cellbag bioreactor from the tray by pressing down the bag clamp opener. ReadyToProcess WAVE 25 Operating Instructions 29009597 AD... - Page 149 Press the power button on the rocker front panel. The light flashes green while shutting down. Note: If the rocker fails to shut down, keep the power button pressed in more than 4 seconds to force a shutdown. Clean the bioreactor system units. ReadyToProcess WAVE 25 Operating Instructions 29009597 AD...
-
Page 150: Maintenance
For detailed information about the maintenance manager, refer to UNICORN Administration and Technical manual. In this chapter This chapter contains the following sections: Section See page 6.1 Calibration 6.2 Cleaning 6.3 Cleaning before planned service ReadyToProcess WAVE 25 Operating Instructions 29009597 AD... -
Page 151: Calibration
Temperature Contact GE service personnel for assistance if needed. Service personnel use special equipment to achieve more accurate cali- bration. and O... - Page 152 Select the appropriate monitor in the Monitor to calibrate drop down menu. Follow the instructions in the right-hand field and enter the correct values in the Calibration procedure field, and click Calibrate for each value. Close the Calibration dialog. ReadyToProcess WAVE 25 Operating Instructions 29009597 AD...
-
Page 153: Cleaning
6.2 Cleaning Cleaning Cleaning procedure To prevent microbial or cross contamination, ReadyToProcess WAVE 25 should be cleaned after each cultivation. The system must be turned off and unplugged before cleaning. • Clean the exterior of the system units with a damp cloth and a suitable cleaning agent. -
Page 154: Cleaning Before Planned Service
Copy the form you need from Section 8.2 Health and Safety Declaration Form, on page 167 or print it from the PDF file available on the User Documentation CD. ReadyToProcess WAVE 25 Operating Instructions 29009597 AD... -
Page 155: Troubleshooting
This chapter describes troubleshooting and corrective actions for ReadyToProcess WAVE ReadyToProcess WAVE 25 System Handbook contains further troubleshooting and cor- rective actions. If the suggested actions in this guide and ReadyToProcess WAVE 25 System Handbook do not solve the problem or if the problem is not covered by these guides, contact your GE representative for advice. -
Page 156: Readytoprocess Wave 25 System
Read the displayed message when you connect pumps is not defined in to the system in System Control. Make sure all UNICORN. available components are selected for the system. See Section 5.2.3 Configure system properties, on page 127. ReadyToProcess WAVE 25 Operating Instructions 29009597 AD... -
Page 157: Readytoprocess Wave 25 Rocker
Rocker is in an error Check the current alarms. • state. Reset power to the unit. • If you still get motor alarms, contact GE service • personnel. Tray is in tilt position. Make sure that the tray is in normal position. •... - Page 158 At the first command None. This is normal. sending another com- sent to the system, the mand than Start rock- system enters Run ing. state and the rocker is initialized and makes a few movements. ReadyToProcess WAVE 25 Operating Instructions 29009597 AD...
- Page 159 Make sure that the pH or DO cables are not in • contact with the temperature sensor. Temperature sensor Calibrate the temperature sensor. See Section 6.1 needs calibration. Calibration, on page 151. If needed, contactGE ser- vice personnel. ReadyToProcess WAVE 25 Operating Instructions 29009597 AD...
- Page 160 Check that the table is rigid, flat and horizontal. ates or drifts. ble. Other components Troubleshooting for pH and DO measurement and control and for media control is de- scribed in the ReadyToProcess WAVE 25 System Handbook. ReadyToProcess WAVE 25 Operating Instructions 29009597 AD...
-
Page 161: Readytoprocess Cbcu
7 Troubleshooting 7.3 ReadyToProcess CBCU ReadyToProcess CBCU For more detailed troubleshooting, see the ReadyToProcess WAVE 25 System Handbook. Error symptom Possible cause Corrective action Status LED flashes red. An internal error has Check any warning message and follow the instruc- occurred, but the CBCU tion. -
Page 162: Readytoprocess Pump
Status LED on the An internal error has Check any warning message and follow the instruc- pump rear panel flash- occurred, but the pump tion. If problem persists, contact GE service person- es red. is still operating. nel. Status LED on the... -
Page 163: Unicorn System Control
1 Open the MadCap help viewer from the Windows buttons or the F1 key. desktop icon. This is described in The help viewer application in UNICORN Administration and Technical manual. 2 Try the help button or F1 key again. ReadyToProcess WAVE 25 Operating Instructions 29009597 AD... - Page 164 UNICORN database instances and is already trying to connect. connected in the other instance. It is not recommended to have a system defined and active in more than one UNICORN database instance. ReadyToProcess WAVE 25 Operating Instructions 29009597 AD...
-
Page 165: Reference Information
For system and component specifications, wetted materials and chemical resistance information, refer to the ReadyToProcess WAVE 25 System Handbook, the ReadyToProcess WAVE 25 Product Documentation and the data file for ReadyToProcess WAVE 25, available for download from www.gelifesciences.com/wave. In this chapter... -
Page 166: Chemical Resistance
67-63-0/200-661-7 Klercide Cleaning/Disinfection PBS solution 10× Testing Sodium bicarbonate 7.5% pH control 144-55-8/205-633-8 Sodium carbonate pH control 497-19-8/207-838-8 Sodium chloride Testing 7647-14-5/231-598-3 Sodium hydroxide pH control 1310-73-2/215-185-5 Sodium hypochlorite Cleaning/Disinfection 7681-52-9/231-668-3 Virkon Cleaning/Disinfection ReadyToProcess WAVE 25 Operating Instructions 29009597 AD... -
Page 167: Health And Safety Declaration Form
Service Ticket #: To make the mutual protection and safety of GE service personnel and our customers, all equipment and work areas must be clean and free of any hazardous contaminants before a Service Engineer starts a repair. To avoid delays in the servicing of your equipment, please complete this checklist and present it to the Service Engineer upon arrival. - Page 168 To make sure the mutual protection and safety of GE personnel, our customers, transportation personnel and our environment, all equipment must be clean and free of any hazardous contaminants before shipping to GE. To avoid delays in the processing of your equipment, please complete this checklist and include it with your return.
-
Page 169: Index
Manufacturing information, 9 equipment dimensions, 78 equipment weight, 78 Notes and tips, 8 Define a system At installation, 101 pH sensor Documentation, 16 Connect, 109 DO sensor Description, 60 Connect, 109 Power failure, 36 ReadyToProcess WAVE 25 Operating Instructions 29009597 AD... - Page 170 Log on, 124 tion, 101 Start, 124 types of e-licenses, 94 System Control module, 66 Software overview, 61 Uninterruptible power supply software modules, 62 (UPS), 37 Space requirements, 76 ReadyToProcess WAVE 25 Operating Instructions 29009597 AD...
- Page 171 Page intentionally left blank...
- Page 172 All goods and services are sold subject to the terms and conditions of sale of the company within GE Healthcare which supplies them. A copy of these terms and conditions is available on request. Contact your local GE Healthcare repre- sentative for the most current information.
Need help?
Do you have a question about the ReadyToProcess WAVE 25 and is the answer not in the manual?
Questions and answers