Table of Contents
Advertisement
Quick Links
Advertisement
Chapters
Table of Contents

Subscribe to Our Youtube Channel
Related Manuals for Denso BHT-500B


Summary of Contents for Denso BHT-500B
- Page 1 Barcode Handy Terminal BHT-500B User’s Manual...
- Page 2 3) The modification of DENSO WAVE's products by parties other than DENSO WAVE. If it is judged by DENSO WAVE INCORPORATED that malfunction of the product is due to the product having been dropped or subjected to impact, repairs will be made at a reasonable charge even within the warranty period.
- Page 3 Barcode Handy Terminal Customer Registration and Inquiries Customer Registration To allow us to provide our customers with comprehensive service and support, we request that all customers complete a Member Registration Form. Registered members will be offered the following privileges. The latest upgrade information ...
-
Page 4: About This Manual
Every attempt has been made to ensure that the content of this manual is thorough and up to date, however, we kindly ask that any questionable content, mistakes, or omissions be reported to DENSO WAVE. The copyright for this User’s Manual belongs to DENSO WAVE INCORPORATED. - Page 5 Barcode Handy Terminal Viewing this Manual − About the Bookmark The PDF Bookmark function can be used to jump to the Contents page. <Procedure> Click the “Bookmark” tab. Click to search for the desired item. Click the item to be read. Click the “Bookmarks”...
- Page 6 BHT-500B − Searching by Word The PDF search function can be used to jump to the target page by entering words or characters related to the item being searched. (1) Click the Search icon. (Or select “Edit” – “Search”.) (2) Enter the word(s) or character(s) to be searched for.
- Page 7 This is an instruction manual used to create handy terminal programs with BHT-BASIC. This manual can be found in the BHT-BASIC Compiler CD-ROM. This manual can also be downloaded from the DENSO WAVE member’s Web site (QBdirect). BHT-BASIC 4.0 Transfer Utility User’s Guide This is an instruction manual for software relating to data transfer between the computer and BHT-500 and comes bundled with the BHT-BASIC 4.0 Transfer Utility.
-
Page 8: Safety Precautions
BHT-500B SAFETY PRECAUTIONS Be sure to observe all these safety precautions. Please READ through this manual carefully. It will enable you to use the BHT and CU correctly. Always keep this manual nearby for speedy reference. Strict observance of these warnings and cautions is a MUST for preventing accidents that could result in bodily injury and substantial property damage. - Page 9 Barcode Handy Terminal Handling the battery cartridge Never disassemble or heat the battery cartridge, nor put it into fire or water; doing so could cause battery-rupture or leakage of battery fluid, resulting in a fire or bodily injury. Do not carry or store the battery cartridge together with metallic ball-point pens, necklaces, coins, hairpins, etc.
- Page 10 BHT-500B Handling the CU If smoke, abnormal odors or noises come from the CU, immediately unplug the AC adapter from the wall socket or CU and contact your nearest dealer. Failure to do so could cause fire or electrical shock.
- Page 11 Barcode Handy Terminal To System Designers: When introducing BHTs in those systems that could affect human lives (e.g., medicines management system), develop applications carefully through redundancy and safety design which avoids the feasibility of affecting human lives even if a data error occurs. Handling the battery cartridge ...
- Page 12 BHT-500B Handling the CU Never disassemble or modify the CU; doing so could result in an accident such as fire or malfunction. Never put the CU in places where there are excessively high temperatures, such as inside closed-up automobiles, or in places exposed to direct sunlight.
- Page 13 (tüüp: WM-G-MR-01), mis vastab direktiivi 1999/5/EÜ põhinõuetele ja nimetatud direktiivist tulenevatele muudele asjakohastele sätetele. Español: Por medio de la presente, DENSO WAVE INCORPORATED, declara que el BHT-500BW incluye módulo de red inalámbrica ( tipo: WM-G-MR-01), el cual cumple con los requisitos esenciales y otras disposiciones aplicables o exigibles de la Directiva 1999/5/CE.
- Page 14 LAN (typu: WM-G-MR-01) i jest zgodny z zasadniczymi wymogami oraz pozostałymi stosownymi postanowieniami Dyrektywy 1999/5/EC. Português: DENSO WAVE INCORPORATED declara que este BHT-500BW inclui um Módulo LAN sem fios (tipo: WM-G-MR-01), o qual está conforme aos requisitos essenciais e a outras disposições da Directiva 1999/5/CE.
- Page 15 Barcode Handy Terminal LABELING: BHT-503B BHT-504BW...
- Page 16 BHT-500B...
-
Page 17: Table Of Contents
BHT-500B Chapter 1 Outline This chapter describes the BHT system and provides an overall outline of the BHT. System Configuration ···················································································2 1.1.1 Hardware Configuration ···················································································2 1.1.2 Software Configuration·····················································································5 Component Names and Functions ·······························································8 1.2.1 BHT Front/Rear ································································································8 1.2.2 Keypad ·············································································································9 1.2.3... -
Page 18: System Configuration
BHT-500B 1.1 System Configuration This section describes the hardware required for the barcode data collection system used by the BHT and the BHT software. 1.1.1 Hardware Configuration In addition to the BHT, the following hardware and software are required for the barcode data collection system used by the BHT. - Page 19 Barcode Handy Terminal Host Computer Allows you to edit, manage and download user programs and data, as well as downloading system programs. Models : PC/AT Compatible Operating Systems and Optional Application Programs Windows NT Windows 2000 Operating Systems (OS) Windows 98 Windows XP 3.51/4.0...
- Page 20 BHT-500B BHT-BASIC 4.0 Development Pack (Option) and BHT-BASIC 4.0 Transfer Utility (Option) Refer to “Software Configuration” on the following page.
-
Page 21: Software Configuration
Barcode Handy Terminal 1.1.2 Software Configuration This section describes the software used for BHT Series application development and application in addition to the software used at the BHT unit. Please note that the above-mentioned software can be downloaded (Certain versions may be for trial use.) from the QBdirect service discussed at “Customer Registration”... - Page 22 BHT-500B BHT-BASIC4.0 Transfer Utility Transfers files between the host computer and BHT at the host computer. YMODEM or BHT-Ir protocol is used for file transfer. BHT-BASIC 4.0 specification files such as application programs and data files are transferred using YMODEM protocol.
- Page 23 Barcode Handy Terminal System Mode This program is used to operate files, make system environment settings, and perform various types of tests. Refer to “Chapter 4 System Operation” –“4.4 System Mode” for further details. Font File These files are required to display JIS 1 and 2 standard Kanji characters at the BHT unit LCD display. By using font files, the BHT unit is able to display 16 to 40 dot Kanji in application programs (*.PD4).
-
Page 24: Component Names And Functions
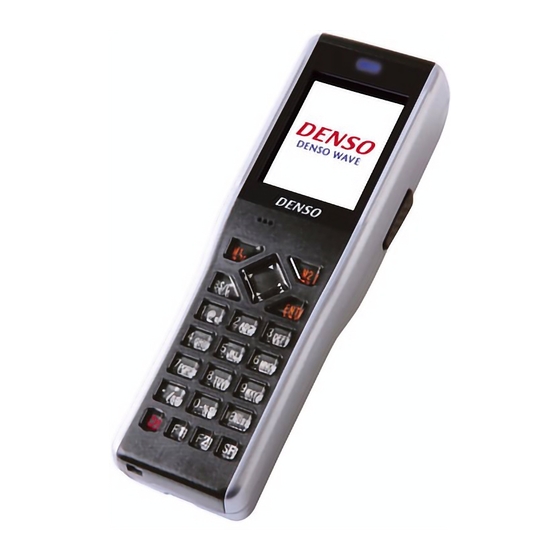
BHT-500B 1.2 Component Names and Functions 1.2.1 BHT Front/Rear * BHT-504BW only (11) (10) (12)* Name Function and Description Indicator LED Indicates the barcode read status. Illuminates in blue when the BHT has successfully read a barcode. LCD (Liquid crystal display) Displays the characters and graphic patterns. -
Page 25: Bht Front/Rear
Barcode Handy Terminal 1.2.2 Keypad The BHT key functions can be set at user programs. The diagram below shows an example of settings for each key function. Name Function and Description Each of the M3 and M4 keys is assigned a trigger switch by default. ... - Page 26 BHT-500B Name Function and Description Press this key to display the following setting screens when set to the default. MENU key Beeper volume magic Vibrator key) LCD display brightness Power save Used in combination with other keys such as the numerical keys for special input Shift key procedures.
-
Page 27: Bht Screen
Barcode Handy Terminal 1.2.3 BHT Screen If the system display is set to ON at the system settings or in the user program, icons display at the bottom of the screen (default) indicating the key shift status, alphabet entry status, and status of the link with the CU-511. SF ALP Connection status with access point * Link status with CU-511... - Page 28 BHT-500B...
- Page 29 BHT-500B Chapter 2 BHT Preparation This chapter describes inserting and charging the battery cartridge, turning the BHT power ON and OFF, and use of the hand strap. “BHT Preparation” Procedure ·····································································14 Loading and Charging the Battery Cartridge ··············································14 2.2.1 Battery Power Level Indicator ········································································22 Attaching the Hand Strap············································································23...
-
Page 30: Bht Preparation" Procedure
BHT-500B 2.1 “BHT Preparation” Procedure Follow the steps below to prepare the BHT for use. 2.2 Loading and Charging the Battery First load and charge the battery cartridge. Cartridge(Page 14) 2.3 Attaching the Hand Strap Attach the hand strap to prevent the BHT from being dropped. -
Page 31: Loading And Charging The Battery Cartridge
Barcode Handy Terminal Charging with the communication unit (CU-501, CU-511 and CU-521) or battery charger (CH-551) Slide the battery cover lock (1) in the direction shown by the arrow, and remove the battery cover (2). Check the battery cartridge terminals and direction indication on the BHT, and insert the battery Terminal cartridge in the direction shown by the arrow. - Page 32 BHT-500B Power for the CU-521 can be obtained from a USB connection port (host computer or hub), Note however, charging is not possible while the host computer is in suspend mode. Charging is resumed when suspend mode is exited. This can be avoided using a dedicated AC adapter to supply power.
- Page 33 Barcode Handy Terminal The BHT indicator LED will change to green Green LED ON when charging is complete. Charging takes approximately 3 hours. Point Charging takes approximately 4 hours when using the CU-521 with power supplied via the ...
- Page 34 BHT-500B Charging with the battery charger (CH-501) Check the battery cartridge terminals and insert the cartridge. Terminal Connect the CH-501 plug to a commercial AC power source (230 V AC). The LED will turn red when charging is commenced. Red LED ON The LED will turn green when charging is complete.
- Page 35 Barcode Handy Terminal Check the battery cartridge terminals and direction Terminal indication on the BHT, and insert the battery cartridge in the direction shown by the arrow. Pull up Pull the battery pull strap upward as Point shown on the right to remove the battery cartridge easily.
- Page 36 BHT-500B...
- Page 37 Barcode Handy Terminal Mishandling of the charger may result in charger overheating, smoke generation, blowout or combustion. Please read the following items prior to use. Never disassemble or modify the battery cartridge. Never connect the battery cartridge (+) and (-) terminals with a metal object such as a piece of ...
-
Page 38: Battery Power Level Indicator
BHT-500B 2.2.1 Battery Power Level Indicator Confirming at the Power Level Icon The battery power level can be confirmed at the battery icon ( ) that displays in the bottom left of the LCD display. The battery power displays in four levels. -
Page 39: Attaching The Hand Strap
Barcode Handy Terminal 2.3 Attaching the Hand Strap Attach the hand strap to prevent the BHT from being accidentally dropped during use. 2.3.1 Attaching the Hand Strap Attach the hand strap as shown below. 2.3.2 Holding the BHT Attach the hand strap to your wrist and hold the BHT as shown below. -
Page 40: Initial Setup
BHT-500B 2.4 Initial Setup Turn ON the power after inserting the fully charged battery cartridge into the BHT. The clock will not have been set at the time of purchase, and therefore it is necessary to set the date and time when turning ON the power for the first time. - Page 41 Barcode Handy Terminal 2.5 Turning OFF the Power Use one of the following three methods to turn OFF the BHT power. Press the Power key ( Normal power OFF Hold down the Power key ( Turning the power OFF after data back-up ) for at least 3 seconds.
-
Page 42: Turning Off The Power
BHT-500B 2.5.4 If the BHT Is Shut Down Abnormally If the BHT is shut down abnormally* and is left without a battery cartridge or with a discharged battery cartridge loaded, then unsaved data may be lost. (*"Normally shut down" refers to "2.5 Turning OFF the Power.") The right message will appear when you load a charged battery cartridge and turn the BHT on. - Page 43 Barcode Handy Terminal If Scandisk finds an invalid file(s), the right screen will appear. (As long as an invalid file exits, the screen displays every time the BHT System is started up.) (Refer to “About “$$BRKLST.SYS” on the following page.) Press the ENT key to start up the BHT System.
-
Page 44: If Invalid Files Are Found
BHT-500B About “$$BRKLST.SYS” If Scandisk finds an invalid file(s), it will automatically create the "$$BRKLST.SYS" file. To check the contents of the file, upload the file in System Mode to the host computer. (Refer to “Chapter 4 System Operation" – “4.5.3 Uploading Files (UPLOAD MENU).") Contents of the “$$BRKLST.SYS”... - Page 45 Barcode Handy Terminal...
-
Page 46: Data Transmission
BHT-500B Chapter 3 Basic Operation This chapter describes basic operations such as barcode scanning, numerical data entry and item selection using the BHT, basic changes to settings, and BHT data transmission. Scanning Barcodes ····················································································30 Numeric Data Entry ····················································································32 Task Selection ····························································································32 Changing the Default Settings ····································································33... -
Page 47: Scanning Barcodes
BHT-500B 3.1 Scanning Barcodes Follow the procedure below to scan barcodes. Turn the BHT power ON. Power key Press the trigger switch. The BHT emits a guide marker (laser light) and illumination LED. The trigger switch is assigned to magic ... - Page 48 Barcode Handy Terminal When unable to successfully read barcodes… Cause Countermeasure Change the BHT scanning angle and try again. When the illumination LED is focused on the printed surface of the barcode from Specular directly above, there are times when reflection scanning is unsuccessful due to specular reflection.
-
Page 49: Numeric Data Entry
BHT-500B 3.2 Numeric Data Entry Enter numeric data such as product volume with the numeric keys and Enter ( ) key. If numeric data is entered incorrectly, use the backspace key ( ) to delete the data and then reenter with the numeric keys. -
Page 50: Changing The Default Settings
Barcode Handy Terminal 3.4 Changing the Default Settings The buzzer volume, vibrator, LCD display brightness and power save settings can be changed at the MENU screen. Item Details Setting Used to set the volume of the buzzer that notifies the user when barcode scanning is complete. - Page 51 BHT-500B Use the [◄] and [►] cursor keys to select the setting. Press MENU key to exit the settings screen. The settings screen is exited. Press the MENU key once again to terminate during operation. Point The MENU key can be assigned to other keys such as the SF or ENT keys. To do this, press the ...
-
Page 52: Transmitting Data
Barcode Handy Terminal 3.5 Transmitting Data Data gathered by the BHT can be transmitted to the host computer by connector communication, infrared communication and wireless communication*. The data transmission method and BHT setting method will differ depending on the system used, and therefore the system administrator should be contacted for details of operation. -
Page 53: Connector Communication
BHT-500B 3.5.1 Connector Communication Connect host computer with dedicated interface cable (Option, Type: CBBHT-RS1000/3-9-02) and perform data communication. The BHT-BASIC 4.0 Development Pack (Option) and BHT-BASIC 4.0 Transfer Utility (Option) software is required. Dedicated interface cable Requests Do not use a cable other than the dedicated interface cable. -
Page 54: Infrared Communication
Barcode Handy Terminal 3.5.2 Infrared Communication When performing data communication between BHT units Point the BHT infrared communication ports toward each other and perform communication. Requests Ensure that the light path between the BHT and any target stations is not obstructed. ... -
Page 55: Wireless Communication
BHT-500B 3.5.3 Wireless Communication * BHT-504BW only Transmit data to host computer via the wireless LAN access point. To perform wireless communication, it is necessary to configure the wireless local area network (wireless LAN) at the BHT and access point. - Page 56 BHT-500B Chapter 4 System Operation This chapter describes how to initialize and update the system, start up a user program, and operate System Mode. Initializing the BHT System·········································································40 4.1.1 Selecting the Memory Area to be Initialized···················································41 4.1.2 Selecting the Message Version (English or Japanese) ·································42 4.1.3...
-
Page 57: Initializing The Bht System
BHT-500B 4.1 Initializing the BHT System By initializing the system, program files and data files downloaded to the BHT user area are deleted, and system settings are returned to the default status when shipped from the factory. The system must be initialized when: ... -
Page 58: Selecting The Memory Area To Be Initialized
Barcode Handy Terminal 4.1.1 Selecting the Memory Area to be Initialized Press the Power key ( ) while holding down the SF, M1 and 0 keys together. The screen on the right displays. Select the memory area to be initialized. (1) To exempt font files from deletion: Ensure that “1:USER AREA EXCEPT FONTS”... -
Page 59: Selecting The Message Version (English Or Japanese)
BHT-500B 4.1.2 Selecting the Message Version (English or Japanese) When the screen on the right displays, select the message display language with the numerical keys. “1: Japanese” Changes the message language to Japanese. “2: English” Changes the message language to English. -
Page 60: Performing System Initialization
Barcode Handy Terminal 4.1.4 Performing System Initialization The screen on the right displays during system initialization. Upon completion of system initialization, the BHT displays the screen on the right for a second and then turns OFF automatically. Never turn OFF the BHT power during system initialization. Turning the power OFF too - Point - early will interrupt the process, requiring initialization to be performed again. -
Page 61: Updating The System
BHT-500B 4.2 Updating the System 4.2.1 Updating the BHT System The BHT system update procedure is as follows. BHT System Update File Download BHT System Update BHT System Update File Download Refer to sections “4.5.2 Downloading Files (DOWNLOAD Menu)” and ”4.5.8 Downloading/Uploading Files by FTP (FTP MENU)”, and download the BHT system update file to the BHT. -
Page 62: System Update
Barcode Handy Terminal 4.2.2 CU-511 System Update (when Equipped with LAN Communication Software) The CU-511 system update procedure is as follows. CU-511 System Update File Download CU-511 System Update CU-511 System Update File Download Refer to sections “4.5.2 Downloading Files (DOWNLOAD Menu)” and ”4.5.8 Downloading/Uploading Files by FTP (FTP MENU)”, and download the CU-511 system update file to the BHT. -
Page 63: Executing User Programs
BHT-500B 4.3 Executing User Programs User programs (application programs) can be executed using the following methods. Select the most appropriate method to meet the objective. 4.3.1 Executing from the SYSTEM MENU “EXECUTE PROGRAM” Select the program to be executed at the SYSTEM MENU “EXECUTE PROGRAM” menu. - Page 64 Barcode Handy Terminal Several directory management program examples are given below. The names of the files used in these examples are as follows. MAIN.PD4 Program to be executed by pressing the Power key ( ) only SUBMAIN.PD4 Program chained from MAIN.PD4 using the BHT-BASIC CHAIN statement USER.PD4 New program...
-
Page 65: Executing By Wake
BHT-500B (Example 3) Recommended download method After system initialization, first download the program to be executed simply by pressing the Power key ( ). In this case, this program is always registered at the beginning of the system directory management unless the program has been deleted and another file downloaded. -
Page 66: System Mode
Barcode Handy Terminal 4.4 System Mode By starting up the BHT in System Mode and selecting each menu, the following operations can be performed individually. Executing user programs File download/upload System environment setting BHT operation test ... -
Page 67: System Mode Basic Operation
BHT-500B 4.4.2 System Mode Basic Operation Menu Selection and Display Use the following procedure to select and display each menu. Operation example (Screen display: BHT-504BW) Press numerical corresponding to the menu to be selected. Select [4: SET SYSTEM] w Alternatively, press the cursor the [4] or [▲]/[▼] keys. - Page 68 Barcode Handy Terminal Setting Value Selection Operation example Use the following procedure to select setting values. Press the numerical key corresponding to the item to be selected. Alternatively, press the cursor keys ([▲] [▼]) to select the item. The selected item will be highlighted. Select the setting value with the cursor keys ([◄] [►]).
-
Page 69: System Menu Configuration
4.4.3 SYSTEM MENU Configuration 4.4.3.1 Menu Configuration for Items Displayed at the SYSTEM MENU Screen Select the item with the numerical keys or cursor keys ([▲] [▼]) and press the ENT key. BHT-500B Menu Configuration SYSTEM MENU Executing Programs Refer to section “4.5.1 Executing User Programs”. - Page 70 Barcode Handy Terminal System Environment Setting Refer to section “4.5.5 System Environment Setting”. 4 and ENT keys Testing Refer to section “4.5.6 BHT Operation Test”. 5 and ENT keys BS/C System Information Display Refer to section “4.5.7 System Information Display”. 6 and ENT keys Downloading/Uploading by FTP Refer to section “4.5.8 Downloading/Uploading Files by...
- Page 71 BHT-500B BHT-504BW Menu Configuration SYSTEM MENU Executing Programs Refer to section “4.5.1 Executing User Programs”. 1 and ENT keys Downloading Refer to section “4.5.2 Downloading Files”. BS/C 2 and ENT keys Uploading Refer to section “4.5.3 Uploading Files”. 3 and ENT keys...
- Page 72 Barcode Handy Terminal System Environment Setting Refer to section “4.5.5 System Environment Setting”. 4 and ENT keys Testing Refer to section “4.5.6 BHT Operation Test”. 5 and ENT keys BS/C System Information Display Refer to section “4.5.7 System Information Display”. 6 and ENT keys Downloading/Uploading by FTP Refer to section “4.5.8 Downloading/Uploading Files by...
- Page 73 BHT-500B 4.4.3.2 Menu Configuration for Items Not Displayed at the SYSTEM MENU Screen Press the corresponding numerical key while holding down the SF key. BHT-500B Menu Configuration SYSTEM MENU Deleting Program/Data Files Refer to section “4.5.10 Deleting Program/Data Files”. 0 with SF...
- Page 74 Barcode Handy Terminal Setting Remote Wake-up Refer to section “4.5.13 Setting Remote Wake-up”. 4 with SF held down BS/C Downloading/Uploading the System Message File Refer to section “4.5.14 Downloading/Uploading System the Message File”. 6 with SF held down Updating the System Refer to section “4.5.15 Updating the System”.
- Page 75 BHT-500B BHT-504BW Menu Configuration SYSTEM MENU Deleting Program/Data Files Refer to section “4.5.10 Deleting Program/Data Files”. 0 with SF held down BS/C Deleting Font Files Refer to section “4.5.11 Deleting Font Files”. 2 with SF held down Downloading/Uploading the BHT System Parameter File Refer to section “4.5.12 Downloading/Uploading the BHT...
- Page 76 Barcode Handy Terminal Setting Remote Wake-up Refer to section “4.5.13 Setting Remote Wake-up”. 4 with SF held down BS/C Downloading/Uploading the System Message File Refer to section “4.5.14 Downloading/Uploading System the Message File”. 6 with SF held down Updating the System Refer to section “4.5.15 Updating the System”.
-
Page 77: System Menu
BHT-500B 4.5 SYSTEM MENU 4.5.1 Executing User Programs (EXECUTE PROGRAM Menu) Individually select and execute user programs downloaded to the BHT. Use the following procedure to execute user programs. Select “1: EXECUTE PROGRAM” at the SYSTEM MENU and then press the ENT key. -
Page 78: Downloading Files (Download Menu)
Barcode Handy Terminal 4.5.2 Downloading Files (DOWNLOAD Menu) Download files to the BHT user area from other devices such as the host computer. If a file with the same name as one already used in the user area of the target memory in - Point - the BHT is downloaded, the newly downloaded file replaces the old one. - Page 79 BHT-500B Select either “1: FILE” or ”2: HT<-->HT COPY” and press the ENT key. The screen on the right displays indicating that the BHT is waiting for the file to be downloaded. The screen on the right displays only when “1: FILE” is selected.
- Page 80 Barcode Handy Terminal When downloading is complete, the beeper sounds once and the screen on the right displays. When the number of received records equals the total number of records, downloading is complete. (When using the Ymodem protocol, the received file size equals the total file size.) Press and hold the BS/C key to return to the DOWNLOAD menu.
-
Page 81: Uploading Files (Upload Menu)
BHT-500B 4.5.3 Uploading Files (UPLOAD Menu) Upload files stored in the BHT user area to another device. Use the following procedure to upload files. Select “3: UPLOAD” at the SYSTEM MENU and then press the ENT key. The screen on the right displays. - Page 82 Barcode Handy Terminal Select “1: FILE”, ”2: ALL FILES” or ”3: HT<-->HT COPY” and press the ENT key. When “1: FILE” is selected: The screen on the right displays. Select the file to be uploaded and press the ENT key. Next, proceed to step 3.
- Page 83 BHT-500B By executing the BHT-BASIC 4.0 Transfer Utility or similar program, the screen on the right displays and file uploading is commenced. (Refer to the “BHT-BASIC4.0 Transfer Utility User’s Guide.”) The screen on the right displays during uploading. The screen on the right displays indicating the file name and the number of sent records/the total number of records.
-
Page 84: Copying Files Between 2 Bht Units
Barcode Handy Terminal 4.5.4 Copying Files between 2 BHT Units Copy “all files (excluding font files)”, “setting data”, and the “date and time” stored in the BHT user area to another BHT. Use the following procedure to copy files between 2 BHT units. Set the same interface at both BHT units. - Page 85 BHT-500B The following setting data is copied when copying between BHT units. - Note - LCD contrast level Beeper volume Switching between beeper and vibrator Program to be executed automatically when the BHT is turned ON Message version (English or Japanese)
- Page 86 Barcode Handy Terminal FTP option, Upload mode FTP option, Verbose mode IP address of host computer for ping-test Data size of echo request Echo request intervals Timeout period for echo request No. of echo requests to be sent Echo request send timing TCP/IP operation device TCP/IP link layer Transmission speed between BHT and CU...
-
Page 87: System Environment Settings (Set System Menu)
BHT-500B 4.5.5 System Environment Settings (SET SYSTEM Menu) Use the following procedure to set the system environment. Select “4: SET SYSTEM” at the SYSTEM MENU and then press the ENT key. The SET SYSTEM menu screen on the right displays. - Page 88 Barcode Handy Terminal [1] Setting the auto-start execution program Use the following procedure to set the auto-start execution program. Select “1: EXECUTE PROGRAM” at the SET SYSTEM menu and then press the ENT key. The SET EXECUTE PROGRAM menu screen on the right displays. The highlighted program will be the program currently set as the auto-start execution program.
- Page 89 BHT-500B [2] Setting the message version and system status indication Use the following procedure to set the display language and system status indication. Select “2: DISPLAY” at the SET SYSTEM menu and then press the ENT key. The SET DISPLAY menu on the right displays.
- Page 90 Barcode Handy Terminal System Status Indication Turning ON the system status indication displays the following icons at the bottom of the screen. Indication Icon Description Key Shift status Displays when the keys on the keypad are in Shift mode. Alphabet Displays when the BHT is set to alphabet entry mode.
- Page 91 BHT-500B [4] Setting the special barcode scanning parameters Use the following procedure to set the barcode scanning conditions. Select “4: BARCODE” at the SET SYSTEM menu and then press the ENT key. The SET BARCODE menu screen on the right displays.
- Page 92 Barcode Handy Terminal “3: ITF”: Minimum number of digits to be read for ITF “4: STF”: Minimum number of digits to be read for STF “5: CODABAR”: Minimum number of digits to be read for Codabar Set minimum number of digits for the code to be scanned. Press [ ] to decrease the setting value and [ ] to increase the setting value.
- Page 93 BHT-500B [5] Setting the communication environment The communication environment settings following system initialization are follows. Do not change these settings unless necessary. Item Default Optical (infrared interface port) Interface port Ymodem protocol Communication protocol Infrared interface port TRANSMIT SPEED Baud rate...
- Page 94 Barcode Handy Terminal Use the following procedure if necessary to change the communication environment settings. Select “5: COMMUNICATION” at the SET SYSTEM menu and then press the ENT key. The SET COMMUNICATION menu screen on the right displays. Use the cursor keys ([▲] [▼]) or numerical keys ([1] [2] [3] [4]) to highlight the item to be set and press the ENT key.
- Page 95 BHT-500B “2: PROTOCOL”: Communication protocol options setting screen Select “2: PROTOCOL” to display the screen shown on the right The highlighted settings will be the current settings. “1: SERIAL No.”: Selects whether or not to add serial numbers to data blocks.
- Page 96 Barcode Handy Terminal “2: CONNECTOR”: Connector communication environment settings Select “2: CONNECTOR” at the SET COMMUNICATION menu and then press the ENT key. The SET CONNECTOR menu screen on the right displays. Use the cursor keys ([▲] [▼]) or numerical keys ([1] [2]) to highlight ”1: PARAMETER”...
- Page 97 BHT-500B “2: PROTOCOL”: Communication protocol option menu Select “2: PROTOCOL” to display the screen shown on the right. The highlighted settings will be the current settings. “1: SERIAL No.”: Selects whether or not to add serial numbers to data blocks.
- Page 98 Barcode Handy Terminal “3: COM PORT”: Setting the interface port Select “3: COM PORT” at the SET COMMUNICATION menu and then press the ENT key. The SET COM DEFAULT PORT menu screen on the right displays. The highlighted settings will be the current settings. “1: BASIC”...
- Page 99 BHT-500B “4: PROTOCOL TYPE”: Setting the communication protocol type Select “4: PROTOCOL TYPE” at the SET COMMUNICATION menu and then press the ENT key. The PROTOCOL TYPE menu screen on the right displays. The highlighted setting will be the current setting.
- Page 100 Barcode Handy Terminal Select “1: Ymodem” at the PROTOCOL TYPE menu to display the screen on the right. The highlighted settings will be the current settings. “1: CR/LF”: Specifies line delimiters. “2: CR/LF CODE”: Specifies handling for line delimiters in records when data files are downloaded.
- Page 101 BHT-500B Select “3: BHT-Ir Protocol” at the PROTOCOL TYPE menu to display the screen on the right. Enter the ID number of the BHT using the numerical keys and then press the ENT key. If there is no need to edit the current setting, press the ENT key only.
- Page 102 Barcode Handy Terminal [6] Defining the functions of the Shift key and Magic keys Use the following procedure to change the key settings. Select “6: KEY” at the SET SYSTEM menu and then press the ENT key. The SET KEY menu screen on the right displays. Use the cursor keys ([▲] [▼]) or numerical keys ([1] [2] [3] [4] [5] [6] [7]) to highlight the item to be set, and then press the ENT key.
- Page 103 BHT-500B “2: M1 KEY” - ”6: M5 KEY”: Defining the Mx key functions Select “2: M1 KEY” to “6: M5 KEY” at the SET KEY menu and then press the ENT key. The SET Mx KEY menu screen on the right displays.
- Page 104 Barcode Handy Terminal [7] Setting the resume function Use the following procedure to set the resume function. Select “7: RESUME” at the SET SYSTEM menu and then press the ENT key. The SET RESUME menu screen on the right displays. The highlighted setting will be the current setting.
- Page 105 BHT-500B [9] Setting the TCP/IP, FTP and DHCP Use the following procedure to change the TCP/IP, FTP and DHCP settings. Select “9: TCP/IP” at the SET SYSTEM menu and then press the ENT key. The SET TCP/IP menu screen on the right displays.
- Page 106 Barcode Handy Terminal “2: IP ADDRESS”: Setting the IP address Select “2: IP ADDRESS” at the SET TCP/IP menu to display the screen on the right where the current settings are displayed. To change the setting: (1) Use the cursor keys ([▲] [▼]) or numerical keys ([1] [2] [3]) to highlight the item to be set and press the ENT key.
- Page 107 BHT-500B Setting the FTP Select “2: SET FTP” at the SET TCP/IP menu and then press the ENT key. The SET FTP menu screen on the right displays. Use the cursor keys ([▲] [▼]) or numerical keys ([1] [2]) to highlight the item to be set, and then press the ENT key.
- Page 108 Barcode Handy Terminal “2: OPTION”: Setting the FTP options Select “2: OPTION” at the SET FTP menu to display the screen on the right where the current settings are displayed. Use the cursor keys ([▲] [▼]) to switch between screen 1/2 and 2/2. “1: CR/LF”: Specifies line delimiters that should match ones used in the server OS.
- Page 109 BHT-500B Setting the DHCP Select “3: SET DHCP” at the SET TCP/IP menu and then press the ENT key. The SET DHCP screen on the right displays. The highlighted setting will be the current setting. Press and hold the BS/C key to return to the SET TCP/IP menu.
-
Page 110: Bht Operation Test (Test Menu)
Barcode Handy Terminal 4.5.6 BHT Operation Test (TEST Menu) Use the following procedure to perform a BHT operation test. Select “5: TEST” at the SYSTEM MENU and then press the ENT key. The TEST menu screen on the right displays. “1: BARCODE”: Selects the barcode scanning test. - Page 111 BHT-500B [1] Barcode scanning test Use the following procedure to perform a barcode scanning test. Select “1: BARCODE” at the TEST menu and then press the ENT key. The screen on the right displays. Scan a barcode with the BHT Upon completion of barcode scanning, the BHT beeps once, and the indicator LED turns blue.
- Page 112 Barcode Handy Terminal Setting the Barcode Scanning Test Options When performing the barcode scanning test, press the F1 key to display the screen on the right, allowing barcode scanning test options to be set. Details of option settings are as follows. [1] COMPOSITE: ON/OFF [2] Add-ON: ON/OFF [3] Multi-line: ON/OFF...
- Page 113 BHT-500B [2] Memory test Use the following procedure to perform a memory test. Select “2: MEMORY” at the TEST menu and then press the ENT key. The screen on the right displays, and the BHT reads and writes data to and from all areas of the RAM and performs an address check.
- Page 114 Barcode Handy Terminal [3] Beeper scale test Use the following procedure to perform a beeper scale test. Select “3: BEEPER” at the TEST menu and then press the ENT key. The screen on the right displays, and the beeper sounds at the three octaves listed below.
- Page 115 BHT-500B [5] LCD and indicator LED tests Use the following procedure to perform an LCD and indicator LED test. Select “5: LCD” at the TEST menu and then press the ENT key. The TEST BEEPER screen on the right displays.
- Page 116 Barcode Handy Terminal Press the ENT key. The entire screen turns a lighter shade of gray. Press the BS/C key to return to the previous screen. Press and hold the BS/C key to return to the TEST menu. Press the ENT key. The entire screen turns an even lighter shade of gray.
- Page 117 BHT-500B Press the ENT key. The entire screen turns red, and at the same time, the indicator LED turns red. Press the BS/C key to return to the previous screen. Press and hold the BS/C key to return to the TEST menu.
- Page 118 Barcode Handy Terminal Press the ENT key. A 1-dot thick frame displays around the screen. Press the BS/C key to return to the previous screen. Press and hold the BS/C key to return to the TEST menu. Press the ENT key. The beeper sounds once, and the display returns to the TEST menu.
- Page 119 BHT-500B [6] File test Use the following procedure to perform a file test. Select “6: FILE” at the TEST menu and then press the ENT key. The screen on the right displays, and if any of the files stored in the memory is defective, an asterisk (*) or plus sign (+) is prefixed to the name of the defective file (s).
- Page 120 Barcode Handy Terminal ommunication test Use the follo wing procedure to perform a communication test. Select “7: COMMUNICATION” at the TEST menu and then press the ENT key. The TEST BEEPER screen shown on the right displays. “1: OPTICAL”: Performs an infrared communication test. “2: CONNECTOR”: Performs a connector communication test.
- Page 121 BHT-500B At the slave BHT to be tested, select “1: SLAVE”, and at the master BHT, select “2: MASTER”. Then press the ENT key. The screen on the right displays during the test, and an infrared communication test is performed.
- Page 122 Barcode Handy Terminal Connector Communication Test Wire the cable with JC-25-P-3 (2.5mm stereo mini- plug) as s hown below and connect to the BHT connector communication port. elect “2: CONNECTOR” at the TEST COMMUNICATION menu nd then press the ENT key. he TEST COMMUNICATION screen displays as shown on the right.
- Page 123 BHT-500B [8] Key-entry, beeper and vibrator test Use the following procedure to perform a key entry, beeper and vibrator test. Select “8: KEY & VIBRATION” at the TEST menu and then press the ENT key. The screen on the right displays, and the BHT waits for key entry.
- Page 124 Barcode Handy Terminal [9] PING test (only on BHT-500B units equipped with software supporting LAN communication) Use the following procedure to perform a PING test. Select “9: PING ” at the TEST menu and then press the ENT key. The TEST PING screen displays as shown on the right.
- Page 125 BHT-500B Upon completion of the PING test, the screen on the right displays. The PING result may include the following: Displays the number of echo replies. [XXXXX]: Echo reply time in milliseconds Displays the number of errors found during the PING test.
- Page 126 Barcode Handy Terminal “2: SET PING” (PING Options Setting Screen) Select “2: SET PING” at the TEST PING menu and then pres s the ENT key. The current settings are displayed. [1: DESTINATION IP]: Specifies the IP address of the host co mputer to be pinged.
- Page 127 BHT-500B PING Echo Request Transmission Timing (SEND TYPE) Two types of echo request send timings are available: TYPE 1 and TYPE 2. TYPE1 After sending an echo request, PING waits for the period specified at INTERVAL and then sends an echo request again.
- Page 128 Barcode Handy Terminal “3: SET DEVICE” (PING Device Setting Scree n) (when Equipped with Software Supporting LAN Communication) Select “3: SET DEVICE” at the TEST PING menu and then press the ENT key. The TCP/IP communicatio n device, link layer, and transmission speed isplay.
-
Page 129: System Information (System Information Menu)
BHT-500B 4.5.7 System Information (SYSTEM INFORMATION Menu) [1] Displaying the BHT system information Use the following procedure to display the BHT system information. Select “6: VERSION” at the SYSTEM MENU and then press the ENT key. The SYSTEM INFORMATION screen on the right displays. - Page 130 Barcode Handy Terminal License List Press the F1 key at the LICENCE INFORMATION screen to display a license list as shown on the right. The license list displays the names of functions for which licens es are required. ”” symbol: Indicates that a license has been registered. ””...
- Page 131 BHT-500B [2] CU-511 System Information Display (when Equipped with Software Supporting LAN Communication) Use the following procedure to display CU-511 system information. lace the BHT on the CU-511. lect “6: VERSION” at the SYSTEM MENU and then press e ENT key.
-
Page 132: Downloading/Uploading Files By Ftp (Ftp Menu)
Barcode Handy Terminal 4.5.8 Downloading/Uploading Files by FTP (FTP MENU) (only on BHT-500B units equipped with software supporting LAN communication) Use the following procedure to download and upload files by FTP. Select “7: FTP” at the SYSTEM MENU and then press the ENT key. - Page 133 BHT-500B Use the cursor keys ([▲] [▼]) to highlight the item to be set, and then press the EN T key. The mode changes to entry mode and the cursor displays. Enter a setting value with the numerical keys and dot key Press the SF key to change the entry mode (numerical entry (no guidance display) a nd alphabet entry).
- Page 134 Barcode Handy Terminal [ ] 2 Uploading by FTP Select “2: UPLOAD” at the FTP MENU and then press the ENT key. The screen on the right displays if uploadable files exist. [1: DIR/FILE]: Entry box for the directory and/or file name [2: SELECT FILE]: File name currently selected (Nothing is displayed at the FTP client initial status.)
- Page 135 BHT-500B Enter the directory and file name, or select a file, and then press the ENT key. Press and hold the BS/C key to return to the FTP MENU screen. DIR /FILE entry box: The FTP client will interpret a character string entered...
- Page 136 Barcode Handy Terminal FTP Download/Upload Messages When the BHT is uploading or downloading files by FTP, the following messages will appear at the bottom of the screen: Aborted. Uploading or downloading has been in terrupted. onnection error The communication pathway is disconnected. evice error Failed to open a device.
- Page 137 BHT-500B Response Messages from the FTP server The messages that FTP servers send during and after FTP operations vary, but servers all use the same reply codes as listed belo 110 : R estart marker re ly 120 : Service re ady in p a prox.
-
Page 138: Wireless Communcation Settings (Rf Menu)
Barcode Handy Terminal 4.5.9 Wireless Communcation Settings (RF MENU) (* BHT-504BW Only) se the following procedure to perform wireless communication settings. lect “8: RF” at the SYSTEM MENU and t hen press the ENT key. e RF MENU screen on the right displays. : PARAMETER]: Performs wireless parameter settings. - Page 139 BHT-500B Wireless Network Parameter Settings Select “1: NETWORK PARAMETER” at the SET RF NETWORK menu and then press the ENT key. The screen on the right displays. [1: SSID]: Displays the current Service Set Refer to “Chapter 5 Communication” – “5.3 Wireless Commu nication”...
- Page 140 Barcode Handy Terminal Wireless Security Settings Select “2: SECURITY” at the SET RF PARAMETER menu and then press the ENT key. The screen on the right displays. [1:SECURI Y MODE]: Sets the wireless secu rity mode. :CONFIGURATION]: Sets the wireless security parameters. Refer to the following section f or details of the above items.
- Page 141 BHT-500B Wireless Security None Mode WEP can be used with the Wireless security None mode. To enable WEP, WEP and WEP KEY settings are required. The first WEP KEY set ting is the encryption key, which can be set from WEP KEY 1 t o 4.
- Page 142 Barcode Handy Terminal Use the cursor keys ([▲] [▼]) or numerical keys ([2] [3] [4] [5]) to ghlight a WEP KEY from 1 to 4, and then press the ENT key. The screen on the right displays. [1: KEY SIZE]: Select 40 (40 bits) or 128 (128 bit).
- Page 143 BHT-500B Press and hold the BS/C key to return to the SET RF PARAMETER menu. It is not possible to re ad a written WEP key, and therefore the WEP ke y setting must always - Point - be stored in a safe location. When not setting a WEP key, the WEP key will be the same as previous setting.
- Page 144 Barcode Handy Terminal ireless Security 1x Supplicant Mode EAP authentication can be used with wireless security 1x Supplicant mode. elect “2: CONFIGURATION” at the SET SECURITY menu and en press the ENT key. The screen on the right displays. [1: AUTH PARAM (EAP)]: EAP authentication parameter setting Press and hold the BS/C key to return to the SET SECURITY menu.
- Page 145 BHT-500B Use the numerical keys to enter an ID and press the ENT key. Press the SF key to change the entry mode (numerical entry (no guidance di play) and alphabet entry). To delete a single character , press the BS/C key.
- Page 146 Barcode Handy Terminal ireless Security WPA-1x Mode EAP authentication and an encryption system can be used with wireless security WPA-1x mode. Select “2: CONFIGURATION” at the SET SECURITY menu and then press the ENT key. The screen on the right displays. [1: AUTH PARAM (EAP)]: EAP authentication parameter setting [2: WPA CIPHER]: Encryption system setting...
- Page 147 BHT-500B Use the numerical keys to enter an ID and press the ENT key. Press the SF key to change the entry mode (numerical entry (no guidance di play) and alphabet entry). To delete a single character , press the BS/C key.
- Page 148 Barcode Handy Terminal Use the cursor keys ([▲] [▼]) or numerical key ([2]) to highligh t [2: WPA CIPHER] and then press the ENT key The screen on the right displays. [1: CIPHER MODE]: Selects TKIP or AES. Ensure that [1: CIPHER MODE] is highlighted and then select TKIP or AES.
- Page 149 BHT-500B Ensure that [1: PRE SHARED KEY] is highlighted and then press the ENT key. The mode changes to entry mode and the cursor displays. Use the numerical k ys to enter a shared key and p ress the ENT key.
- Page 150 Barcode Handy Terminal Use the cursor keys ([▲] [▼]) or numerical key ([1]) to highlight [1: AUTH PARAM (EAP)] and then press the ENT key. The screen on the right displays. [1: EAP TYPE]: Selects PEAP or EAP-TLS. [2: IDENTITY]: [3: ANONYMOUS ID]: Anonymous ID [4: PASSWORD]: Password...
- Page 151 BHT-500B Use the cursor keys ([▲] [▼]) or numerical key ([4]) to highlight [4 PASSWORD] and then press the ENT key. The mode changes to entry mode and the cursor displays. Use the numerical keys to enter a password and pre ss the ENT key.
- Page 152 Barcode Handy Terminal ireless Security WPA2-PSK Mode (when Equipped with Software Supporting WPA2) PSK authentication and an encryption system can be used with wireless security WPA2-PSK mode. Select “2: CONFIGU RATION” at the SET SECURITY menu and then press the ENT key. The screen on the right displays.
- Page 153 BHT-500B Press the ENT key or press and hold the BS/C key to return to the SET RF PARAMET menu. Wireless Parameter Initializa tion Select “3: INITIALIZE” at the SET RF PARAMETER menu a nd then press the ENT key he screen on the right displays.
- Page 154 Barcode Handy Terminal [2] Site Survey Menu Select “2: SITE SURVEY” at the RF MENU and the n press the ENT key. The SITE SURVEY screen on the right di splays. Press and hold the BS/C key to return to the RF MENU screen. Press the ENT key.
-
Page 155: Deleting Program/Data Files (Delete File Menu)
BHT-500B 4.5.10 Deleting Program/Data Files (DELETE FILE Menu) Delete program files or dat a files stored in the FLASH ROM. Use the following procedure to delete files. Press the 0 key while holding down the SF key at the SYSTEM MENU. -
Page 156: Deleting Font Files (Delete File Menu)
Barcode Handy Terminal 4.5.11 Deleting Font Files (DELETE F ILE Menu) Delete font files stored in the FLASH ROM. there is insufficient user area, by deleting font files, a user are a equal to the size of the deleted font files can be secured. - Page 157 BHT-500B To delete font files: Use the cursor keys ([▲] [▼]) or numerical key ([1]) to highlight [1: Yes] and then press the ENT key. The selected file is deleted and the screen on the right displays. Press and hold th e BS/C key to return to the DELETE FILE menu.
-
Page 158: Downloading/Uploading The Bht System Parameter File
Barcode Handy Terminal 4.5.12 Downloading/Uploading the BHT System Param ter File (SYSTEM PARA METER Menu) The system parameter file (file name: ”_BHT.SYS”) is a file con taining sett ings such as values, LCD contrast and beeper volume set at section “4.5.5 Setting Environme nt Settings”. - Page 159 BHT-500B [1] Downloading the BHT system parameter file Use the cursor keys ([▲] [▼]) or numerical key ([1]) to highlight [1: DOWNLOAD] and then press the ENT key. The screen on the right displays indicating that the BHT is waiting for the system parameter file to be downloaded.
- Page 160 Barcode Handy Terminal Uploading the BHT system parameter file Use the cursor keys ([▲] [▼]) or numerical key ([2]) to highlight UPLOAD] and then press the ENT key. The screen on the right displays indicating that the BHT is waiting for the system parameter file to be uploaded.
-
Page 161: Setting The Remote Wake-Up (Set Remote Wakeup Menu)
BHT-500B 4.5.13 Setting the Remote Wake-up (SET REMOTE WAKEUP Menu) Use the following procedure to perform remote wake-up settings. Press the 4 key while holding down the SF key at the SYSTEM MENU. The SET REMOTE WAKEUP menu dis plays as shown on the right. -
Page 162: Downloading/Uploading The System Message File
Barcode Handy Terminal 4.5.14 Downloading/Uploading the System Message File (SYSTEM MESSAGE Menu) The system message file is a file (file name: “_B50MSG.FN4”) used by the system to display messages such as “Shutdown in progress. Do not remove the battery.” or “Charge the battery!”. ownloading/Uploading the System Message File (1) Upload the system me ssage file to the host computer and so on. - Page 163 BHT-500B [1] Downloading the system message file Use the cursor keys ([▲] [▼]) or numerical key ([1]) to highlight [1: DOWNLOAD] and then press the ENT key. The screen on the right displays indicating that the BHT is waiting for the ystem message file to be downloaded.
- Page 164 Barcode Handy Terminal [2] Uploading the system message file Use the cursor keys ([▲] [▼]) or numerical key ([2]) to highlight [2: UPLOAD] and then press the ENT key. The screen on the right displays indicating that the BHT is waiting for the system message file to be uploaded.
-
Page 165: Updating The System (Modify Menu)
BHT-500B 4.5.15 Updating the System (MODIFY MENU) Use the following procedure to update the system. Press the dot key while holding down the SF key at the SYSTEM MENU. he MODIFY MENU screen on the right displays. : SYSTEM MODIFY]: Updates the BHT system. - Page 166 Barcode Handy Terminal When the Displayed File Name Differs from the BH T System Update File If the name of the file displayed at [2: FILENAME] differs from the name of the BHT system update file to be used for updating the system, enter the correct f ile name.
- Page 167 BHT-500B [2] Updating the CU-511 system (when equipped with software supporting LAN communication) Update the CU-511 system after downloading the CU-511 system update file. (Refer to section ”4.2.2 CU-511 System Update (when Equipp ed with LAN Communication Software)” for details.) Use the cursor keys ([▲] [▼]) or numerical key ([2]) to highlight...
- Page 168 Barcode Handy Terminal If the System Update File Does not Exist when Updating the CU-511 System The screen on the right displays if the system update file does not exist when updating the CU-511 system. Download the CU-511 system update file and update the CU-511 system again.
- Page 169 BHT-500B...
- Page 170 BHT-500B Chapter 5 Communication This chapter describes technical information relating to the connector communication (RS-232C interface), infrared communication, and wireless communication functions with which the BHT is equipped. Connector Communication(RS-232C Interface) ·······································154 5.1.1 Interface Connector and Pin Assignment ····················································154 5.1.2 Interface Cable Connection ·········································································155...
-
Page 171: Connector Communication(Rs-232C Interface)
BHT-500B 5.1 Connector Communication(RS-232C Interface) The BHT-500B is equipped with a connector interface used to communicate with other devices. 5.1.1 Interface Connector and Pin Assignment Connector interface : JC-25-J-3A (ø2.5 mm stereo mini jack) Connector pin: JC-25-P3 (ø2.5 mm stereo mini plug) -
Page 172: Interface Cable Connection
Barcode Handy Terminal 5.1.2 Interface Cable Connection Connect the BHT directly to a host computer, a modem, or a printer with a connector interface cable as illustrated below. [Ex.1] Cable Connection between BHT and Host computer [Ex.2] Cable Connection between BHT and Modem [Ex.3] Cable Connection between BHT and Printer... -
Page 173: Infrared Communication
BHT-500B 5.2 Infrared Communication The BHT has a built-in infrared communication device that enables wireless transfer of programs and data both between the BHT and the host computer and between BHTs without the need for a cable. Infrared communication offers the following benefits over other forms of communication. -
Page 174: Infrared Communication Port Baud Rate
Barcode Handy Terminal 5.2.1 Infrared Communication Port Baud Rate Communicating Device Baud Rate BHT-500 シリーズ 9.6, 19.2, 38.4, 57.6, 115.2, 460.8kbps CU-501 9.6, 19.2, 38.4, 57.6, 115.2kbps CU-511 460.8kbps CU-521 115.2, 460.8kbps 5.2.2 BHT Hardware (Physical Layer) and Communication Protocols ... -
Page 175: Wireless Communication
3. If other problems arise due to reasons such as electromagnetic interference from this device to a specified low-power wireless station being used for mobile identification, please contact DENSO WAVE through QBdirect (see page ii). -
Page 176: Setting Parameters
Barcode Handy Terminal 5.3.2 Setting Parameters Programs written in BHT-BASIC control wireless communication with commands between the BHT and access points which are connected each other by a wireless LAN. For the setting procedure of RF-related parameters, refer to “Chapter 4 System Operation” – “Wireless Communication Settings (RF MENU).”... - Page 177 BHT-500B EAP TYPE This is the EAP authentication method setting used for 802.1x authentication. Select PEAP or EAP-TLS. This is valid only when the Security mode is 1x Supplicant, WPA-1x or WPA2-1x. IDENTITY This is the user ID used for 802.1x authentication.
-
Page 178: Basic Communication Specifications And Parameters
Vertical parity None Even, odd, or none * 460800bps is only possible when communicating from one BHT-500B unit to another or between the BHT-500B and CU-521 or BHT-500B and CU-511. Synchronization For accurate data transaction, it is necessary to synchronize transmission between the sender and receiver. - Page 179 BHT-500B Transmission Code and Bit Order All characters should be coded to 7 or 8-bit code for data transmission. The standard code at the BHT is ASCII 7-bit or 8-bit code. The transmission bit order is LSB (Least significant bit) first.
-
Page 180: Communications Parameters
Stop bit length 1 bit 1 or 2 bits * 460800bps is only possible when communicating from one BHT-500B unit to another or between the BHT-500B and CU-521 or BHT-500B and CU-511. System Mode Refer to “Chapter 4 System Operation” – “4.4.3 System Properties.”... - Page 181 BHT-500B...
- Page 182 BHT-500B Chapter 6 Maintenance This chapter describes battery cartridge and daily procedures for taking care of the BHT and CU/CH. Replacing the Battery Cartridge································································166 6.1.1 Battery Cartridge Service Life ······································································166 6.1.2 Battery Cartridge Replacement Method ······················································166 Using the BHT after Long Periods ····························································168 Daily Maintenance ····················································································169...
-
Page 183: Replacing The Battery Cartridge
BHT-500B 6.1 Replacing the Battery Cartridge 6.1.1 Battery Cartridge Service Life The battery cartridge is a consumable part and should be replaced after being charged approximately 300 times. The performance of the battery cartridge’s lithium-ion battery will deteriorate gradually with repeated charging, even during normal use. - Page 184 Barcode Handy Terminal Close the battery cartridge cover (1) and return the battery cover lock (2). Ensure that the battery pull strap is not Point jammed by the cover. Be careful not to jam the strap. Battery Cartridge Recycling Request ●...
-
Page 185: Using The Bht After Long Periods
BHT-500B 6.2 Using the BHT after Long Periods Data stored in the BHT may be lost and the calendar clock may stop if the BHT is left unused for long periods of time. Take appropriate measures in accordance with the procedure below. -
Page 186: Daily Maintenance
Barcode Handy Terminal 6.3 Daily Maintenance 6.3.1 Proper Care of the BHT Wipe any dirt from the BHT housing, charge terminals, and BHT or battery cartridge terminals with a dry, soft cloth. Ensure to turn OFF the BHT before cleaning. Never use substances such as benzene or alcohol, as this may cause the housing to be marred or ... - Page 187 BHT-500B...
- Page 188 BHT-500B Chapter 7 Error Messages This chapter describes causes and countermeasures for error messages that display during BHT use. Refer to the programming manual appendix A “Error Codes and Error Messages” for the errors while the application is running. System Errors···························································································172...
-
Page 189: System Errors
BHT-500B 7.1 System Errors The error messages that display on the screen and the causes and countermeasures to be taken if an error occurs when the power is turned ON or while running a program are shown below. Message BHT Response... - Page 190 Barcode Handy Terminal Message BHT Response Cause Countermeasure The date and time settings calendar clock Set the current date and screen displays, awaiting integrated in the BHT has time.(Refer to “Chapter 2 entry. stopped because: BHT Preparation” – “2.4 - the battery cartridge had Initial Setup”) been removed for a long time,...
- Page 191 BHT-500B Message BHT Response Cause Countermeasure The message continues to When the BHT is turned on, Contact your system display. no user programs are found. administrator. You can run the code scanning demo without user programs. Pressing “1:Yes” runs the code scanning demo.
- Page 192 Barcode Handy Terminal Message BHT Response Cause Countermeasure If this error occurs, the BHT An error has occurred during Unload and reload the beeps five times. execution of System battery cartridge, then Program. turn the BHT on. If this error occurs frequently, make a note of the displayed code and contact your system...
- Page 193 BHT-500B 7.2 System Mode Errors When error messages display while running System Mode, refer to the following table and take appropriate measures. Message BHT Response Countermeasure You attempted to execute a user Press the BS/C key for at least 0.5 seconds...
- Page 194 Barcode Handy Terminal Message BHT Response Countermeasure The current download will exceed the Press the 2 key to return to the SYSTEM maximum allowable number of files (120 MENU, then delete unnecessary files in the files) in the memory. memory (or decrease the number of files to downloaded attempted download more than one file in the...
- Page 195 BHT-500B Message BHT Response Countermeasure The memory is insufficient for setting up Press the BS/C key to return to the the BHT system parameter file or system SYSTEM MENU and delete unnecessary message file to be uploaded. files. The memory has already contained 120...
- Page 196 BHT-500B Chapter 8 Specifications This chapter describes the BHT-503B/504BW specifications. BHT-503B/504BW Specifications ·····························································180 8.1.1 Hardware Specifications···············································································180 8.1.2 Barcode Specifications·················································································181 8.1.3 Scanning Performance·················································································182 8.1.4 Interface Specifications ················································································184...
-
Page 197: Bht-503B/504Bw Specifications
BHT-500B 8.1 BHT-503B/504BW Specifications 8.1.1 Hardware Specifications Power supply (main power): Rechargeable lithium-ion battery cartridge (3.7 V DC) Dimensions (W) x (L) x (H): 48 x 150 x 30 mm Weight: BHT-503B: Approx. 160 g (including battery cartridge BT-50L) BHT-504BW: Approx. -
Page 198: Barcode Specifications
Barcode Handy Terminal 8.1.2 Barcode Specifications Supported Barcode Types Barcode Type Bar Dimensions Scan Magnification Universal product codes EAN-13 (JAN-13) EAN-8 (JAN-8) UPC-A UPC-E EAN-13 (JAN-13) with add-on Min. 0.26 mm Min. 0.8 EAN-8 (JAN-8) with add-on UPC-A with add-on UPC-E with add-on 2-digit add-on 5-digit add-on... -
Page 199: Scanning Performance
BHT-500B 8.1.3 Scanning Performance Scanning Reference Position As illustrated at left, align the reading window with the center of the label (code) Label to be scanned. Scanning Distance and Area Minimum Narrow Bar Width Depth of Field 0.15 mm 90 to 120 mm 0.33 mm... - Page 200 Barcode Handy Terminal Under the following conditions: Under the following conditions: - Ambient illuminance: 500 Lx. (Fluorescent lamp) - Ambient illuminance: 500 lux. (Fluorescent lamp) - Code 39, 15 digits - EAN-13 Narrow bar: Wide bar = 1 : 2.2 - Reflection intensity of white bars: 85% min.
-
Page 201: Interface Specifications
BHT-500B 8.1.4 Interface Specifications IrDA Interface Synchronization: Start-stop Input signals: Output signals: Transmission speed: Max. 460,800 bps Note: This speed is only possible when communicating from one BHT-503B/504BW unit to another or between the BHT-503B/504BW and CU-521 or BHT-503B/504BW and CU-511. The transmission speed in all other cases is 115,200 bps. - Page 202 BHT-500B Chapter 9 Appendices This chapter describes the CU-500 Series (option) specifications, and describes causes and countermeasures when unable to transfer files. CU-500 Specifications ··············································································186 9.1.1 Hardware Specifications···············································································186 9.1.2 Charging Requirements (CU-501/521/511) ·················································186 9.1.3 Interface Specifications ················································································187 When File Transfer is Not Possible Using the Transfer Utility ··················189...
- Page 203 BHT-500B 9.1 CU-500 Specifications 9.1.1 Hardware Specifications CU-501 CU-521 CU-511 Power supply: 100/230 V AC Powered from the USB 100/230 V AC (Using dedicated AC interface * (Using dedicated AC adapter) adapter) Max. power consumption: 6.5 VA 5V 500 mA...
- Page 204 Pin. No. Signal Name Function CU-501 External Device Receipt data Transmission data Data terminal ready Signal ground — Data set ready — Transmission request — Transmission ready — The CU-501 internal wiring is shown below. CU-501 BHT-500B...
- Page 205 BHT-500B CU-521 The USB interface on the CU-521 is USB1.1 (Full-speed) compliant, with a Type Mini-B receptacle. CU-511 The CU-511 has an IEEE802.3-compliant Ethernet interface port (10base-T). Ethernet Interface Port (RJ45 jack) on the CU-511 Pin No. Signal Functions Send data...
- Page 206 Barcode Handy Terminal 9.2 When File Transfer is Not Possible Using the Transfer Utility This section describes the causes and remedies when file transfer is not possible using the Transfer Utility. Error No. Cause Details Remedy Illegal field information specification option Set a correct value for the field information option.
- Page 207 BHT-500B Error No. Cause Details Remedy The Transfer Utility “Communication port” Specify the communication port to which the BHT is option specification is illegal. connected for the “Communication port” option. The transmission speed at the BHT and PC Ensure that the transmission speed at the BHT and does not match.
- Page 208 Barcode Handy Terminal Error No. Cause Details Remedy An attempt was made to download a Use BHT-BASIC 4.0 format program files (*.PD4). BHT-BASIC 3.6 format program file (*.PD3). Note 1: “Customer Registration” is required to use Qbdirect (free of charge). When using for the first time, complete “Customer Registration”...
- Page 209 Barcode Handy Terminal BHT-500B User’s Manual First Edition May 2008 Second Edition March 2010...
Need help?
Do you have a question about the BHT-500B and is the answer not in the manual?
Questions and answers