Extron electronics MediaPort 200 User Manual
Hdmi and audio to usb scaling bridge
Hide thumbs
Also See for MediaPort 200:
- User manual (164 pages) ,
- Setup manual (4 pages) ,
- User manual (105 pages)

Related Manuals for Extron electronics MediaPort 200


Summary of Contents for Extron electronics MediaPort 200
- Page 1 User Guide Scalers MediaPort 200 HDMI and Audio to USB Scaling Bridge 68-2755-01 Rev. B 06 16...
-
Page 2: Safety Instructions
Safety Instructions Safety Instructions • English Istruzioni di sicurezza • Italiano WARNING: This symbol, , when used on the product, is intended to AVVERTENZA: Il simbolo, , se usato sul prodotto, serve ad alert the user of the presence of uninsulated dangerous voltage within avvertire l’utente della presenza di tensione non isolata pericolosa the product’s enclosure that may present a risk of electric shock. - Page 3 より 『Extron Safety www.extron.com and Regulatory Compliance Guide』 (P/N 68-290-01) をご覧ください。 Copyright © 2016 Extron Electronics. All rights reserved. Trademarks All trademarks mentioned in this guide are the properties of their respective owners. The following registered trademarks®, registered service marks( ), and trademarks( ) are the property of RGB Systems, Inc.
- Page 4 FCC Class A Notice This equipment has been tested and found to comply with the limits for a Class A digital device, pursuant to part 15 of the FCC rules. The Class A limits provide reasonable protection against harmful interference when the equipment is operated in a commercial environment.
- Page 5 Conventions Used in this Guide Notifications The following notifications are used in this guide: WARNING: Potential risk of severe injury or death. AVERTISSEMENT : Risque potentiel de blessure grave ou de mort. CAUTION: Risk of minor personal injury. ATTENTION : Risque de blessure mineure. ATTENTION: •...
-
Page 6: Table Of Contents
Connecting to the USB Config Port ....23 Front Panel Operation ......61 Connecting to the RS-232 Port ..... 26 Configuring Windows for MediaPort 200 ... 27 Front Panel Features .......... 61 Configuring Skype for Business Powering On ............. 62... - Page 7 MediaPort 200 with External DSP with Picture Control Menu ........68 AEC Application Setup ......93 Input Configuration Menu ......70 Output Configuration Menu......73 Overview ............93 Audio Configuration Menu ......74 Video Input and Output ........93 Advanced Configuration Menu ....... 76 HDMI Input ............
-
Page 8: Introduction
Introduction This section provides an overview of the MediaPort 200 HDMI and Audio to USB Scaling Bridge. The following topics are discussed: • About this Guide • About the MediaPort 200 Features • • USB Video Audio Functions • •... -
Page 9: Features
USB sound card with send and return audio capability. This allows the MediaPort 200 to send a two-channel audio source mix to the personal computer, and the computer to deliver its program audio plus two- channel communication audio from the soft codec’s far-end to the MediaPort 200. - Page 10 HDMI input and loop-through signal presence, HDCP status, plus USB signal presence for the host computer, video send, audio send, and audio return. Logo image display – The MediaPort 200 can be set to automatically display a user- •...
- Page 11 Parametric EQ, filters, and limiter on USB and line outputs – The MediaPort 200 • provides nine-band equalization for room tuning. It also detects actual onset of clipping by comparing input and output waveforms. Gain is automatically reduced without audible artifacts to protect the audio system from clipping distortion.
-
Page 12: Usb Video
MediaPort 200. When a Universal Communications (UC) application on the host PC is launched, it requests the desired video resolution in real time from the MediaPort 200 based on host PC hardware usage, available network bandwidth, and far-end UC application window size. -
Page 13: Application Diagrams
MODEL 80 iPod 9:45 AM WiFi 1 2 3 4 iPod Location A Video/Audio Network FLAT PANEL Display Audio Location B Locati Table Microphones Location A Figure 2. Application 2– MediaPort 200 with External DSP with AEC MediaPort 200 • Introduction... -
Page 14: Theory Of Operation
DSP matrix processor with AEC (acoustic echo cancellation) is connected to the Mic/Line input. It is important to select the correct mode before configuring the MediaPort 200 with the host PC. Changing the audio mode will cause the MediaPort to reboot, after which the computer... -
Page 15: Speakerphones And Aec (Acoustic Echo Cancellation)
AEC should be turned off automatically. In this case, an external DSP would be connected to the MediaPort Mic/Line Input with the AEC applied in the external DSP processor. MediaPort 200 • Theory of Operation... -
Page 16: Mediaport 200 Signal Flow
MediaPort default configuration and available processing. Figure 3 below is an audio matrix routing table that displays MediaPort 200 audio routing. Viewing the mix matrix routing from the perspective of the outputs: USB Out •... -
Page 17: Mixing And Control
Input Tab Input page 51). Once the input gain controls are set for optimal signal levels, mixing and further run-time level control can be performed from the Mix tab (see Mix Tab on page 56). MediaPort 200 • Theory of Operation... - Page 18 The signals associated with these four controls comprise the mix that is sent to the MediaPort Analog Line Out. The Program Mix audio, minus the From Far End audio (USB Communications), comprise the mix that is sent to the USB Out. MediaPort 200 • Theory of Operation...
- Page 19 LINE IN R GAIN COMP GAIN USB COMMUNICATIONS L GAIN COMP DUCKER GAIN USB COMMUNICATIONS R GAIN COMP DUCKER GAIN = enabled = disabled MIC/LINE IN GAIN COMP DUCKER GAIN Figure 6. USB Communication (Example) MediaPort 200 • Theory of Operation...
-
Page 20: Master Volume Controls
LINE IN L GAIN COMP GAIN LINE IN R GAIN COMP GAIN USB COMMUNICATIONS L GAIN COMP DUCKER GAIN USB COMMUNICATIONS R GAIN COMP DUCKER GAIN MIC/LINE IN GAIN COMP DUCKER GAIN Figure 7. Volume Controls MediaPort 200 • Theory of Operation... - Page 21 This is so that program audio and USB communications audio can be managed separately in the DSP. (Alternatively, this setting can also be used to send program and USB Communications audio to separate sound systems.) MediaPort 200 • Theory of Operation...
- Page 22 USB COMMUNICATIONS ROOM VOLUME HDMI LINE IN PLAYBACK STEREO STEREO SEND TO DUAL MONO DUAL MONO AEC Ref + Line Out AEC Ref Only MUTE MUTE MUTE MUTE MUTE MUTE MUTE Figure 9. Mix Controls MediaPort 200 • Theory of Operation...
- Page 23 These two outputs provide special routing capabilities that make it easy to use the MediaPort 200 with an external DSP with AEC and/or a hardware video conferencing device (video codec). The AEC Ref Out carries the only far end USB Communications audio, while the Aux Out carries only the audio signal from the MediaPort Mic/Line In.
-
Page 24: Setting Audio Modes
59 for information on how to select audio modes. ATTENTION: If the MediaPort 200 is not set in the correct audio mode, two major issues can occur: A MediaPort set in Standalone audio mode, while an external DSP with AEC is in •... -
Page 25: Installation
Installation This section provides a description of the MediaPort 200 rear panel connections, instructions for cabling, instructions for setting the MediaPort 200 audio mode, and instructions for configuring Windows. The following topics are discussed: • Rear Panel Connections Securing the HDMI Connectors Using the LockIt HDMI Lacing Brackets •... -
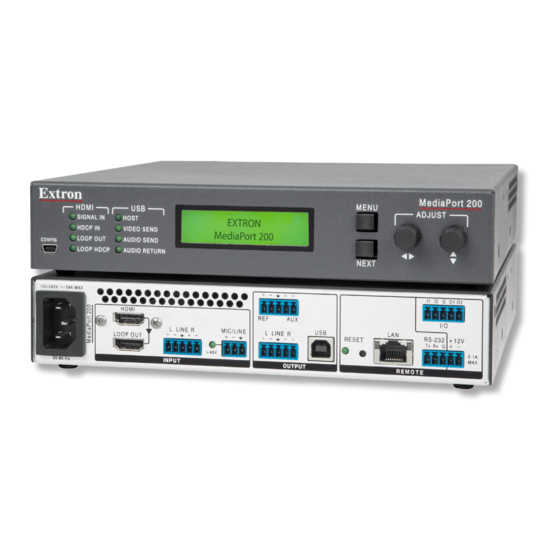
Page 26: Rear Panel Connections
Rear Panel Connections Figure 11 below shows the rear panel features of the MediaPort 200. WARNING: • Remove power from the system before making any connections. • Débranchez l’alimentation du système avant de faire n’importe quelle connexion. ATTENTION: • Use electrostatic discharge precautions (be electrically grounded) when making connections. - Page 27 Line Level Audio Output Connector — At default settings, this output carries the stereo HDMI audio, USB communications, USB playback, and Stereo Line Input signals. Wire the connector as shown in figure 14 on the next page. MediaPort 200 • Installation...
- Page 28 PCS software, or the embedded web pages. When connected to an Ethernet LAN, the MediaPort 200 can be accessed from a computer running a standard Internet browser. Use a patch cable to connect the MediaPort to a switch or router. Use...
- Page 29 Ref — The Ref line level output carries only the USB • communications audio. Aux — The Aux line level output carries only the Mic/Line Input • signal. To wire an individual device to the Aux port, use one of the provided 3-pole captive screw connectors. MediaPort 200 • Installation...
-
Page 30: Securing The Hdmi Connectors Using The Lockit Hdmi Lacing Brackets
Connecting for Remote Control The MediaPort 200 has three ports through which it can be connected to a computer for configuration and control: the rear panel LAN port, the front panel USB Config port, and the rear panel RS-232 port. - Page 31 USB Mini B USB A USB 1 Ports USB Cable MediaPort 200 Front Panel MediaPort 200 Front Panel Computer MedioPort 200 MENU ADJUST ADJUS S T HDMI SIGNAL IN HOST HDCP IN VIDEO SEND CONFIG LOOP OUT AUDIO SEND LOOP HDCP...
- Page 32 (a disk is not needed). Next Figure 20. Selecting the Radio Button to Install the USB Driver Automatically The computer locates the driver needed for it to communicate with the MediaPort 200 through the USB port. MediaPort 200 • Installation...
-
Page 33: Connecting To The Rs-232 Port
Universal Control cable (UC 50 feet or UC 100 feet) or other female 9-pin-to-bare-wire RS-232 cable. Wire the unterminated end of the RS-232 cable to the provided 3-pole captive screw connector as shown in figure 21 below: RS-232 MediaPort 200 Rear Panel RS-232 Port Tx Rx 1 2 3 NOTES: •... -
Page 34: Configuring Windows For Mediaport 200
Speakerphone Speakerphone Connect a USB type A to B cable from the MediaPort 200 rear panel Type B USB port to a Type A USB port of the computer running Windows 7. The appropriate drivers install automatically. Figure 22 below shows the message that is displayed above the Windows taskbar during driver installation. - Page 35 On the control panel, right-click Playback Speakers – Extron MediaPort 200 (see figure 24 below). From the drop-down menu, select Set as Default Device Figure 24. Setting Speakers as Default Output Device MediaPort 200 • Installation...
- Page 36 Right-click (see figure 25 below) and Speakerphone – Extron MediaPort 200 select ) from the drop-down menu. Set as Default Communication Device Figure 25. Setting Speakerphone as Default Playback Communication Device MediaPort 200 • Installation...
- Page 37 Playback MediaPort 200 devices (see figure 26 below). Figure 26. Default Device and Communications Icons on the Playback Screen Click the tab in the dialog box. Recording Sound...
- Page 38 (4) beside the Recording Speakerphone MediaPort 200 device icon (see figure 28 below). Figure 28. MediaPort 200 (Speakerphone) Selected on Recording Screen MediaPort 200 • Installation...
-
Page 39: Configuring Skype For Business
Configuring Skype for Business (Microsoft Lync ) for MediaPort 200 ® ® NOTE: If you are using a soft codec other than Skype for Business, visit the MediaPort 200 Web page and download the Soft Codec Configuration Guide. Open the Skype application and select... - Page 40 In the left panel, click (see figure 30 below). Video Device Figure 30. Options Dialog Box, Video Device Screen From the drop-down menu, select Video Device MediaPort 200 Video Click ). The dialog box closes. Options MediaPort 200 • Installation...
-
Page 41: Product Configuration Software (Pcs)
Software (PCS) The Extron Product Configuration Software (PCS) is a Windows-based application that allows the user to control the MediaPort 200 as well as configure the input, output, DSP, and image settings. The following topics are discussed: Downloading the PCS Software •... - Page 42 PCS” in one of the following location on the computer (depending on Windows version): c:\Program Files (x86)\Extron\Extron PCS c:\Program Files\Extron\Extron PCS If there is not already an Extron folder in the computer’s Program Files or Program Files (x86) folder, the installation program creates it. MediaPort 200 • Product Configuration Software (PCS)
-
Page 43: Starting The Pcs Software
Device Discovery panel and click its name to select it (see figure 32 below). TIP: If the MediaPort 200 does not have a user defined name (see General Settings Tab on page 59 for information on naming the MediaPort), it can be identified by type of connection (USB or TCP/IP) or by accessing the MAC address, which is printed on the white label located on the back of the MediaPort. - Page 44 The default IP address is 190.168.254.254. Click . The MediaPort main window opens (see figure 34 below). Connect Figure 34. PCS Main Window for MediaPort 200 MediaPort 200 • Product Configuration Software (PCS)
-
Page 45: Updating Firmware Via Pcs
On the next page, provide the required information and click Download MediaPort200_FW0x00x0000.exe Open the downloaded firmware installer and install the firmware file. The default install location is Program Files (x86) > Extron > Firmware > MediaPort MediaPort 200 • Product Configuration Software (PCS) - Page 46 To update firmware via PCS: Connect the MediaPort 200 to the host PC via the LAN port (see LAN Port page 21). From the PCS main window for MediaPort 200 (see figure 34 on page 37), select the drop down triangle from the MediaPort 200 (see figure 37 below).
-
Page 47: Input/Output Configuration Tab
Input/Output Configuration Tab tab provides status indicators and configuration for the Input/Output Config following video inputs and outputs: HDMI Input USB Output HDMI Loop Test Patterns Figure 39. Input/Output Config Tab MediaPort 200 • Product Configuration Software (PCS) -
Page 48: Hdmi Input
HDCP Authorized — If this box is left unchecked (default), sources will be blocked from encrypting their output, which may prevent some content from being displayed. Freeze — Freezes the HDMI input. MediaPort 200 • Product Configuration Software (PCS) -
Page 49: Hdmi Loop
Resolution — This view only field displays the resolution being sent by the USB Output. NOTE: The streaming USB video resolution output from the MediaPort 200 is determined by the host UC software based on available PC resources and network conditions. -
Page 50: Test Patterns
HDMI Loop output. You can also view the resolution, refresh rate, and audio support of all HDMI EDID configurations located locally in the PCS EDID library and remotely on the connected MediaPort 200. The following panels are available in the EDID Minder tab: Filter... -
Page 51: Filter
Favorites panel, right click the EDID being removed, and select Remove from Favorites Connected Outputs Panel Figure 47. Connected Outputs Panel panel displays the EDID of the sink device that is connected to the Connected Outputs HDMI Loop output. MediaPort 200 • Product Configuration Software (PCS) -
Page 52: Available Edid
Figure 48. Available EDID Panel panel displays the library of available EDID configurations located on Available EDID the connected MediaPort 200 and the host PC. Input Figure 49. Input Panel panel displays the current EDID configuration of the source connected to the Input HDMI Input. -
Page 53: Picture Config Tab
The following panels are available on the Picture Config tab: Adjust Graphically Signal Sampling and Overscan Adjust Numerically Input Presets Picture Controls Figure 50. Picture Config Tab MediaPort 200 • Product Configuration Software (PCS) -
Page 54: Adjust Graphically
Lock Aspect Ratio — Marking this checkbox locks the aspect ratio of the image so when adjustments are made on one side, the others are automatically adjusted to retain original aspect ratio. MediaPort 200 • Product Configuration Software (PCS) -
Page 55: Adjust Numerically
Auto-Image — Performs an Auto-Image function. Auto-Image & Fill — Performs an Auto-Image and fills the entire output raster. Auto-Image & Follow — Performs an Auto-Image and compensates for the native aspect ratio of the applied input. MediaPort 200 • Product Configuration Software (PCS) -
Page 56: Picture Controls
SMPTE input resolutions to mask edge effects and ancillary data that are common in broadcast signals. Overscan is applied only to SMPTE input rates: 480i (NTSC), 576i (PAL), 480p, 576p, 720p, 1080i, or 1080p. Figure 54. Signal Sampling and Overscan Panels MediaPort 200 • Product Configuration Software (PCS) -
Page 57: Input Presets
Recall Preset — Recalls the selected preset and applies the parameters saved in the preset. Clear — Clears the selected preset slot, deleting the preset saved in that slot. MediaPort 200 • Product Configuration Software (PCS) -
Page 58: Audio Config Tab
Audio Config Tab tab contains all audio mixing and DSP for the MediaPort 200 within the Audio Config following sub-tabs: • Input Tab • Output Tab • Mix Tab • Preset and Digital I/O Tab This is a general overview of the audio controls. In-depth coverage of this topic can be... - Page 59 DSP Icon — Each input channel contains DSP that can be accessed by clicking this icon that opens the input DSP window. Within the DSP window, there are three tabs: Filters Compressor Ducking • • • MediaPort 200 • Product Configuration Software (PCS)
-
Page 60: Input Dsp Window
When disengaged, the filters and parameters are hidden. Filters and parameters are visible by default. Copy and Paste — Allows a filter type and parameters to be copied and pasted from one slot to another. MediaPort 200 • Product Configuration Software (PCS) - Page 61 Ratio Attack Time can also be adjusted by clicking and Release Time Attack Release Time dragging the sliders next to the text fields. Reset to Default — Resets all compressor parameters to default. MediaPort 200 • Product Configuration Software (PCS)
- Page 62 In the column, determine the Duck By amount each channel should be ducked in dB. NOTE: Only Mic/Line and USB Comm inputs can trigger ducking, therefore ducking controls are only available on those channels. MediaPort 200 • Product Configuration Software (PCS)
-
Page 63: Mix Tab
NOTE: If using a web-based soft codec, mute program audio to the far end. Web- based codec audio is sometimes recognized as playback audio, and would then create a feedback loop if sent to the far end. MediaPort 200 • Product Configuration Software (PCS) -
Page 64: Output Tab
-12 dBFS. The signal is Pink Noise generated at the output stage, pre-processing. Only output DSP will be applied to the pink noise signal. MediaPort 200 • Product Configuration Software (PCS) -
Page 65: Preset And Digital I/O Tab
Configure Digital I/O — Contains the available actions for each digital input and output. Clicking each drop-down menu will provide the actions and states available for each input and output. See the MediaPort 200 Help file for more information on configuring digital I/O. -
Page 66: General Settings Tab
Unit Information — Displays device specific information such as firmware version, • temperature, device name, DHCP status, IP address, and MAC address. Device Name — Contains a text field for renaming the selected MediaPort 200. • Only letters, numbers, and hyphens are available for device names. - Page 67 DSP with AEC attached to • External DSP with AEC the MediaPort 200. This will cause Windows to enumerate the MediaPort as an Echo Cancelling Speakerphone and the external DSP will provide AEC. NOTES: •...
-
Page 68: Front Panel Operation
Front Panel Operation This section discusses the functions available through the front panel to configure and operate the MediaPort 200. The following topics are discussed: • Front Panel Features • Powering On • Menus on the LCD Screen • Front Panel Lockout (Executive Mode) Resetting •... -
Page 69: Powering On
2 seconds through four screens: the input video signal type and rate, the USB video output rate, the USB audio input status and the USB output signal status. The default cycle continues while the menu system is not in use. MediaPort 200 • Front Panel Operation... -
Page 70: Menus On The Lcd Screen
Power-up and Default Cycle Screens Example Menus on the LCD Screen The MediaPort 200 menus that are displayed on the LCD screen enable configuration and operation of the product without PCS or SIS commands. The menu navigation buttons ) are located to the right of the LCD screen. Press these buttons to cycle... - Page 71 30 sec. the order in which they appear when the Menu Menu button is pressed repeatedly. Advanced Configuration 30 sec. Menu View Comm Settings 30 sec. Menu Exit Menu? Menu Press NEXT 30 sec. Next MediaPort 200 • Front Panel Operation...
-
Page 72: Quick Setup Menu
(no test pattern), Crop Alt Pixels , and Crosshatch Color Bars Grayscale NOTE: On the LCD screen, a default value is indicated by an asterisk ( ) next to it. MediaPort 200 • Front Panel Operation... -
Page 73: Input Presets Menu
Performing Auto-Image When Auto-Image is performed, the MediaPort 200 attempts to size and position the image to fill the display screen (fill mode) or to use the native aspect ratio of the input (follow mode). Using SIS commands or the LCD menus, a one-time Auto-Image can be performed on the current input. - Page 74 “letterbox” image for a 16:9 input resolution and save it to an user image preset. Subsequently, if a 1080p resolution is applied to the unit, the letterbox preset that was saved at 720p can be recalled with the new 1080p input resolution. MediaPort 200 • Front Panel Operation...
-
Page 75: Picture Control Menu
The video within this center section is viewable on the output. (-x, y) (0, y) (x, y) Figure 68. Image Positioning Space When the aspect ratio changes, the horizontal size and position values are updated accordingly. MediaPort 200 • Front Panel Operation... -
Page 76: Adjusting The Picture Controls
NOTE: As the encoder is rotated, horizontal size and position values are adjusted in increments and decrements of 8 pixels. Vertical size and position values are incremented or decremented by 2 lines. Repeat steps 1 through 3 for each additional image adjustment. MediaPort 200 • Front Panel Operation... -
Page 77: Input Configuration Menu
Adjust Figure 70 below shows the selections available from this menu. NOTE: The streaming USB video resolution output from the MediaPort 200 is determined by the host UC software based on available PC resources and network USB Video conditions (see on page 5 for more information). - Page 78 Press or wait until the LCD screen times out to the default cycle (approximately Next 30 seconds). The selection is saved and appears next time the HDMI Input EDID screen is accessed. MediaPort 200 • Front Panel Operation...
- Page 79 Add custom EDIDs or save the EDID of the HDMI loop output using SIS commands (see the HDMI Input EDID on page 119) or the PCS control software (see the MediaPort 200 Help file). These custom EDIDs are then added to the LCD menu.
-
Page 80: Output Configuration Menu
HDMI loop output, and enable or disable the HDCP notification. Figure 71 below gives an overview of this menu. NOTE: The streaming USB video resolution output from the MediaPort 200 is determined by the host UC software based on available PC resources and network conditions. -
Page 81: Audio Configuration Menu
NOTE: If the MediaPort 200 is being used with external DSP with AEC, then all audio will pass through the MediaPort 200 at unity gain levels and therefore no audio configuration needs to be done in the MediaPort 200. -
Page 82: Audio Configuration
Audio Test — Sends pink noise to any of the audio outputs to test the audio during system configuration. Rotate the left knob to select the audio channel to test. Adjust Rotate the right encoder to select to enable or to disable sending the pink noise. MediaPort 200 • Front Panel Operation... -
Page 83: Advanced Configuration Menu
Crosshatch Alternate Pixels Color Bars (8) Grayscale Figure 74. Test Patterns NOTES: • All test patterns include a single pixel wide crop pattern line. • Test patterns remain in effect through a power cycle. MediaPort 200 • Front Panel Operation... -
Page 84: View Comm Settings Menu
Subnet Mask Gateway Address IP Address Next Next 255.255.0.0 0.0.0.0 192.168.254.254 View the subnet mask IP address. View the unit internet address. View the gateway IP address. Figure 75. View Comm Settings Menu Flow MediaPort 200 • Front Panel Operation... -
Page 85: Edit Comm Settings Menu
When finished editing the settings for the selected item, either press to display the Next editing screen for the next item, or press to exit Edit mode and display the next Menu menu ( Quick Setup MediaPort 200 • Front Panel Operation... - Page 86 • IP Address: Set the MediaPort 200 IP address. An IP address is a 32-bit binary number that is used to identify each device on an Ethernet network. This number consists of four decimal numbers called “octets,” each in the range of 0 through 255 and separated by dots.
-
Page 87: Front Panel Lockout (Executive Mode)
Front Panel Lockout (Executive Mode) To prevent accidental changes to settings, the MediaPort 200 front panel controls can be locked by placing the unit in Lock (executive) mode. While the MediaPort is in lock mode, Ethernet, RS-232, and USB communication remain available, as well as the ability to exit lock mode. - Page 88 NOTE: Mode 5 reset clears most adjustments. To save these settings, use the PCS control program and select from the tab menu before this reset is performed (see the Backup MediaPort 200 MediaPort 200 Help file for more information). MediaPort 200 • Front Panel Operation...
-
Page 89: No Signal Indicator (Usb Output)
, or custom logo (.png or .jpg file) on a black MediaPort 200 No Signal background (see the MediaPort 200 Help file for more information on selecting a custom No Signal Indicator). The indicator screen turns off when an input signal is detected. -
Page 90: Setup
This section contains a general discussion of MediaPort 200 inputs and outputs and their intended uses when the MediaPort 200 is used as a standalone device. All of the principles described here are used in the application setup procedure that follows. -
Page 91: Mic/Line Input
“voicelift” system if local speech reinforcement is needed. NOTE: Mic/Line Input signal is not sent to the Analog Line Output of the MediaPort 200. USB Communications Input USB communications (far end) audio is mixed with the line inputs and sent to the Analog Line Output for local sound reinforcement. -
Page 92: Audio Line Outputs
USB port to the PC to be sent to the far end. Ref and Aux Outputs The following outputs are on a shared connector on the MediaPort 200 rear panel: • The REF Output is designed to be used in conjunction with an external DSP with AEC. -
Page 93: Application Setup Example
ATTENTION: Ensure that the MediaPort 200 is set to Standalone audio mode in PCS before beginning setup (see General Settings Tab on page 59 for more information about selecting Standalone audio mode). This is an application for soft codec conferencing, in which the MediaPort 200 operates as a standalone device. Audio OVER TEMP... -
Page 94: Gain Structure
Systems, for detailed information. NOTE: To view the white paper, an Extron Insider account is required. Extron Product Control Software (PCS) is used to set gain structure in the MediaPort 200. From the ) screen pictured in figure 78 below, each of the... -
Page 95: Output Tab
The gain structure article referenced earlier in this section suggests an amplifier input setting of 12 o’clock, which usually falls in the aforementioned range. The 12 o’clock setting is convenient and, most importantly, easily repeatable, and therefore, highly recommended as a best practice. MediaPort 200 • Standalone MediaPort 200 Application Setup... -
Page 96: Setting Mix And Listening Levels Using The Pcs Software
Setting Mix and Listening Levels using the PCS Software After setting up the MediaPort 200 inputs for optimal level, adjustments to the MediaPort 200 mix and listening levels are made from the screen in PCS. PCS Mix Screen screen consists of four panels, each of which contains one or more faders. Below each fader is a text field with up and down arrow buttons and a mute button that are associated with it. - Page 97 The ducking processor returns the program audio to its original level when talking stops. MediaPort 200 • Standalone MediaPort 200 Application Setup...
-
Page 98: Adjusting Mix Levels
(this depends on the size of the amplifier in the room and its input sensitivity setting). Adjust the fader ( ) during an active conference to set a USB Communications comfortable and intelligible listening level for speech from the far end. MediaPort 200 • Standalone MediaPort 200 Application Setup... - Page 99 Set this mix level while the talkers at the near end and far end are speaking at normal levels for conferencing, and when program material is being played at the far end. MediaPort 200 • Standalone MediaPort 200 Application Setup...
-
Page 100: Mediaport 200 With External Dsp With Aec Application Setup
AEC Application Setup The MediaPort 200 can integrate seamlessly into a variety of applications. This section contains instructions on how to set up the MediaPort 200 for the following applications: Application 1 • — MediaPort 200 with external DSP with AEC •... -
Page 101: Hdcp-Compliant Hdmi Loop-Out
102), or to a sound reinforcement “voicelift” system for local speech reinforcement. NOTE: Mic/Line Input signal is not sent to the Analog Line Output of the MediaPort 200. USB Communications Input USB communications (far end) audio is mixed with the line inputs (except the Mic/Line Input) and sent to the Analog Line Output for local sound reinforcement. -
Page 102: Audio Line Outputs
NOTE: Mic/Line Input signal is not sent to the Analog Line Output of the MediaPort 200. When using an external DSP with AEC, mute the USB communications audio (far end) to... -
Page 103: Application Setup Examples
USB communications audio to the DSP as an AEC reference and to be heard at the near end. The line output from the MediaPort 200 sends program audio to the DSP, where it is routed for AEC reference and to be heard at the near end (see... - Page 104 The DSP uses this signal as an AEC reference on each microphone input and also routes it to the sound reinforcement system. Connect the REF output of the MediaPort 200 to a line input on the DSP (DMP 128 input 11, “USB Comm” in figure 85 on page 99).
-
Page 105: Dsp Routing For Application 1
In the DMP 128 AEC processing dialog, “AEC Ref (Virtual Return #H)” is assigned as the AEC reference for mic inputs 1 – 8. Program L/R Inputs 9 and 10 Program content comes from the MediaPort 200 Line Output L/R, which is a mix of the USB Playback, HDMI, and Line Input signals. •... - Page 106 Figure 85. DSP Routing for Application 1 MediaPort 200 with External DSP with AEC Application Setup...
-
Page 107: Control For Application 1
“Privacy Mute.” This control mutes the mic mix routed to Output #3, connected to the MediaPort 200 Mic/Line Input, and ultimately to the far end of a soft codec conference. This control can be used for privacy during a conference call, to mute the near end mics going to the far end while still being able to hear the far end. - Page 108 Volume control for far end audio (from MediaPort) to local room Far End (mute) Mute control for far end audio (from MediaPort) to local room Privacy Mute Mutes local mics for private discussion Figure 86. Application 1 Group Controls MediaPort 200 with External DSP with AEC Application Setup...
-
Page 109: Application 2 - Mediaport 200 With External Dsp With Aec With Hardware And Software Codecs
Application 2 — MediaPort 200 with External DSP with AEC with Hardware and Software Codecs ATTENTION: Ensure the MediaPort 200 is set to External DSP with AEC audio mode in PCS before beginning setup (see General Settings Tab on page 59 for more information about selecting Standalone audio mode). - Page 110 PC or Mac computer. Make sure the drivers are configured properly. Connecting the MediaPort 200 to the DSP Connect the Line output of the MediaPort 200 to line inputs on the DSP (DMP 128 input 9 “MP Program L” and input 10 “MP program R,” see figure 87 on the previous page).
-
Page 111: Dsp Routing For Application 2
Virtual Return A is also routed to Output 4, connected to the video codec. • Program L/R Inputs 9 and 10 Program content comes from the MediaPort 200 Line Output L/R, which is a mix of the USB Playback, HDMI, and Line Input signals. •... - Page 112 Video codec line out is connected to DMP 128 Input 12 “Video Codec.” • • DMP 128 Input 12 is routed to Output 3. Output 3 is connected to the MediaPort 200 Mic/Line Input. • DMP 128 Input 12 is routed to Virtual Send E.
-
Page 113: Control For Application 2
“Privacy Mute.” This control mutes the mic mix routed to Output #3, connected to the MediaPort 200 Mic/Line Input, and ultimately to the far end of a soft codec conference. This control can be used for privacy during a conference call, to mute the near end mics going to the far end while still being able to hear the far end. - Page 114 Volume control for far end audio (from MediaPort) to local room Far End (mute) Mute control for far end audio (from MediaPort) to local room Privacy Mute Mutes local mics for private discussion Figure 89. Application 2 Group Controls MediaPort 200 with External DSP with AEC Application Setup...
-
Page 115: Setting Mix And Listening Levels Using The Pcs Software
Setting Mix and Listening Levels Using the PCS Software After setting up the MediaPort 200 inputs for optimal levels and the outputs according to the signal level needed at the receiving devices (such as amplifiers, DSP, and video codecs), MediaPort 200 mix and listening levels can be controlled from the screen of the PCS configuration software. - Page 116 When the USB communications audio is sent to the REF output only, the application is using a DSP in conjunction with the MediaPort 200. In this case, volume control is performed in the DSP. For this type of application, it is recommended the...
-
Page 117: Adjusting Mix Levels
(this depends on the size of the amplifier in the room and its input sensitivity setting). Adjust the fader ( ) during an active conference to set a USB Communications comfortable and intelligible listening level for speech from the far end. MediaPort 200 with External DSP with AEC Application Setup... - Page 118 MediaPort 200 with External DSP with AEC Application Setup...
-
Page 119: Remote Configuration And Control
Remote Configuration and Control This section describes the connections through which the MediaPort can be configured and controlled remotely via SIS commands and the MediaPort 200 web page. Topics include: • SIS Commands MediaPort 200 Web Page • SIS Commands Simple Instruction Set (SIS) commands are a set of commands developed by Extron. -
Page 120: Mediaport-Initiated Messages
ASCII. NOTE: Unless otherwise stated, upper- and lowercase text can be used interchangeably in the commands. ASCII to HEX Conversion Table Space • Figure 93. ASCII to Hexadecimal Character Conversion Table MediaPort 200 • Remote Configuration and Control... -
Page 121: Symbol Definitions
H range: 0120 through 4096 through • V range: 0064 2400 Response is 4 digits with leading + or - and padded with zeros. Must be divisible by 8 for horizontal or by 2 for vertical. MediaPort 200 • Remote Configuration and Control... - Page 122 1 = HDMI output (valid for EDID save and export only) 201 = Custom output rate 1 202 = Custom output rate 2 203 = Custom output rate 3 SIS Variables for MediaPort 200 Resolutions and Refresh Rates = 10 through 53) Resolution 23.98 Hz 24 Hz 25 Hz 29.97 Hz...
- Page 123 2 = 5.0% — Auto-Image commands snap to a 5.0% table. No true Auto-Image is performed. = Aspect ratio 1 = Fill — Each input rate automatically fills the entire output raster (default). 2 = Follow — Each input rate is displayed with its native aspect ratio. MediaPort 200 • Remote Configuration and Control...
- Page 124 2 = Echo canceling speakerphone = HDMI audio input type 0 = None — input is muted. 2 = LPCM 2-Ch digital (embedded in the HDMI input) (default) 5 = Multi-Ch digital (PCM or encoded formats) MediaPort 200 • Remote Configuration and Control...
- Page 125 E14 error code is returned. Clearing the Administrator password clears all passwords. = Serial port baud rate = Serial port parity = Serial port number of data bits = Serial port number of stop bits = Hardware (MAC) address (xx-xx-xx-xx-xx-xx) MediaPort 200 • Remote Configuration and Control...
-
Page 126: Command And Response Table For Sis Commands
1 = HDMI output (valid for EDID save and export only), 201 = Custom output rate 1, 202 = Custom output rate 2, 203 = Custom output rate 3 Input HDCP authorized: 0 = Input HDCP Authorized disabled, 1 = Input HDCP Authorized enabled (default) MediaPort 200 • Remote Configuration and Control... - Page 127 V range: ± vertical streaming resolution HDCP status: 0 = No sink or source device detected, 1 = Sink or source device detected with HDCP, 2 = Sink or source device detected with no HDCP present MediaPort 200 • Remote Configuration and Control...
- Page 128 V range: ± vertical streaming resolution X1& Horizontal or vertical size. Response is 5 digits with leading + or - and padded with zeros. H range (width): 0120 through 4096 V range (height): 0064 through 2400 MediaPort 200 • Remote Configuration and Control...
- Page 129 Enable or disable Auto Memory: 0 = Off or disable, 1 = On or enable Preset name, up to 16 characters Input preset number: 1 – 16. Response is 3 digits padded with a zero. MediaPort 200 • Remote Configuration and Control...
- Page 130 Passes encrypted output only when the select input is encrypted. 3 = Continuous HDCP trials to the HDMI sink. Continuous HDCP trials to the DVI sink. Passes encrypted output 100% of the time. MediaPort 200 • Remote Configuration and Control...
- Page 131 = Video mute status: 0 = unmuted (default), 1 = muted to black screen, 2 = all output sync and video muted X4& = USB output streaming format: 1 = MJPEG 422 full (default), 2 = MJPEG 420 full MediaPort 200 • Remote Configuration and Control...
- Page 132 2 = 5% — An Auto-Image command snaps to a 5% table (no true Auto-Image is performed). Aspect ratio: 1 = Fill: The input rate fills the entire output raster (default). 2 = Follow: The input rate is displayed with its native aspect ratio. MediaPort 200 • Remote Configuration and Control...
- Page 133 Front panel lock mode (executive mode): 0 = Unlock front panel (default), 1 = Lock front panel USB terminal type 1 = Non-echo canceling speakerphone (default) 2 = Echo canceling speakerphone Video signal presence: 0 = No input signal detected, 1 = Input signal detected MediaPort 200 • Remote Configuration and Control...
- Page 134 Horizontal and vertical frequencies. Expressed as 3 digits with one decimal place and leading zeros. Video mute status: 0 = off (unmute) (default), 1 = on (mute to black screen), 2 = on (mute sync and video) MediaPort 200 • Remote Configuration and Control...
- Page 135 = USB audio type: 0 = none (input audio muted), 1 = LPCM 2-Ch, 5 = Multi-Ch (return audio only) = USB standard: 0 = None (no host), 1 = USB 1.1, 2 = USB 2.0, 3 = USB 3.0 MediaPort 200 • Remote Configuration and Control...
- Page 136 Leading zeros in each of the four fields are optional in setting values and are suppressed in returned values. Factory default address (when DHCP is turned off) off) 192.168.254.254 MAC address of the unit in the format 00-05-A6-xx-xx-xx. MediaPort 200 • Remote Configuration and Control...
- Page 137 Prefix (subnet mask bits). Subnet 255.255.0.0 is represented as a prefix value by /16 X7& Administrator or user password, 12 characters maximum. / \ | * and space characters are not allowed. Passwords are case-sensitive. MediaPort 200 • Remote Configuration and Control...
- Page 138 Minimum = 1 (10 seconds), maximum = 65000 (650,000 seconds), default = 30 (300 seconds) Each step = 10 seconds. Response contains leading zeros. Baud rate for serial port Parity for serial port Stop bits for serial port Data bits for serial port MediaPort 200 • Remote Configuration and Control...
- Page 139 [1] = ‘filename1, date1, filesize1’; file [2] = ‘filename2, date2, filesize2’; file [3] = ‘filename3, date3, filesize3’; file [n] = ‘filename n, date n, filesize n’; file [n+1] = ‘filename n+1, date n+1, filesize n+1’; MediaPort 200 • Remote Configuration and Control...
- Page 140 Disable the SNMP port. Disable SNMP port A 161PMAP Pmap A 00000 View SNMP port map View the current SNMP port value. A PMAP {port#} NOTE: Config type: 0 = IP Config, 2 = Box Config MediaPort 200 • Remote Configuration and Control...
-
Page 141: Audio Sis Commands
Mic/Line Input Gain Mic/Line Pre-Mixer Control Input Gain Control Mic/Line in 40000 Mic/Line in 40100 X10@ Line Output Attenuation USB out L/R 60000 Line out L/R 60002 Reference out 60004 Aux out 60005 MediaPort 200 • Remote Configuration and Control... - Page 142 X11& = Soft limit low value X11* = Group master value X11( = On and Off status X12) = Increment or decrement value X12! = Digital inputs: X12@ = Digital input state = logic low = logic high MediaPort 200 • Remote Configuration and Control...
- Page 143 = follow mute (when muted, output is high) = follow inverted mute (when unmuted, output is high) = blink, following input 1 trigger (either increment/decrement or preset recall) = blink, following input 2 trigger (either increment/decrement or preset recall) MediaPort 200 • Remote Configuration and Control...
- Page 144 135 for the gain range of each processor). X10^ = Mute status of signal: 0 = unmuted (pass), 1 = muted X10( = Phantom power status: 0 = standard power (phantom power off), 1 = phantom power on (default) MediaPort 200 • Remote Configuration and Control...
- Page 145 135). X11$ = Group number (name): 1 - 16. X11% = Group parameter indicator: 6 = gain, 12 = mute X11^ = Soft limit high value X11& = Soft limit low value MediaPort 200 • Remote Configuration and Control...
- Page 146 (verbose modes 2 and 3): X11$ X11* ] Grpm D X11* Gain Level Range table = Processor indicator range (object ID or OID, see on page 135). NOTE: X12) = Group number (name): 1 - 16. MediaPort 200 • Remote Configuration and Control...
- Page 147 Follow mute (when muted, output is high) Follow inverted mute (when unmuted, output is high) Blink, following input 1 trigger (either increment/decrement or preset recall) Blink, following input 2 trigger (either increment/decrement or preset recall) MediaPort 200 • Remote Configuration and Control...
-
Page 148: Mediaport 200 Web Page
MediaPort 200 Web Page The embedded MediaPort 200 web page enables monitoring and adjusting certain settings of the MediaPort 200 through its Ethernet port, connected via a LAN or WAN and using a web browser such as Microsoft Internet Explorer . -
Page 149: Web Page Components
Passwords Configure This Device USB Status Figure 95. MediaPort 200 Web Page The MediaPort 200 web page contains the following panels: Communication Settings — This panel contains the current TCP/IP and RS-232 connection settings. Editing the TCP/IP settings Click the button. - Page 150 It also displays the USB output resolution and rate, and the USB streaming format (MJPEG 420 or 422). MediaPort 200 • Remote Configuration and Control...
-
Page 151: Updating Firmware
Firmware Update Dialog Box Click to begin. During the updating process, a message window appears Update in the middle of the screen, showing the progress of the update: Initializing , and Installing the Firmware Rebooting Device MediaPort 200 • Remote Configuration and Control... - Page 152 If requested, enter a Login ID. The default is Admin Enter the new administrator password in the field. Administrator Password Repeat the password in the field (see figure 102 below). Confirm Password Figure 102. Passwords Dialog Box with Administrator Password Entered MediaPort 200 • Remote Configuration and Control...
-
Page 153: Special Characters
Use of the following characters is not recommended: and {space}. + ~ , @ = ` [] {} < > ‘’ “” ; : | \ ? MediaPort 200 • Remote Configuration and Control... -
Page 154: Mounting
Extron mounting kits and ordering information. Mounting Options The MediaPort 200 can be mounted by any of the following methods: Rack mounting: Attach the MediaPort to a standard 19-inch rack shelf. The following • Underwriters Laboratories (UL) guidelines pertain to the installation of the MediaPort in a rack: Elevated operating ambient temperature —... - Page 155 Extron Electronics makes no further warranties either expressed or implied with respect to the product and its quality, performance, merchantability, or fitness for any particular use. In no event will Extron Electronics be liable for direct, indirect, or consequential damages resulting from any defect in this product even if Extron Electronics has been advised of such damage.