iDirect evolution x1 Installation Manual
Satellite routers
Hide thumbs
Also See for evolution x1:
- Installation and safety manual (60 pages) ,
- Installation, support, and maintenance manual (90 pages) ,
- Installation and safety manual (80 pages)

Related Manuals for iDirect evolution x1


Summary of Contents for iDirect evolution x1
- Page 1 Installation and Commissioning Guide iDirect Satellite Routers iDX Release 3.3 July 31, 2014 iDirect Satellite Router Installation and Commissioning Guide iDX Release 3.3...
- Page 2 Copyright © 2014 VT iDirect, Inc. All rights reserved. Reproduction in whole or in part without permission is prohibited. Information contained herein is subject to change without notice. The specifications and information regarding the products in this document are subject to change without notice. All statements, information, and recommendations in this document are believed to be accurate, but are presented without warranty of any kind, express, or implied.
-
Page 3: Revision History
Revision History The following table shows all revisions for this document. To determine if this is the latest revision for your release, check the TAC Web site at http://tac.idirect.net. Revision Date Released Reason for Change(s) Who Updated? 07/31/2014 First release of document for iDX 3.3... -
Page 4: Table Of Contents
2.3.3 Elevation Offset ..........9 iDirect Satellite Router Installation and Commissioning Guide... - Page 5 3.3.2 Logging In to the iDirect Application ....... . .
- Page 6 12.3 Verify the Download ........69 iDirect Satellite Router Installation and Commissioning Guide...
- Page 7 16.3.3 Evolution X1 ........
- Page 8 Appendix A: Loading Images with TFTP Server ... . . 109 Appendix B: Disabling the PWM Voltage in iBuilder ..111 viii iDirect Satellite Router Installation and Commissioning Guide iDX Release 3.3...
-
Page 9: List Of Figures
Figure 9. Root Login and Linux Prompt ....... . 19 Figure 10. Telnet and Login to iDirect Application ......19 Figure 11. - Page 10 Figure 60. Web iSite Modem Status Page ......107 Figure 61. iBuilder Remote Information Tab: Disabling Tx PWM ....111 iDirect Satellite Router Installation and Commissioning Guide iDX Release 3.3...
- Page 11 Table 8. iDirect Evolution X3 and X5 LED Definitions ..... . . 95 Table 9. iDirect Evolution X1 LED Definitions ......96 Table 10.
- Page 12 Satellite Router Installation and Commissioning Guide iDX Release 3.3...
-
Page 13: About
Satellite Routers are not supported in iDX Release 3.2 and later. Intended Audience This guide is written for satellite earth station engineers, network operators, and field technicians tasked with the installation and commissioning of iDirect Evolution Satellite Routers. Contents Of This Guide This document contains the following major sections: •... -
Page 14: Document Conventions
Related Documents The following iDirect documents are available at http://tac.idirect.net and contain related information. Please consult these documents for information about installing and using iDirect satellite network software and equipment. • Satellite Router Quick Start Guide •... -
Page 15: Getting Help
Link Budget Analysis Guide Getting Help The iDirect Technical Assistance Center (TAC) is available 24 hours a day, 365 days a year. Software user guides, installation procedures, a FAQ page, and other documentation that supports our products are available on the TAC Web site. Access the TAC Web site at http://tac.idirect.net. - Page 16 Satellite Router Installation and Commissioning Guide iDX Release 3.3...
-
Page 17: Getting Started
Management System (NMS) iSite client software application. The iSite application is used when commissioning the Evolution X3, X5, e8350, and e8xx Satellite Routers. Part Two describes the Web iSite interface, used when commissioning the Evolution X1, X7, and e150 Satellite Routers. -
Page 18: Required Equipment
PC. Installation and commissioning of the Evolution X1, X7, and e150 Satellite Routers is performed using Web iSite. Web iSite is an embedded Web server that enables configuration and commissioning using a Web browser. -
Page 19: Extracting Files
The NMS iSite program and support files (iSite folder) • The Evolution e8000 Series BSP and remote image files (Remote_Evolution_e8series folder) • The Evolution X3 and X5 BSP and remote image files (Remote_Evolution_X3_X5 folder) iDirect Satellite Router Installation and Commissioning Guide iDX Release 3.3... -
Page 20: Pc Firewall
When using Windows XP and Windows 7 with iSite version 3.1 and above, it is necessary to disable or modify the Windows Firewall for full functionality of some features. For Windows 7, because the Firewall may be selectively applied to separate domains, iDirect recommends that the Firewall remain enabled, but that the iSite application be granted access as an allowed application. -
Page 21: Figure 1. Allowing Isite In Windows Firewall
PC Firewall Figure 1. Allowing iSite in Windows Firewall iDirect Satellite Router Installation and Commissioning Guide iDX Release 3.3... - Page 22 PC Firewall iDirect Satellite Router Installation and Commissioning Guide iDX Release 3.3...
-
Page 23: Site Considerations
The antenna base is fixed on a stable surface that will not shift. • Ballast is installed on the antenna base (to combat wind). • The mast pipe is plumb. iDirect Satellite Router Installation and Commissioning Guide iDX Release 3.3... -
Page 24: Orientation
Magnetic variation alters the reading of a magnetic compass with respect to true North. Maps and map display systems, including the output of the iDirect Look Angle Calculator, are referenced to true geographic North. Therefore a correction factor must be applied to readings taken by a magnetic compass to obtain the correct value, referred to as the true heading. -
Page 25: Sighting Antenna Azimuth
Always refer the original equipment manufacturer’s (OEM) installation instructions when installing the antenna and mount. Consult the OEM specifications to determine the offset angle for the particular antenna being installed. iDirect Satellite Router Installation and Commissioning Guide iDX Release 3.3... -
Page 26: Figure 3. Antenna Elevation Offset
Orientation Figure 3. Antenna Elevation Offset iDirect Satellite Router Installation and Commissioning Guide iDX Release 3.3... -
Page 27: Part One: Isite
One describes the commissioning process when using the iVantage NMS iSite client. The iSite software is used when commissioning the Evolution X3, X5, e8350, and e8xx Satellite Routers. Part Two: Web iSite on page 39 when commissioning the Evolution X1, X7, and e150 Satellite Routers. Part One contains the following chapters: •... - Page 28 Satellite Router Installation and Commissioning Guide iDX Release 3.3...
-
Page 29: Connecting To The Lan Port
If the IP address and subnet mask are unknown for an Evolution X3, X5 or e8000 Series Satellite Router, retrieve the IP configuration by accessing the iDirect Application software on the Satellite Router using the Console port. See “Retrieving the IP Address using the Console... -
Page 30: Local Area Connection
To modify the Local Area Connection: 1. In Control Panel, click Network Sharing Center. 2. Double-click Local Area Connection to display the Status dialog box. Figure 4. Local Area Connection Status Dialog Box iDirect Satellite Router Installation and Commissioning Guide iDX Release 3.3... -
Page 31: Figure 5. Local Area Connection Properties Dialog Box
Figure 5. Local Area Connection Properties Dialog Box 4. Highlight Internet Protocol Version 4 (TCP/IPv4) as shown in Figure 5, and click Properties. The properties dialog box appears. Figure 6. Internet Protocol (TCP/IP) Dialog Box iDirect Satellite Router Installation and Commissioning Guide iDX Release 3.3... -
Page 32: Table 1. Lan Ports For Ethernet Cable Connections
5. Verify that packets are returned without error. The local PC is now configured to use iSite for communication over the LAN port. Continue to “Loading Packages with iSite” on page 21. iDirect Satellite Router Installation and Commissioning Guide iDX Release 3.3... -
Page 33: Retrieving The Ip Address Using The Console Port
PuTTY to illustrate the procedure. Once the IP address is known, telnet can be used to connect to the console port. Note: Evolution X1 and e150 Satellite Routers do not have console ports. One end of the console cable terminates in a DB-9 female connector. An appropriate adapter must be used (e.g., DB-9 male to USB, DB-9 male to RJ-45) to interface with the local PC. -
Page 34: Figure 8. Putty Configuration: Serial Parameters
4800 bps during the boot process. All other settings will remain the same. To re-establish communication with the console port, change the serial port speed to 4800 bps. iDirect Satellite Router Installation and Commissioning Guide iDX Release 3.3... -
Page 35: Logging In To The Idirect Application
), enter telnet localhost. 2. At the Username prompt, enter, admin. 3. At the Password prompt, enter the default password, iDirect. (In some cases, the default password may be P@55w0rd!.) Figure 10. Telnet and Login to iDirect Application > Successful login to the iDirect application is indicated the prompt. -
Page 36: Retrieving The Ip Address
Retrieving the IP Address using the Console Port 3.3.3 Retrieving the IP Address After logging in to the iDirect Application program, retrieve the IP address and subnet mask. To display the IP address and Subnet Mask: 1. At the command line prompt, enter laninfo (Figure 11). -
Page 37: Loading Packages With Isite
2. Launch iSite with the shortcut created earlier, or by clicking iSite.exe in the iSite folder created during the unzip operation. The iSite welcome screen opens. 3. Create a logical remote in iSite by right-clicking the Globe icon (iDirect) in the iSite Tree View displayed in the left-hand viewing pane. -
Page 38: Figure 12. Welcome Screen And New Element Creation
Loading Packages with iSite Figure 12. Welcome Screen and New Element Creation Figure 13. Logging In to New Element iDirect Satellite Router Installation and Commissioning Guide iDX Release 3.3... -
Page 39: Loading Bsp And Remote Images
X3. 5. Double-click the board support package (.bsp file) in the Open dialog box. The selected package file is displayed in the Download Package dialog box. iDirect Satellite Router Installation and Commissioning Guide iDX Release 3.3... -
Page 40: Figure 14. Selecting The Bsp File
Figure 14. Selecting the BSP File 6. In the Download Package dialog box (Figure 15), select the following options: • Don’t check versions • Download images only • Don’t reset iDirect Satellite Router Installation and Commissioning Guide iDX Release 3.3... -
Page 41: Figure 15. Download Package Dialog Box Settings
7. Click Start. The Download Package Information window displays the progress of the file transfer and image flash. Wait until the word Done is displayed before proceeding. Figure 16. Information Window: File Transfer Progress iDirect Satellite Router Installation and Commissioning Guide iDX Release 3.3... - Page 42 5. Wait while the file transfer progresses. Observe the Information section of the Download Package dialog box until the word Done is displayed. After loading both software packages on the Satellite Router, continue to “Loading Options Files with iSite” on page 27. iDirect Satellite Router Installation and Commissioning Guide iDX Release 3.3...
-
Page 43: Loading Options Files With Isite
Routers using iSite. This chapter includes the following section: • “Options File” on page 27 Note: For Evolution X1, X7, or e150 Satellite Routers. See “Connecting with Web iSite” page 41. Options File The remote options file contains specific site and network information such as operating frequencies, geo location, and other important parameters. -
Page 44: Figure 18. Open Dialog Box With Remote Options File Selected
Network Service Provider or Network Operator. The default password is also specified in the options file. If the Network Service Provider changed the Satellite Router password from the iDirect factory default, log in to the router using the new password. -
Page 45: Configuring Transec Acc Keys
4. Coordinate with the Network Operator to select Disable Authentication on the iBuilder Remote Information tab, and to apply the hub-side changes. Authentication is now disabled on the Satellite Router, and at the hub. iDirect Satellite Router Installation and Commissioning Guide iDX Release 3.3... -
Page 46: Loading Acc Keys
7. When asked to continue, enter: A message appears stating that the Network Acquisition Key has been updated. After loading the ACC Keys, continue to “Pointing the Antenna with iSite” on page 31. iDirect Satellite Router Installation and Commissioning Guide iDX Release 3.3... -
Page 47: Pointing The Antenna With Isite
7.2.1 Calculating Look Angle iSite calculates look angle based upon the geographic location data entered by the user. If the antenna site geographic coordinates are unknown, they may be determined with a GPS iDirect Satellite Router Installation and Commissioning Guide iDX Release 3.3... -
Page 48: Figure 21. Isite Antenna Pointing Dialog Box: Look Angle Calculator
Prime Meridian in the adjacent drop-down boxes. 4. In Spacecraft Position, the Longitude field is automatically populated. If not, enter the orbital position of the spacecraft in degrees East or West of the Prime Meridian. iDirect Satellite Router Installation and Commissioning Guide iDX Release 3.3... -
Page 49: Coarse Alignment
For the procedures that follow, two operator feedback methods are employed: • A DC voltage on the TX Out port that varies with received signal strength (PWM) • An iSite graphic display depicting received signal strength in a histogram iDirect Satellite Router Installation and Commissioning Guide iDX Release 3.3... -
Page 50: Pwm
Execute the procedures in the following sections to achieve peak received signal strength of the downstream link. Note: If the Antenna Pointing Histogram does not operate as expected, refer to “PC Firewall” on page 4. iDirect Satellite Router Installation and Commissioning Guide iDX Release 3.3... -
Page 51: Figure 22. Starting Antenna Pointing
The signal trace of the histogram progressively turns from red, to yellow, and then to green as downstream carrier signal strength increases. See Figure iDirect Satellite Router Installation and Commissioning Guide iDX Release 3.3... -
Page 52: Figure 23. Antenna Pointing Histogram And Current Signal Strength
Peaking the Antenna Signal Detected No Signal Antenna Peaked Carrier Lock Achieved Figure 23. Antenna Pointing Histogram and Current Signal Strength iDirect Satellite Router Installation and Commissioning Guide iDX Release 3.3... - Page 53 If the site is configured as a secure mobile or “itinerant” installation, proceed to “Setting Geo Location for Secure Mobiles” on page 75 after peaking of the antenna has been completed. Otherwise, proceed to “Cross Polarization” on page 79. iDirect Satellite Router Installation and Commissioning Guide iDX Release 3.3...
- Page 54 Peaking the Antenna iDirect Satellite Router Installation and Commissioning Guide iDX Release 3.3...
-
Page 55: Part Two: Web Isite
The Satellite Router Installation and Commissioning Guide is divided into three parts. Part Two describes the commissioning process using the Web iSite user interface. Web iSite is used when commissioning the Evolution X1, X7, and e150 Satellite Routers. Refer to Part One: iSite when commissioning the X3, X5, e8350, and e8xx Satellite Routers. - Page 56 Satellite Router Installation and Commissioning Guide iDX Release 3.3...
-
Page 57: Connecting With Web Isite
“Restoring Factory Defaults” on page 42 • “Cold Start: X1 Outdoor” on page 45 Note: If the internal temperature of an Evolution X1 Outdoor Satellite Router is below -25 C when power is first applied, it may take up to four minutes to become operational. -
Page 58: Restoring Factory Defaults
“Local Area Connection” on page 14 to reconfigure the local IP settings. If the IP address of an Evolution X1, X7, or e150 Satellite Router is unknown, follow the procedure in “Restoring Factory Defaults” on page 42 to restore the factory default IP address. -
Page 59: Figure 25. X1 Outdoor Front Panel: Reset Button
Reset Button Figure 25. X1 Outdoor Front Panel: Reset Button Note: To access the LAN port and reset button on an Evolution X1 Outdoor Satellite Router, remove the M25 Cable Gland covering the LAN port. The reset button has two uses: •... -
Page 60: E150
Factory default mode of the e150 is entered by applying a contact closure across the reset lines of the J5 Reset Header for a minimum of eight seconds. The factory default mode attributes are the same as for the X1 Indoor and Outdoor Satellite Routers. See the iDirect e150 Satellite Router Integration Guide for details. -
Page 61: Cold Start: X1 Outdoor
Connecting with Web iSite Cold Start: X1 Outdoor An Evolution X1 Outdoor Satellite Router is designed to operate in ambient temperatures as low as -40 C. However, if the Satellite Router is without power long enough for the internal temperature to fall below -25 C, a warm-up period is required before becoming operational. - Page 62 Connecting with Web iSite iDirect Satellite Router Installation and Commissioning Guide iDX Release 3.3...
-
Page 63: Loading Packages With Web Isite
Figure 27. Connecting to the Satellite Router using Web iSite 4. When the Login page appears: a. For User, enter admin. b. For Password, enter the admin password of the Satellite Router. c. Click Login iDirect Satellite Router Installation and Commissioning Guide iDX Release 3.3... -
Page 64: Figure 28. Web Isite Login Page
Loading Packages with Web iSite Figure 28. Web iSite Login Page Note: The factory default admin password is iDirect. However, after an options file has been loaded and the Satellite Router has been reset, the password changes to match the password in the options file. -
Page 65: Loading The Package File
1. In the top navigation bar in Web iSite, click the Admin button. The File Management page appears by default (Figure 30). If not, click the File Management link on the left. Figure 30. Web iSite File Management Page: Load Sections iDirect Satellite Router Installation and Commissioning Guide iDX Release 3.3... -
Page 66: Figure 31. Selecting Package File
Figure Figure 31. Selecting Package File Note: There are two Evolution X1 package files: one for Evolution X1 Indoor Satellite Routers, and one for Evolution X1 Outdoor Satellite Routers. 4. Double-click the correct package for the Satellite Router model being commissioned. - Page 67 After performing the procedure “Loading Options Files with Web iSite” on page 53 for an Evolution X7 Satellite Router, iDirect highly recommends loading the X7 software package a second time. This ensures that both partitions contain the correct software.
- Page 68 Loading Packages with Web iSite iDirect Satellite Router Installation and Commissioning Guide iDX Release 3.3...
-
Page 69: Loading Options Files With Web Isite
2. Navigate to the folder on the local PC that contains the applicable site-specific options file. 3. Double-click the options file or click Open. 4. Verify that the correct filename is displayed in the Load Package window (Figure 33). iDirect Satellite Router Installation and Commissioning Guide iDX Release 3.3... -
Page 70: Figure 33. File Management: Load Options File
7. In the Restart Device section of the File Management page, click Restart. 8. If this is an Evolution X7 Satellite Router: a. Wait until the Satellite Router restarts. b. Log on to Web iSite. iDirect Satellite Router Installation and Commissioning Guide iDX Release 3.3... -
Page 71: Figure 35. Evolution X7 With Latest Software In Both Partitions
Satellite Router again before continuing to the next procedure. Note: iDirect recommends loading the X7 software package a second time. This allows the Satellite Router to operate using the software in the second partition in the unlikely event of an unrecoverable error in the operational partition. -
Page 72: Downstream Template
Loading Options Files with Web iSite 10.2 Downstream Template Evolution X1, X7, and e150 Satellite Routers support the Downstream Template feature in Web iSite. The Downstream Template is provided as an option to speed commissioning of large numbers of remote sites by avoiding the requirement for the installer to obtain and manage a large number of individual options files. -
Page 73: Figure 37. Web Isite Downstream Configuration Page
2. Click the Downstream Config link on the left to view the Downstream Configuration page. Figure 37 shows the Downstream Configuration page of an Evolution X7 Satellite Router. Figure 37. Web iSite Downstream Configuration Page iDirect Satellite Router Installation and Commissioning Guide iDX Release 3.3... -
Page 74: Figure 38. Restart Confirmation Box
“Pointing the Antenna with Web iSite” on page 59. Once the antenna is correctly pointed, the Network Operator can use iBuilder to push the software package and the remote-side options file. iDirect Satellite Router Installation and Commissioning Guide iDX Release 3.3... -
Page 75: Pointing The Antenna With Web Isite
11 Pointing the Antenna with Web iSite This chapter explains how to point the antenna using Web iSite. The chapter is applicable when commissioning the Evolution X1, X7, and e150 Satellite Routers. This chapter includes the following sections: • “Preparation” on page 59 •... -
Page 76: Figure 39. Web Isite Commissioning Dialog Box: Angle Calculator
3. Under Elevation, enter the Elevation Offset of the antenna. Refer to the antenna manufacturer’s specifications for the offset angle. After the required data is entered, Web iSite automatically calculates azimuth, elevation, and polarization angles and displays the data under Gross Antenna Pointing. iDirect Satellite Router Installation and Commissioning Guide iDX Release 3.3... -
Page 77: Coarse Alignment
When peaking the antenna, the Satellite Router generates a pulse train on the TX Out port. The duration of each pulse is proportional to the received signal strength. The method is iDirect Satellite Router Installation and Commissioning Guide iDX Release 3.3... -
Page 78: Graphic Display
3. Click Antenna Pointing (at left) to view the Antenna Pointing page. The graphic display appears and begins to scroll across the screen. 4. For dual-receiver models such as the X7, select Rx1 or Rx2 at upper-right. See Figure iDirect Satellite Router Installation and Commissioning Guide iDX Release 3.3... -
Page 79: Figure 40. Web Isite Antenna Pointing Graphic Display: X7
The bar graph progressively turns from red, to yellow, and then to green as downstream carrier signal strength increases. iDirect Satellite Router Installation and Commissioning Guide iDX Release 3.3... -
Page 80: Figure 41. Web Isite: Antenna Peak Indication
Figure 41. Web iSite: Antenna Peak Indication Note: The Satellite Router must be reset to fully exit pointing mode and re-enable the operational state. Remove power from the Satellite Router before continuing. iDirect Satellite Router Installation and Commissioning Guide iDX Release 3.3... - Page 81 Location for Secure Mobiles” on page 75. If using the Downstream Template feature to download both software and configuration (X7 only) or configuration only over-the-air, proceed to “Over the Air Download” on page 67. iDirect Satellite Router Installation and Commissioning Guide iDX Release 3.3...
- Page 82 Peaking the Antenna iDirect Satellite Router Installation and Commissioning Guide iDX Release 3.3...
-
Page 83: Over The Air Download
12.1 Software Package and Options Push This section explains how to work with the Network Operator to push both the software package and remote-side options file to an Evolution X1, X7 or e150 Satellite Router. To push only the options file, follow the procedure in “Options File Only Push”... - Page 84 Version field. See Figure 35 page Note: iDirect recommends loading the X7 software package to the second partition. This allows the Satellite Router to switch to the second partition in the unlikely event of an unrecoverable error in the operational partition.
-
Page 85: Options File Only Push
12.2 Options File Only Push This section explains how to work with the Network Operator to push the remote-side options file to an Evolution X1, X7 or e150 Satellite Router. If pushing both the software and options file, follow the procedure in “Software Package and Options Push”... -
Page 86: Figure 42. Web Isite: Confirming The Software Version
Confirm that the LNB and BUC frequency information is correct. The data can be viewed in Web iSite by clicking the Status button, and selecting ODU Status from the left-hand menu pane. See Figure Figure 43. Web iSite: ODU Status iDirect Satellite Router Installation and Commissioning Guide iDX Release 3.3... -
Page 87: Figure 44. View Options File: Frequency Translation
Figure 44. View Options File: Frequency Translation In the options file, down_translation is the frequency of the LNB local oscillator in MHz, and up_translation is the frequency of the BUC local oscillator in MHz. iDirect Satellite Router Installation and Commissioning Guide iDX Release 3.3... - Page 88 If the remote site is being configured as a secure mobile, proceed to “Setting Geo Location for Secure Mobiles” on page 75. Otherwise, proceed to “Cross Polarization” on page 79. iDirect Satellite Router Installation and Commissioning Guide iDX Release 3.3...
-
Page 89: Part Three: Commissioning
Chapter 14, “Cross Polarization” • Chapter 15, “1 dB Compression Point and Maximum Power” • Chapter 16, “Acquiring the Network” • Chapter 17, “Setting Power” • Chapter 18, “Post Acquisition Activities” iDirect Satellite Router Installation and Commissioning Guide iDX Release 3.3... - Page 90 Satellite Router Installation and Commissioning Guide iDX Release 3.3...
-
Page 91: Setting Geo Location For Secure Mobiles
Routers as both Mobile and Secure. If commissioning a Satellite Router that does not fall into this category, skip this chapter. Note: Evolution X1, X3, and e150 Satellite Routers cannot function as mobile or “itinerant” remotes. 13.1 Secure Mobile Remotes A “secure mobile remote”... -
Page 92: Setting Geographic Location Using The Console
3. Click the Commissioning button at the top of the Web page. 4. In the left-hand menu pane under Commissioning, click Geo Location to open the Geo Location page (Figure 45). iDirect Satellite Router Installation and Commissioning Guide iDX Release 3.3... -
Page 93: Figure 45. Setting Geographic Location: Evolution X7
8. Click the Admin button at the top of the Web page. 9. Restart the Satellite Router by clicking Restart on the File Management page. After setting geographic location, continue with the procedures in “Cross Polarization” on page 79. iDirect Satellite Router Installation and Commissioning Guide iDX Release 3.3... - Page 94 Setting Geographic Location of an X7 iDirect Satellite Router Installation and Commissioning Guide iDX Release 3.3...
-
Page 95: Cross Polarization
3. Connect the transmit IF cable to the BUC Tx input. 4. Connect power to the Satellite Router. 5. For all Satellite Routers except the Evolution X1, X7, and e150, connect to the Satellite Router using iSite. If commissioning an Evolution X1, X7, or e150, connect using a Web browser. -
Page 96: Figure 46. Isite Cross Polarization Dialog Box
In the navigation bar at the top of the Web iSite window, click the Commissioning button. b. Click the Cross Polarization link on the left to view the Cross Polarization page. See Figure iDirect Satellite Router Installation and Commissioning Guide iDX Release 3.3... -
Page 97: Satellite Access
For a Satellite Router that transmits an SCPC return channel, the assigned test frequency may be the same as the final operating frequency. For TDMA terminals, cross-pol must be measured at a test frequency different from the traffic-carrying channel. iDirect Satellite Router Installation and Commissioning Guide iDX Release 3.3... -
Page 98: Preparation
Transmit Power section of the Cross Polarization screen. (See Figure 46 Figure 47.) 4. At the instruction of the access controller, rotate the feed slowly in one direction. Move the assembly in small (1/2°) increments. iDirect Satellite Router Installation and Commissioning Guide iDX Release 3.3... -
Page 99: After Securing The Antenna
47). b. Enter the Symbol Rate as directed. c. Click the Start button. After completing the cross-pol isolation adjustments, proceed to “1 dB Compression Point and Maximum Power” on page 85. iDirect Satellite Router Installation and Commissioning Guide iDX Release 3.3... - Page 100 After Securing the Antenna iDirect Satellite Router Installation and Commissioning Guide iDX Release 3.3...
-
Page 101: 15 1 Db Compression Point And Maximum Power
Although the P1dB point is located beyond the start of gain compression and is therefore in the non-linear region of the transfer characteristic, most BUCs can operate safely at that power level without exceeding the limits imposed by the transmit spectral mask. Many of iDirect Satellite Router Installation and Commissioning Guide iDX Release 3.3... -
Page 102: Figure 49. Sample Transfer Characteristic
The considerations are incorporated into the link budget and site provisioning calculations. The purpose of P1dB determination in the iDirect system is to set a maximum IF transmit power limit for each site. Linear Region... -
Page 103: Determining The 1 Db Compression Point
7. Record the Transmit Power setting of the Satellite Router at the point at which delta equals 1. This is the 1 dB compression point. The Network Operator will enter this value later as the Maximum Power for the remote site in iBuilder. iDirect Satellite Router Installation and Commissioning Guide iDX Release 3.3... -
Page 104: Optional Procedure To Determine Pn Max Power
128 ksps should be used for this procedure. This carrier configuration produces a worst- case ACPR compared to all other MODCODs and symbol rates supported in iDirect networks. Note: This procedure assumes the acceptable side lobe level is -20 dBc. -
Page 105: Figure 51. Isite: Transmitting A Modulated Carrier
7. While the access controller observes the spectrum analyzer, increase power in 1 dB increments. 8. After each 1 dB power increase, have the access controller clear the averaging mode set Step 2 and restart averaging. iDirect Satellite Router Installation and Commissioning Guide iDX Release 3.3... - Page 106 Network Operator will enter this value as a custom key when setting the powers in iBuilder after initial acquisition. (See “Setting TDMA Initial Power and Maximum Power” page 101.) Disconnect the access control center from the call and proceed to “Acquiring the Network” on page 91. iDirect Satellite Router Installation and Commissioning Guide iDX Release 3.3...
-
Page 107: Acquiring The Network
The initial acquisition or “first burst” power may or may not be sufficient for reliable acquisition. iDirect recommends that the initial power in the commissioning options file be set at a low value (for example, -30 dBm for an X1 or -35 dBm for all other model types) to ensure that the satellite router does not cause interference on the transponder when transmitting its first acquisition bursts. -
Page 108: Initial Acquisition
Note: In a TRANSEC network, the Network Operator must Disable Authentication for the Satellite Router on the iBuilder Remote Information tab and apply the hub-side configuration. See “Using the iDirect CA Foundry” in the iBuilder User Guide. To Prepare to Acquire the Network: 1. Remove power from the Satellite Router. - Page 109 7. Wait for the Transmit Power displayed on the Probe to settle on a constant value and note the value. This value is required to set the correct Initial Power in iBuilder in “Setting Power” on page 101. iDirect Satellite Router Installation and Commissioning Guide iDX Release 3.3...
-
Page 110: Front-Panel Leds
The installer or site operator can determine the state of the Satellite Router by observing the LEDs and referring to the tables presented in this section. 16.3.1 Evolution e8350 Table 7 contains LED definitions for the Evolution e8350 Satellite Routers: Table 7. iDirect Evolution e8350 LED Definitions Label Color Definition POWER... -
Page 111: Evolution X3 And X5
Front-Panel LEDs 16.3.2 Evolution X3 and X5 Table 8 contains LED definitions for the Evolution X3 and X5 Satellite Routers: Table 8. iDirect Evolution X3 and X5 LED Definitions Label Color Definition Receiver off or not configured Yellow Demodulator not locked to the downstream carrier Flashing Yellow Demodulator locked. -
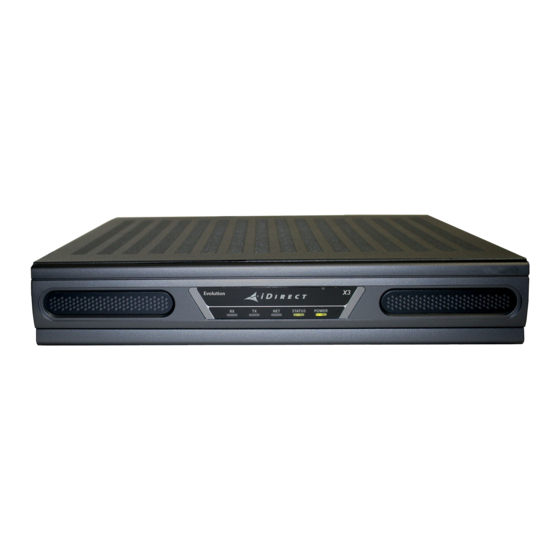
Page 112: Evolution X1
16.3.3 Evolution X1 Table 9 contains LED definitions for the Evolution X1 Satellite Routers. Note: Evolution X1 Outdoor Satellite Routers have only one LED (POWER) on the front panel. However, the LEDs in Table 9 are simulated by the Web iSite user interface. -
Page 113: Evolution X7
Front-Panel LEDs 16.3.4 Evolution X7 Table 10 contains LED definitions for the Evolution X7 Satellite Routers. Table 10. iDirect Evolution X7 LED Definitions Label Color Definition POWER No power or low power input Green Valid power input detected Yellow Incorrect BUC voltage selection... - Page 114 Front-Panel LEDs iDirect Satellite Router Installation and Commissioning Guide iDX Release 3.3...
-
Page 115: Setting Power
Satellite Router is not yet participating in the UCP loop. An acquisition or “initial” power must be configured that guarantees acquisition without overpowering the transponder or the receiver. iDirect defines initial power as the acquisition burst power. Initial power varies from site to site. -
Page 116: Maximum Power
“Optional Procedure to Determine PN Max Power” on page 88 may provide a more accurate maximum power during network operation. If that procedure was also performed, the resulting value is added to iBuilder as a remote-side custom key. iDirect Satellite Router Installation and Commissioning Guide iDX Release 3.3... -
Page 117: Setting Power
“Determining the 1 dB Compression Point” on page 87. 6. Enter the same value in the 1 dB Compression Point field. (This is an optional field for information only). iDirect Satellite Router Installation and Commissioning Guide iDX Release 3.3... -
Page 118: Figure 56. Setting Modulated Maximum Power Custom Key
1. If the remote has not yet been issued an X.509 certificate, issue the certificate now. (See the iBuilder User Guide appendix “Using the iDirect CA Foundry” for details.) 2. Re-enable authentication on the remote Information tab by clearing the Disable Authentication check box. -
Page 119: Setting Scpc Return Initial Power And Maximum Power
6. Double-click the cell in the Max Power column of the applicable SCPC return carrier. Enter the value determined in “Maximum Power” on page 100. 7. Click OK in the SCPC Initial Power dialog box to return to the Remote Information tab. iDirect Satellite Router Installation and Commissioning Guide iDX Release 3.3... - Page 120 SCPC carrier. The Initial Power may vary per carrier depending on a number of factors, including satellite transponder response, symbol rate, MODCOD, and block size. After completion of the procedures in this chapter, continue to “Post Acquisition Activities” page 105. iDirect Satellite Router Installation and Commissioning Guide iDX Release 3.3...
-
Page 121: Post Acquisition Activities
After the Network Operator has made any additional adjustments to the Satellite Router configuration, the Satellite Router is reset. Upon completion of POST, the Satellite Router acquires the network for the first time in the fully operational state. iDirect Satellite Router Installation and Commissioning Guide iDX Release 3.3... -
Page 122: Recording Remote Status Using A Console Connection
Follow the procedure in “Recording Remote Status Using a Console Connection” to record the baseline readings for all model types except for Evolution X1, X7, and e150 Satellite Routers. For those models, follow the procedure in “Recording Remote Status Using Web iSite” on page 107... -
Page 123: Recording Remote Status Using Web Isite
Remote Installer Duties 18.2.2 Recording Remote Status Using Web iSite Follow the steps in this section to record remote status for Evolution X1, X7, and e150 Satellite Routers. To Display Status: 1. Open a Web browser and log in to the Satellite Router as either user or admin. (See “IP... -
Page 124: Initiating Traffic Flow
Testing of IP throughput is not generally considered a commissioning activity, and is beyond the scope of this guide. Refer to the iDX Technical Reference Guide for information about IP throughput scenarios. iDirect Satellite Router Installation and Commissioning Guide iDX Release 3.3... -
Page 125: Appendix A: Loading Images With Tftp Server
An alternate method of downloading the images to the Satellite Router is to use the TFTP server that comes bundled with iSite. Note: This appendix is not applicable to Evolution X1, X7, or e150 Satellite Routers. 1. Open iSite and select TFTP from the File menu. - Page 126 Loading Images with TFTP Server iDirect Satellite Router Installation and Commissioning Guide iDX Release 3.3...
-
Page 127: Appendix B: Disabling The Pwm Voltage In Ibuilder
1. Apply power to the Satellite Router and allow it to initialize. 2. In iBuilder, right-click the remote and select Modify Item. The Remote Information tab opens. Figure 61. iBuilder Remote Information Tab: Disabling Tx PWM iDirect Satellite Router Installation and Commissioning Guide iDX Release 3.3... - Page 128 Disabling the PWM Voltage in iBuilder 3. On the Remote Information tab, select Disable Tx PWM if it is not already selected. 4. Apply the new configuration and reset the Satellite Router. iDirect Satellite Router Installation and Commissioning Guide iDX Release 3.3...
- Page 129 Disabling the PWM Voltage in iBuilder iDirect Satellite Router Installation and Commissioning Guide iDX Release 3.3...
- Page 130 13861 Sunrise Valley Drive, Suite 300 Herndon, VA 20171-6126 +1 703.648.8000 +1 866.345.0983 www.idirect.net Advancing a Connected World...
Need help?
Do you have a question about the evolution x1 and is the answer not in the manual?
Questions and answers