Extron electronics ShareLink 200 User Manual
Wireless collaboration gateway
Hide thumbs
Also See for ShareLink 200:
- Setup manual (9 pages) ,
- Setup manual (9 pages) ,
- User manual (23 pages)

Related Manuals for Extron electronics ShareLink 200


Summary of Contents for Extron electronics ShareLink 200
- Page 1 User Guide Wireless Collaboration Systems ShareLink 200 Wireless Collaboration Gateway 68-2687-01 Rev. A 01 15...
-
Page 2: Safety Instructions
Safety Instructions Safety Instructions • English Chinese Simplified (简体中文) 警告: 产品上的这个标志意在警告用户该产品机壳内有暴露的危险 WARNING: This symbol, , when used on the product, is intended to alert the user of the presence of uninsulated dangerous voltage 电压, 有触电危险。 within the product’s enclosure that may present a risk of electric shock. - Page 3 FCC Class B Notice NOTE: This device complies with part 15 of the FCC rules. Operation is subject to the following two conditions: (1) This device may not cause harmful interference, and (2) This device must accept any interference received, including interference that may cause undesired operation.
- Page 4 Safety Compliance IC Canada, Industry Canada (IC) Notices CAN ICES-3 (B)/NMB-3(B) This device complies with Industry Canada licence-exempt RSS standard(s). Operation is subject to the following two conditions: (1) this device may not cause interference, and (2) this device must accept any interference, including interference that may cause undesired operation of the device.
- Page 5 Sécurité IC conformité Canada, avis d’Industry Canada (IC) CAN ICES-3 (B)/NMB-3(B) Le présent appareil est conforme aux CNR d’Industrie Canada applicables aux appareils radio exempts de licence. L’exploitation est autorisée aux deux conditions suivantes : (1) l’appareil ne doit pas produire de brouillage, et (2) l’utilisateur de l’appareil doit accepter tout brouillage radioélectrique subi, même si le brouillage est susceptible d’en compromettre le fonctionnement.
- Page 6 NOTE: A note draws attention to important information. Specifications Availability Product specifications are available on the Extron website, www.extron.com. Copyright © 2015 Extron Electronics. All rights reserved. Trademarks All trademarks mentioned in this guide are the properties of their respective owners. ®...
-
Page 7: Table Of Contents
Moderating a Presentation ........ 29 Operation Using a Computer ......8 Configuring ShareLink 200 Settings ....30 Connecting a Computer to the ShareLink 200 ..8 Device Setup ..........32 Connecting through the ShareLink 200’s Network Setup ..........33 Internal WAP..........8 WiFi Setup ............ -
Page 9: Introduction
Features About the ShareLink 200 The Extron ShareLink 200 Wireless Collaboration Gateway allows users to present wirelessly from their mobile device or computer onto a display device. The ShareLink 200 is compatible with Windows and OS X computers as well as Android... -
Page 10: Features
• WebShare™ technology enables attendees to view slide images on personal devices via a Web browser — ShareLink 200 enables meeting content to display on each participant’s mobile device, ensuring visibility regardless of sight lines. • Power over Ethernet, or PoE, eliminates the need for a local power supply —... -
Page 11: Installation
RJ-45 connector — use an ethernet cable to connect a network switch, hub, router, or PC to this female RJ-45 connector. NOTE: When the ShareLink 200 is connected to a wired or wireless network, by default it functions as a wireless access point, allowing access to the ShareLink 200 from all network computers. -
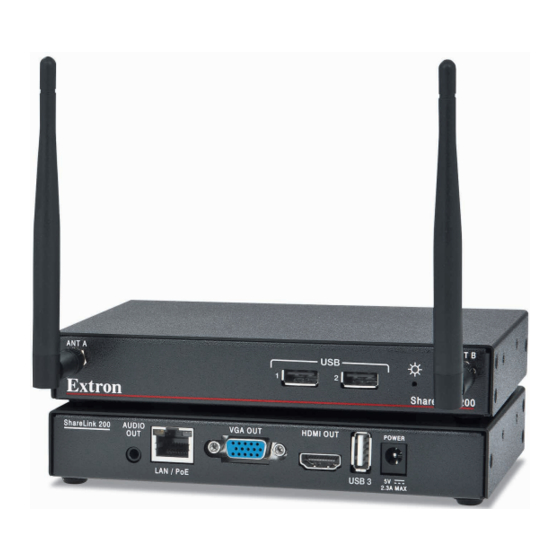
Page 12: Front Panel Features And Cabling
Wi-Fi antenna jacks — Attach the included antennae to these receptacles. USB ports — Connect a USB keyboard or mouse to setup and control the ShareLink 200, and to use the Whiteboard feature (see figure 4, 2 on the next page). -
Page 13: Setting Up The Standby Screen
Setting Up the Standby Screen Once the ShareLink 200 is connected and powered on, the default standby screen (figure 4) appears on the display. Figure 4. Standby Screen Instructional Screen — Provides instructions for starting a presentation. The background image of the instructional screen can be customized (see OSD Setup page 38). -
Page 14: Using The Whiteboard Feature
Pen color and size — select pen color (red, green, or blue), and pen size Eraser — erase selected parts within drawing Delete — delete entire drawing on the screen Return — return to the standby screen Minimize/Open — minimize or open the menu ShareLink 200 • Installation... -
Page 15: Using The Usb Player
(.xls, xlsx); PDF The following codecs are supported: • Image: JPG, BMP, PNG, GIF • Video: MPEG-2, MPEG-4 (Microsoft MPEG-4 v1-3 is not supported), Motion JPEG, WMV9 (only WMV3/WVC1 is supported) • Audio: LPCM, AAC, MP3, WMA ShareLink 200 • Installation... -
Page 16: Operation Using A Computer
Operation Using a Computer Users can present from a Windows or Mac computer using the ShareLink 200 software. This section covers the following: • Connecting a Computer to the ShareLink 200 • Setting Up the ShareLink 200 Software Using the ShareLink 200 Software •... -
Page 17: Setting Up The Sharelink 200 Software
Ensure that your computer is connected to the ShareLink 200 device, either through Wi-Fi or through a physical network connection. The computer and the ShareLink 200 must be on the same network. Launch your internet browser and enter the IP address of the ShareLink 200 into the browser. figure 4, 4 on page 5). -
Page 18: Connecting To The Sharelink 200 Receiver
Select your ShareLink 200 device from the Receiver Name section and click Connect. NOTE: The receiver name is shown on the standby screen. If your ShareLink 200 unit is not listed, click the refresh button. If the device still does not appear, click Manual and enter the receiver IP address manually. - Page 19 NOTE: If you connect to a Wi-Fi network, and the Wi-Fi network is password protected, you will be asked to enter the network password. Click on the ShareLink 200 receiver or network that you wish to connect to, and click Connect.
-
Page 20: Using The Sharelink 200 Software
NOTE: When multiple screens are shared, audio is output from the first (top left) quadrant only. Play button — Click to display the screen as specified in the drop-down menu. The button becomes a Stop button, which can be clicked to stop displaying the screen. ShareLink 200 • Operation Using a Computer... -
Page 21: Presenting A Media File (Share Media Tab)
Repeat icon — Click to automatically replay the video or audio when it is finished. ShareLink 200 • Operation Using a Computer... -
Page 22: Using The Software Menu
— This feature allows a user to load the • Create USB Thumb-drive App ShareLink 200 software into a USB thumb-drive, and to run the software directly from the drive (instead of having to install the software on a PC). See Creating a USB Thumb-drive App on the next page for instructions. -
Page 23: Sharing On Multiple Screens
Creating a USB Thumb-drive App This feature allows a user to load the ShareLink 200 software into a USB thumb-drive, and to run the software directly from the drive (instead of having to install the software on a PC). -
Page 24: Creating A Room File
Creating a Room File A room file can be created for the ShareLink 200 software to connect automatically to a designated receiver. This file provides a shortcut to open the software and directly connect to the receiver. Follow these steps to create the room file: Create and save a text (.txt) file, using a word processing program, and enter the... -
Page 25: Operation Using A Mobile Device
Using MirrorOp for Extron ShareLink Connecting to a Receiver Follow these steps to connect your mobile device to the ShareLink 200 using the app: Ensure that the ShareLink 200 is powered and connected to the network. Connect your mobile device to the ShareLink 200 unit through Wi-Fi. You may connect through either of the following options: Connect to the ShareLink’s built-in WAP: Open the Wi-Fi networks list on... -
Page 26: Main Menu Overview
You may also use the search bar to search for the receiver as follows: 1 1 2 2 If the ShareLink 200 receiver is on the same network and subnet, you can search • for it by entering the SSID or IP address in the search bar ( 3 ). -
Page 27: Presenting Documents And Photos
Click Add File. Browse to and select the file you wish present. The file is listed in the ShareLink Documents panel and added to the Document section of the app. Proceed to the next section, Present the Document or Photo, on page 21. ShareLink 200 • Operation Using a Mobile Device... - Page 28 When download is complete, press and hold the attachment icon. A box opens, showing installed apps that can open the file: Select Open in ShareLink, and proceed to step 3 of the next section, Present the Document or Photo, on the next page. ShareLink 200 • Operation Using a Mobile Device...
- Page 29 3 3 4 4 5 5 6 6 Slideshow – tap this button to start Figure 19. Photo View Screen a slideshow of all the images in the 3 3 4 4 5 5 6 6 current folder. ShareLink 200 • Operation Using a Mobile Device...
-
Page 30: Presenting Dropbox Files
NOTE: iOS devices only: When you open a file from the Dropbox feature, the file is automatically copied to the iPad or iPhone and is listed in the Document section of the app. ShareLink 200 • Operation Using a Mobile Device... -
Page 31: Presenting Web Pages
Address Bar – Enter the web address Refresh – Refresh the web page Annotation tool – Make annotations on the web page during presentation (see Making Annotations on page 25 for instructions) Play – Start or stop presentation ShareLink 200 • Operation Using a Mobile Device... -
Page 32: Presenting The Device Camera
You can also take a picture with the device camera, and the picture will display automatically. Return to the app to pause the presentation ( 1 ) or to change the display quadrant ( 2 ). ShareLink 200 • Operation Using a Mobile Device... -
Page 33: Making Annotations
Press the Settings button to access the following options: Figure 25. Settings WebShare — Switch to “On” to enable WebShare. WebShare allows the presentation to be viewed on individual user devices connected to the ShareLink 200 (see Watching a Presentation (WebShare) on page 28). -
Page 34: Downloading Mirrorop Sender For Galaxy
Install the app on your mobile device. Using MirrorOp Sender for Galaxy Ensure that the ShareLink 200 is powered and connected to the network. Connect your device to the ShareLink 200 through Wi-Fi (see step 2 of Connecting to a Receiver on page 17). -
Page 35: Using The Embedded Web
Configuring ShareLink 200 Settings Opening the Embedded Web Pages To access the embedded web pages, enter the ShareLink 200 IP address (shown on the Standby Screen) into the web browser. The landing page appears on the computer screen as shown here: Figure 28. -
Page 36: Watching A Presentation (Webshare)
• Each user connected through WebShare adds to the wireless bandwidth of the ShareLink 200. It is recommended that the device be connected to an Ethernet network or bridged to a router for best performance. Audience members must follow these steps to watch a presentation: Open a web browser on the mobile device or computer and connect to the IP address of the ShareLink 200. -
Page 37: Moderating A Presentation
Click the drop-down menu and select where to display the presentation (Share to Full Screen is selected by default). IP Address — This column shows the IP Address of each connected user device. ShareLink 200 • Using the Embedded Web Pages... -
Page 38: Configuring Sharelink 200 Settings
ShareLink 200 model, network status, connection status, and date and time. • Device Setup — Use this page to adjust the ShareLink 200 output resolution, login code, date and time, and to reboot settings (see Device Setup on the page 32). - Page 39 Firmware Update — Use this page to update the ShareLink 200 firmware. (see Firmware Update on page 41). • Reset to Default — Use this page to reset the ShareLink 200 to its factory default settings (see Reset to Default on page 41).
-
Page 40: Device Setup
4, F, page 5). Three options are available for the login code: Disable – No login code is required to connect to the ShareLink 200. • Random (default) – A new random code is generated when the last user •... -
Page 41: Network Setup
Auto (default setting): If a DHCP server is available on the network, the • ShareLink 200 uses an IP address assigned by the server. If a DHCP server is not available on the network, the ShareLink 200 uses its internal DHCP server to assign IP addresses to network devices. -
Page 42: Wifi Setup
80, which is typically used for internet access. Internet Only: Users connected to the wireless LAN can connect to the • ShareLink 200 and can access port 80 (for internet access only). All other data is blocked. WiFi Setup Figure 35. - Page 43 AP (Access Point) mode In AP mode, the ShareLink 200 is configured as a wireless access point. If the ShareLink is wired to the network, wireless devices may access the network by connecting to the ShareLink through Wi-Fi. Figure 36.
- Page 44 In Client mode, the ShareLink 200 scans for existing access points and connects to one as a client. In this mode, the ShareLink 200 is no longer configured as an AP and does not appear as a WAP on user devices. In order to connect to the ShareLink 200, users must connect to the LAN network.
-
Page 45: Snmp Setup
User Name: Configure the user name of the person in charge of managing the • ShareLink 200 through SNMP. Auth Password (MD5): Configure the Auth password. • Priv Password (DES): Configure the Priv password. • Trap: Configure the trap receiver IP. ShareLink 200 • Using the Embedded Web Pages... -
Page 46: Osd Setup
Show Code on Standby and Login: When this option is set to Off, the login • code is hidden from the standby screen. The “Show Receiver Info” option remains enabled, allowing the IP address and SSID to be displayed. ShareLink 200 • Using the Embedded Web Pages... -
Page 47: Webshare Setup
Access Password Control Panel Use this section to disable or configure the WebShare access password (this is the password required when connecting to the ShareLink 200 through WebShare): Disable: Select to disable the password. This allows users to connect to the •... -
Page 48: Change Passwords
Use this section to change the Admin password. This password is used to access the Configuration pages. Enter the New Password. Confirm the New Password. Click Apply to activate the new Admin password. ShareLink 200 • Using the Embedded Web Pages... -
Page 49: Firmware Update
Import: Import the system configuration file to the ShareLink 200 • Firmware Update Use this section to update the ShareLink 200 firmware. Follow these instructions to update the firmware. Download latest firmware file from the Extron website (see Downloading ShareLink 200 Firmware on page 45). -
Page 50: Reboot System
Reboot System Figure 45. Reboot System Click Reboot to reboot the ShareLink 200 automatically. ShareLink 200 • Using the Embedded Web Pages... -
Page 51: Reference Information
Mounting Wall Mounting Follow these steps to mount the ShareLink 200 on a wall using the included wall mount kit: Secure the bracket to the wall using the four supplied bracket screws. Be sure to install the bracket with the large keyhole facing upward as shown below. -
Page 52: Rack Mounting
Pay particular attention to supply connections other than direct connections. Rack Mounting Procedure The ShareLink 200 can be mounted in a rack, using an optional Extron rack mounting kit (see www.extron.com for part numbers). Follow the instructions provided with the kit. -
Page 53: Downloading Sharelink 200 Firmware
Download link at the top of the page. Click Firmware on the left sidebar menu. On the Download Center screen, locate the section for the ShareLink 200 firmware. (Optional) click Release Notes. These notes show the issues that are addressed by the latest update. -
Page 54: Extron Warranty
Extron Electronics makes no further warranties either expressed or implied with respect to the product and its quality, performance, merchantability, or fitness for any particular use. In no event will Extron Electronics be liable for direct, indirect, or consequential damages resulting from any defect in this product even if Extron Electronics has been advised of such damage.
Need help?
Do you have a question about the ShareLink 200 and is the answer not in the manual?
Questions and answers