Table of Contents
Advertisement
Quick Links
Computer-controlled, Direct-drive,
High-speed, 1-needle, Lockstitch,
Zigzag Stitching Machine (Quick-reverse type)
LZ-2290A-SR
INSTRUCTION MANUAL
NOTE :
Read safety instructions carefully and understand them before using.
Retain this Instruction Manual for future reference.
/ IP-100D / SC-916
R
E-No.01
40016921
Advertisement
Table of Contents

Related Manuals for JUKI LZ-2290A-SR/IP-100D/SC-916


Summary of Contents for JUKI LZ-2290A-SR/IP-100D/SC-916
-
Page 1: Instruction Manual
Computer-controlled, Direct-drive, High-speed, 1-needle, Lockstitch, Zigzag Stitching Machine (Quick-reverse type) LZ-2290A-SR / IP-100D / SC-916 INSTRUCTION MANUAL NOTE : Read safety instructions carefully and understand them before using. Retain this Instruction Manual for future reference. E-No.01 40016921... -
Page 2: Important Safety Instructions
17. The machine is only allowed to be used for the purpose intended. Other used are not allowed. 18. Remodel or modify the machine in accordance with the safety rules/standards while taking all the effective safety measures. JUKI assumes no responsibility for damage caused by remodeling or modification of the machine. -
Page 3: For Safe Operation
FOR SAFE OPERATION 1. To avoid electrical shock hazards, neither open the cover of the electrical box nor touch the components mounted inside the electrical box. 1. To avoid personal injury, never operate the machine with any of the finger guard or safety devices removed. -
Page 4: Caution Before Operation
CAUTION BEFORE OPERATION WARNING : To avoid malfunction and damage of the machine, confirm the following. • Remove the air-vent cap (red color) attached to the sewing machine bed. • Be sure to fill the oil tank with oil before use. •... -
Page 5: Table Of Contents
CONTENTS 6-8. Reverse feed stitching ......71 1. NAME OF EACH COMPONENT ..... 1 (1) Standard condensation ......72 2. SPECIFICATIONS ........2 (2) 2-point condensation ........74 2-1. Specifications of the machine head ..2 (3) Condensation custom ........ 75 2-2. - Page 6 7. SEWING ..........120 9. MAINTENANCE ........133 7-1. Adjusting the thread tension ....120 9-1. Replacing the power fuse ....... 133 7-2. Adjusting the pressure of the presser foot .. 121 9-2. Adjusting the contrast of the operation 7-3. One-touch type reverse feed panel display ..........
-
Page 7: Name Of Each Component
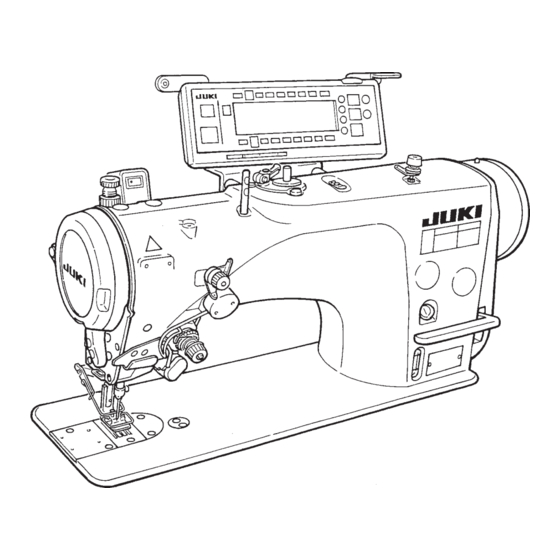
1. NAME OF EACH COMPONENT !5 Oil supply opening 1 Needle thread draw-out device 8 Knee lifter lever !6 Mirror inversion switch 2 Wiper switch 9 Power switch !0 Hand switch !7 Reverse feed control lever 3 Thread take-up cover !1 Control panel 4 Finger guard !2 Bobbin winder... -
Page 8: Specifications
5 mm (normal/reverse feed) Stitch pattern 14 kinds 20 patterns Needle SCHMETZ 438 #75 (Needle at the time of delivery) Oil used JUKI New Defrix Oil No. 1 Thread trimmer With Feed method Standard feed (Computer controlled system) Wiper method... -
Page 9: Stitch Pattern Table
3. STITCH PATTERN TABLE Stitch Number of stitches Max.zigzag Name of pattern Remarks pattern for pattern width Straight stitch Standard zigzag stitch 2-step zigzag stitch 3-step zigzag stitch Standard scallop Crescent scallop Scallop (right) Equal-width scallop Equal-width scallop Standard scallop Crescent scallop Scallop... -
Page 10: Initial Value Of The Stitch Pattern And The Table
3-1. Initial value of the stitch pattern and the table Standard zigzag Scallop 24 Scallop 12 3-step zigzag 2-step zigzag Straight stitch stitch stitches stitches stitch stitch Standard scallop Equal-width scallop Crescent scallop Equal-width scallop Zigzag width Normal feed amount Reverse feed amount Number of... - Page 11 Pattern 2 Blind stitch Custom pattern T stitch Pattern 1 Pattern 3 Pattern 4 (Fagoting) (Left) (Left) (Right) (Right) – 2.0 – 2.0 P 45, 60, 79, P 39, 40, 65, P 34, 59 P 35, 36, 37 P 37, 38, 64, P 41, 42, 67, P 43, 44, 69, 80, 81, 82,...
-
Page 12: Installation
4. INSTALLATION WARNING : • Perform the installation of the sewing machine by the technical personnel who have been trained. • To prevent personal injury, ask our dealer or the electrician for electric wiring. • Be sure to perform the work with two persons or more when transporting the sewing machine and use a lorry when moving it. -
Page 13: Removing The Needle Bar Stopper
4-2. Removing the needle bar stopper Remove needle bar stopper 1 for transportation. Keep the needle bar stopper which has been removed, and install this needle bar stopper when transporting the Cau tion sewing machine.The needle bar stopper may be cut when it is strongly drawn out. -
Page 14: Installing The Electrical Box
4-5. Installing the electrical box Install the electrical box on the underside of the table at the location illustrated using round-head bolt 1, plain washer 2, spring washer 3 and nut 4 supplied with the machine, and using bolt having hexagonal indentation on the head 5, plain washer 6 and spring washer 7 supplied with the machine. -
Page 15: Connecting The Cords
4-8. Connecting the cords WARNING : • To prevent personal injury caused by abrupt start of the sewing machine, carry out the work after turning OFF the power switch and a lapse of 5 minutes or more. • To prevent damage of device caused by maloperation and wrong specifications, be sure to connect all the corresponding connectors to the specified places. -
Page 16: Connecting The Connectors
(2) Connecting the connectors • Each connector has the inserting direction. Check the direction and securely insert it. (In case of the type with lock, insert up to the lock.) • If the connector is forcibly inserted, trouble or accident will be caused. Cau tion •... - Page 17 9) Insert black connector 4P white cord 9 coming from the machine head inside the electrical box through front cover through hole B, and insert it into connector CN31 !0 through cord clamps a and c. 10) Insert gray round connector 7P cord !1 coming from the machine head inside the electrical box through front cover through hole B, pass it through cord clamp “j”, and insert it into connector CN30...
- Page 18 13)-2 Insert white connector 10P cord !9 coming from the machine head to the rear of the connector as shown in the figure. 14) Insert black square connector 8P cord @1 coming from the machine head inside the electrical box through front cover through hole B, pass it through cord clamps “e”, “f”, “h”...
- Page 19 When the Auto-lifter (AK121) is used : 17) Insert white connector 2P cord @5 coming from the machine head inside the electrical box through front cover through hole B, pass it through cord clamps “e”, “f” and “j”, and insert it into connector CN40 @6 .
-
Page 20: Attaching The Connecting Rod
When the insertion of the connector is completed, lock How to lock the cord clamp the cord clamps. Clamp 4 Lightly press the corner of clamp. (Cord clamp is locked with a click.) q Take care so that the cord is not caught between the rear cover and the electrical box main body, close the rear cover while pressing section A on the lower side of the rear cover, and tighten four... -
Page 21: Adjustment Of The Pedal
4-12. Installing the bird’s nest prevention (CB) type sewing machine 1) Punch dots on the positions of the setscrews of (bottom surface of the machine table) (mm) solenoid valve (asm.) and regulator (asm.) on the bottom surface of the machine table. Besides, awling is performed on JUKI genuine table. - Page 22 2) Fix solenoid valve (asm.) 1 with wood screws 2 supplied with the sewing machine as accessories. 3) Fix regulator (total asm.) 3 with wood screw 4 supplied with the sewing machine as accessories. 4) Connect 6 and 8 hoses attached to regulator (total asm.) 3 to the respective solenoid valves.
-
Page 23: Lubrication
Fill the oil tank with oil for hook lubrication before operating the sewing machine. 1) Remove oil hole cap 1 and fill the oil tank with JUKI New Defrix Oil No. 1 using the oiler supplied with the machine. -
Page 24: Test Run
4-14. Test run (1) Turn ON the power WARNING : • Check again the power voltage before connecting the power cord. • Check that the power switch is turned OFF and connect the power cord to the power receptacle. • Be sure to connect the earth wire. •... -
Page 25: Preparation Before Sewing
5.PREPARATION BEFORE SEWING 5-1. Inserting the needle WARNING : To protect against possible personal injury due to abrupt start of the machine, be sure to start the following work after turning the power off and ascertaining that the motor is at rest. 1) Turn the handwheel by hand to raise the needle to its highest position. -
Page 26: Placing The Bobbin Case And The Bobbin
6) In case that the bobbin thread is not wound evenly on the bobbin, loosen the nut 4 and turn the bobbin thread tension to adjust the height of the thread tension disk 2. • It is the standard that the center of the bobbin is as high as the center of the thread tension disk. -
Page 27: Threading The Machine Head
5-5. Threading the machine head WARNING : To protect against possible personal injury due to abrupt start of the machine, be sure to start the following work after turning the power off and ascertaining that the motor is at rest. 1) Turn the handwheel by hand to bring the needle to the most raised position. -
Page 28: How To Use The Operation Panel
6. HOW TO USE THE OPERATION PANEL 6-1. Names and functions of the respective sections !5 Power display lamp 1 Re-sewing switch 8 Information switch !6 Smart media cover 2 Needle up/down compensating switch 9 Feed amount display switch !7 Smart media slot !0 One-shot stitching switch 3 Screen changeover switch !1 With/without automatic thread trimmer switch... - Page 29 7 Teaching switch This is the switch to set the setting of the number of stitches with the value of number of stitches which has been actually sewn. 8 Information switch This is the switch to perform various function settings. 9 Feed amount display switch Number of rotations, normal feed amount and reverse feed amount of the pattern which is selected at present are displayed.
-
Page 30: Before Setting The Pattern 2
6-2. Before setting the pattern WARNING : • When using presser foot, throat plate and feed dog other than those delivered as standard, needle may come in contact with throat plate and breaks, or feed dog may come in contact with throat plate in case of some set values. Be sure to perform the regulation of limitation values of 1, 3 and 4 in accordance with the gauge used. - Page 31 How to set max. zigzag width limitation value Determine whether limitation of zigzag width Limitation of zigzag Limitation of left/ width symmetrical right positions R = +4.7 L = -3.3 symmetrical in the center or limitation of left/right in the center Setting Setting positions in the order of 1) to 3) of the previous page...
-
Page 32: Setting The Reference Of Stitch Base Line
(2) Setting the reference of stitch base line • Reference position of stitch base line can be set to left, center and right. Reference of center Reference of left Reference of right stitch base line stitch base line stitch base line How to set 1) Press switch 1. -
Page 33: Setting The Feed Amount
(3) Setting the feed amount • Max. possible setting range in the normal direction and max. possible setting range in the reverse direction can be set in accordance with the gauge used. Setting procedure Change in the reverse direction 1) Press +/– of switch 1 to set the limitation value in the reverse direction. -
Page 34: Basic Screen
6-3. Basic screen The screen after turning ON the power source becomes the screen at the time of turning OFF the power source for the last time. Every time switch is pressed, the screen changes as follows : Example) Free stitching of standard zigzag with reverse feed stitching (Contents of display change depending on the set values.) Sewing shape list first screen Selection of each shape is... -
Page 35: List Of The Display Pictographs Of Each Screen
6-4. List of the display pictographs of each screen Sewing shape list first screen Straight stitch Standard zigzag stitch 2-step zigzag stitch 3-step zigzag stitch Scallop Custom Pattern Blind stitch Sewing shape list second screen Continuous stitching T stitch, left T stitch, right Pattern 1 Cycle stitching... - Page 36 Blind stitch selection pop-up screen Left blind stitch Right blind stitch Custom pattern selection pop-up screen Custom pattern new creation Continuous stitching selection pop-up screen Continuous stitching new creation Cycle stitching selection pop-up screen Cycle stitching new creation...
- Page 37 Straight stitch sewing shape setting screen Position Reverse Normal Kind of of stitch feed feed sewing amount base line amount Pattern register Free – 5.0 – 5.0 – 5.0 stitching Programmed stitching Overlapped stitching Standard zigzag, 2-step zigzag, and 3-stap zigzag stitch sewing shape first screen Position Reverse Normal...
- Page 38 Standard zigzag, 2-step zigzag, and 3-stap zigzag stitch sewing shape second screen Position Position Kind of sewing sewing sewing start Pattern register Free Optional Optional stitching First screen display Programmed Right Right stitching Overlapped Left Left stitching Scallop sewing shape setting first screen Position Reverse Normal...
- Page 39 Scallop sewing shape setting second screen Position at Position at Stop sewing sewing position Kind of start sewing Root • Right • Root • Crest Left Crest Pattern register Free Root stitching Optional Optional Programmed Crest Crest stitching Root Overlapped stitching Right Left...
- Page 40 Blind stitch sewing shape setting first screen Reverse Position Normal Kind of Zigzag of stitch feed feed sewing width base line amount amount Pattern register Free stitching Second screen display Programmed stitching 10.0 Overlapped stitching Blind stitch sewing shape setting second screen Kind of Number of sewing...
- Page 41 T stitch, left sewing shape setting first screen Position Normal Compensation Zigzag Kind of of stitch feed value width sewing base line amount Pattern register Free stitching Second screen display Programmed stitching 10.0 Overlapped stitching T stitch, left sewing shape setting second screen Position Position Kind of...
- Page 42 T stitch, right sewing shape setting first screen Position Normal Zigzag Compensation Kind of of stitch feed sewing value width base line amount Pattern register Free stitching Second screen display Programmed stitching 10.0 Overlapped stitching T stitch, right sewing shape setting second screen Position Position Kind of...
- Page 43 Pattern 1 sewing shape setting first screen Position Normal Kind of Zigzag Compensation feed of stitch sewing value width amount base line Pattern register Free stitching Second screen display Programmed stitching 10.0 Overlapped stitching...
- Page 44 Pattern 1 sewing shape setting second screen Position Position Kind of sewing sewing sewing start Pattern register Free Center 1 Center 1 stitching Programmed Center 2 Center 2 stitching Left Left Overlapped stitching Center 3 Center 3 Right Right Optional Optional...
- Page 45 Pattern 2 (fagoting) sewing shape setting first screen Reverse Position Normal Kind of Zigzag of stitch feed feed sewing width base line amount amount Pattern register Free stitching Second screen display Programmed stitching 10.0 Overlapped stitching...
- Page 46 Pattern 2 sewing shape setting second screen Position Position Kind of sewing sewing sewing start Pattern register Free Right 1 Right 1 stitching Programmed Center 1 Center 1 stitching Left 1 Left 1 Overlapped stitching Left 2 Left 2 Center 2 Center 2 Right 2 Right 2...
- Page 47 Pattern 3 sewing shape setting first screen Reverse Position Normal Zigzag Kind of feed of stitch feed sewing width amount base line amount Pattern register Free stitching Second screen display Programmed stitching 10.0 Overlapped stitching...
- Page 48 Pattern 3 sewing shape setting second screen Position Position Kind of sewing sewing sewing start Pattern register Free Right 1 Right 1 stitching Programmed stitching Center 1 Center 1 Left 1 Left 1 Overlapped stitching Left 2 Left 2 Center 2 Center 2 Right 2 Right 2 Optional Optional...
- Page 49 Pattern 4 sewing shape setting first screen Position Reverse Normal Kind of Zigzag of stitch feed feed sewing width base line amount amount Pattern register Free stitching Second screen display Programmed stitching 10.0 Overlapped stitching...
- Page 50 Pattern 4 sewing shape setting second screen Position Position Kind of sewing sewing sewing start Pattern register Free Left 1 Left 1 stitching Programmed Left 2 Left 2 stitching Right 1 Right 1 Overlapped stitching Right 2 Right 2 Right 3 Right 3 Left 3 Left 3...
- Page 51 Custom pattern sewing shape setting screen Custom Pattern needle entry image Position Kind of Zigzag of stitch sewing width base line Edit screen Pattern register display Copy, and Free deletion screen stitching Changeover of total display and enlargement display Pattern register of custom pattern Programmed stitching...
- Page 52 Pattern sewing shape setting screen Sewing Display of contents depends on shape. shape Refer to each shape. Selection of Copy and sewing shape deletion screen Straight stitch Standard zigzag stitch 2-step zigzag stitch Copy 3-step zigzag stitch Scallop (8 kinds) Blind stitch (Right and Left) Deletion...
- Page 53 Continuous stitching edit screen Number Pattern Sewing Step shape stitches Determination * For the sewing shape, the shape which has been registered in the pattern is displayed. Cycle stitching setting screen Number Position Pattern Step Stop state of presser stitches foot Edit screen display Copy and...
- Page 54 Cycle stitching edit screen Number Position Presser Pattern Stop Step of presser lifting state stitches foot time Determination Needle Presser DOWN foot UP stop stop (0 stitch) Thread Presser trimming foot DOWN stop 99.9 Needle UP stop * Stop state is not displayed when the number of stitches is (0 stitch).
- Page 55 Reverse stitching setting first screen Reverse Sewing start Sewing end stitching at sewing start Selection Selection Process Process Process Process With/ of kind of kind without Reverse stitching at sewing With/ without 0 to 19 0 to 19 0 to 19 0 to 19 Normal Normal...
- Page 56 Reverse stitching setting second screen (Condensation custom) Width Width Reverse Max. adjustment adjustment Feed number of at sewing at sewing amount rotations start 10.0 10.0 5,000 * Feed amount is displayed only when custom pattern sewing or continuous stitching is performed. Sewing common data setting first screen (When max.
- Page 57 Sewing common data setting first screen (When limiting procedure of max. zigzag width limitation is set to left/right) Limiting Reverse Normal Specifying Specifying Reference procedure feed amount feed amount left right of stitch of max.zigzag limitation limitation position position base line width limitation value value...
-
Page 58: Setting The Sewing Pattern
6-5. Setting the sewing pattern WARNING : Be sure to check presser foot and gauge currently being used before sewing after changing the zigzag pattern or zigzag width. In case where sewing is performed with the presser foot or gauge not matching the zigzag width, it is in danger of accident such as needle breakage or the like. - Page 59 Left standard scallop Left crescent scallop Left equal-width scallop of 24 stitches Left equal-width scallop of 12 stitches In case of the scallop 1) Press scallop 3 and the screen on the left side appears. Press the pattern switch you desire to select.
-
Page 60: Setting Of The Sewing Shape
6-6. Setting of the sewing shape • Zigzag width can be set from “0” to 10 mm. (Set value is limited by the max.zigzag width limitation.) • Stitch base line can be set as follows. When the center of zigzag is “0.0”, Right side : “+” Left side : “–”. (1) Standard zigzag, 2-step zigzag and 3-step zigzag stitch Sewing shape list first screen 2-step zigzag... - Page 61 ¡Setting of the zigzag width Change the zigzag width with +/– of switch 1. ¡Setting of the position of stitch base line Change the pZosition of stitch base line with +/– of switch 2. ¡Setting of the reverse feed amount Change the reverse feed amount with +/–...
-
Page 62: Scallop Stitching
(2) Scallop stitching Sewing shape list first screen 1) Select scallop stitching 1 in the sewing shape list first screen. Scallop selection pop-up screen Left equal-width Left standard Left crescent Left equal-width scallop of 24 scallop of 12 scallop scallop stitches stitches 2) Press the switch of pattern... - Page 63 Sewing shape setting screen 1 2 3 4 First screen 1 2 3 4 5 6 7 8 Second screen 6 7 8 ¡Setting of the zigzag width Change the zigzag width with +/– of switch 1. ¡ Setting of the position of stitch base line Change the position of stitch base line with +/–...
- Page 64 Start from crest and start from root of scallop Start from Start from Start of sewing root crest Normally, scallop starts the Needle position after sewing with the pattern of thread trimming start from root. However, start from crest can be selected by changing the setting.
-
Page 65: Blind Stitch Sewing
(3) Blind stitch sewing Sewing shape list first screen 1) Select the blind stitch sewing in the sewing shape list first screen. Blind stitch selection pop-up screen 2) Press the switch of pattern to be selected from the screen of the left figure. Left blind stitch Right blind stitch Sewing shape list first screen... -
Page 66: Custom Pattern Stitching
(4) Custom pattern stitching Sewing shape list first screen 1) Select custom pattern 1 in the sewing shape list first screen. Custom pattern selection pop-up screen 2) Press the custom pattern No. to be selected. Sewing shape list first screen 3) T h e s e l e c t e d s h a p e reverses and is indicated on the left end of the... -
Page 67: T Stitch, Left
(5) T stitch, left Sewing shape list second screen 1) Select T stitch, left sewing 1 in the sewing shape list second screen. 2) The selected shape reverses and is indicated on the left end of the screen. 3) Press to display the sewing shape setting screen. -
Page 68: T Stitch, Right
¡ Setting of the compensation amount of seam section at feed amount "0" Change the normal feed amount with +/– of switch 3. ¡ Setting of the normal feed amount Change the feed amount with +/– of switch 4. ¡ Display of the second screen Display the sewing shape setting second screen with switch 5. - Page 69 Second screen The feed amount cannot be set to 0 and the T stitch pattern may be deformed due to materials, height of fed dog or gauges. (2nd stitch does not Cau tion correspond with 4th stitch.) In this case, perform compensation with switch 3 “Setting of the compensation amount of seam section at feed amount “0””...
-
Page 70: Pattern 1
(7) Pattern 1 Sewing shape list second screen 1) Select pattern 1 sewing 1 in the sewing shape list second screen. 2) The selected shape reverses and is indicated on the left end of the screen. 3) Press to display the sewing shape setting screen. Sewing shape setting screen 1 2 3 4 First screen... -
Page 71: Pattern 2 (Fagoting)
¡ Display of the second screen Display the sewing shape setting second screen with switch 5. ¡ Setting of the position of sewing start of switch 6. Set the position of sewing start with Position of sewing start, center 1 Position of sewing start, center 2 Position of sewing start, left Position of sewing start, center 3... - Page 72 Sewing shape setting screen 1 2 3 4 First screen 1 2 3 4 5 Second screen ¡ Setting of the zigzag width Change the zigzag width with +/– of switch 1. ¡ Setting of the position of stitch base line Change the position of stitch base line with +/–...
-
Page 73: Pattern 3
¡ Setting of the stop position of switch 7. Set the stop position with Position of sewing end, right 1 Position of sewing end, center 1 Position of sewing end, left 1 Position of sewing end, left 2 Position of sewing end, center 2 Position of sewing end, right 2 Free position of sewing end ¡... - Page 74 Second screen ¡ Setting of the zigzag width Change the zigzag width with +/– of switch 1. ¡ Setting of the position of stitch base line Change the position of stitch base line with +/– of switch 2. ¡ Setting of the reverse feed amount Change the reverse feed amount with +/–...
-
Page 75: Pattern 4
(10) Pattern 4 Sewing shape list second screen 1) Select pattern 2 sewing 1 in the sewing shape list second screen. 2) The selected shape reverses and is indicated on the left end of the screen. 3) Press to display the sewing shape setting screen. Sewing shape setting screen First screen 1 2 3 4... - Page 76 ¡ Setting of the normal feed amount Change the feed amount with +/– of switch 4. ¡ Display of the second screen Display the sewing shape setting second screen with switch 5. ¡ Setting of the position of sewing start of switch 6.
-
Page 77: Setting Of The Number Of Rotations
6-7. Setting of the number of rotations The number of rotations can be set at each pattern (cycle stitching is not possible to set the number of rotations). Setting of the number of rotations can be performed in the reverse feed stitching setting second screen (when the pattern is the overlapped stitching, perform it in the overlapped stitching setting second screen). -
Page 78: Standard Condensation
(1) Standard condensation Standard condensation performs reverse feed stitching at the same needle entry as that of the selected zigzag pattern. Example) Reverse feed stitching at sewing end Zigzag pattern section 2-step zigzag stitching Standard condensation section Process C : 4-times setting Example) In case of free stitching of the standard zigzag stitch 1) Press to display reverse feed stitching setting screen. - Page 79 * For the reverse feed stitching setting, there are two kinds of methods below according to the zigzag patterns. 1) In case of straight stitch, scallop stitch, blind stitch, custom and continuous stitch, set the reverse feed stitching with the number of stitches. Reverse feed stitching at sewing start A (feed in normal direction) : 0 to 19 stitches can be set.
-
Page 80: 2-Point Condensation
(2) 2-point condensation 2-point condensation performs reverse feed stitching of two points between the existing needle entry of the selected zigzag pattern and the next needle entry. The width between two points can be adjusted in the direction of “–”. Example) Reverse feed stitching at sewing end Zigzag pattern section 2-step zigzag stitch... -
Page 81: Condensation Custom
The second screen of reverse feed stitching setting (2-point condensation) Press to display the first screen. (3) Condensation custom Condensation custom performs reverse feed stitching with the optional needle entry which has been inputted. 1) Select the shape of condensation with the first screen. 1: Select the shape of condensation at the sewing start. -
Page 82: Comparision Table Of The Reverse Stitch Of Each Shape
The second screen of reverse feed stitching setting (condensation custom) Press to display the first screen. (4) Comparision table of the reverse stitch of each shape Standard condensation 2-point condensation Condensation custom Sewing start Sewing end Sewing start Sewing end Sewing start Sewing end Straight stitch... -
Page 83: Selection Of The Kind Of Stitching
6-9. Selection of the kind of stitching Impor tant Standard delivery level of the key lock is “1”. When the level of the key lock is the case other than “0”, be sure to change the level to “0” to perform the operation below. Example) Standard zigzag Sewing shape setting screen Select the kind of stitching... - Page 84 Example) Standard zigzag Sewing shape setting screen 1) S e l e c t s h o w i n g programmed stitching with 1 of sewing shape setting screen. Programmed stitching selection screen 2) Press to display the programmed stitching setting screen.
-
Page 85: Custom Pattern
One-shot automatic stitching One-shot automatic stitching can be set by each step. 1) In the programmed stitching edit screen, press one-shot automatic stitching switch 5 to select the one-shot automatic stitching. (When it is in the selected state, a mark is displayed on the side of switch 5.) 2) In the step where the one-shot automatic stitching has been selected, the sewing machine will automatically continue sewing, once the sewing machine starts running, until the number of stitches of the step is reached. -
Page 86: New Creation Of The Custom Pattern
Custom pattern selection pop-up screen 2) Press switch 2 corresponding to the pattern which has been registered in the custom pattern selection pop-up screen. Sewing shape setting screen 3 4 5 3 4 5 3) Press to display the sewing shape setting screen. 4) Zigzag width, position of stitch base line, etc. -
Page 87: Custom Pattern Edit
(3) Custom pattern edit 1) Press switch of in the sewing shape setting screen to move to the custom pattern edit screen. Custom pattern edit screen 3 4 5 3 4 5 7 2) Set the needle entry position and sewing direction of each step in the custom pattern edit screen. 3 : Set the step with “+”... - Page 88 Registration of pattern Registration pop-up screen 1 in the pop-up screen of pattern registration, copy and deletion of custom pattern. 1) Press 2) Select the pattern No. you desire to register with 4 in the registration pop-up screen. When is pressed here, the screen returns to the former one without registering the pattern. 3) When is pressed, registration is performed.
-
Page 89: Condensation Custom
3 in the copy pop-up screen and the deletion pop-up screen to display the deletion pop-up 1) Press screen. 2) Select the pattern No. you desire to delete in the deletion pop-up screen. 7 : Select the pattern to be deleted with “+” and “–”. When is pressed here, the screen returns to the former one without deleting. -
Page 90: Condensation Custom Edit
(2) Condensation custom edit Condensation custom edit screen 1) Press to display the reverse feed stitching setting screen. 2) Press 2 or 4 in the reverse feed stitching setting screen to move to the condensation custom edit screen. 3) Set the needle entry position for each step in the condensation custom edit screen. 1 : Set the step with “+”... -
Page 91: Pattern Stitching
5) When all inputting procedures have been completed, press key to determine. When the power source is turned OFF without pressing key, the inputted data returns Cau tion to the former one. When you desire to determine the data, be sure to press key. -
Page 92: Registering The Pattern Stitching
Sewing shape setting screen * When there is the second 4 is displayed. screen, 4) Setting of the respective items can be performed in the sewing shape setting screen. Reverse Normal Position of Position at Number of Number Stop Zigzag Compensation feed feed... -
Page 93: Copy And Deletion Of The Pattern Stitching
New registration pop-up screen 3) Select the pattern No. to w h i c h y o u d e s i r e t o register with 2 in the new registration pop-up screen. When is pressed here, the screen returns to the f o r m e r o n e w i t h o u t performing the registration. -
Page 94: Continuous Stitching
How to delete Deletion pop-up screen 2 in the copy 1) Press and deletion pop-up screen to display the deletion pop- up screen. 2) Select pattern No. you desire to delete in the deletion pop-up screen. 5 : Select the pattern to be deleted with “+”... -
Page 95: New Creation Of The Continuous Stitching
(1) New creation of the continuous stitching Continuous stitching pattern can be newly created. New creation pop-up screen 1) Press in the continuous stitching selection pop-up screen to display the new creation pop-up screen. 2) Nos. which have not been registered at present are displayed in 1. Select the No. you desire to obtain with “+”... - Page 96 Continuous stitching setting screen 3 4 5 3 4 5 3) Press to display the continuous stitching setting screen. 4) Zigzag width and position of stitch base line can be set in the continuous stitching setting screen. 3 : Set zigzag width after combining with “+” and “–”. 4 : Set the position of stitch base line with “+”...
-
Page 97: Copy And Deletion Of The Continuous Stitching
(3) Copy and deletion of the continuous stitching Press in the continuous stitching setting screen, and the copy and deletion of continuous stitching pop-up screen is displayed. The copy and deletion of the continuous stitching pattern can be performed. How to copy Copy and deletion of continuous stitching pop-up screen 1 in the copy 1) Press... -
Page 98: Cycle Stitching
6-14. Cycle stitching Impor tant Standard delivery level of the key lock is “1”. When the level of the key lock is the case other than “0”, be sure to change the level to “0” to perform the operation below. Cycle stitching can change over the different patterns in order and perform the sewing. - Page 99 Cycle stitching setting screen 3 4 5 4) Setting of each step can be displayed in the cycle stitching setting screen. 3 : Select the registered steps with “+” and “–”. 4 : Pattern No. which is being selected at present is displayed. Editing cannot be performed. 5 : Stop state of the step which is being selected at present is displayed.
-
Page 100: Copy And Deletion Of The Cycle Stitching
(3) Copy and deletion of the cycle stitching Press in the cycle stitching setting screen to display the copy and deletion of cycle stitching pop-up screen. Then copy and deletion of the cycle stitching pattern can be performed. How to copy Copy and deletion of cycle stitching pop-up screen Copy pop-up screen 1 in the copy and deletion of cycle stitching pop-up screen. -
Page 101: Teaching
How to delete Deletion pop-up screen 2 in the copy and deletion of cycle stitching pop-up screen. 1) Press 2) Deletion pop-up screen is displayed. 5 : Select the cycle stitching pattern to be deleted with “+” and “-”. When is pressed here, the screen returns to the former one without performing deletion. -
Page 102: Performing The Programmed Stitching Using The Cycle Stitching
(5) Performing the constant-dimension stitching using the cycle stitching Constant-dimension stitching, zigzag patterns of which are different from each other in the respective steps can be performed by setting the number of stitches in the cycle stitching. Example) In the process of label attaching, change over the zigzag patterns of constant-dimension Label stitching of standard zigzag stitch and... -
Page 103: Information
2) Set the initial value with “+” and “–” switch. When the switch is held pressed and the set value exceeds the digit of 100, the set value increases/decreases by 100 unit. When setting the value near to 100 digit, press the switch each time. -
Page 104: Sewing Common Data
(1) Sewing common data 1) Press 2 in the information screen. The first screen of sewing common data setting 1 2 3 1 2 3 2) Set the items below in the first screen. 1) Center 1 : Limiting procedure of max. zigzag width limitation For the limiting procedure of max. -
Page 105: Mirror Function Setting
1) 1 pattern : Mirror inversion is “1” pattern Sewing direction only. After completion of inversion pattern, LED lights up. the pattern returns to the original one. Pattern 2) Continuous : The machine continuously mode operates the inversion pattern after the inversion until thread trimming is performed Continuous or, the mirror switch is pressed again. -
Page 106: Sewing Management Information
(2) Sewing management information For the sewing management information, there are warning of time of replacement of needle, that of time of cleaning and that of time of replacement of oil as the maintenance management information. [Maintenance management function] Sewing management information screen 1) Press 1 to display the maintenance function screen. - Page 107 Clear screen 1 : The screen returns to the maintenance function screen without performing clearing. 2 : The screen returns to the maintenance function screen after executing clearing. Warning screen Warning screen is displayed when the warning time is reached. 1 : When 1 is pressed, the screen can be cleared.
- Page 108 Sewing management information selection screen 2) Press 2 to display the maintenance function screen. (For other functions, refer to the Engineer's Manual.) Maintenance function screen 34 and 5 : Warning time input screen is displayed. 3) Set the warning time with 2. Setting time inputted is shown in reverse video at 4. Warning time input screen 3 Clear screen is displayed.
-
Page 109: Communication Mode
[Maintenance personnel level] 1) Turn ON the power. When the needle bar is not in the UP position, turn the handwheel to bring the needle bar to its UP position. 2) Press switch 1 for approximately three seconds to display the information screen. Information screen (Maintenance personnel level)] 2 3 4 5 6 7 2 : Ver display For the details, refer to the Engineer ’... - Page 110 Example of download Example) Parameter file No. 70 of the smart media is downloaded to the condensation custom pattern at the sewing end No. 10 (EPD). 1) Open the smart media cover and insert the smart media (Optional Part No. : HX005750000) from the insertion opening.
- Page 111 4) Selection of file No. of the smart media Press 3 in the communication setting screen to display the file No. input screen (10-key screen) of smart media. File No. input screen (10-key screen) Input the file No. of smart media with 2. Input section 2 as 070 and determine with 1 in the file input The file No.
- Page 112 3) Selection of communication method Press 2 in the communication setting screen to display the communication method setting screen. [Explanation of the pictograph] 1 : Download from the smart media 2 : Download from SU-1 3 : Upload to the smart media 4 : Upload to SU-1 Press 3 to select the upload to the smart media.
-
Page 113: Setting For Functions
6-17. Setting for functions (1) How to change over to the function setting mode Do not perform switch operations other than those described in the following explanations. Cau tion Be sure to re-turn the power switch ON after one second or more has passed. If the power is turned ON immediately after turning it OFF, the sewing machine may not work normally. - Page 114 Change set value with “+/–” Key of switch 5. The set value has been changed from “0” to “3”. When this changed value is acceptable, press switch 7. When you desire to return the value to the previous one, press switch 6. Turn OFF the power switch and turn ON the power switch after approximately...
- Page 115 3) This screen is the function setting screen. Change the setting No. with “+/–” Key of switch 3. For the details of setting No., see page 81. Setting No. Set value Example) Changing the number of rotation of reverse feed stitching (Setting No.
-
Page 116: Function Setting List
(2) Function setting list Setting Panel display Ref. Item Description Setting range level Standard set value Page Soft start The number of stitches to be sewn at a low speed when the soft- 0 to 9 N-SOFT function start function is used at the start of sewing. 0 : Soft-start function is not operative 0 to 8 Flicker... - Page 117 Setting Panel display Ref. Item Description Setting range Page Standard set value level Function of Function of reverse feed stitching on the way reverse feed 0 : Function of reverse stitching on the way is not operative. stitching on 1 : Function of reverse feed stitching on the way is operative. the way Number of 0 to 19...
- Page 118 Setting Ref. Panel display Item Description Setting range Standard set value Page level Foot lift after Function of lifting presser foot at the time of (after) thread FLAT thread trimming trimming 0 : Not provided with the function of lifting presser foot after thread trimming 1 : Provided with the function of lifting presser foot automatically after thread trimming...
- Page 119 Ref. Setting Panel display Item Description Setting range Standard set value Page level Function of Function to reduce speed at the time of reverse feed stitching at F-DSBT reducing the start of sewing. speed of 0 : Speed is not reduced. reverse feed 1 : Speed is reduced.
-
Page 120: Detailed Explanation Of Selection Of Functions
(3) Detailed explanation of selection of functions 1 Selection of the soft-start function (Function setting No.1 N-SOFT) The needle thread may fail to interlace with the bobbin thread at the start of sewing when the stitching pitch (stitch length) is small or a thick needle is used. To solve such problem, this function (called “soft-start”) is used to limit the sewing speed, thereby assuring successful formation of the starting stitches. - Page 121 5 Optional switch function selection (Function setting No.12 SW 2) : It is used only when it is combined with the machine head provided with the optional switch. (Optional SW kit Part No. : 40003640) Insert the cord connector pins into No. 7 and No. 8 of 12P connector (CN53). A.
- Page 122 9 Function of reverse feed stitching on the way (Function setting Nos. 30 to 33 OBT, OBTS, OBTT) Functions of the limit of number of stitches and thread trimming command can be added to the touch back switch on the sewing machine head. Function setting No.
- Page 123 9 Holding time of lifting presser foot (Function setting No.47 T-FL) Solenoid type presser foot lifter (No. 46 0) can adjust the holding time control of lifting presser foot. This function automatically lowers the presser foot when the time set with the setting No. 47 has passed after lifting the presser foot.
- Page 124 !4 Function of stop immediately after the reverse feed stitching at the start of sewing (Function setting No.60 SBTQ) This function temporarily stops the sewing machine even when keeping depressing the front part of the pedal at the time of completion of process of reverse feed stitching at the start of sewing. It is used when sewing a short length by reverse feed stitching at the start of sewing.
-
Page 125: External Interface
!8 Retry function (Function setting No.73 F-RET) When the retry function is used, if the sewing material is thick and not piereced with needle, this function makes the needle pierce in the material with ease. 0 : Normal 1 : Retry function is provided. !9 Function to select the start-up speed of the sewing machine (Function setting No.76 F-SCS) This function is selected in the case where the speed of the sewing machine is desired to be more at the time of start-up. -
Page 126: Sewing
7. SEWING 7-1. Adjusting the thread tension WARNING : In case of thread-breakage. It may occur that the thread tangles on the thread take-up lever. In this case, remove the thread tangling around the thread take-up lever by raising the thread take-up cover. At this time, be careful not to cut your fingers with the knife. -
Page 127: Adjusting The Pressure Of The Presser Foot
7-2. Adjusting the pressure of the presser foot WARNING : To protect against possible personal injury due to abrupt start of the machine, be sure to start the following work after turning the power off and ascertaining that the motor is at rest. 1) Turn the presser spring regulator 1 clockwise A to increase the pressure given by the presser foot. -
Page 128: Pattern 2 (Fagoting) Sewing
* The position of reverse feed switch 4 and mirror switch 2 can be reversed. When changing the position of the switch in case of “A. In case of the machine with the auxiliary thread take-up lever”, refer to the items 3) through 5). (Note) Freely adjust the height of the respective switches. -
Page 129: Hand Switch
7-5.Hand switch 1) Reverse feed switch 1 Press reverse feed switch 1 and reverse feed is performed. When it is released, normal feed is performed. 2) Mirror switch 2 When scallop, custom pattern or continuous stitching is selected, the switch becomes a mirror switch. -
Page 130: Standard Adjustment
1 is near in fully-tightened state, it is considered that hook shaft oil wick (JUKI Part No. 11015906) is clogged or the like. Replace the hook shaft oil wick. For the replacing procedure, refer to (10) Replacing the hook shaft oil wick of 9. -
Page 131: Adjusting The Height Of The Presser Bar
8-3. Adjusting the height of the presser bar 1) To change the height of the presser bar or the inclination of the presser foot, loosen the presser bar connection screw 1 and perform the adjustment properly. 2) After the adjustment, securely tighten the screw. 8-4. -
Page 132: Hook Adjusting Mode
8-6. Hook adjusting mode Cau tion When the hook adjusting mode is set, it is possible to adjust the hook by turning the handwheel. 1) Turn ON the power. When the needle bar is not in the UP position, turn the handwheel to bring the needle bar to its UP position. -
Page 133: Attaching / Removing The Hook
B. as shown in the figure on the left. Never let A protrude from line B. Part No. of hook 3 is 22525877. Do not use the hook other than that Reference designated by JUKI. -
Page 134: Adjusting Height Of The Needle Bar
8-8. Adjusting height of the needle bar WARNING : To protect against possible personal injury due to abrupt start of the machine, be sure to start the following work after turning the power off and ascertaining that the motor is at rest. 1) Set the zigzag width to “0”. -
Page 135: Adjusting The Stop Position Of The Needle
8-10. Adjusting the stop position of the needle (1) Stop position of the needle after thread trimming 1) The needle stops at the standard stop position when marker dot A engraved on the handwheel cover is aligned with white marker dot B engraved on the handwheel. -
Page 136: Adjusting The Needle Thread Feeding Device
If the initial position of the moving knife is not correct Loosen the nut 3 , and move the moving knife to the right or left until the pin 1 meets the marker dot 2 . Then, tighten the nut 3 . (2) Adjusting the thread trimming timing Put roller 4 in the cam groove. -
Page 137: Adjusting The Bird's Nest Prevention (Cb) Type Wiper
8-13. Adjusting the bird's nest prevention (CB) type wiper WARNING : To protect against possible personal injury due to abrupt start of the machine, be sure to start the following work after turning the power off and ascertaining that the motor is at rest. Position of the wiper 1) Adjust the white marker dot on the handwheel 1 to the position where it is aligned with the marker dot on... -
Page 138: Replacing Procedure Of The Bird's Nest Prevention (Cb) Type Presser Knife
8-14. Replacing procedure of the bird’s nest prevention (CB) type presser knife WARNING : To protect against possible personal injury due to abrupt start of the machine, be sure to start the following work after turning the power off and ascertaining that the motor is at rest. The needle thread cutting knife is mounted on the presser delivered as standard for the bird's nest prevention (CB) type. -
Page 139: Maintenance
9. MAINTENANCE WARNING : To prevent personal injuries caused by electric shock hazards or abrupt start of the sewing machine, carry out the work after turning OFF the power switch and ascertaining that the motor has completely stopped. To prevent personal injuries, when a fuse has blown out, be sure to replace it with a new one with the same capacity after turning OFF the power switch and removing the cause of the blown-out of the fuse. -
Page 140: Adjusting The Contrast Of The Operation Panel Display
9-2. Adjusting the contrast of the operation panel display 1) Press in the direction of arrow mark the click of section A of cord outlet cover 2 assembled in the rear of Light Shade operation panel 1 and remove the cover. 2) Turn LCD screen display brightness adjustment variable resistor 3 to adjust the brightness (contrast) of LCD screen. -
Page 141: Cleaning The Cooling Fan
9-5. Cleaning the cooling fan installed on the under cover Cloth waste or the like gathers around the cooling fan filter section installed on the lower part of the under cover, and there is a case where cooling effect of the machine head is decreased. -
Page 142: Replacing Procedure Of The Hook Shaft Oil Wick
2) Draw out hook shaft oil wick 1 from hook shaft oil wick screw 2 which has been drawn out and push a new hook shaft oil wick 1 (JUKI Part No. : 11015906) to hook shaft oil wick screw 2 (JUKI Part No. -
Page 143: At A Time Like This
10. AT A TIME LIKE THIS ! Confir mation In case of the following, check again before you judge the case as trouble. Phenomenon Cause Corrective measure Buzzer peeps and the sewing The measures described on the left are Tilt the machine head after turning OFF machine fails to operate when the taken for safety when tilting the machine the power. -
Page 144: Error Display
11. ERROR DISPLAY Error is informed by means of the panel display, machine head mirror LED blink and control box buzzer. Reference Four different kinds of screens of the panel display screen appear due to the difference of the procedures. 1) Error screen disappears when the operator removes the cause. -
Page 145: Error Code List (Error Display In Panel)
11–1. Error code list (Error display in panel) There are the following error codes in this device. These error codes interlock (or limit function) and inform the problem so that the problem is not enlarged when any problem is discovered. When you request our service, please confirm the error codes. - Page 148 Warning list Contents and display of warning Corrective measure Remarks Replacement of needle warning A201 • Press to close warning screen, and Refer to “Sewing perform replacement of needle. Then clear management the value in the clear screen. information, p.100. •...
-
Page 149: Troubles And Corrective Measures
The thread is too thick for the needle. Use a suitable thread or needle. c. The thread is broken by heat. Use JUKI Silicone Oil Lubricant unit. !1 When the stitch is skipped. Refer to the following paragraphs, Stitch skipping. - Page 150 Bird’s nest prevention (CB) type Phenomenon Corrective measure See page Cause Needle 1 Improper wiper position. Adjust the wiper to the proper position. thread clamp 2 Air pressure drop. Set the air pressure to 0.6Mpa. failure 3 Dust bag becomes excessively filled with Remove waste thread from the dust bag.
- Page 151 [Power voltage changeover procedure (power voltage setting procedure)] WARNING : To prevent personal injuries caused by electric shock hazards or abrupt start of the sewing machine, carry out the work after turning OFF the power switch and a lapse of 5 minutes or more. To prevent accidents caused by unaccustomed work or electric shock, request the electric expert or engineer of our dealers when adjusting the electrical components.
Need help?
Do you have a question about the LZ-2290A-SR/IP-100D/SC-916 and is the answer not in the manual?
Questions and answers