Table of Contents
Advertisement
Quick Links
Advertisement
Table of Contents

Related Manuals for Pitney Bowes DP40S


Summary of Contents for Pitney Bowes DP40S
- Page 1 DP40S Color Printer Operator Guide...
- Page 2 Some product features may be country specific. Postage By Phone and E-Z Seal are trademarks or registered trademarks of Pitney Bowes Inc. ENERGY STAR is a registered trademark of the United States Environmental Protection Agency. Other company names, products or services mentioned herein may be protected by trademarks, registered trademarks or service marks and are the property of their respective owners.
-
Page 3: Table Of Contents
Table of Contents Chapter 1 - Introduction Safety ..................1-1 Features ..................1-2 Important Notes ................1-2 System Components ..............1-3 The Control Panel ............... 1-4 Buttons and Lights ..............1-4 Display Panel Messages ............1-6 Using the Menus ..............1-7 Trays and Stackers .............. - Page 4 Table of Contents Chapter 2 - Getting Started Printer Location ................2-1 Opening and Closing the Top Cover ........... 2-1 Turning the Printer On and Off ............ 2-2 Changing the Display Language..........2-2 Loading Tray 1 ................2-3 Loading MP Tray/Envelope Feeder ..........2-4 Checking the Current Settings ............
- Page 5 Table of Contents Chapter 4 - Troubleshooting Paper Jams ................. 4-1 Tray 1 Side Cover ..............4-1 MP Tray Side Cover .............. 4-2 Top Cover ................4-2 Check Duplex Unit, Paper Jam ..........4-4 Avoiding Paper Jams ..............4-5 Unsatisfactory Printing ..............4-6 Appendix A - Display Panel Messages Messages ...................A-1 Appendix B - Menu System...
- Page 6 Table of Contents This page left intentionally blank. SV62531 Rev. B...
-
Page 7: Chapter 1 - Introduction
Follow the normal safety precautions for all office equipment: Safety • Use only Pitney Bowes approved supplies, in particular aerosol dusters. Improper storage and use of aerosol dusters or flammable aerosol dusters can cause an explosive-like condition that could result in personal injury and/or property damage. -
Page 8: Features
• 40GB hard disk drive enables job spooling and verified printing. • Standard 1 GB memory. These instructions explain how to use the Pitney Bowes Digital Envelope Important printer. Please spend a few moments reading through them; understanding notes what the system does and how it does it will keep problems to a minimum and help you get the best performance from it. -
Page 9: System Components
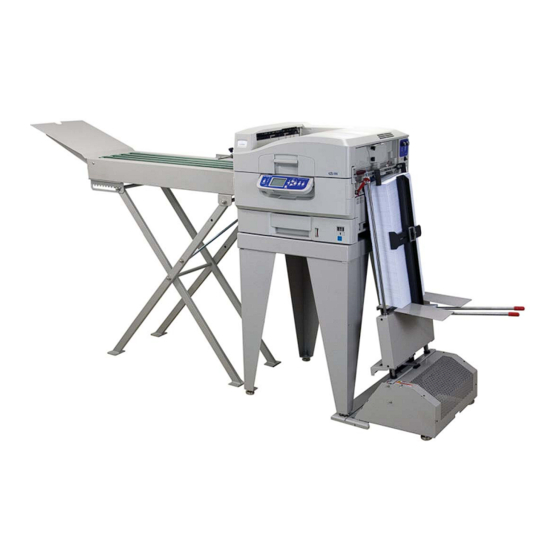
1 • Introduction System Components 1. Conveyor Stacker (face-up stacker) 12. Parallel Interface Connector 2. Control panel 13. Conveyor Connector 3. Top cover handle 14. USB Interface Connector 4. Top cover (face-down stacker) 15. Power Connector 5. MP (Multi-purpose) tray/Envelope 16. -
Page 10: The Control Panel
1 • Introduction The control panel can be swiveled The Control to 90° (maximum) upwards from its Panel base position as required for ease of use. Buttons and Lights The parts of the control panel are identified and briefly explained as follows: Digital Envelope printer MENU READY... - Page 11 1 • Introduction The Control Up-arrow button Enters menu mode and enables upward movement through the displayed Panel list of menu items. Down-arrow button Enters menu mode and enables downward movement through the displayed list of menu items. Back button Returns to the previous higher level menu item.
-
Page 12: Display Panel Messages
1 • Introduction Trays and Display Panel Messages There are four types of display panel messages which are explained below. Stackers A list of messages you may see is given in Appendix A of this guide. 1. Status Information Status information is associated with three printer states: •... - Page 13 1 • Introduction The Control Using the Menus Menu details are given in “Appendix B — Menu System” for reference. Panel The Enter, Up-arrow, Down-arrow and Back buttons are used to move through the printer menus. You can adjust settings (e.g. set the paper size for Tray 1) or view information (e.g.
-
Page 14: Tray 1
1 • Introduction Trays and Tray 1 Tray 1 is the standard blank paper input tray and can hold up to 530 sheets Stackers of 20 lb. (75 g/m²) paper. Tray 1 can handle 20 -56 lb. (75 - 216 g/m²) paper. If you have identical paper stock loaded in the MP Tray, you can have the printer automatically switch to that other tray when the current tray runs out of paper. - Page 15 1 • Introduction number of pages is variable based on the size of the media. Trays and This stacker can be used for any material, but always use it and the multi- Stackers purpose tray for envelope printing and paper stocks heavier than 56 lb. (216 g/m²).
-
Page 16: Software Supplied
1 • Introduction Utility and Document CD: Software • Contains drivers, utilities and network software. Supplied • Contains documentation in electronic form to describe how to use the printer for day-to-day tasks. Your printer will handle a variety of print media, including a range of paper Paper Advice weights and sizes, transparencies, labels and envelopes. -
Page 17: Paper Input And Output Information
1 • Introduction The following table gives advice on which input tray to use and which output Paper Input stacker to use for a variety of common material. and Output Information Type Size Weight Input/Output Plain Paper Letter, Legal 13, up to 80 lb. -
Page 18: Specifications
1 • Introduction Specifications Item Specification Dimensions 91-3/4" (2330 mm) W x 24-1/2" (620 mm) D x 18-1/4" (462 mm) H (includes feeder and stacker) Weight approx. 159 lbs. (69 kg), printer only Print speeds up to 60 ppm (envelopes) up to 36 ppm color, 40 ppm monochrome paper sheet printing Resolution... -
Page 19: Chapter 2 - Getting Started
2 • Getting Started This chapter provides information to help you get started with using your Printer Location Pitney Bowes digital envelope printer. Check that you have sufficient space for access around and above your printer. 8" (20cm) rear clearance 58"... -
Page 20: Turning The Printer On And Off
2 • Getting Started Turning the Turning On If the display panel shows that you can either turn off or restart the printer, Printer On and press Shutdown/Restart to turn on the printer. If the printer is turned off (no power), use the On/Off switch to turn it on. On/Off Switch Turning Off Hold down the Shutdown/Restart button on the control panel for at least 2... -
Page 21: Loading Tray 1
2 • Getting Started 1. Pull out the tray. Loading Tray 1 2. Press the paper rear stopper tab and adjust the tab to the required paper size. Adjust Rear Stopper tab 3. Fan the paper to be loaded then jog the stack on a flat surface to align it. 4. -
Page 22: Loading Mp Tray/Envelope Feeder
2 • Getting Started If necessary, lower the MP tray using the Loading MP up/down switch shown. Tray/Envelope Feeder 2. Fold an envelope in half. Align the center fold with the tray sensor and adjust the long side guide up to the envelope edge. Use the lever below to set the guide. -
Page 23: Checking The Current Settings
2 • Getting Started Carry out the following steps to generate a Configuration report (Menu Map) Checking to confirm that your printer is correctly configured. the Current 1. Ensure that there is paper in Tray 1 (to be used in this operation). Settings 2. -
Page 24: Connecting The Usb Interface
2 • Getting Started Interfaces and Connecting the USB Interface Do not connect the USB cable at this time. You will be instructed when to Connection connect the USB cable when you install the driver from the supplied CD. If you are connecting your printer directly to a stand alone computer proceed to the relevant section within “Windows Installation”... -
Page 25: Assigning An Ip Address To Your Printer
2 • Getting Started If you are not using Dynamic Host Configuration Protocol (DHCP), you need Assigning an IP to obtain an IP Address from your network Administrator and enter it using Address to your the printer control panel: printer 1. -
Page 26: Windows Installation
2 • Getting Started Windows TCP/IP Driver Installation 1. Make sure the Ethernet cable is connected and your printer is turned Installation 2. Insert the supplied CD into your CD-ROM drive. The CD will autorun. If it does not autorun, 'explore' the CD and double click 'setup.htm' to launch the CD menu. -
Page 27: Usb Driver Install
2 • Getting Started Windows USB Driver Install The installation procedure may vary slightly depending on the operating Installation system you are using. Drivers are provided for Windows 7/Vista/XP/2000/ Me/98. 1. Insert the supplied CD into your CD-ROM drive. The CD will autorun. If it does not autorun, 'explore' the CD and double click 'setup.htm' to launch the CD menu. -
Page 28: Parallel (Lpt1) Driver Install
2 • Getting Started Windows Parallel (LPT1) Driver Install The installation procedure may vary slightly depending on the operating Installation system you are using. Drivers are provided for Windows 7/Vista/XP/2000/ Me/98. 1. Make sure the parallel cable is connected and that your printer is turned OFF. -
Page 29: Activating Optional Hardware
2 • Getting Started If your printer has optional components (i.e., Duplexer or additional RAM), Activating they must be activated before they can be used. Optional Hardware Windows 1. Click [Start] → [Settings] → [Printers]. 2. Right click the printer icon and go to [Properties]. 3. -
Page 30: Setting Default Software Options
2 • Getting Started This section details how to access the software options from each operating Setting Default system. For specific information on the individual software options see the Software Printing Guide on the supplied CD. Options Windows 1. Click [Start] → [Settings] → [Printers]. 2. -
Page 31: Installing Additional Utilities
60 Lb. (222 g/m²) – 102 lb. (385 g/m²) NOTE: The correct media type must be selected along with the correct media weight in order to ensure the best print quality. Pitney Bowes recommends setting your tray default for media type and weight to be what you will print, on from that paper source, most of the time. - Page 32 2 • Getting Started This page left intentionally blank. 2-14 SV62531 Rev. B...
-
Page 33: Checking Usage
Transfer Belt Unit 43D-9 Waste Toner Box 43D-A Order consumables from your local Pitney Bowes Supply Line. Contact details are given in the separate 'contact sheet' supplied with your product. Quote the model Pitney Bowes Digital Envelope Printer when ordering supplies. -
Page 34: Replacing Consumables
3 • Consumables and Maintenance Use only genuine Pitney Bowes consumables to ensure the best Replacing quality and performance from your printer. Non-Pitney Bowes Consumables products may reduce your printer’s performance and void your warranty. Specifications subject to change without notice. All trademarks acknowledged. -
Page 35: Installing A Replacement Image Drum
3 • Consumables and Maintenance 1. Switch off the printer as described on page 2-2 and open the top cover. Installing a 2. When replacing an image drum, it is best to first remove the relevant Replacement drum and toner cartridge as a unit before separating them. This method Image Drum ensures that the possibility of toner spillage into the printer is minimized. -
Page 36: Installing A Replacement Fuser
3 • Consumables and Maintenance 1. Switch off the printer as described on page 2-2 and open the top cover. Installing a Replacement Caution Fuser The fuser is very HOT after the printer has been printing. Let it cool before replacing it. 2. - Page 37 3 • Consumables and Maintenance 1. Switch off the printer as described on page 2-2 and open the top cover. Installing a Replacement Caution Transfer Belt The fuser is very HOT after the printer has been printing. Be careful not to touch it. 2.
- Page 38 3 • Consumables and Maintenance 6. Unpack the new transfer belt. Installing a Grasp the blue handles and Replacement lower the left side of the belt Transfer Belt into the printer, installing the pins into the guides at the front and back, then lower the right side.
-
Page 39: Cleaning The Led Heads
3 • Consumables and Maintenance You are advised to clean the LED heads: Cleaning the • Any time you replace a toner cartridge (a LED lens cleaner is enclosed LED heads with each replacement toner cartridge). • If printing is showing signs of faded images, white stripes or blurred letters. -
Page 40: Cleaning The Paper Feed Rollers
3 • Consumables and Maintenance Clean the paper feed rollers if paper jams frequently occur. Cleaning the 1. Remove items like a wrist watch or bracelet and follow the correct steps Paper Feed to turn the printer off. Rollers 2. Move the Envelope Feeder away from the printer. 3. -
Page 41: Chapter 4 - Troubleshooting
4 • Troubleshooting This chapter covers dealing with issues that may arise when using the printer. The following paragraphs describe actions to take in the event of a paper stoppage and how to deal with unsatisfactory print results. Display panel messages about paper stoppages and relevant actions are given in this section;... -
Page 42: Mp Tray Side Cover
4 • Troubleshooting Paper MP Tray Side Cover 1. Move the Envelope Feeder away from Stoppages the printer. 2. Pull the release lever and pull open the side cover. 3. Carefully remove the stuck paper. 4. Close the side cover. 5. - Page 43 4 • Troubleshooting 4. If paper is stuck in the fuser unit, push Paper the lock lever in the direction shown to Stoppages release the unit. Be careful not to touch the fuser unit which may be hot after printing. If the fuser unit is hot, wait until it cools before attempting to remove any stuck paper.
-
Page 44: Check Duplex Unit, Paper Jam
4 • Troubleshooting Paper Check Duplex Unit, Paper Jam 1. Move the conveyor away from the Stoppages printer. 2. Operate the duplex cover release button and open the cover. 3. Carefully remove any stuck paper. 4. Operate the levers and pull out the duplex unit. -
Page 45: Avoiding Paper Jams
4 • Troubleshooting The following table summarizes possible causes of paper stoppages and Avoiding Paper suggests ways of avoiding them. Stoppages Possible Cause Suggested Remedy The printer is not level. Place the printer on a steady, level surface. Your paper is too light or too Use appropriate media. -
Page 46: Unsatisfactory Printing
4 • Troubleshooting Unsatisfactory Printing Symptoms Possible Cause Suggested Remedy Vertical white lines in The LED head is dirty. Wipe the LED head with a LED lens cleaner or the direction of feed with a soft cloth. can be seen on the The toner is low. - Page 47 4 • Troubleshooting Unsatisfactory Printing Symptoms Possible Cause Suggested Remedy Horizontal lines When the interval is Wipe it lightly with a soft cloth. Replace the and spots appear about 3-3/4” (94 mm), image drum cartridge when it is damaged. periodically. the image drum (the green tube) is damaged or dirty.
- Page 48 4 • Troubleshooting This page left intentionally blank. SV62531 Rev. B...
-
Page 49: Appendix A - Display Panel Messages
Appendix A • Display Panel Messages Messages Message Comment Ready to Print Your printer is online and ready to print. Printing Tray 1 Your printer is printing and paper is currently being fed from Tray 1. Tray 1 Near End The paper supply in the Tray 1 will run out soon. - Page 50 Appendix A • Display Panel Messages Messages Message Comment Install Tray 1 The printer has tried to take paper from a tray that has been removed. Ensure that Tray 1 is correctly located or put Tray 1 loaded with paper back into the printer. Open Cover Paper Additional paper has been detected after a paper Remains Tray 1...
-
Page 51: Appendix B - Menu System
Appendix B • Menu System The top-level Functions menus are: Menu Structure • Configuration • Print Information • Print Secure Job • Menus • Admin Setup • Calibration • Print Statistics The two other special top-level menus are: • Boot Menu •... -
Page 52: Configuration
Appendix B • Menu System Configuration Page Count Item Value Description Color Page nnnnnn Displays number of color printed pages converted to Letter equivalent. Monochrome Page nnnnnn Displays number of monochrome printed pages converted to Letter equivalent. Tray 1 nnnnnn Displays total printed pages from Tray MP Tray nnnnnn... -
Page 53: Paper Size In Tray
Appendix B • Menu System Configuration Network - 10/100 Base T Item Value Description Printer Name xxxxxxxxxxxxxxx Displays printer name (DNS or xxxxxxxxxxxxxxx PnP) in wired network. Short Printer xxxxxxxxxxxxxxx Displays printer name Name (NetBEUI) in wired network. IP Address xxx.xxx.xxx.xxx Displays IP address. -
Page 54: System
Appendix B • Menu System Configuration System Item Value Description Serial Number xxxxxxxxxxxxxxx Displays the printer serial number Asset Number xxxxxxx Displays Asset Number. Asset Number is 8 alphanumeric characters that can be assigned by a user. Same as Asset Number of Menu Map. -
Page 55: Print Information
Appendix B • Menu System Print Item Value Description Information Configuration Execute Prints printer configuration details. Network 10/100 Print Execute Prints summary BaseT Summary information about the wired network. Print Execute Prints full information Information about the wired network. File List Execute Prints a list of jobs stored on the Hard Disk. -
Page 56: Menus
Appendix B • Menu System Menus Tray Configuration Tray Configuration Item Value Description Paper Feed Tray 1 Specifies a feed tray. MP Tray Auto Tray Sets the automatic tray Switch switch function. Tray Specifies selection order Down Sequence priority for automatic tray selection/ automatic tray Paper feed tray switch. - Page 57 Appendix B • Menu System Menus Tray Configuration (continued) Item Value Description Tray 1 A3 Nobi A3 Nobi The printer detects A3 Nobi, Config. A3 Wide and Tabloid Extra Paper A3 Wide sizes as the same. Use this Tabloid Extra setting to tell the printer which of the three sizes is loaded in Tray 1.
- Page 58 Appendix B • Menu System Menus Tray Configuration (continued) Item Value Description MP Tray Sets Custom paper length 3-1/2" (90 Config. Dimension mm) - 47-1/4" for MP Tray. Sets for the (1200mm) same direction as paper movement. Media Type Plain Sets the media type for MP Letterhead Tray.
-
Page 59: System Adjust
Appendix B • Menu System Menus System Adjust Item Value Description Power Save 1 min Sets the period after which power save 3 min Time mode starts. 5 min 15 min 30 min 60 min 240 min Clearable Online When Online is selected, you must Warning manually clear the warning by pressing the Online button. - Page 60 Appendix B • Menu System Menus System Adjust (continued) Item Value Description Error Report ON: prints an error report during the occurrence of an internal error. This item is valid only for PS and PCLXL. Print Position X Adjust +/– 2 mm at Adjusts the position +/- .25 mm of the whole printing...
- Page 61 Appendix B • Menu System Menus System Adjust (continued) Item Value Description Trans. Color Used for fine color adjustment for a significantly white horizontal dotted line, Setting a significantly faded image or other such a problem that occurs in results printed on transparencies.
- Page 62 Appendix B • Menu System Menus Menus Example 1 - Tray 1 Transparencies To print on transparencies (accommodated in Tray 1): 1. Ensure that the display panel indicates that the printer is ready to print. 2. Enter menu mode by pressing either the Up-arrow or Down-arrow button and press them repeatedly until the Menus menu is highlighted.
- Page 63 1 Elmcroft Road Stamford, Connecticut 06926-0700 www.pitneybowes.com PB Form SV62531 Rev. B 10/10 © 2010 Pitney Bowes Inc. All Rights Reserved Printed in the USA *sv62531revB*...
Need help?
Do you have a question about the DP40S and is the answer not in the manual?
Questions and answers