Table of Contents
Advertisement
Quick Links
Advertisement
Table of Contents

Related Manuals for Sevcon MillipaK 4QPM


Summary of Contents for Sevcon MillipaK 4QPM
- Page 2 Document updated for V1.50.00 software 07/03/02 1.50.01 Document updated for V1.50.01 software 20/03/02 1.50.01 Document updated to reference PCpaK Modified overtemp cutback characteristics 24/05/02 1.50.03 SRO Delay personality 1.50.03 Added page numbers and tidied up 19/02/03 document. MillipaK 4QPM Controller Manual Page 2 13/08/03...
-
Page 3: Table Of Contents
Traction Drive Hours Meter ..........................44 Reverse Speed ..............................45 Pump Soft Start ..............................46 Alarm Buzzer................................47 Line Contactor Drop out............................48 ..............................49 AFETY EATURES Start Up Sequence..............................49 FS1 Recycle................................50 SRO (Static return to off) .............................51 Belly Switch................................52 MillipaK 4QPM Controller Manual Page 3 13/08/03... - Page 4 ...................70 OFTWARE ERSION AND ERIAL UMBER INDICATION SPECIFICATIONS ..............................71 ............................71 OWER ONFIGURATIONS ..............................71 STANDARDS .............................71 OCKET PROTECTION .............................71 ONTACTOR DRIVE RATINGS ..........................71 NALOGUE NPUT MPEDANCE ............................71 IGITAL NPUT MPEDANCE EMC GUIDELINES..............................72 ORDERING INFORMATION...........................73 MillipaK 4QPM Controller Manual Page 4 13/08/03...
-
Page 5: Introduction
______________________________________________________________________________ Introduction The MillipaK 4QPM (Four Quadrant Permanent Magnet) range of controllers provides a new range of power frames for 24V-48V, 330A in small, highly efficient packages. This is achieved using a Sevcon patented power switching scheme and radical new construction techniques, which enable large powers to be incorporated into very small packages. -
Page 6: Safety
+ sign on the top molding. The MillipaK controller may be used with suitable onboard chargers, as supplied by Sevcon. There are several software features which are intended to prevent inadvertent or unexpected vehicle movement –... -
Page 7: Installation
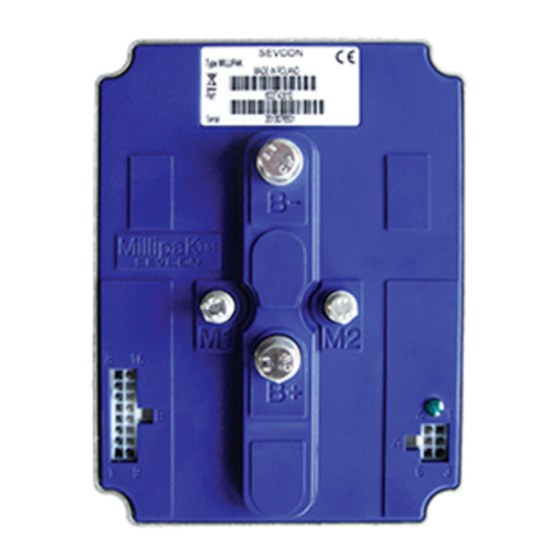
Figure 1: MillipaK HP Dimensions Maximum terminal torque: M8 terminals – 10NM M6 terminals – 7NM MillipaK 4QPM Controller Manual Page 7 13/08/03... -
Page 8: Millipak 4Qpm Power Wiring
Installation Wiring/Power ______________________________________________________________________________ MillipaK 4QPM Power Wiring Figure 2: MillipaK 4QPM Power Wiring NOTE: The Pump MOSFET’s are optional (soft start versions only). MillipaK 4QPM Controller Manual Page 8 13/08/03... -
Page 9: Millipak Light Wiring Example
***Extra Suppre s sion and Horn Suppre s s ion inputs to be us ed as s how n below : Extra Suppre s s ion 1 or 2 Batte ry +ve or Horn Suppre ss ion Exte rnal Contactor / Horn Batte ry -ve Figure 3: MillipaK Light Wiring MillipaK 4QPM Controller Manual Page 9 13/08/03... - Page 10 Pins 13,14 & 15 are general-purpose suppression connections and may be used to suppress spikes generated by contactors opening / closing. The internal configuration is shown below: Pin 16 is used to select FLASH memory program update mode and should normally be left unconnected. MillipaK 4QPM Controller Manual Page 10 13/08/03...
-
Page 11: Calibrator
The Calibrator is a hand-held adjustment unit which can be used to configure and test the system. The MillipaK is designed to work with the Calibrator currently in use with SEVCON's MOS90 system. See diagram below. The menu structure is shown in the Calibrator Map located near the end of this manual. -
Page 12: Traction Drive Hours Counter
Keyswitch. This is also the point at which you can enter a password to enable different levels of access to personalities. Refer to the section below on Calibrator Security Levels for more details. MillipaK 4QPM Controller Manual Page 12 13/08/03... -
Page 13: Calibrator Security Levels
Service mode. After the Security Level has been displayed, the system enters the normal menu structure shown in the Calibrator Map. To change the password level, you need to recycle the Keyswitch. MillipaK 4QPM Controller Manual Page 13 13/08/03... -
Page 14: Navigation
Pressing the SELECT button at any time exits the Test menu and moves to the first item in the menu structure (menu item 0.01 - Armature Current Limit). The items which are displayed depends on the current system configuration and the Security Level. MillipaK 4QPM Controller Manual Page 14 13/08/03... -
Page 15: Adjustments
System Setup any of the other personalities. Unlike the personalities in the other menus, changes to items in this menu do not take affect until the Keyswitch is recycled. Table 2: Adjustment Menus MillipaK 4QPM Controller Manual Page 15 13/08/03... -
Page 16: Status And Test Information
Software Version, Controller Serial Number and the Personality Checksum. Refer to the appropriate sections for more information on each of these items. Table 3: Status and Test Information Menus MillipaK 4QPM Controller Manual Page 16 13/08/03... -
Page 17: Configuration
System Configuration The MillipaK system configuration items relate to how the MillipaK will interface with connected hardware such as the system battery, vehicle control switches, accelerator and the traction motor. MillipaK 4QPM Controller Manual Page 17 13/08/03... -
Page 18: System Voltage
The system voltage usually refers to the main system supply battery voltage. The controller uses this information to ensure low and high voltage settings are within an appropriate range. System Voltage Power Up Calibrator Menu Reference: 12.19 Minimum Maximum Step Size Default MillipaK 4QPM Controller Manual Page 18 13/08/03... -
Page 19: System I/O Configuration
Ride On vehicle with Power Steer Trigger switch, Footbrake switch and Power Steer Contactor. Ride On vehicle with Speed Cutback 1 and 2 switches and Alarm Buzzer drive. Table 4: Description of each Digital I/O configuration. MillipaK 4QPM Controller Manual Page 19 13/08/03... - Page 20 Incorrect configuration could cause a vehicle to move unexpectedly, for example if FS1 was inadvertently configured as a belly switch. If your application doesn’t fit any of the above, please contact Sevcon with details of your requirements. Each of the above configurations allocates the controller i/o as shown below:...
- Page 21 Table 6 details which analogue functions are configured for each value of the Analogue Input Configuration Item. Digital Configuration Power Up Calibrator Menu Reference: 12.17 Minimum Maximum Step Size Default As Required Analogue Configuration Power Up Calibrator Menu Reference: 12.18 Minimum Maximum Step Size Default As Required MillipaK 4QPM Controller Manual Page 21 13/08/03...
-
Page 22: System / Motor Set-Up
Configuration System/Motor Set-up ______________________________________________________________________________ System / Motor Set-up There are various settings available to the user to tailor the MillipaK controller to specific motors and applications. MillipaK 4QPM Controller Manual Page 22 13/08/03... - Page 23 Armature Current Limit Immediate Calibrator Menu Reference: 0.01 Minimum Maximum Step Size Typical Value ABR – Armature Block Rating refers to the controller maximum peak current. MillipaK 4QPM Controller Manual Page 23 13/08/03...
-
Page 24: Contactor Chopping
On setting is for 24V coils on higher voltage vehicles. Setting to 24V provides chopping for 24V coils and lamps without the drop to 16V after 1s. Chop Select Power Up Calibrator Menu Reference: 12.01 Options Default MillipaK 4QPM Controller Manual Page 24 13/08/03... -
Page 25: Accelerator Full /Zero Setting
Note that a 6 flash fault will occur if the full and zero levels are set within 0.50V of each other. The PWM demand will vary between the Creep level and Maximum Speed level as the accelerator voltage varies between “Accelerator Zero” and “Accelerator Full”. MillipaK 4QPM Controller Manual Page 25 13/08/03... -
Page 26: Performance
Neutral Deceleration Delay Immediate Calibrator Menu Reference: 2.04 Minimum Maximum Step Size Typical Value 0.1S 10.0S 0.1S 0.1S MillipaK 4QPM Controller Manual Page 26 13/08/03... -
Page 27: Control Mode
THE METHOD OF MOTOR CONTROL MAY BE SWITCHED BETWEEN TORQUE AND SPEED CONTROL. Control Mode Power Up Calibrator Menu Reference: 12.03 Options Default Torque Speed Torque Currently only torque control mode is available. MillipaK 4QPM Controller Manual Page 27 13/08/03... -
Page 28: Regen Braking
Setting the level to 0% disables braking (Note: Direction Braking cannot be disabled), 1% sets the braking strength to minimum (weakest braking) and 100% sets the braking strength to maximum (strongest braking). Footbraking MillipaK 4QPM Controller Manual Page 28 13/08/03... - Page 29 Similar to the Accelerator input there are 2 personalities which can be used to setup the input voltage range of the Footbrake Pot. MillipaK 4QPM Controller Manual Page 29 13/08/03...
- Page 30 and at 75% demand the braking effort would be × braking effort MillipaK 4QPM Controller Manual Page 30 13/08/03...
- Page 31 Footbrake priority can be set to drive or brake and this determines the controller action in the case of the accelerator and footbrake pedal both being active at the same time. Footbrake Priority Power Up Calibrator Menu Reference: 12.15 Options Default Drive Brake Drive MillipaK 4QPM Controller Manual Page 31 13/08/03...
-
Page 32: Creep Speed
The motor voltage is rapidly ramped to the creep level (equivalent to a 100mS acceleration delay). Creep Speed Immediate Calibrator Menu Reference: 3.01 Minimum Maximum Step Size Typical Value MillipaK 4QPM Controller Manual Page 32 13/08/03... -
Page 33: Maximum Speed
Configuration Performance/Maximum Speed ______________________________________________________________________________ Maximum Speed Adjustment limits the maximum applied %on to the armature. Maximum Speed Immediate Calibrator Menu Reference: 5.01 Minimum Maximum Step Size Typical Value 100% 100% MillipaK 4QPM Controller Manual Page 33 13/08/03... -
Page 34: Accelerator Characteristics
If a valid direction is selected and the accelerator demand is at 0%, the speed demand will be set to the Creep Speed personality. As the accelerator demand is increased to 100%, the speed demand increases linearly to the Maximum Speed personality. MillipaK 4QPM Controller Manual Page 34 13/08/03... - Page 35 32.75%. i.e.: Accelerato Demand − × Speed Demand Creep Speed Maximum Speed Creep Speed − × MillipaK 4QPM Controller Manual Page 35 13/08/03...
-
Page 36: Features
These features can be split into three categories – standard controller features, safety features and controller protection features. Standard Controller Features The following section details the standard features found on a MillipaK controller. MillipaK 4QPM Controller Manual Page 36 13/08/03... -
Page 37: Power Steer
Immediate Calibrator Menu Reference: 9.01 Minimum Maximum Step Size Typical Value Power Steer Trigger Power On Calibrator Menu Reference: 12.14 Minimum Maximum Step Size Default See also contactor drive output configuration (System/Digital IO). MillipaK 4QPM Controller Manual Page 37 13/08/03... -
Page 38: High Speed Switch And Anti-Tie Down
The lower of the Cutback Speed 1 configuration item or the Cutback Speed 2 configuration item, if High Speed Operation is not active. The Cutback Speed 2 configuration item, if High Speed Operation is active. MillipaK 4QPM Controller Manual Page 38 13/08/03... - Page 39 Anti-Tie Down inhibiting will be kept active until the High Speed Switch is cycled through its inactive state. Anti-Tie Down is used to prevent High Speed operation under conditions where the operator may not be expecting it. MillipaK 4QPM Controller Manual Page 39 13/08/03...
- Page 40 Drive will be allowed after the Quick Pick switch is released only if all Drive Switches are Deselected. For example, if the Forward switch is activated during the Quick Pick operation, Drive is inhibited when the Quick Pick switch is released until the Forward switch is deactivated. MillipaK 4QPM Controller Manual Page 40 13/08/03...
-
Page 41: Seat Switch
Seat Delay Immediate Calibrator Menu Reference: 10.01 Minimum Maximum Step Size Typical Value 0.1S 5.0S 0.1S 5.0S Seat Cuts Pump Power On Calibrator Menu Reference: 12.04 Options Typical Value MillipaK 4QPM Controller Manual Page 41 13/08/03... -
Page 42: Handbrake Switch
Features Standard Features/Handbrake Switch ______________________________________________________________________________ Handbrake Switch An input is provided for the connection of a handbrake switch, which if operated will disable armature pulsing. MillipaK 4QPM Controller Manual Page 42 13/08/03... -
Page 43: Cutback Speeds
Cutback Speed 1 Immediate Calibrator Menu Reference: 6.01 Minimum Maximum Step Size Typical Value 100% 100% Cutback Speed 2 Immediate Calibrator Menu Reference: 7.01 Minimum Maximum Step Size Typical Value 100% 100% MillipaK 4QPM Controller Manual Page 43 13/08/03... -
Page 44: Traction Drive Hours Meter
Traction functionality. The Traction Drive Hours Meter runs whenever the vehicle is driving or braking. The current number of logged Traction hours can be viewed using the Calibrator. Refer to the Calibrator section for more information. MillipaK 4QPM Controller Manual Page 44 13/08/03... -
Page 45: Reverse Speed
This can be achieved by enabling the reverse speed limit and setting the Maximum Reverse Speed personality accordingly. Maximum Reverse Speed Immediate Calibrator Menu Reference: 5.02 Minimum Maximum Step Size Typical Value 100% 100% Reverse Speed Limit Enable Power Up Calibrator Menu Reference: 12.06 Options Default MillipaK 4QPM Controller Manual Page 45 13/08/03... -
Page 46: Pump Soft Start
Typical Value 0.5S 10.0S 0.1S 2.0S WARNING: The pump soft start option, when fitted, is NOT current limited and care should be taken not to exceed the maximum current specified by the controller rating. MillipaK 4QPM Controller Manual Page 46 13/08/03... -
Page 47: Alarm Buzzer
2) The Reverse Switch is active or vehicle is travelling in reverse – continuous output. 3) The vehicle is moving without a direction selected – pulsed output. Alarm Buzzer Power Up Calibrator Menu Reference: 12.16 Options Default MillipaK 4QPM Controller Manual Page 47 13/08/03... -
Page 48: Line Contactor Drop Out
Line contactor dropout operation can be enabled or disabled in the setup menu. Line Contactor Drop out Power Up Calibrator Menu Reference: 12.10 Options Default Line Contactor Dropout Timer Immediate Calibrator Menu Reference: 11.06 Minimum Maximum Step Size Typical Value MillipaK 4QPM Controller Manual Page 48 13/08/03... -
Page 49: Safety Features
Alternatively, the system may be programmed only to check FS1 at power on. This option is programmable: Direction Switch Checking Power Up Calibrator Menu Reference: 12.08 Options Default MillipaK 4QPM Controller Manual Page 49 13/08/03... -
Page 50: Fs1 Recycle
This feature is implemented as an option and is selected in the PERS setup: FS1 Recycle Power Up Calibrator Menu Reference: 12.07 Options Default MillipaK 4QPM Controller Manual Page 50 13/08/03... -
Page 51: Sro (Static Return To Off)
FS1 is active for more than the SRO Delay with no direction selected. In this case the FS1 will need to be recycled. Static Return to Off POWER UP Calibrator Menu Reference: 12.02 Options Default SRO Delay Immediate Calibrator Menu Reference: 11.07 Minimum Maximum Step Size Typical Value MillipaK 4QPM Controller Manual Page 51 13/08/03... -
Page 52: Belly Switch
Belly Delay Immediate Calibrator Menu Reference: 11.03 Minimum Maximum Step Size Typical Value 0.1S 5.0S 0.1S 1.0S Belly Style Power Up Calibrator Menu Reference: 12.13 Options Default Normal Continuous Normal MillipaK 4QPM Controller Manual Page 52 13/08/03... -
Page 53: Anti-Rollback
______________________________________________________________________________ Anti-Rollback This is a standard SEVCON feature and is used to help prevent roll back conditions on ramps. If the driver reselects the previous direction after a neutral condition, braking is not attempted, and full drive power is available to restart on a hill. -
Page 54: Anti-Rolloff
The Roll-Off strength is not adjustable but can be enabled and disabled using the Roll-Off Enable option. Roll-Off Enable Immediate Calibrator Menu Reference: 11.01 Options Default Roll-Off E-Brake Power On Calibrator Menu Reference: 12.05 Options Default MillipaK 4QPM Controller Manual Page 54 13/08/03... -
Page 55: Fail-Safe
Every time the controller is powered-up, the software checks that the fail-safe circuit is able to switch off the MOSFETs and open the contactors. MillipaK 4QPM Controller Manual Page 55 13/08/03... -
Page 56: Controller Protection Features
LED will flash 8 times. Inspection of the calibrator fault messages will indicate which unit is in thermal cutback. Thermal Cutback Characteristic Armature Current Limit Temperature (DegC) Armature Current Limit Figure 6: Armature Thermal Cutback Characteristic MillipaK 4QPM Controller Manual Page 56 13/08/03... - Page 57 C, then the current limit is increased by 1% of the ABR. The current limit can be reduced to a minimum of 60% of the ABR. The system will limit the current through the armature to the calculated limit during drive and braking. MillipaK 4QPM Controller Manual Page 57 13/08/03...
- Page 58 12.09 Options Default Current Cubed Lower Limit Immediate Calibrator Menu Reference: 8.01 Minimum Maximum Step Size Typical Value Current Cubed Upper Limit Immediate Calibrator Menu Reference: 8.02 Minimum Maximum Step Size Typical Value MillipaK 4QPM Controller Manual Page 58 13/08/03...
-
Page 59: Safe Operating Area (Soa)
For most applications SOA will have little or no effect on the operation of the controller. Its effect is more significant in protecting the controller against adverse loads such as damaged motors and static test rigs. 24-48V Controllers % On Figure 7: SOA Characteristic MillipaK 4QPM Controller Manual Page 59 13/08/03... -
Page 60: Under-Voltage And Over-Voltage Protection
Step Size Typical Value 14.5V Low V Start 0.5V 16.0V High Voltage Start Immediate Calibrator Menu Reference: 11.10 Minimum Maximum Step Size Typical Value System High V 0.5V High V Cutout Voltage Cutout MillipaK 4QPM Controller Manual Page 60 13/08/03... - Page 61 The maximum High Voltage Cutout depends on the level of the System Voltage item. If the System Voltage is set to 36V or lower, then the maximum is 50.0V. If the System Voltage is set greater than 36V, then the maximum is 58.0V. MillipaK 4QPM Controller Manual Page 61 13/08/03...
-
Page 62: Pcpak
Program Mode The MillipaK 4QPM controller must be configured into program mode to allow the down load of application software only into the flash memory when using PCpaK. Pin 16 of the 16-way molex (connector B) connector must be connected to pin 1 (key switch input). The controller will automatically enter program mode when it is keyed on and the system status LED shall remain off. - Page 63 Digital 1 Switch Digital 2 Switch Digital 3 Switch Digital 4 Switch Digital 5 Switch Digital 6 Switch W Version S/W Revision No. Date No. ID1 No. ID2 Pers Checksum Voltage T OP MillipaK 4QPM Controller Manual Page 63 13/08/03...
-
Page 64: Commissioning Checklist
Power wiring checked, shortest routes taken where possible? Light wiring checked; use calibrator to verify controller correct switch operation. Accelerator set-up and checked 0 – 100%? Personalities are all set, checked and record filled out? MillipaK 4QPM Controller Manual Page 64 13/08/03... -
Page 65: Personality Record
12.04 Seat Cuts Pump OFF/ON 12.05 Roll-Off Electro brake OFF/ON 12.06 Reverse Speed Limit OFF/ON 12.07 FS1 recycle on Dir Change OFF/ON 12.08 Dir Sw Seq Checking OFF/ON 12.09 Motor Thermal Protection OFF/ON MillipaK 4QPM Controller Manual Page 65 13/08/03... - Page 66 High Speed Mode NORMAL/MOMENTARY 12.13 Belly Style NORMAL/CONTINUOUS 12.14 Power Steer Trigger FS1/SEAT/DIRECTION/ 12.15 Foot-brake Priority DRIVE/FOOTBRAKE 12.16 Buzzer Alarm Off/REVERSE+ROLLOFF/ALL 12.17 Digital I/O 12.18 Analogue I/P 12.19 System Voltage Table 9: Personality Record MillipaK 4QPM Controller Manual Page 66 13/08/03...
-
Page 67: Fault Finding
No drive allowed until power up autozero has Autozero Not Taken been taken FS1 switch remained closed during a direction FS1 Recycle change FS1 switch selected for greater the SRO delay SRO Fault with Direction switches open. MillipaK 4QPM Controller Manual Page 67 13/08/03... -
Page 68: Fault Clearance
Drive 1 On checks (failsafe circuit disabled). Table 11: Fault Numbers and Descriptions Fault Clearance Any fault indication will be cleared by re-initiating the start sequence after the cause of the fault has been removed. MillipaK 4QPM Controller Manual Page 68 13/08/03... -
Page 69: Fault Reporting Form
______________________________________________________________________________ Fault Reporting Form Sevcon is committed to improving the quality if all of its products. Please help us by using this form to report faults to Sevcon. Please give as much detail as possible. Use extra sheets if required. Fax this form to +44 191 482 4223. -
Page 70: Software Version And Serial Number Indication
The MillipaK range of controllers use the latest FLASH technology to allow In System Reprogramming. This is achieved without having to remove the controller from its installation – all that is needed is connection to the 6-way calibrator socket. MillipaK 4QPM Controller Manual Page 70 13/08/03... -
Page 71: Specifications
Digital Input Impedance The digital inputs are internally pulled up and are active LOW. They therefore must be connected to battery minus to operate a function. Maximum resistance to battery minus to operate is 500ohms. MillipaK 4QPM Controller Manual Page 71 13/08/03... -
Page 72: Emc Guidelines
The complete installation should be documented, in detail, and faithfully reproduced on all production vehicles. When making changes, consider their effect on compliance ahead of any consideration of cost reduction or other “improvement”. MillipaK 4QPM Controller Manual Page 72 13/08/03... -
Page 73: Ordering Information
HP = High Power For panels then the voltage, current and logic numbers should be used to describe the traction controller. Examples: 330A 4QPM controller 633T43801 330A 4QPM controller with Soft Start 633T43901 MillipaK 4QPM Controller Manual Page 73 13/08/03...
Need help?
Do you have a question about the MillipaK 4QPM and is the answer not in the manual?
Questions and answers