
Related Manuals for Interacoustics VisualEyes 505


Summary of Contents for Interacoustics VisualEyes 505
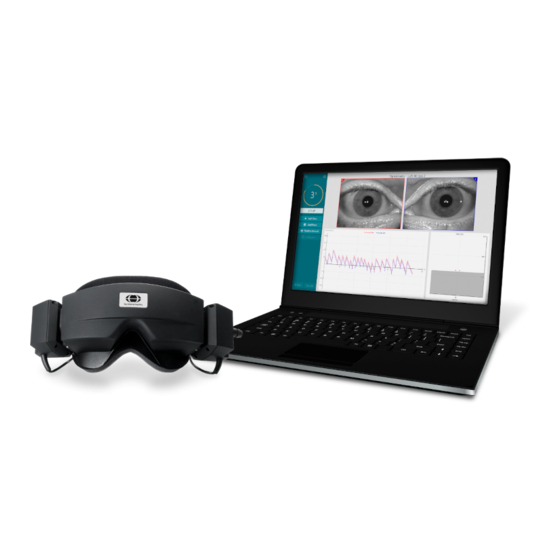
- Page 1 Science made smarter Instructions for Use - EN VisualEyes™ Micromedical by Interacoustics...
- Page 2 All rights reserved. Information in this document is proprietary to Interacoustics⅍. The information in this document is subject to change without notice. No part of this document may be reproduced or transmitted in any form or by any means without a prior written permission of Interacoustics⅍.
-
Page 3: Table Of Contents
Table of contents Introduction ............................ 1 About this manual ........................1 Intended use ..........................1 Contraindications ........................2 Product description ........................2 1.4.1 Standard configurations without rotary chairs ..............2 1.4.2 Standard configurations with rotary chairs ................ 5 1.4.3 Included and optional parts ....................7 1.4.4 Additional parts based on VNG goggle type .............. - Page 4 2.9.1 TV considerations ......................50 2.9.2 Windows display settings ....................50 2.9.3 VisualEyes™ software settings ..................51 2.9.3.1 Stimuli ........................... 51 2.9.3.2 Hardware delay ......................52 2.9.3.3 DVA stimulus ........................ 55 Language settings ....................... 56 Data and video storage ....................... 57 2.11.1 Session data ........................
- Page 5 3.11.1 Session review ......................... 94 Review patient videos ......................95 Research module ........................ 97 3.13.1 Nystagmus parameters ....................97 3.13.2 Data export ........................97 System shutdown ........................ 98 Care and maintenance ......................... 99 How to clean the VisualEyes™ system .................. 99 Warranty and service ......................
-
Page 6: Introduction
This manual is valid for VisualEyes™ 505, VisualEyes™ 515, VisualEyes™ 525, Orion Reclining, Orion Comprehensive (+ Basic), Orion Auto-Traverse (+ Basic), and VisualEyes™ EyeSeeCam with software version 3.1 These products are manufactured by: Interacoustics A/S Audiometer Allé 1 5500 Middelfart Denmark Tel.:... -
Page 7: Contraindications
VisualEyes™ EyeSeeCam is intended for patients from 5 years of age and above. The patient must be physically sound as the procedures include some physical stimulation/movement. The patient must be able the see the target without the use of spectacles. Contraindications VNG and vHIT testing may be contraindicated in patients who exhibit the following: blindness, broken nose or other face/head trauma, recent eye surgery and lazy eye. - Page 8 On top of the standard modules, different optional add-on modules can be added to some of the configurations: VORTEQ™ Assessment (VisualEyes™ 505 / VisualEyes™ 515 / VisualEyes™ 525) • VORTEQ™ Assessment is an add-on module including the VORTEQ™ 2 Generation IMU and headband for head position and velocity tracking.
- Page 9 Table 1.4-1 License Overview (without Rotary Chairs): VisualEyes™ VisualEyes™ VisualEyes™ VisualEyes™ EyeSeeCam Video Frenzel Spontaneous Nystagmus Gaze Dix Hallpike Positional Bithermal Caloric* Optokinetic Smooth Pursuit Saccade Ocular Counter Roll w. torsional tracking Saccadometry EyeSeeCam vHIT ADD-ON: VORTEQ™ Assessment** Dynamic Visual Acuity Dix Hallpike Advanced Lateral Head Roll Gaze Stabilization Test...
-
Page 10: Standard Configurations With Rotary Chairs
1.4.2 Standard configurations with rotary chairs Rotary chairs can be combined with VisualEyes™ 515 and VisualEyes™ 525, as described below. The Orion Comprehensive and the Orion Auto-Traverse can also be configured as Orion Comprehensive Basic and Orion Auto-Traverse Basic. These include only the tests that can be performed inside the chair enclosure. - Page 11 Table 1.4-2: License Overview (with Rotary Chairs): Orion R + Orion R Orion C Orion AT Orion C Orion AT VE515 + VE525 Basic Basic + VE525 VE525 Video Frenzel Spontaneous Nystagmus Gaze Dix Hallpike Positional Bithermal Caloric* Optokinetic Smooth Pursuit Saccade Ocular Counter Roll Saccadometry...
-
Page 12: Included And Optional Parts
1.4.3 Included and optional parts VisualEyes™ VisualEyes™ VisualEyes™ VisualEyes™ Orion AT/C EyeSeeCam Basic Included major parts: Included major parts: Included major Included major Included major parts: parts: parts: • VNG goggle of • VNG goggle of choice choice VNG goggle of EyeSeeCam Orion Auto- •... -
Page 13: Additional Parts Based On Vng Goggle Type
1.4.4 Additional parts based on VNG goggle type Side Mount USB Side Mount Top Mount Front Mount (2D-VOGFW) FireWire (BG4.0USB / (USBM2.1A (2D-VOGFW) BG4.0KUSB) USBM2.1P) Included major parts: Included major parts: Included major parts: Included major parts: USB 2.0 camera module FireWire ®... -
Page 14: Additional Parts Based On Add-On Modules
1.4.6 Additional parts based on add-on modules VORTEQ™ VORTEQ™ Research Static SVV Diagnostic Assessment Module Module Compatible VisualEyes™ VisualEyes™ 505 VisualEyes™ 505 VisualEyes™ 505 • • • • 525 (top mount / (top mount / side VisualEyes™ 515 VisualEyes™ 515 with: •... -
Page 15: Warnings And Precautions
Always refer to qualified/authorized personnel for product service. No modification (if necessary) should be done to this equipment/its component without authorization from Interacoustics. 3. This equipment is intended to be connected to other equipment thus forming a Medical Electrical System. - Page 16 4. A separation device (isolation device) is needed to isolate the equipment located outside the patient environment from the equipment located inside the patient environment. In particular, such a separation device is required when a network connection is made. The requirements for separation devices are defined in IEC 60601-1, edition 3, clause 16.
- Page 17 Within the European Union it is illegal to dispose electric and electronic waste as unsorted municipal waste. Electric and electronic waste may contain hazardous substances and must therefore be collected separately. Such products will be marked with the crossed-out wheeled bin.
-
Page 18: Safety Features And Complaints Handling
Upon receipt of any serious incident with serious health impact for the patient or user (serious adverse events), Interacoustics shall ensure that the regulatory authority in patient’s home country is informed according to the vigilance requirements. Interacoustics shall handle all the product complaints and adverse events as per the internal procedure. -
Page 19: Unpacking And Installation
Unpacking and installation Unpacking and inspection Check shipping box As soon as you receive the instrument, please check the shipping box for any sign of rough handling or damage. If the box is damaged, keep the shipping material as it may be required for inspection by the carrier regarding any potential insurance claim. -
Page 20: Markings And Symbols
Failing to do so may endanger the environment. The CE-mark in combination with MD symbol indicates that Interacoustics A/S meets the requirements of the Medical Device Regulation (EU) 2017/745. - Page 21 This product contains a component (Orion Comprehensive/Auto-Traverse chair) of ‘Class 2 Laser beam’. Hence, do not look directly into the laser beam Keep dry Transport and storage temperature range Transport and storage humidity limitations ETL listing mark Logo D-0134090-A – 2022/11 VisualEyes™...
-
Page 22: To Know Before You Start The Installation
1. You must have administrative rights to the computer on which you install the VisualEyes™ software. 2. Interacoustics will not guarantee the functionality of the system if any other software is installed on the computer, with the exception of software delivered by Interacoustics and OtoAccess®. -
Page 23: Pci Expresscard
Windows Power Options: Navigate to Control Panel > Power Options. Select the “High Performance” power plan, and open “change plan settings” and “Change advanced power settings”. On battery: Never Hard disk > Turn off hard disk after: • Plugged in: Never On battery: Maximum Performance Wireless Adapter Settings >... - Page 24 Click the Micromedical VisualEyes™ Installer to initiate the installation. The VisualEyes™ Setup Wizard pops Check the box to accept the “license terms and conditions”. If a previous version of VisualEyes™ has been installed on the computer, checking “Migrate any existing VisualEyes system settings”...
-
Page 25: Demo Patients
The VisualEyes™ software includes demo patients that you can import into OtoAccess® Database for demos. The demo patients are available at the following path after the VisualEyes™ software installation: C:\Program Files (x86)\Interacoustics\Micromedical VisualEyes™\Demo data Please refer to the OtoAccess® Database documentation for further instructions on how to import patients into the database. -
Page 26: Uninstalling Visualeyes
2.5.2 Uninstalling VisualEyes™ Windows® 10 and Windows® 11 VisualEyes™ software removal is possible from Programs and Features. Open Windows® Control Panel and then select Programs and Features. If the option Category is used, then select Uninstall a program in Programs. Select Micromedical VisualEyes™. -
Page 27: Vng And Vhit Goggles
2.6.1 VNG and vHIT goggles Depending on the configuration, the VisualEyes™ system comes with a variety of VNG and vHIT goggles: VisualEyes™ EyeSeeCam: EyeSeeCam goggle • Orion Auto-Traverse Basic and Comprehensive Basic: Top Mount goggle • • VisualEyes™ 505/515/525: Side/Top/Front Mount goggles 2.6.1.1 Side mount goggles The VisualEyes™... - Page 28 Figure 2.6-3: Hexagon fixation screws on the top and bottom of the side mount goggle, used for fixation of a camera or fixation of a cover (in picture) Each camera on the side mount goggle contains three knobs for image adjustment: 1.
-
Page 29: Top Mount Goggles
2.6.1.2 Top mount goggles The VisualEyes™ top mount goggles come with an easy-to-place cover over the portal for vision--denied testing. Side-lights on the goggles are programmed to flash to remind the operator which ear to irrigate during the caloric test and are also used to provide illumination when placing the cover on the goggles. The knobs on the top side of the goggle adjust the focus for the optimal image, and the switch on the left side of the goggles can be used to start and stop tests. -
Page 30: Eyeseecam Goggle
Hardware setup: 1. Insert the camera into the portal on the mask. Ensure that the camera is placed in the correct orientation by placing the camera with the “UP” label pointing upwards. 2. Connect the USB mini-B connector to the connector on the camera. 3. -
Page 31: External Room Camera
Figure 2.6-9: Calibration laser on the EyeSeeCam goggle. Hardware setup: 1. Connect the USB mini-B connector to the connector on the EyeSeeCam camera. 2. Connect the other end of the USB cable to the supplied USB hub. Ensure that the hub is powered through the external power supply. -
Page 32: Foot Switch And Rf Remote Control
2.6.3 Foot switch and RF remote control VisualEyes™ 505/515/525, Orion Comprehensive Basic, and Orion Auto-Traverse Basic are all delivered with either a foot switch or a remote control. These can be used to start/stop the tests away from the computer. The RF remote can also be used to restart, turn the fixation light on/off, or to center the camera image (if used with the top mount goggle): 1. -
Page 33: Caloric Irrigators (Optional)
2.6.4 Caloric irrigators (optional) AquaStim and AirFx can be added to VisualEyes™ 515/525 for water or air irrigation. The caloric irrigators can be controlled through the VisualEyes™ software. Figure 2.6-13: AquaStim for water irrigation (left), and AirFx for air irrigation (right) For fill- and installation instructions, please refer to separate documentation for AquaStim or AirFx. -
Page 34: Digital Light Bar (Optional)
2.6.5 Digital Light Bar (optional) The Digital Light Bar can be added to the VisualEyes™ 525 system. This can be used as visual stimuli for oculomotor tests. The Digital Light Bar is attached to a tripod that can be adjusted in height, and the direction of the stimuli can be altered between horizontal and vertical by rotating the Digital Light Bar via the hinge connected to the tripod. -
Page 35: Vorteq™ 2Nd Eneration Imu (Optional)
2.6.6 VORTEQ™ 2nd eneration IMU (optional) The VORTEQ™ 2 Generation IMU is delivered with the VORTEQ™ Assessment and VORTEQ™ Diagnostic modules, and is used to measure the patient’s head movement and positioning in space during testing. The VORTEQ™ Assessment module can be added to VisualEyes™ 505, 515, and 525, and the VORTEQ™... -
Page 36: Optotype Tests
Set the Connection Type to ”USB”. If the device is properly connected, the Board Status should be green. Figure 2.6-19: Configuration of VORTEQ™ 2nd Generation IMU in System Default Settings > Head Sensor 6. If wireless connection is desired, connect the USB dongle to a USB port on the computer or on the USB hub, and select ”Bluetooth”... -
Page 37: Rotary Chairs (Optional)
2.6.7 Rotary chairs (optional) Several different rotary chairs can be added to the VisualEyes™ system. The VisualEyes™ software supports below rotary chairs: Orion Reclining • • Orion Auto-Traverse • Orion Comprehensive • Nydiag 200 System 2000 Reclining • System 2000 Auto-Traverse •... -
Page 38: Reclining Rotary Chair
2.6.7.1 Reclining rotary chair VisualEyes™ 515 and VisualEyes™ 525 can be used with the reclining rotary chairs. The system supports the Orion Reclining, Nydiag200, and System 2000 Reclining. The reclining rotary chair allows for sinusoidal harmonic acceleration (SHA) and velocity step testing. The reclining rotary chair can also be used as the exam table for positional and caloric testing. - Page 39 Figure 2.6-21: Configuration of Nydiag 200 Reclining Chair Figure 2.6-22: Configuration of System 2000 Reclining Chair D-0134090-A – 2022/11 VisualEyes™ - Instructions for Use - EN Page 34...
-
Page 40: Auto-Traverse & Comprehensive Rotary Chairs
Figure 2.6-23: Configuration of Orion Reclining Chair 2.6.7.2 Auto-Traverse & Comprehensive rotary chairs The Auto-Traverse & Comprehensive rotary chairs are available with VisualEyes™ 525, Orion Comprehensive Basic, and Orion Auto-Traverse Basic. The user gets the additional test options of the sinusoidal harmonic acceleration (SHA) test and the velocity step test by combining the VisualEyes™... - Page 41 For SVV testing, the patient will use the SVV remote. This will rotate the SVV line by 0.1° counter clockwise (left button) or clockwise (right button). The buttons can be held down as well to rotate the SVV line incrementally until the button is released. Figure 2.6-25: SVV remote for Orion Auto-Traverse/Comprehensive rotary chair The observation camera for the Orion Auto-Traverse/Comprehensive chair is placed inside the chair enclosure, and the monitor is placed near the operator.
- Page 42 Figure 2.6-27: Configuration of Orion Auto-Traverse/Comprehensive Figure 2.6-28: Configuration of System 2000 Auto-Traverse/Comprehensive D-0134090-A – 2022/11 VisualEyes™ - Instructions for Use - EN Page 37...
-
Page 43: Auto-Traverse & Comprehensive Rotary Chairs Optional Add-Ons
2.6.7.3 Auto-Traverse & Comprehensive rotary chairs optional add-ons The Auto-Traverse and Comprehensive chairs have two optional add-ons. Child Option Accessory kit for Orion Comprehensive/Auto-Traverse The Auto-Traverse/Comprehensive rotational chairs can be configured with a child option accessory kit including an infant car seat, monocular camera, a small-face goggle and a pediatric observation camera. The pediatric observation camera is mounted to a pole which fits into the bracket at the footrest. -
Page 44: Rotary Chair Calibration & Validation
Figure 2.6-30: Pediatric observation camera attached to the Orion Auto-Traverse/Comprehensive chair and connected to the USB ports on the back of the chair EOG Accessory kit for Orion Comprehensive/Auto-Traverse The Auto-Traverse/Comprehensive rotational chairs can be configured with an electrode amplifier built into the back of the chair frame to test patients with electrode lead wires for ENG evaluations. - Page 45 Figure 2.6-31: Selection of rotary chair type As part of installation checks, the operator can validate and calibrate the system. Once the installation is done, the operator must validate the system. By choosing the Validation option under Maintenance Routines, the operator can perform Sine Wave Validation. Click Go on the Sine Wave Validation screen.
-
Page 46: Additional Steps For Auto-Traverse And Comprehensive Chairs
Figure 2.6-33: Drift and Velocity Tach Calibration 2.6.7.5 Additional steps for Auto-Traverse and Comprehensive chairs For otolith function testing, a 0 to 7 cm micro-centrifuge option is available. The chair seat should be centered laterally on the chair base. If the scale shows the chair is off-center, enter the current chair off-center position under ”Current Lateral Position (cm)”, then select the direction the chair is from center (Left / Right). - Page 47 Laser check Select the stimulus type as Laser and Drum from the drop-down menu. For Settings and Calibration, select ”Laser”. Figure 2.6-35: Laser stimuli settings for the Auto-Traverse/Comprehensive chair Select the Center position and click ’Go’ under the Laser Angle Test. The laser light should put a red target on the booth wall depending on the position selected (Center, Left 15, Right 15, Left 25, Right 25 etc.).
- Page 48 Figure 2.6-36: Drum stimuli settings for the Auto-Traverse/Comprehensive chair If the sine wave does not show superimposed lines, select the ’Calibration’ option. Click the Go button under Drift Calibration and adjust the drift using the left / right arrow buttons to stop any drum movement. Click Stop.
-
Page 49: Datalink (Optional)
2.6.8 DataLink (optional) DataLink can be added to VisualEyes™ 515 and VisualEyes™ 525 through the “EOG Accessory kit for VNG”. This can be used to perform ENG tests for patients who cannot be tested with VNG goggles. DataLink measures eye position with electrodes attached to the patient. The EOG Patient Cable connectes to the DataLink, and the color coded lead wires connect to the EOG Patient Cable and snap on the electrodes attached to the patient. - Page 50 Figure 2.6-39: Improper detection of DataLink board (minilab 1008) as board#0 with System 2000 Comprehensive/Reclining chair To solve this, change the board number by right clicking on the board in Instacal and click “Change Board#...” Configure instacal so the DataLink (miniLAB 1008) is Board#1, and the chair (USB-231 / PCI-DAS6025) is Board#0.
-
Page 51: Trv Chair (Optional)
Installing DAQ hardware driver for Orion chair, System 2000 chair, and DataLink Open Windows® Explorer. Navigate to the following location: C:\Program Files (x86)\Interacoustics\Micromedical VisualEyes™\Driverfiles and run the program icalsetup.exe. Click on Setup to begin installing InstaCal. -
Page 52: Hardware Registration And Licensing
Ensure that the CAN motor control cable from the Nydiag 200 chair is connected to the computer’s USB port. Open Windows® Explorer. Navigate to the following location: C:\Program Files (x86)\Interacoustics\Micromedical VisualEyes™\Driverfiles and run the program kvaser_drivers_setup.exe. When asked which components should be installed, choose the default selections for installing the drivers (32/64-bit x86), Start Menu Shortcuts, and GUI tools. - Page 53 Click the “Register” button to store the hardware in the system, and click “Next”. A new window for entering license keys will appear. Enter the license delivered with the system for the newly registered hardware. NOTICE Only the main VNG goggle and the EyeSeeCam goggle should hold licenses. These are the licenses that are delivered with the VisualEyes™...
- Page 54 D-0134090-A – 2022/11 VisualEyes™ - Instructions for Use - EN Page 49...
-
Page 55: Display Configuration
Display configuration VisualEyes™ requires a precise TV/projector configuration to present the visual stimuli properly, and to calibrate the eye tracking to the correct angles. When using a display for presentation of visual stimuli, it is therefore important to ensure that this is configured correctly according to the following instructions. 2.9.1 TV considerations It’s important that the screen dimensions are large enough for the software to present the visual stimuli at the desired angles. -
Page 56: Visualeyes™ Software Settings
Then select the “Monitor” tab in the top of the window, and select “60 Hertz” in the drop down selection under Screen refresh rate. 2.9.3 VisualEyes™ software settings When the TV and Windows settings are configured correctly, launch the VisualEyes™ software, and configure the displays in the software using the following instructions. -
Page 57: Hardware Delay
• Measure and enter the width and height of the horizontal and vertical gridlines • Measure and enter the distance from the screen to the patient. NOTICE: The specified units to be entered in the software are determined by the Windows Regional format, and can be either cm or inches. - Page 58 The value currently set for the hardware delay can be found under System Default Settings > Stimuli. Clicking “Reset Delay”, will set the hardware delay to 0 ms. To adjust the hardware delay for the connected monitor for visual stimuli, the below instructions should be followed: 1.
- Page 59 2. After completion of the test, click on the subtest. 3. Go to Temporary Setup. 4. From Temporary Settings, click on Hardware Delay in the left panel. 5. The suggested adjustment for the hardware delay will be presented as Current Delay.
-
Page 60: Dva Stimulus
6. After clicking “Adjust Hardware Delay”, the adjusted value will be visible in System Default Settings > Stimuli. 7. In order to validate the new value for the hardware delay, perform another “Smooth Pursuit” test on a person known to have a normal response. -
Page 61: Language Settings
Language settings The language in the software can be set up by navigating to System Default Settings > General, and selecting the appropriate language in the drop-down selection menu (see ). The software will have Figure 2.6-2 to be restarted when the program language is changed. The languages available in the software are below: English (United States) Japanese (Japan) -
Page 62: Data And Video Storage
Figure 2.10-1: Setting up language from System Default Settings Data and video storage 2.11.1 Session data VisualEyes™ can store session data through OtoAccess® Database. The session data will be stored automatically when VisualEyes™ is opened through OtoAccess® Database, and the session data will be stored on the patient selected in the database. -
Page 63: Session Reports
2.11.3 Session reports Print to Database OtoAccess® Database can store session reports in pdf for fast and easy access without the need to launch the VisualEyes™ software for session reviews. To use this function, the operator must click “Print to Database” in the Session Review after each completed session. - Page 64 Figure 2.11-1: PDF Configuration section in System Default Settings > Print After following above instructions, a new “Create PDF” button will appear in the Session Review after a completed session. Clicking Create PDF will generate a PDF report in the selected data location, with the configured PDF filename.
-
Page 65: Operating Instructions
Operating instructions System startup When starting the VisualEyes™ system, please follow the below instructions: 1. Turn on power sources: Ensure that the PC systems and USB hub are power connected. If any components are connected through an isolation transformer, this must be turned on using the power switch. 2. -
Page 66: Main Screen
The ”Help” button will open up the ”Instructions for Use” and ”Additional Information” documents. These documents can also be found from the Windows File Explorer by navigating to ” C:\Program Files (x86)\Interacoustics\Micromedical VisualEyes\Operation Manual”. This folder also contains relevant quick guides. - Page 67 Figure 3.2-1: VisualEyes™ main screen D-0134090-A – 2022/11 VisualEyes™ - Instructions for Use - EN Page 62...
-
Page 68: System Default Settings
System default settings Clicking on “Configuration” from the main screen, and selecting “System Default Settings” will take the operator to the menu shown in Figure 3.3-1 This menu is used for setting up the system components and accessories, and general software settings, such as language and Video Storage Location. -
Page 69: Protocol Management
Protocol management Clicking on “Configuration” from the main screen, and selecting “Protocol Management” will take the operator to the menu shown in Figure 3.4-1 This menu is used for managing the protocols in the system. Protocols are composed of a list of tests and designated to be performed in a specific order at the preference of the clinician or clinic. -
Page 70: Default Protocols Delivered With Visualeyes™ Systems
3.4.1 Default protocols delivered with VisualEyes™ systems After registering and licensing the components of the VisualEyes™ system, the software will automatically generate one or more protocols depending on the licenses added. An overview of the automatically generated protocols is presented in Table 1.4-1. The Dix Hallpike and Headshake tests presented in the VisualEyes™... -
Page 71: Customized Protocols
3.4.2 Customized protocols Protocols can be customized to the desired settings of the operator. The operator can generate a new protocol by clicking “New Protocol” in the Protocol Management menu. When clicking “New Protocol”, the operator can choose to create a copy of the currently selected protocol by clicking “Yes”... -
Page 72: Patient Preparation
Patient preparation The operator and the patient should be aware of the below-listed points before starting a test. General: 1. Ensure that the goggles are sanitized. Disposable foam pads used with the side mounted camera goggles are meant for single use and should be replaced after testing every single patient to avoid cross infection. -
Page 73: Seat The Patient In The Reclining Rotary Chair
7. Before starting any test involving the Orion Auto-Traverse/Comprehensive chairs, a set of safety checks ( ) will appear if the software to confirm safety precautions have been taken. Each Figure 3.5-1 box in the safety checklist must be checked before testing can begin. To ensure the safety of the patient before rotating the patient in the chair, please use this checklist as a guide to ensure the patient’s safety during the test. -
Page 74: Seat The Patient In The Auto-Traverse/Comprehensive Chair
3.5.2 Seat the patient in the Auto-Traverse/Comprehensive chair Open the door to the booth enclosure. Unscrew the head support and move it up and out of the way. Guide the patient to sit and push into chair while avoiding the footrest (refer to Figure 3.5-3). Note that the footrest should not be used as a step to enter the chair. -
Page 75: Placing The Goggles On The Patient
Figure 3.5-5 Electrode montage positions for ENG evaluations The patient must be prepared with the electrodes based on the chosen montage type. The operator can verify the electrode placement against the labels on the pictures shown in the software. The default montage can be set from Configuration >... -
Page 76: Focus Adjustment
Top mount goggle: If using the top mount goggle, the images can be centered from the software by using the center eyes button from the eye tools menu, as described in section 3.6.3. Front mount goggle: If using the front mount goggle, use the center eyes button in the eye tools menu and manually adjust the camera in the goggle viewport. -
Page 77: Calibration
4. Toggle threshold sliders: Allows the operator to adjust the image contrast using the appearing scrollbars. The contrast should be adjusted so the eye tracking crosshair appears in the middle of the pupil when the patient is looking center, up, down, left, and right. The contrast will be adjusted automatically by default, and can be reset to automatic threshold adjustment by clicking the icon below each slider. -
Page 78: Standard Calibration
Figure 3.7-1: Calibration screen After entering the calibration screen, the operator should ensure that the source and stimuli are selected properly. This is done by first selecting the source in the drop down selection menu (1 in ), and Figure 3.7-1 afterward selecting the stimuli in the drop down selection menu (2 in Figure 3.7-1 Center the calibration stimulus for the patient using the target center slider (3 in... - Page 79 target has been accepted by the software, a yellow check mark will appear on the calibration screen at the specific target position. Figure 3.7-2: Calibration screen during standard calibration procedure. A yellow check marks appears at the accepted target positions After completion of the calibration, the check marks will turn green if the calibration values are within acceptable ranges ( ).
-
Page 80: Torsion Calibration
3.7.2 Torsion calibration Tests that include torsional tracking (e.g. Advanced Dix Hallpike, Ocular Counter Roll, and Lateral Head Roll) will need to perform a torsion calibration before use. For these tests, a Torsion calibration button will be present in the calibration screen ( ). -
Page 81: Eyeseecam Calibration
3.7.3 EyeSeeCam calibration For the EyeSeeCam goggle, the standard calibration should be peformed first. Open the calibration screen, and select EyeSeeCam as input source, EyeSeeCam Laser as stimuli, and click start calibration. The standard calibration follows the same procedure as described in section 3.7.1, except that the EyeSeeCam laser always presents 5 stationary dots. -
Page 82: Eng Calibration And Impedance Test
Figure 3.7-9: EyeSeeCam Head Calibration results 3.7.4 ENG calibration and impedance test With ’DataLink’ or ’ENG in Chair’ selected as input source, the ’Impedance Test’ and ’Center Traces’ buttons will appear in the left panel on the calibration screen. Clicking the Impedance Test button will open the Impedance Test screen. - Page 83 Figure 3.7-10: Impedance Test screen. When the impedance test has been performed, a standard calibration can be performed by following the procedure in section 3.7.1. If the electrode traces for horizontal and vertical traces show drift, the traces can be manually centered using the Center Traces button.
-
Page 84: The Test Screen
Figure 3.7-11: Standard calibration with ENG The test screen When the system and the patient have been prepared, the tests can be performed. To enter a test session, select the desired protocol and click on ”BEGIN TESTING” from the main screen. - Page 85 After clicking “BEGIN TESTING”, the software will open a test session starting with the first test in the selected protocol. If a session was already created on today’s date with the same protocol for the selected patient, the software will continue from where the previous session was left.
-
Page 86: Performing The Tests
Performing the tests This section contains a short description on how to perform the tests available with the VisualEyes™ system. For a detailed description, please refer to Additional Information. 3.9.1 VisualEyes™ 505, VisualEyes™ 515 and VisualEyes™ 525 3.9.1.1 Video Frenzel The Video Frenzel test is available with VisualEyes™... -
Page 87: Positional
Figure 3.9-1 Chair in supine position for Dix-Hallpike with head support removed (Orion and System 2000) 3.9.1.4 Positional This is a vision-denied test and the test can be performed on an examination table/reclining chair. If the reclining chair is used for the test, install the head support on the chair (Orion and System 2000). Lock the chair with the foot brake if using the System 2000 reclining chair. -
Page 88: Oculomotor Tests
If the wrong ear or wrong temperature was tested by mistake, a message will appear at the end of the subtest asking if the wrong test was performed. Options for switching to the appropriate ear or temperature will be available when this message appears. This change is only available upon completing the test and cannot be changed thereafter. -
Page 89: Ocular Counter Roll
3.9.1.7 Ocular counter roll Side mounted/front mounted/top mounted goggle with camera with cover removed can be used for this test. If user wants to use VORTEQ™ IMU sensor for the test, they can perform the test using either by side mounted or top mounted goggles as they are compatible for attaching the sensor. -
Page 90: Vorteq™ Assessment
3.9.2 VORTEQ™ assessment VORTEQ™ Assessment can be added to VisualEyes™ 505, VisualEyes™ 515 and VisualEyes™ 525, and includes the Dynamic Visual Acuity, Dix Hallpike Advanced, Lateral Head Roll and Gaze Stabilization tests. The tests all require the use of the VORTEQ™ IMU. 3.9.2.1 Dynamic Visual Acuity This test does not require any goggle. -
Page 91: Dix Hallpike Advanced
3.9.2.3 Dix Hallpike Advanced The Dix Hallpike Advanced is performed similarly to the Dix Hallpike test described in section 3.9.1.3. However, the Dix Hallpike Advanced also enables torsional eye movement recordings, and uses the 3D head model to get feedback on the patient’s head position. The spatial position of the head will be presented with a black bar on the two position sliders. -
Page 92: Eyeseecam Vhit
3.9.4 EyeSeeCam vHIT The test is performed with the EyeSeeCam goggle, and includes subtests for Lateral, RALP, and LARP vHIT testing, along with the SHIMP test. Ensure that the patient is seated in an upright position and 1.5 meters away from the wall on which the red laser dots are projected on to. Before testing, conduct the calibration as described in section 3.7.3. -
Page 93: Performing The Test
3.9.4.3 Performing the test A three-dimensional head model with the semicircular canals ( ) is displayed in the upper right Figure 3.9-6 corner of the screen. The EyeSeeCam head sensor will automatically reset if the sensor is left still. At the start of the test, have the patient look straight ahead and keep the head still. - Page 94 Figure 3.9-8 VHIT EyeSeeCam analysis As each subtest is performed, the software displays each subtest’s analysis on a page ( ). The Figure 3.9-8 analysis displayed is defined by the page navigation at the top of the screen. Once the Lateral, LARP, and RALP tests have been performed, the EyeSeeSix report can be created from the vHIT for EyeSeeCam summary’s side panel.
- Page 95 To view the information in a tabular form, click on the Numerical Results button ( ). The text can be Figure 3.9-10 copied (click and drag or by using Ctrl + A on the keyboard) and pasted into Excel or other spreadsheet software.
- Page 96 Performing test: 1. Have the patient relax his/her neck, open his/her eyes wide and fixate on the center dot in the 5-dot pattern. 2. Turn the patient’s head to the right or the left. The 5-dot laser pattern will move with the head so they are now located in a new position.
-
Page 97: Test Review Screen
Figure 3.9-13 Result screen for SHIMP test Test review screen Once the operator has ended the test, the software will allow the operator to review the patient’s response during the test. The test review screen ( ) contains the playback menu, timeline, and eye and room Figure 3.10-1 video recordings. -
Page 98: Editing Tools
Go to previous frame (hold to play backwards in slow motion). Play/pause. Go to next frame (hold to play forwards in slow motion). Go back 10 secs in video playback. 3.10.1 Editing tools For most test types, editing tools are available from the Test Review screen. The tools available are highly dependent on the test type. -
Page 99: Session Review
Figure 3.11-2 Patient Sessions screen After selecting the patient session from the listing, click on the Jump to session review button to go to the Session Review screen. This will provide further options like export data, print session, preview, print to database, and etc. -
Page 100: Review Patient Videos
Figure 3.11-5 Session Review screen Click or touch the Finish button in lower left corner of the Session Review screen to return to the main screen. Review patient videos If video recording has been enabled during the patient sessions, the videos may be reviewed after testing. The recorded videos are available from the PATIENT VIDEOS menu from the main screen ( Figure 3.12-1 Figure 3.12-1: PATIENT VIDEOS button... - Page 101 In the Patient Videos menu, the videos are categorized by date and test type. Figure 3.12-2: Patient videos display categorized by date and type of test To playback the video click on the video file of interest. It will be launched in a compatible video player. Video of eye recordings (no raw data).
-
Page 102: Research Module
Figure 3.12-4: Export Video Files menu. Destination folder can be selected and it is possible to combine eye and room videos Research module The Research Module is an advanced add-on feature for researchers and scientists as discussed below. 3.13.1 Nystagmus parameters With the Research Module, the clinician can modify nystagmus parameters to create their own customized test protocol. -
Page 103: System Shutdown
System shutdown Turn off computer Firstly, close the VisualEyes™ software by returning to the main screen and selecting the Exit button. Close the OtoAccess® Database software. Shut down the computer using Start > Shut down. Turn off stimulus Turn off the TV/projector. Turn off accessories If the Orion Reclining Chair or Nydiag 200 Reclining Chair is used, turn off the power switch in the base of IMU off if applicable. -
Page 104: Care And Maintenance
Interacoustics warrants that: • The VisualEyes™ system is free from defects in material and workmanship under normal use and service for a period of 24 months from the date of delivery by Interacoustics to the first purchaser • Accessories are free from defects in material and workmanship under normal use and service for... -
Page 105: Rotational Chair Error Messages
This warranty shall not apply to any subsequent owner or holder of the product. Furthermore, this warranty shall not apply to, and Interacoustics shall not be responsible for, any loss arising in connection with the purchase or use of any Interacoustics product that has been: •... - Page 106 Emergency stop error (applicable for Orion and System 2000 rotational chairs) If the operator presses the Emergency Stop button during the rotary chair test, the chair will stop, and the software will present the error message below. The operator can resume rotary chair testing by disengaging the emergency stop and restarting the test.
-
Page 107: Cameras Disconnecting
Watchdog timeout error (applicable for Orion Auto-Traverse/Comprehensive chair) If the system with an Orion Auto-Traverse/Comprehensive chair stops responding, the Emergency Stop circuit will activate and the chair, laser and optokinetic drum will turn off and gradually come to a stop. Following, the operator shall exit the test or go to the home screen and restarting the test will reset the watchdog timer. -
Page 108: General Technical Specifications
General technical specifications Minimum computer requirements Desktop PC: One PCI Express card available (FireWire® systems only). USB port required (expanded by USB hub) Intel i5 processor 2.5 GHz or better, and not older than 5th generation. Minimum 4 cores (4 threads). Minimum 8 GB RAM or more. -
Page 109: Goggles
Goggles Side Mount (2D-VOGFW) Quick Description: Goggle with side mounted cameras. This goggle is highly versatile and will be able to fit the use of most clinics as it can be configured with either FireWire or USB connection and either monocular or binocular. - Page 110 Top Mount (BG4.0USB) Quick Description: Goggle with top mounted cameras. This binocular goggle includes start/stop button on goggle, along with software controlled image centering. Also available with Asian Faceplate (BG4.0KUSB). Technical Specifications: Standards: Applied Part Type: BF according to IEC 60601-1 Operation Environment: Temperature: 15 –...
- Page 111 Front Mount (USBM2.1A) Quick Description: Goggle with front mounted camera. This monocular goggle includes a camera that can easily be interchanged between right and left eye. Also available as a smaller pediatric version (USBM2.1P) Technical Specifications: Standards: Applied Part Type: BF according to IEC 60601-1 Operation Environment: Temperature: 15 –...
- Page 112 EYESEECAM vHIT Quick Description: Lightweight monocular goggle for EyeSeeCam vHIT. The camera can be interchanged between right and left eye. Fits both pediatric and adult faces. Also available with Asian goggle frame version (EyeSeeCam vHIT ASIA). Technical Specifications: Standards: Applied Part Type: BF according to IEC 60601-1 Operation Environment: Temperature: 15 –...
-
Page 113: Accessories
Accessories VORTEQ™ IMU (2nd generation) Quick Description: Inertial Measurement Unit used to track head movement and position. The VORTEQ™ IMU is used with both the VORTEQ™ Assessment and VORTEQ™ Diagnostic modules, and is compatible with the side mount and top mount goggles. Technical Specifications: Interface: Wireless / USB 2.0... - Page 114 DIGITAL LIGHTBAR Quick Description: Digital Lightbar presenting visual stimuli for oculomotor testing. Technical Specifications: Interface: USB 2.0 Dimensions (L x W x H): 83.8 x 8.9 x 4.4 cm Weight: 1.2 kg Power: 5 VDC supplied by PC USB D-0134090-A – 2022/11 VisualEyes™...
-
Page 115: Trv Chair
TRV Chair TRV CHAIR Quick Description: Unique chair with 2-axis 360° rotation for diagnosis and treatment of Benign Paroxysmal Positional Vertigo (BPPV) in all semi-circular canals. Technical Specifications: Standards: Applied Part Type: B according to IEC 60601-1 Operation Environment: Temperature: 5 –... -
Page 116: Rotary Chairs
Rotary chairs ORION RECLINING ROTARY CHAIR Quick Description: Rotary chair with reclining options, for caloric, dix hallpike, and positional tests. Technical Specifications: Standards: Applied Part Type: B according to IEC 60601-1” “Protection class: Class I accordint to IEC 60601-1 Operation Environment: Temperature: 15 –... - Page 117 ORION AUTO-TRAVERSE / COMPREHENSIVE ROTARY CHAIR Quick Description: Rotary chair in enclosure with built-in laser and optokinetic drum for visual stimuli. With add-on packages it is possible to do ENG testing in the rotary chair and perform tests in pediatric patients. With the Orion Auto-Traverse, it is also possible to do off-axis rotation for dynamic SVV.
-
Page 118: Orion Auto-Traverse/Comprehensive Accessories
Shipping info: Shipping crate dimensions (LxWxH): Enclosure crate: 236x118x133 cm Chair crate: 119x175x100 cm Accessories pallet: 122x60x115 cm Power supply: 110VAC, 220VAC step down to 110VAC through included isolation transformer Orion Auto-Traverse/Comprehensive accessories PEDIATRIC OBSERVATION CAMERA Quick Description: Camera mounted on a unipod that can be attached to the Orion Auto-Traverse / Comprehensive. -
Page 119: Electromagnetic Compatibility (Emc)
Electromagnetic compatibility (EMC) This section is valid for the VisualEyes™ system including all variant of goggles. This equipment is suitable in hospital and clinical environments except for near-active HF surgical equipment and RF-shielded rooms of systems for magnetic resonance imaging, where the intensity of electromagnetic disturbance is high. - Page 120 To ensure compliance with the EMC requirements as specified in IEC 60601-1-2, it is essential to use only the following accessories as applicable: Item Manufacturer Model Goggle, 2-D VOGfw Interacoustics 2D VOGfw Goggle, BG4.0USB Interacoustics BG4.0USB Goggle, USB2.1A Interacoustics USB2.1A Goggle, USB2.1P...
- Page 121 Guidance and Manufacturer’s Declaration - Electromagnetic Emissions The ORION is intended for use in the electromagnetic environment specified below. The customer or the user of the ORION should assure that it is used in such an environment. Emissions Test Compliance Electromagnetic environment - guidance RF emissions Group 1...
- Page 122 Guidance and Manufacturer’s Declaration - Electromagnetic Immunity The ORION is intended for use in the electromagnetic environment specified below. The customer or the user of the ORION should assure that it is used in such an environment. Immunity Test IEC 60601 Test level Compliance Electromagnetic environment - guidance Floors should be wood, concrete or...
- Page 123 Guidance and Manufacturer’s Declaration — Electromagnetic Immunity The ORION is intended for use in the electromagnetic environment specified below. The customer or the user of the ORION should assure that it is used in such an environment, Immunity test IEC / EN 60601 test Compliance level Electromagnetic environment –...
-
Page 124: Return Procedure
If it is decided that it is necessary to return the instrument to Interacoustics, you must fill out a detailed report of your concern. In the delivery box and also at the end of this manual you will find a Return Report form, where you can describe the problem. - Page 125 Other : Date : Person : Please provide e-mail address or fax No. to whom Interacoustics may confirm reception of the returned goods: The above mentioned item is reported to be dangerous to patient or user In order to ensure instant and effective treatment of returned goods, it is important that this form is filled in and placed together with the item.
Need help?
Do you have a question about the VisualEyes 505 and is the answer not in the manual?
Questions and answers