Interacoustics VisualEyes 515 Instructions For Use Manual
Hide thumbs
Also See for VisualEyes 515:
- Instructions for use manual (46 pages) ,
- Additional information (136 pages) ,
- Instructions for use manual (125 pages)

Related Manuals for Interacoustics VisualEyes 515


Summary of Contents for Interacoustics VisualEyes 515
- Page 1 Science made smarter Instructions for Use - US VisualEyes™ 515/525 Micromedical by Interacoustics...
- Page 2 All rights reserved. Information in this document is proprietary to Interacoustics⅍. The information in this document is subject to change without notice. No part of this document may be reproduced or transmitted in any form or by any means without a prior written permission of Interacoustics⅍.
-
Page 3: Table Of Contents
Table of Contents INTRODUCTION ........................... 1 About this manual ....................... 1 Intended use ........................1 Contraindications ........................ 2 Product description ......................2 1.4.1 Minimum PC requirements ..................2 1.4.2 Included and optional parts ..................2 Warnings and precautions ....................5 Safety features and complaints handling ................ - Page 4 Starting the VisualEyes™ software................... 20 Room recording......................... 20 Patient preparation ......................21 4.5.1 Seat the patient in the reclining chair (Orion/System 2000/Nydiag 200) ....22 4.5.2 Seat the patient in the AT/C chairs (Orion/System 2000) ........22 4.5.3 Seat the infant patient in the AT/C chairs ............... 23 4.5.4 Electrode placement and impedance test for ENG evaluation .......
-
Page 5: Introduction
1.2 Intended use Videonystagmography (VNG): The Orion rotary chair is an optional accessory for VisualEyes 525/ VisualEyes 515 eye movement recording systems. he VisualEyes™ system provides information to assist in the nystagmographic evaluation, diagnosis and documentation of vestibular disorders. -
Page 6: Contraindications
The VisualEyes™ system is to be used by trained personnel only, such as audiologists, ENT surgeons, physicians, hearing healthcare professionals or personnel with a similar level of education. The device should not be used without the necessary knowledge and training to understand its use and how results should be interpreted. - Page 7 Table 1.4-1 Product description of VisualEyes™System Additional Accessory ENG* Test Availability Requirement 515 / 525 None Calibration 515 / 525 None Spontaneous nystagmus 515 / 525 Exam Table / Reclining Chair Dix Hallpike 515 / 525 Exam Table / Reclining Chair Positional Exam Table / Reclining Chair, 515 / 525...
-
Page 8: Minimum Pc Requirements
1.4.1 Minimum PC requirements The user must ensure that the chosen PC is complying to minimum PC requirements to be compatible to the VisualEyes™ system. Please refer to section for the recommended computer specifications. NOTICE: As a part of data protection, ensure to be compliant with the following points Use Microsoft supported operating systems Ensure operating systems are security patched Enable database encryption... - Page 9 Table 1.4-2 Detailed Description of Included and Optional components of VisualEyes™ USB camera systems FireWire ® camera systems Included parts* VisualEyes™ 515/525 installation media OtoAccess® Database media Handheld RF remote control and/or foot pedal Certificates and reports: e.g: VNG test result report, license certificate, certificate of conformity and if applicable safety test report.
- Page 10 USB camera systems FireWire ® camera systems Booth and accessories Booth observation camera Intercom Remote control for SVV line Tools and accessories for assembly Pediatric option - Child seat - USBM2.1P goggle w. front mounted camera - Pole mounted patient observation camera ENG on Chair option - Electrode skin prep pads - Set of 7 leadwires (40”)
-
Page 11: Warnings And Precautions
Always refer to qualified/authorized personnel for product service. No modification (if necessary) should be done to this equipment/its component without authorization from Interacoustics. 3. This equipment is intended to be connected to other equipment thus forming a Medical Electrical System. - Page 12 9. The manufacturer will make available on request circuit diagrams, component part lists, descriptions, calibration instructions, or other information that will assist service personnel designated by the manufacturer to repair those parts of this system. 10. For maximum electrical safety, turn off the power to the equipment when it is left unused. 11.
-
Page 13: Safety Features And Complaints Handling
(serious adverse events), Interacoustics shall ensure that the regulatory authority in patient’s home country is informed according to the vigilance requirements. Interacoustics shall handle all the product complaints and adverse events as per the internal procedure. - Page 14 D-0126445-A – 2020/08 VisualEyes™ 515/525 Instructions for Use - EN Page 1...
-
Page 15: Unpacking And Inspection
Failing to do so may endanger the environment. The CE-mark indicates that Interacoustics A/S meets the requirements of Annex II of the Medical Device Directive 93/42/EEC. TÜV Product Service, Identification No. - Page 16 Medical device Manufacturer Date of Manufacture Indicates a component is intended for one use, or for use on a single patient during a single procedure. Cross contamination risk Reference number Do-not-push symbol used with components that could easily tip over, such as the Digital Light Bar Chinese RoHS compliance standard where the product contains less than the maximum concentration value of lead, mercury, cadmium, hexavalent...
- Page 17 ETL listing mark Logo D-0126440-A – 2020/08 VisualEyes™ 515/525 Instructions for Use - US Page 4...
- Page 18 D-0126445-A – 2020/08 VisualEyes™ 515/525 Instructions for Use - EN Page 5...
-
Page 19: Setup And Installation
AHR and DVA. 3.2 Installation of the VisualEyes™ software If the computer is purchased from Interacoustics, all the software / databases / drives (e.g: OtoAccess® Database, VisualEyes™, rotational chair drivers) are preinstalled. If the customer wants to install VisualEyes™... -
Page 20: Nydiag 200 Reclining Chair
Its software is designed to be compatible with both Interacoustics A/S and Micromedical Technologies Inc. equipment. 3.4.1 Laptop/desktop PC The customer can choose between a laptop or desktop PC from Interacoustics, which comes with pre-installed software (Figure 3.4-1). Laptop systems are configured with an externally powered USB hub to connect additional devices. -
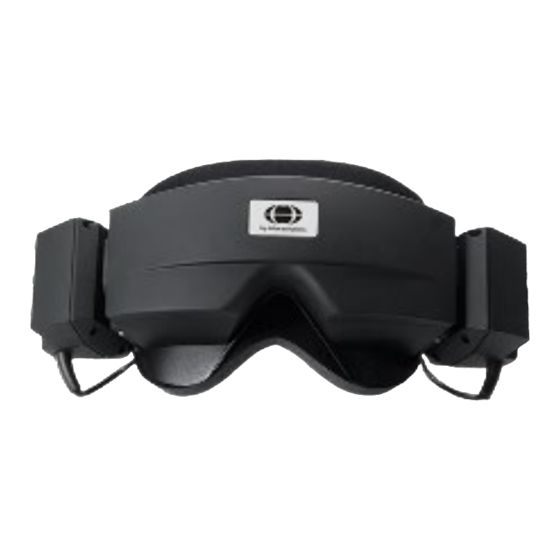
Page 21: Side Mounted Camera Goggles
Figure 3.4-2 TV, Projector Display and Digital Light Bar (DLB) 3.4.3 Side mounted camera goggles The VisualEyes™ side mounted goggles (Figure 3.4-3) allow the recording of eye movements during various test conditions, both with and without visual stimulation. The VisualEyes™ side mounted goggles use either FireWire®... -
Page 22: Front Mounted Camera Goggles
Figure 3.4-4 Top mounted camera goggles. Cover slips over front of goggles for vision-denied testing. The switch on the left side of the goggles starts and stops the test. 3.4.5 Front mounted camera goggles The front mounted camera goggles (Figure 3.4-5) use a single USB camera pressed into the camera portal on the front of the goggle’s mask. -
Page 23: Pediatric Observation Camera
Figure 3.4-6 EyeSeeCam camera and goggle with built-in IMU. 3.4.7 Pediatric observation camera The AT/C rotational chairs may be configured with the pediatric observation camera. The provided infant car seat may be used for pediatric seating. This camera is mounted to a pole which fits into the bracket and sits on the footrest. -
Page 24: Reclining Rotary Chair (Optional)
3.4.8 Reclining rotary chair (optional) The reclining rotary chair (Figure 3.4-8) provides sinusoidal harmonic acceleration (SHA) test and step test capability to the VisualEyes™ system. The reclining rotary chair can also be used as the exam table for positional and caloric testing. The backrest can be reclined to 30 from horizontal for caloric irrigations. -
Page 25: Foot Pedal (Optional)
Figure 3.4-9 AT/C rotary chair and booth enclosure. 3.4.10 Foot pedal (optional) The foot pedal (Figure 3.4-10) allows you to begin testing by pressing the foot switch so you have both hands free to look after the patient (e.g. Dix-Hallpike) or to operate other devices (e.g. caloric irrigators). Connection with the PC is via a USB port. -
Page 26: External Room Camera And Observation Camera
Please find the below example for better explanation: Before calibration, one can command to select ‘Calibration’ option which is shown in white background. After calibration, one can command to select ‘START’ option which is shown in white background. This way, the operator can perform below listed actions. Goes forward in the software •... -
Page 27: Vorteq™ Imu
The observation camera (Figure 3.4-13) is placed inside the booth of the AT/C chairs and the monitor is placed nearer to the operator. This enables the operator to monitor the patient inside the booth via the observation monitor screen. The observation video is not recorded or saved in the software. Figure 3.4-13 Observation camera and monitor screen 3.4.13 VORTEQ™... -
Page 28: Datalink
3.4.14 DataLink The operator can use Datalink (Figure 3.4-16) to perform the ENG tests (Spontaneous Nystagmus, Dix-Hallpike, Positional, Calorics, Gaze, Smooth Pursuit, Random Saccade, Saccadometry, Optokinetic, SHA, Step Velocity, VOR Supression and Visual VOR) using electrodes. These options are controlled with the licenses. Patients who cannot be tested with the video goggles may be candidates for ENG tests. -
Page 29: Systems Configured With A Rotational Chair
Laptop configurations will use a USB hub to connect devices that use an external power adapter. If a DataLink is connected to the system, it should connect either to a USB port on the monitor hub (tower computers) or directly to the laptop computer. -
Page 30: Auto Traverse And Comprehensive Chair Setup
Figure 3.5-3 VisualEyes™ with System 2000 reclining chair Figure 3.5-4 VisualEyes™ with Orion reclining chair For complete installation instructions regarding the reclining rotational chairs, please refer to the NyDiag 200, Orion and System 2000 rotary chair installation manuals. 3.5.4 Auto Traverse and Comprehensive chair setup The VisualEyes System can be configured with Orion Auto Traverse/Comprehensive and System 2000 Auto Traverse/Comprehensive chairs. - Page 31 Figure 3.5-5 VisualEyes™ with Orion Auto Traverse/Comprehensive Chair Figure 3.5-6 VisualEyes™ with System 2000 Auto Traverse/Comprehensive Chair D-0126440-A – 2020/08 VisualEyes™ 515/525 Instructions for Use - US Page 18...
- Page 32 D-0126445-A – 2020/08 VisualEyes™ 515/525 Instructions for Use - EN Page 19...
-
Page 33: Operating Instructions
4 Operating instructions 4.1 System startup 4.1.1 Turn on power sources Ensure that the laptop/PC systems and USB hub are power connected. Isolation transformers should be turned on using the power switch in case Orion rotational chair (R/AT/C) is in use. 4.1.2 Turn on accessories Goggles: Ensure that the goggle cameras (binocular or monocular) are connected to the computer, USB hub... -
Page 34: Patient Preparation
4.5 Patient preparation The operator and the patient should be aware of the below-listed points before starting a test. 1. Before starting a test, it is very important that the patient is provided with all the relevant information about a test and what he/she/guardian can expect out of a test such as general precaution, adverse effects etc. -
Page 35: Seat The Patient In The Reclining Chair (Orion/System 2000/Nydiag 200)
4.5.1 Seat the patient in the reclining chair (Orion/System 2000/Nydiag 200) If the rotational chair is to be used for a test, the patient must be seated appropriately as follows. Orion Reclining chair: The chair can be rotated using the electronic locking mechanism (ELM) switch (refer Figure 4.5-2) to control the chair movement. -
Page 36: Seat The Infant Patient In The At/C Chairs
4.5.3 Seat the infant patient in the AT/C chairs Open the door to the booth enclosure. Unscrew the head support and remove it. Slide the hook through the seat belt slot of the safety seat so that a hook is available on each side of the infant seat. Secure the infant seat and foam on top of the chair seat by attaching the hooks to the eye bolts on the chair frame. -
Page 37: Placing The Goggles On The Patient
The patient must be prepared with the electrodes based on the chosen montage type. The operator can verify the electrode placement against the labels on the pictures shown in the software. The default montage can be set from Configuration > System Default Settings > ENG. The patient’s skin has to be abraded with alcohol-free pumice pads and dried before placing the electrodes. -
Page 38: Testing The Patient
If the 5-point calibration is not achieved, the operator can use the ‘Default Calibration’ option to use the default calibration values. These values will provide an approximate calibration scaling; however, the accuracy of the measurements will be reduced when default calibration values are used. In general, the operator can accept the partially achieved calibration based on the clinical interest of evaluation (e.g. -
Page 39: Spontaneous Nystagmus
4.7.3 Spontaneous nystagmus This is a vision-denied test and the patient will look straight ahead with the goggle cover on. The operator will be able to watch the patient’s eyes either from the computer screen or from the TV or projector screen. When the test is started, the eye position graphs will be displayed. -
Page 40: Oculomotor Tests
Figure 4.7-2 Supine positional test. 4.7.6 Oculomotor tests The oculomotor tests include Gaze, Smooth Pursuit, Random saccade, Saccadometry, and Optokinetic tests. These tests are performed with the goggle cover removed so that the patient can follow targets as they move around on the TV, projector screen, or with the laser projected on the booth enclosure wall. -
Page 41: Video Head Impulse Testing (Vhit For Vorteq And Eyeseecam)
4.7.9 Video Head Impulse Testing (vHIT for VORTEQ and EyeSeeCam) vHIT for VORTEQ Ensure that the patient is seated in an upright position and the head rest of the rotational chair is taken off. Ensure the calibration is done before starting the test. Side mounted/top mounted goggle with camera can be used for this test. -
Page 42: Rotary Chair Tests
A spontaneous nystagmus test can also be performed as a caloric subtest, which is recommended when spontaneous nystagmus is present in the caloric position. When spontaneous nystagmus is detected, the average SPV value can be used to correct the caloric summary by toggling the Spontaneous Correction option in the left menu panel. -
Page 43: Rotational Chair Error Messages
4.8 Rotational chair error messages 4.8.1 Rotary chair speed error (applicable for Orion and System 2000 rotational chairs) If the rotary chair has not been calibrated previously, then the chair’s tachometer and signal traces will not align, resulting in the chair spinning slower or faster than intended. The operator gets the error message as shown in Figure 4.8-1. -
Page 44: Rotary Chair Reclined Position Error (Applicable For Orion/System 2000 Reclining Chair)
4.8.5 Rotary chair reclined position error (applicable for Orion/System 2000 reclining chair) If the Orion Reclining or System 2000 Reclining chair is reclined during a rotary chair test, the software will present an error message (Figure 4.8-5) to the operator. The operator can resume rotary chair testing by setting the chair upright and restarting the test. -
Page 45: Cameras Disconnecting
4.9 Cameras disconnecting If unusual behavior is experienced such as camera images dropping out and not coming back, USB device disconnects, or software not running as expected, perform the follow sequence to recover: Shut down the VisualEyes™ software completely. Unplug the main USB cable from the computer and leave it unplugged for 20 seconds. Plug the main USB cable back into the computer. - Page 46 D-0126445-A – 2020/08 VisualEyes™ 515/525 Instructions for Use - EN Page 33...
-
Page 47: Care And Maintenance
The VisualEyes™ system is free from defects in material and workmanship under normal use and • service for a period of 12 months from the date of delivery by Interacoustics to the first purchaser Accessories are free from defects in material and workmanship under normal use and service for a •... -
Page 48: Concerning Product Repair / Service
This warranty shall not apply to any subsequent owner or holder of the product. Furthermore, this warranty shall not apply to, and Interacoustics shall not be responsible for, any loss arising in connection with the purchase or use of any Interacoustics product that has been: repaired by anyone other than an authorized Interacoustics service representative;... -
Page 49: General Technical Specifications
Interacoustics A/S cannot be held liable for your data. Some Interacoustics A/S products support or may work with operating systems unsupported by Microsoft. -
Page 50: Component Specifications
6.4 Component specifications Orion Reclining Chair Specifications Dimensions (L x W x H): 78 x 27 x 60 inches (198 x 69 x 152 cm) Weight: 375 lbs (170 kg) Maximum rotation: 200 degrees/second Maximum patient weight: 350 lbs (160 kg) Power required: 900W, 110 VAC (provided by isolation transformer) IEC 60601-1 Class I, Type B Orion Auto Traverse / Comprehensive Specifications... - Page 51 Single IR LED infrared illumination: 950 nm at 1.5 mw/cm2. IEC 60601-1 Type B Goggles weight: Binocular VNG cameras 345g (occluded view) without cables. Component specifications side mount VNG goggles Monocular/binocular video eye tracking goggles. Removable eye cover for vision-enabled or vision-denied recording USB 2.0 or FireWire®...
-
Page 52: Electromagnetic Compatibility (Emc)
The use of accessories, transducers and cables other than those specified, except for servicing parts sold by Interacoustics A/S as replacement parts for internal components, may result in increased EMISSIONS or decreased IMMUNITY of the device. - Page 53 Guidance and Manufacturer’s Declaration - Electromagnetic Emissions The ORION is intended for use in the electromagnetic environment specified below. The customer or the user of the ORION should assure that it is used in such an environment. Emissions Test Compliance Electromagnetic environment - guidance RF emissions Group 1...
- Page 54 Guidance and Manufacturer’s Declaration - Electromagnetic Immunity The ORION is intended for use in the electromagnetic environment specified below. The customer or the user of the ORION should assure that it is used in such an environment. Immunity Test IEC 60601 Test level Compliance Electromagnetic environment - guidance...
- Page 55 Guidance and Manufacturer’s Declaration — Electromagnetic Immunity The ORION is intended for use in the electromagnetic environment specified below. The customer or the user of the ORION should assure that it is used in such an environment, Immunity test IEC / EN 60601 test Compliance level Electromagnetic environment –...
- Page 56 To ensure compliance with the EMC requirements as specified in IEC 60601-1-2, it is essential to use only the following accessories: Cable Item Manufacturer Model Length Screened [meter] [Y/N] Camera System for 2D-VOGfw Interacoustics Vestibular Analysis (Side Mount) Goggles USB BG4.0USB Interacoustics Binocular 4.0 (Top Mount) Goggles USB Monocular USBM2.1A Interacoustics...
- Page 57 Other : Date : Person : Please provide e-mail address or fax No. to whom Interacoustics may confirm reception of the returned goods: The above mentioned item is reported to be dangerous to patient or user In order to ensure instant and effective treatment of returned goods, it is important that this form is filled in and placed together with the item.
Need help?
Do you have a question about the VisualEyes 515 and is the answer not in the manual?
Questions and answers