Interacoustics OtoRead Operation Manual
Screener
Hide thumbs
Also See for OtoRead:
- Instructions for use manual (172 pages) ,
- Instructions for use manual (79 pages) ,
- Instructions for use manual (65 pages)

Related Manuals for Interacoustics OtoRead


Summary of Contents for Interacoustics OtoRead
- Page 1 Operation Manual OtoRead – Screener Valid from serial number 4049004 - software version 7.65.01 8011609 D-0004788-D 11/2015...
-
Page 3: Table Of Contents
Cleaning and Disinfecting the Unit ..........7 Waste Disposal ................7 Introduction ..................8 What is the OtoRead Instrument? ............ 8 How are the Results Stored and Reported? ........9 Definition of OAEs ................9 Measurement of OAEs ..............10 Basic Functions ................ - Page 4 A Note about Rounding of Results ..........37 Operation Panel Dictionary............38 Program Flowchart ................. 40 Technical Specification ..............42 Preset Test Protocols ..............43 Parts ....................45 Unpacking and Inspection ............. 46 Contents of Shipment ..............46 Reporting Imperfections ..............47 Care and Maintenance ..............
-
Page 5: Tabout This Manual
Web: www.interacoustics.com Intended Use The OtoRead OAE Test Instrument is designed to be a screening device for hearing loss. Sensitivity and specificity of this type of device are based on the test characteristics defined by the user, and may vary depending on environmental and operating conditions. The presence of otoacoustic emissions suggests normal outer hair cell function, which in turn correlates to normal hearing. -
Page 6: Important Safety Instructions
Important Safety Instructions The OtoRead Otoacoustic Emission Test System should be used only by those individuals trained to perform the testing for which it has been designed. No person should attempt to use this instrument without the necessary knowledge and training to understand how this equipment is to be properly utilized and interpreted. - Page 7 The eartips are disposable and for single use only. Do not clean or reuse eartips. Disposable 1.5v AA/UM-3/R6 Alkaline batteries are recommended for use with OtoRead. If other batteries are used, they must be 1.6v AA Nickel Zinc rechargeable batteries. Care must be taken to avoid bending the battery clips with incorrect sized batteries.
-
Page 8: Warranty
Warranty INTERACOUSTICS warrants that: • The OtoRead is free from defects in material and workman ship under normal use and service for a period of 24 months from the date of delivery by Interacoustics to the first purchaser. -
Page 9: Printer Ac Power Source Precautions
Furthermore, this warranty shall not apply to, and Interacoustics shall not be responsible for, any loss arising in connection with the purchase or use of any Interacoustics product that has been: • repaired by anyone other than an authorized Interacoustics service representative;... -
Page 10: Use Of Rechargeable Batteries
Should a faulty condition occur, remove the plug from the outlet immediately. Use of Rechargeable Batteries The OtoRead is designed for use with 1.5v AA/UM-3/R6 Alkaline batteries. Rechargeable batteries are not recommended for use with the OtoRead, however should you choose to use them, the OtoRead requires the use of 1.6v high voltage Nickel Zinc rechargeable... -
Page 11: Cleaning And Disinfecting The Unit
Failing to recycle such waste products in an appropriate way may endanger the environment and consequently the health of human beings. Disposal of batteries must be made according to national regulations. OtoRead Screener Important Safety Instructions Page 7... -
Page 12: Introduction
Introduction The purpose of the OtoRead test system is to provide a rapid measurement and documentation of Distortion Product Otoacoustic Emissions (DPOAEs) or Transient Evoked Otoacoustic Emissions (TEOAEs) at several frequencies. What is the OtoRead Instrument? The OtoRead Otoacoustic Emission test instrument is a hand-held device designed to provide an objective measure of outer hair cell function through the measurement of cochlear emissions. -
Page 13: How Are The Results Stored And Reported
How are the Results Stored and Reported? When the OtoRead is set in its default settings, the instrument will store the results from one patient (left and right ear) in its non-volatile memory for subsequent printing. However, the OtoRead instrument can store up to 250 test results. -
Page 14: Measurement Of Oaes
By using band pass filters, the OtoRead device provides an estimate of outer hair cell function over a wide range of frequencies. - Page 15 TEOAEs can be reliably recorded at lower frequencies than DPOAEs, but cannot be measured reliably above 4 kHz. OtoRead Screener Introduction Page 11...
-
Page 16: Basic Functions
Basic Functions Quick Start These steps will allow you to quickly start using the OtoRead OAE Test System. Be sure to perform the necessary otoscopic examination prior to testing. Read the entire manual before testing patients. Step 1 Insert 4 AA/UM-3/R6 Alkaline batteries into the OtoRead . -
Page 17: Loading Paper Into The Printer
To turn the printer on, press the button on the front of the printer. The printer indicator light will flash green briefly and then continue flashing orange to indicate it is ready to receive data from the OtoRead unit. The printer will automatically power off after one minute of inactivity. Figure 1... -
Page 18: Attaching The Eartips
Green Power Indicator will be lit if battery powered Attaching the Eartips The OtoRead instrument comes with a box of disposable eartips that fit a variety of ear canal sizes. The probe tip must have an eartip attached before inserting it into an ear canal. The eartip kit has 12 different size eartips that are color-coded for easy selection. -
Page 19: Connecting The Extension Cord
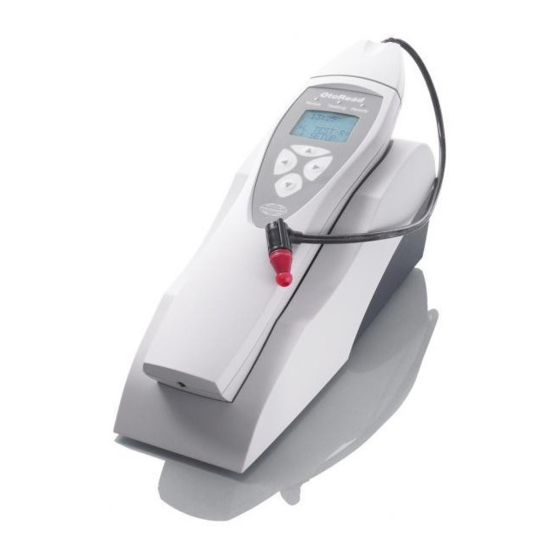
Connecting the Extension Cord It is possible to extend the reach of the OtoRead by pulling off the top and inserting the extension cord between the instrument and the top (see Figure 4). A regular test situation can be seen in Figure 5. The extension of the OtoRead is particularly useful in situations where more flexibility is needed e.g. -
Page 20: Probe Tip Replacement
Tug lightly on the probe tip to verify that the tip is securely attached. NOTE: If the probe tip is not inserted completely, the OtoRead will not perform a test. -
Page 21: Operating Instructions
Place the patient in a position that will allow the OtoRead instrument to be held steady while testing is in progress. The patient should remain still and quiet while the test is being performed. -
Page 22: Testing In The Default Modes
Display # 1 Display # 2 NOTE: If this is the first time the OtoRead instrument is being used, or if you wish to change the date or time, see Setting the Clock on page 26 for instructions on setting the correct date and time. - Page 23 To Begin Testing To begin testing, place an eartip as far down as possible on the probe tip, turn on the OtoRead instrument by pressing the down button and select either the LEFT or RIGHT arrow key to indicate which ear will be tested. After the test ear is selected, Display # 3 will be shown.
- Page 24 (Display # 5). The NOISE bar will show a decrease from the original reading. When a seal is obtained, the unit will automatically begin testing (auto start) and the yellow test LED will illuminate throughout the test. OtoRead Screener Operating Instructions Page 20...
- Page 25 To disable auto start, at the main menu select the ear to be tested by holding down the RIGHT or LEFT arrow keys for 3 seconds until the green “test” light turns off. Once the key is released, the OtoRead will calibrate and test as before. Auto Calibration...
- Page 26 Review Results When testing is complete, a display similar to Display # 8 will appear. Display # 8 The results of the test are automatically saved in memory as soon as the test is complete. OtoRead Screener Operating Instructions Page 22...
- Page 27 When testing is completed, the results should be printed before a new patient is tested. Note, however, that the OtoRead instrument can be configured to store up to 250 tests in the unit for printing at a later time. It is important to keep a record of the test number for each patient if this feature is used.
-
Page 28: Noise Sources
When testing a newborn, gently pull down and back on the pinna to straighten out the ear canal. Prepare the OtoRead unit by turning on the device, selecting the test ear and eartip. It is... -
Page 29: Printing The Test Results
The results stay in the memory after they have been printed, but will be erased once new testing is begun. The OtoRead instrument can be configured to store up to 250 tests in memory before printing. See the section Changing Instrument Settings - Save Mode/Storing Test Results on page 30 for instructions to save more than two tests in memory. -
Page 30: Setting The Clock
Setting the Clock When the OtoRead test instrument is first used, the correct date and time will need to be set on its internal clock. The date and time are listed on the test printout as month-day-year (e.g., Feb-28-01). The clock should be set prior to testing, as changing it after tests are saved will not change the date on the printout (i.e., whatever date... - Page 31 When the correct minute is selected, pressing the DOWN arrow key will return to the Main Menu. The time and date changes are automatically saved. Display # 13 Display # 14 Display # 15 OtoRead Screener Operating Instructions Page 27...
-
Page 32: Changing Instrument Settings
Changing Instrument Settings The OtoRead instrument allows the user to change many of the instrument's settings or functions. These settings include Test Mode (DP Screener only), Clearing Test Results, Auto-Shutdown Time, Minimum Amplitude Value, Save Mode, Clock Mode, Language, and Reset to Default Settings. -
Page 33: Clearing Test Results
Auto-Shutdown Time The Power Off menu (Display # 21) refers to the Auto-Shutdown time which controls how long the OtoRead instrument waits before shutting itself off after a period of inactivity. It is not necessary to manually turn off the OtoRead unit. -
Page 34: Save Mode/Storing Test Results
(NOTE: You may print or download the saved results at this time.) If you choose CLEAR, all 250 tests will be deleted and the test numbers will start again at 1. The OtoRead unit will ask to verify your decision to erase all stored tests. -
Page 35: Minimum Amplitude
This is in addition to meeting the other pass criteria including the minimum SNR and the number of passing frequencies for overall test “Pass.” The OtoRead is set with this feature turned off when it is shipped from the factory. -
Page 36: Language
Selecting the LEFT or RIGHT arrow key in the Reset to Default menu (Display # 26) will return the instrument settings to their original factory settings. (NOTE: This does not affect the Custom settings.) OtoRead Screener Changing Instrument Settings Page 32... - Page 37 Display # 26 OtoRead Screener Changing Instrument Settings Page 33...
-
Page 38: Interpreting Test Results
Interpreting Test Results Understanding the Display The display on the OtoRead test instrument will indicate the results of the test with a graphic display. The display will be generated and shown during the test and can be reviewed after the test is complete. -
Page 39: Understanding The Dpoae Printed Results
9. The noise floor in dB SPL. 10. The signal-to-noise ratio (TE level minus the noise floor). 11. A “P” indicates that the signal-to-noise ratio for the test was equal to or above the SNR criterion. OtoRead Screener Interpreting Test Results Page 35... -
Page 40: Understanding The Teoae Printed Results
2. The time and date of the test, based on the setting of the internal clock. If the clock is set correctly, this time and date will be correct. 3. The software version number. OtoRead Screener Interpreting Test Results Page 36... -
Page 41: A Note About Rounding Of Results
4.1 dB, the printed values would be TE = 5 dB, NF = 0, SN = 4. The printed SN value of 4 dB appears to be an error, but is in fact correct. OtoRead Screener Interpreting Test Results Page 37... -
Page 42: Operation Panel Dictionary
OtoRead. Use the LEFT and RIGHT arrow keys to clear the results stored in the OtoRead. Next choose YES to VERIFY CLEAR verify clear and No to return to the menu without clearing the menu. - Page 43 The Save Mode menu allows the user to change the SAVE TESTS number of tests stored in the OtoRead from only the most recent test result for each ear (L/R) to 250 tests. Is shown briefly upon turning on the OtoRead.
-
Page 44: Program Flowchart
Program Flowchart OtoRead Screener Operation Panel Dictionary Page 40... - Page 45 OtoRead Screener Operation Panel Dictionary Page 41...
-
Page 46: Technical Specification
EMC: Conforms to IEC 60601-1-2. Safety: Conforms to IEC 60950 MEDICAL CE-MARK The CE-mark indicates that Interacoustics A/S meets the requirements of Annex II of the Medical Device Directive 93/42/EEC. Approval of the quality system is made by TÜV identification no. 0123. -
Page 47: Preset Test Protocols
Number of Frequencies Tested = 6 Frequency Range = 1.5 kHz to 4 kHz Averaging Time = 64 seconds Pass SNR (Signal-to-Noise Ratio) = 4 dB Number of Passing Frequencies for Overall Test Pass = 3 OtoRead Screener Technical Specification Page 43... - Page 48 P1 (Intensity of f1 in dB SPL) = 65 P2 (Intensity of f2 in dB SPL) = 55 Pass SNR (Signal-to-Noise Ratio) = 6 dB Number of Passing Frequencies for Overall Test “Pass” = 3 OtoRead Screener Technical Specification Page 44...
-
Page 49: Parts
Parts Included parts OtoRead Hand-held Unit Probe Tips Cradle Box of 146 Eartips (12 sizes) Printer AA/UM-3/R6 Alkaline Batteries Printer Power Supply Thermal Printer Paper Roll Printer Cable Operation Manual Probe Cord for extension CE Manual 100 cm/39” Replacement parts: Ear Tips and Remote Probe Tips may be ordered from your Special Instrument Distributor. -
Page 50: Unpacking And Inspection
Once the batteries are correctly in place, slide the panel back onto its tracks to close the battery compartment. The following is a list of parts shipped with each OtoRead system: (1) OtoRead Hand-held Unit (4) Probe Tips... -
Page 51: Reporting Imperfections
Printer Serial Number: Date Purchased: Reporting Imperfections Inspect before connection: Prior to connecting OtoRead to the Power Supply it should once more be inspected for damage. All of the cabinet and the accessories should be checked visually for scratches and missing parts. -
Page 52: Troubleshooting
• Check that the printer cable is correctly attached to the cradle and the printer. • Are there any tests in memory to be printed? 4. Problem: “Printer paper low” message appears on LCD. Solutions: • Open printer cover and reposition or replace the paper roll. OtoRead Screner Trouble Shooting Page 48... -
Page 53: Appendix A: Test Sequence
4 closest (+/-2) bins to the DP bin. FOR TEOAE: The calibration phase automatically measures the peak pressure obtained from a sequence of clicks and calculates the voltage required to obtain the target peak pressure. If the OtoRead Screener Appendix A: Test Sequence Page 49... - Page 54 SNR for tests that have a low noise floor. As the noise level of the test increases, the user will notice that more “false” emissions will appear, which is to be expected. OtoRead Screener Appendix A: Test Sequence Page 50...
-
Page 55: Appendix B: Pass/Refer Criteria
2 per 1000, verifying a 99.7% accuracy would require testing hundreds of thousands of babies with a given system. Thus to demonstrate that only 3 babies OtoRead Screener Appendix B: High Frequency DPOAE Page 51... - Page 56 Without that difference, the numerical SNR value for a PASS with the two methods would be quite similar. The OtoRead uses a novel noise rejection algorithm that permits accurate DPOAE and TEOAE measurements in background noise and babble as high as 55-65 dB SPL (A-weighted). Briefly explained,...
- Page 57 If the ambient noise level rises too high (and/or the eartip seal is poor), then all samples will be noisy and accurate measurements will be impossible, in which case the test result will indicate “noisy.” OtoRead Screener Appendix B: High Frequency DPOAE Page 53...
-
Page 58: Return Report
Please note that the goods must be carefully packed, preferably in original packing, in order to avoid damage during transport. (Packing material may be ordered from Interacoustics. EC Medical Device Directive rules require immediate report to be sent, if the device by malfunction deterioration of performance or characteristics and/or by inadequacy in labelling or instructions for use, has caused or could have caused death or serious deterioration of health to patient or user.
Need help?
Do you have a question about the OtoRead and is the answer not in the manual?
Questions and answers