
Related Manuals for Interacoustics Micromedical Orion


Summary of Contents for Interacoustics Micromedical Orion
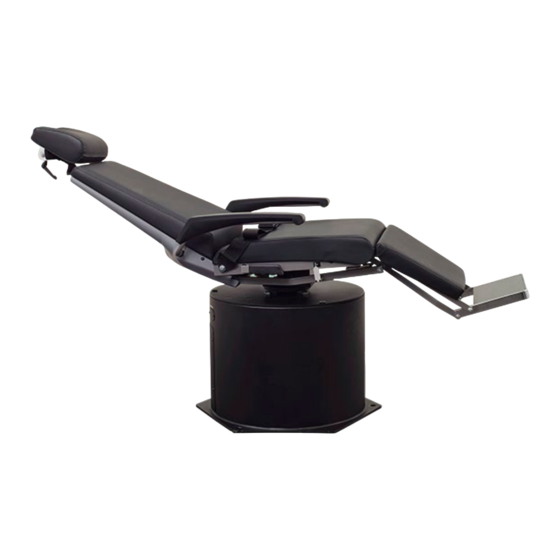
- Page 1 Science made smarter Installation Instructions Orion Reclining Chair Micromedical by Interacoustics...
- Page 3 All rights reserved. Information in this document is proprietary to Interacoustics⅍. The information in this document is subject to change without notice. No part of this document may be reproduced or transmitted in any form or by any means without a prior written permission of...
-
Page 4: Table Of Contents
Table of Contents INTRODUCTION ........................... 1 About this manual ......................1 Environmental conditions ....................1 Markings ..........................1 Disposal of the product ....................2 Included parts ........................3 Additional required tools ....................5 Define the room layout for chair installation ..............7 UNPACKING AND INSPECTION .................... -
Page 5: Introduction
Orion Chair used with the VisualEyes™ 515 and VisualEyes™ 525 software version 3.0 and later. Orion Reclining Chair will hereafter be referred to as the ‘Orion Chair’. This product is manufactured by: Interacoustics A/S Audiometer Allé 1 5500 Middelfart Denmark Tel.:... -
Page 6: Disposal Of The Product
Transport and storage humidity limitations 1.4 Disposal of the product Interacoustics is committed to ensuring that our products are safely disposed of when they are no longer usable. The cooperation of the user is important to ensure this. Interacoustics therefore expects that local sorting and waste regulations for disposal of electric and electronic equipment are followed, and that the device is not discarded together with unsorted waste. -
Page 7: Included Parts
Included parts The following objects provided by the supplier are required to assemble the Orion Chair. Orion Reclining Chair 8530926 Installation Instructions 8530912 Isolation Transformer 8515235 Power Cord for isolation transformer Power Cord for Orion Reclining Chair 3m 8514823 USB A-B 3m 8502734 Emergency stop box 8528958... - Page 8 4x Ø0.375x2.500" hex Screws 8520309 4x Ø0.375x1.750" Threaded metal anchors 8520310 Alcohol Pads 20 pcs 8530569 Screwdriver - Hex Key Spinner 2.5x75mm 8530595 5/8" Rotary Hammer drill bit (SDS-Plus shank) 8503521 3/8" 0.438" ID 1.000" OD Flat Washer 8502205 3/8" 0.406" ID 2.000" OD Flat Washer 8502210 Cable protector 8502981...
-
Page 9: Additional Required Tools
Additional required tools Please note that the following tools are required to assemble the Orion Chair. Battery powered drill with Torx 15,20,25,30 bit Hammer Drill SDS-Plus Standard and Phillips screwdrivers 16 oz hammer Pencil Hobby knife Tape measure Adjustable wrench or socket wrench with ½”... - Page 10 Ear plugs Safety glasses Disposable dust mask Work gloves D-0120794-D – 2023/06 Orion Reclining Chair Installation Instructions Page 6...
-
Page 11: Define The Room Layout For Chair Installation
Define the room layout for chair installation Ensure that you have a very clear floor plan to install the chair and other accessories. The sample room layout with minimum dimensions is provided below see Figure 1. Figure 1: Room layout example D-0120794-D –... -
Page 12: Unpacking And Inspection
2 Unpacking and inspection 2.1 Inspection of shipment Check for damage Ensure that you have received all the components on the shipping checklist during unpackaging. All the components should be checked visually for scratches and missing parts before use. All the contents of the shipment must be checked for their mechanical and electrical functioning. - Page 13 Figure 3: Images from packaging disassemble procedure The installer can now proceed to unwrap the chair by carefully cutting tape and removing the plastic sheeting, see Figure 3 and Figure 4. D-0120794-D – 2023/06 Orion Reclining Chair Installation Instructions Page 9...
- Page 14 Figure 4: Orion Chair without plastic foil The isolation transformer, head support and accessories for the Orion Chair are placed in the boxes located on the chair seat, see Figure 4. D-0120794-D – 2023/06 Orion Reclining Chair Installation Instructions Page 10...
-
Page 15: Moving The Chair To Test Room
2.3 Moving the chair to test room It is recommended that two persons are present when moving the Orion Chair. The Orion chair is strapped to a 2-wheel steel hand truck inside the crate. A wooden ramp which is part of the equipment on the pallet, is fastened with screws to the chair pallet, so the installer can roll the Orion chair down from the pallet. - Page 16 Figure 6: Rolling the chair down from the pallet With the chair standing in the clinic/room, the installer can now proceed to the setup guide in Section 3. D-0120794-D – 2023/06 Orion Reclining Chair Installation Instructions Page 12...
-
Page 17: Setup
It is recommended that the computer used with the Orion Chair is connected to a powered USB Hub. The hub will be the terminal for USB data connections amplifying signals to ensure the desired data quality. All goggles with USB communication delivered by Interacoustics come with an apt USB Hub, which can be used for Orion chair communication. - Page 18 Orion Reclining Chair Isolation Transformer Power Cord for isolation transformer Power Cord for Orion Reclining chair 3m USB A-B 3m Emergency stop box VNG goggle 3.2.1.1 Isolation Transformer The installer must check the setting of the Isolation Transformer before it is plugged in the wall outlet. The Transformer is set by factory, however;...
- Page 19 3.2.1.2 Emergency stop box The Emergency stop box is a safety button, which the operator can press to stop the Orion Chair if something unexpected happens. When the button is pressed, it will stay down wherefrom it must be turned clockwise to unlock and turn the system back on, see Figure 9.
- Page 20 3.2.1.3 Connect chair to power and computer Step 1: Flip the chair base power switch to off, see Figure 10 Step 2: Connect the Emergency Stop box to the base of the chair and place it on the desk or equipment cart for easy operator access, see Figure 10 Step 3: Connect the USB A-B cable from the base of the chair to the computer USB HUB, see Figure 10...
- Page 21 3.2.1.4 Install Orion Chair drivers Step 1: Follow the guide from Figure 11 Error! Reference source not found. to install the InstaCal software. Figure 11: InstaCal installation process Step 2: Launch the InstaCal software, select the Orion Chair named USB-231 and click ok to register the device in the program Figure 12: InstaCal Board Detection Step 3:...
- Page 22 With the drives set up, the installer can proceed to the registration of the Orion Chair in the VisualEyes software. 3.2.1.5 Orion Chair registration in VisualEyes There are two possible registration scenarios for the Orion Chair. Scenario one (New complete VNG setup) Installing a system ordered with new computer, VNG system, and accessories including Orion Chair.
- Page 23 Step 2: Plug the goggles in the side of the Orion Chair back rest and plug the Orion Chair USB cable into the Computer USB. New rows will appear under Unknown hardware. Click the drop-down list and select the type of goggles used, see Figure 16.
- Page 24 Figure 17: Registering goggles Step 4: Click the Add new license under registered licenses and enter the provided license codes. A message stating that the licenses have been added will appear when the last license is entered. Figure 18: Entering license keys D-0120794-D –...
- Page 25 The licenses for the goggles with appertaining Orion Chair are now added successfully. The Hardware and Licenses screen should show a row under Registered licenses containing a VNG system such as 525 as seen in Figure 19. The tests battery of a license containing an Orion Chair should include Rotational Chair tests such as Step Velocity, SHA, and VOR Suppression.
- Page 26 To retrieve the settings for the Orion Chair, follow the path in Figure 21 from the VisualEyes home screen: Figure 21: Path to Orion Reclining settings Figure 22 below illustrates the Orion Chairs setting page, wherefrom modifications to chair performance can be adjusted.
- Page 27 3.2.2.2 Velocity tach calibration Once the chair’s drift has been corrected, click Go for the Velocity tach calibration. The software will then spin the chair to optimize the signal voltage and tach voltage values to synchronize the traces. After two spins past the chair’s zero position (seen by the deflections in the PPR trace), the software will stop the chair and update the signal and tach voltage values.
- Page 28 The Orion Chair is now ready to be used in clinical testing. The goggles should be connected through the USB ports on the side of the Orion Chair backrest when having the patient placed in it, see Figure 10. D-0120794-D – 2023/06 Orion Reclining Chair Installation Instructions Page 24...
-
Page 29: Chair Installation
Chair installation This section guides the installer in the mechanical installation of the Orion Chair. It is important to follow the guidelines of this section to get a functional setup that fits the specific clinic. 4.1 Prepare for chair installation Ensure that you have all the tools and mounting hardware listed in sections 1.5 and 1.6. -
Page 30: Drilling Anchor Holes
Follow the steps mentioned below the achieve correct alignment: Establish all connections between chair, PC, goggles, and safety transformer so the system is fully • functioning. Turn on the PC and enter the license codes as from section 3.2.1. Place the chair in a position where the service door and connection panel are facing the center of the •... -
Page 31: Variations In Flooring
Secure the drill bit in the chuck of the hammer drill. Place the drill in the middle of the target hole. Keep the drill bit vertical. Be careful not to drill at an angle, because this may cause difficulty in keeping the anchor screw head flush on the washer. -
Page 32: Placing Anchors
4.5 Placing anchors Place the anchor into the drilled hole with the expanded end first. Figure 29: Anchor with expanded end pointing to hole Insert the split anchor end into the drilled hole. Make sure the anchor is below the concrete surface. Complete this process for all three anchors. -
Page 33: Cable Protector
4.6 Cable protector The cable protector (8502981) from the accessories must be installed to avoid potential trip incidents and to protect the Orion Chair wires. The installer can cut the length of the protector, so it fits the specific installation. Also, the back side of the protector can be cut open to slide the cable into the protector cavity see Figure 31. -
Page 34: Head Support
4.7 Head support Install the head support by following the steps below. • Take out the head support provided from the box. Insert the head support to chair and secure with the screw provided on the backside of the chair. •... - Page 35 Figure 34: Cord Clip For instructions in calibration and validation of the Orion Chair, see section 3.2.2. D-0120794-D – 2023/06 Orion Reclining Chair Installation Instructions Page 31...
Need help?
Do you have a question about the Micromedical Orion and is the answer not in the manual?
Questions and answers