
Related Manuals for WisyCom MPR30-IEM


Summary of Contents for WisyCom MPR30-IEM
- Page 1 MPR30-IEM User Manual High performance True diversity Receiver SN: ________________ Rev. 06 (ref. FW v1.6) Date: 04 July 2014...
- Page 2 Rev. 06 MPR30-IEM User Manual...
- Page 3 MPR30-IEM-N: 470/700 MHz (TV ch 21/49) MPR30-IEM-M:566/798 MHz (TV ch 33/61) MPR30-IEM-M: 566/798 MHz (TV ch 33/61) クラスで最高のパフォーマンス。 最新のWisycomテクノロジーにより、最高のRF感度、 “best in class performances”, thanks to the latest Wisycom technology the unit has 対混信性、優れた音質 extreme RF sensitivity and immunity and superb audio quality 耐久性と拡張性。非常に堅牢に設計された(アルミニウム筐体)とユニットのアップグレード...
-
Page 4: Safety Instruction
Rev. 06 MPR30-IEM User Manual AFETY INSTRUCTION Read this safety instruction and the manual first Follow all instructions and information. Do not lose this manual. Do not use this apparatus under the rain or near the water. - Page 5 Rev. 06 MPR30-IEM User Manual ATTERIES バッテリー MPR30-IEM works with standard camera battery: MPR30-IEM は標準のカメラバッテリーで動作します。 2xIEC-LR6 1.5 size-AA alkaline or NiMh rechargeable 単三型のアルカリかニッケル水素充電電池を2個 KLIC 8000 (lithium-ion, rechargeable) KLIC 8000(リチウムイオン 充電電池) Ricoh DB-50 (lithium-ion, rechargeable) Richo DB-50 (リチウムイオン 充電電池) DR9708 Duracell(リチウムイオン 充電電池)...
- Page 6 SMA connector Antenna A SMA antenna Connector A and B SMAアンテナコネクター A と B MPR30-IEM is supplied with two couple of antennas. According to the working band, different MPR30-IEMには2つのアンテナがつきます。 御使用になる周波数帯により、異なるアンテナモデルが antenna models can be supply. All the models have 供給されます。 すべてのモデルには、黒いキャップ、...
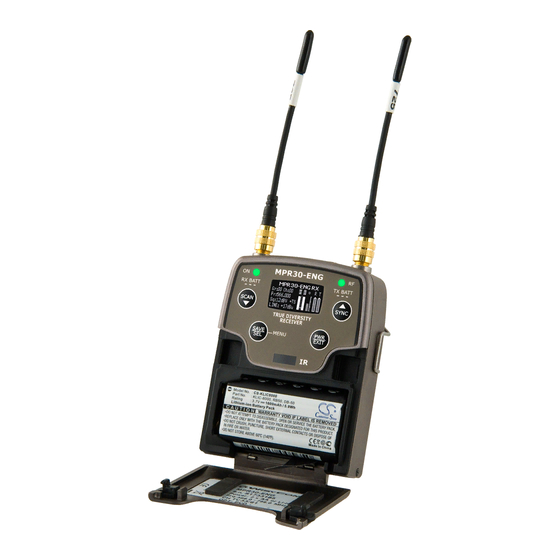
- Page 7 Rev. 06 MPR30-IEM User Manual Front panel フロントパネル MPR30-IEM は、RGB色のLEDとOLEDディスプレイを見ながらボタン操作で簡単かつクィックに設定を MPR30-IEM allows an easy and quick configuration using buttons, RGB LED’s and an OLED 行うことができます。 display. ON Led Indicator ON LED 表示 RF LED 表示 RF Led Indicator SYNC/UP SCAN/DOWN...
- Page 8 ブートローダーモード blue * to put the MPR30-IEM in boot mode: power on the device push and keep both UP and DOWN buttons MPR30-iemをブートモードにするには、UPとDOWNボタンを数秒間押しながらユニットの電源を 入れてください。 for few seconds (until the led indicators light up, then release the buttons)
- Page 9 Operating Menu 設定を確かめて、最後に”Operating Menu” の中で設定を調整してください。 Status display - Receiver Name (ex. MPR30-IEM RX) レシーバーの名前(例:MPR30-IEM RX) - Group (ex. Gr:00) and Channel (ex. Ch:01) グループ(例:Gr:00)と チャンネル(例:Ch:01) - Frequency (ex. Fr:697.000 MHz) 周波数(例:Fr:697.000MHz)...
-
Page 10: Display Menu
Rev. 06 MPR30-IEM User Manual ISPLAY MENU Out mode Stereo/Mono/Mix Balance Low (-12÷+12) Equalizer Audio Hi (-12÷+12) Settings Vol. boost -12÷+12dB Output load 32Ω/16Ω Pwr limit OFF/100mW/50mW/30mW GR (0÷39) Gr-Ch CH (0÷59) N: 470.000÷700.000 Frequency M: 566.000÷798.000 *Only using lithium battery Squelch OFF*-0/3/6/9/12/15/18/21/24//28/32/36/40/46 dBµV... - Page 11 Rev. 06 MPR30-IEM User Manual From Status Display push SEL and EXIT together to enter on the メインメニューに入るには、ステータス画面で SEL と EXIT を同時に 押します。 Main menu Use UP/DOWN to navigate on all available menus メニューの中を移動するには、UP/DOWNを使用します。 メニューアイテムを選択するには、 SEL を押します。 Push SEL to select a menu item 異なるパラメーターへ移動するには、UP/DOWN を使用します。...
- Page 12 Wisycom標準で、group 00 と group 01 か 09 は特別です。 ”center frequency” (474,482/… MHz) と (*)As per Wisycom standard, group 00 and group 01 or 09 are special; respectively the “center intergap frequency (例 470/478/486/… MHz) です。group 00のスキャンは、数秒で そのエリアのDVB-T frequency”...
- Page 13 Rev. 06 MPR30-IEM User Manual “Scan now” menu 次の表は、実行可能な3つのスキャンタイプです。 The following table lists the three types of scans that can be performed チャンネルスキャンを始まると、レシーバーは使用されるグループを Once started a Channel scan operation the receiver asks for 尋ねます。 SELボタンを長押ししてスキャンするためのグループを group to be used*. Press and hold the SEL button to select the 選択してください。...
- Page 14 Rev. 06 MPR30-IEM User Manual 数秒後、スキャンの結果がヒストグラム上に表示されます。 After few seconds, scan results are displayed on a histogram. ヒストグラムの各コラムは黒線で2つのパートに分かれています。 Each column of the histogram is divided into two parts by a 下部分はグループの中のフリーチャンネルの数(RFレベル<スケルチ black line. The lower part indicates the number of free レベル...
- Page 15 Infrared (赤外線) ファームウェアアップグレードやセットアップのために、MPR30-IEMを IRDAに接続するときに By this menu, MPR30-IEM can be connected to IRDA for setup or firmware upgrades. このメニューを使用します。 赤外線インターフェースが有効になっている時、つぎの画面が表示されます。 When the Infrared interface is active, the following screen is displayed. NOTE: while in this menu display is not automatically turned off.
- Page 16 Operating menu for more details). MPR30-IEMのファームウェアv1.3から、24までのクローン(00から23まで)を管理することができます。 From firmware version v1.3 the MPR30-IEM is able to manage up to 24 clones (from 00 to 23). The クローンマネージメントのメニューで、クローンの追加、ロード、削除ができます。 menus of the clone management allow to add/load and delete a clone. Clone” のパラメータは、1台以上のクローンが少なくとも存在すれば表示されます。...
- Page 17 Rev. 06 MPR30-IEM User Manual How to add a clone (クローンの追加方法) Outモード バランス Out mode イコライザー Balance Volブースト Equalizer Vol boost Group-Channel Pilot tone スケルチ Gr-Ch RXネーム Squelch RX Name クローンネーム Clone name レシーバーのIRDAインターフェースをコンフィグレーショ Enable the IRDA interface on the RX from ン(Infraredメニュー) から有効にします。...
- Page 18 NOTE: the clones are saved on the EPROM and remains saved also after a reboot of the device. 備考:もしクローンがロードされてからリブートを実行しても、MPR30-IEMは常に、事前のコンフィグレーション NOTE: If a clone is loaded and then a reboot is executed, the MPR30-IEM always restarts with the (default clone)で再起動します。 previous configuration (default clone).
-
Page 19: Error List
: When the receiver is reset the error information (code and error type on the list) are 87/88/89/8A以外。) lost, with the exception of errors codes 87/88/89/8A. 備考2:エラーカウンターとエラーリストをリセットするには、Wisycomにご相談ください。 NOTE : To reset the error counter and the errors list, it is necessary to contact Wisycom. Message on display Error type Code Errors... -
Page 20: Troubleshooting
(バッテリー不良か、一次電池の装着) (damage batteries or wrong batteries) display “12C communication “I2C communication error” バス12Cの交信に障害。 修理センターに送ってください。 - send to repair at Wisycom error” が表示される。 message appears on the Communication error on bus I2C Repair Centre display “Device ID copy 1 invalid “Device ID copy1 invalid 初期化段階の障害。デバイスデータ... - Page 21 周波数ファイル(wdf)をロードし (MPR30-IEM-Nに470MHz frequency of the receiver of the receiver and MPR30-IEM-Mに566MHz) てください。 (according to the receiver - contact Wisycom for more 470 MHz for MPR30-IEM-N 566 MHz for MPR30-IEM-M) information エラーリストにコード86が表示 if the error code 86 appears on されていたら、Presetメニュー the error list: でプリセットコンフィグレーション...
-
Page 22: Accessories And Parts
Antenna Code label AWMH30 For MPR30-IEM-M Band 654 ÷ 798 MHz Antenna Code label Other accessories available: CAUSBM1 Micro USB cable (to configure MPR30-IEM and to recharge lithium battery) UPK300E Infrared programming kit (interface + software) USB interface MPRLBP Lithium-ion battery pack CS-KLIC8000 type Rating: 3.7Vdc @1600mAh (5.9Wh) - Page 23 MPR30-IEM User Manual MPR30 RX M OW TO USE ANAGER (使い方) Wisycom MPR30 RX Manager can be used to load or save the channels memory and upgrade Wisycom MPR30 RX Mnagerはチャンネルメモリーのセーブ&ロオードとファームウェアアップグレード に使用されます。 the firmware. Instruction to connect MPR30 using UPK300 / UPK300E UPK300 / UPK300E を使ってMPR30を接続する手順:...
- Page 24 Rev. 06 MPR30-IEM User Manual もし接続が成功すると、Connectedアイコンがパネルのトップに表示され、”Connected on USB by If the connection is ended well, the Connected icon is showed on the top of the panel UPK” がインフォメーションパネルに表示されます。 and “Connected on USB by UPK” is displayed on the information panel...
- Page 25 Rev. 06 MPR30-IEM User Manual Instruction to connect MPR30 using USB cable: USBケーブルを使ってMPR30を接続する方法: MPR30の設定に必要なマイクロUSBポートを使えるように In order to use the micro USB port to configure the するために、MPR30 USBドライバーをインストールする必要 MPR30, it is necessary to install the MPR30 USB があります。 (MPR30 USBドライバーのインストール方法を driver (see How to install MPR30 USB driver) 参照してください。)...
- Page 26 Rev. 06 MPR30-IEM User Manual How to load/save channels memory チャンネルメモリーを、セーブ・ロードするには Write: Write from WDF file... を押して、MPR30上でロードするためのwdfファイルを選択します。 Push the button Write from WDF file… and select the wdf file to load on the MPR30. Read and save: Read and save to WDF file... を押して、保存先のパスとファイルネームをタイプしてください。...
-
Page 27: Technical Specifications
: Stereo Plug 3.5mm(TRS) Locking (M6 x 0.5 thread) with 2 X 150mW @ 32 Ohm • Battery life : approx.. 5 hours (alkaline batteries), 8 hours (lithium batteries) NOTE [1]: RMS value, 22 Hz / 22 kHz, unweighted. The MPR30-IEM receiver complies with ETSI specifications: ETS 300 422. - Page 28 Rev. 06 MPR30-IEM User Manual ECHANICAL RAWING Note: unit is mm...
- Page 29 Rev. 06 MPR30-IEM User Manual...
- Page 30 Rev. 06 MPR30-IEM User Manual ITALY ONLY Obblighi di informazione agli utilizzatori Modello di informazioni agli utenti dei prodotti di tipo “professionale” INFORMAZIONE AGLI UTENTI ai sensi dell’art. 13 del Decreto Legislativo 25 luglio 2005, n. 151 “Attuazione delle Direttive 2002/95/CE, 2002/96/CE e 2003/108/CE, relative alla riduzione dell’uso di sostanze pericolose nelle apparecchiature...
- Page 31 Rev. 06 MPR30-IEM User Manual...
- Page 32 Rev. 06 MPR30-IEM User Manual Wireless System Communications Via Spin 156 I-36060 Romano d’Ezzelino Italy Tel. +39 -0424 -382605 Fax +39 - 0424 - 382733 e-mail: sales@wisycom.com www.wisycom.com...
Need help?
Do you have a question about the MPR30-IEM and is the answer not in the manual?
Questions and answers