
Related Manuals for Barco ACTAS 2


Summary of Contents for Barco ACTAS 2
- Page 1 BARCO PROJECTION SYSTEMS ACTAS 2 R9827961 R9827968 OWNER'S MANUAL Date : Revision : Art. No. : 170297 R5975636...
- Page 2 Due to constant research, the information in this manual is subject to change without notice. Produced by BARCO NV, February 1997. All rights reserved. Trademarks are the rights of their respective owners. Printed in Belgium BARCO nv/Projection Systems Noordlaan 5...
-
Page 3: Table Of Contents
Select / Edit setup menu ........................Selecting a Setup memory block ............................Editing the setup memory blocks ............................2-10 Selecting the projector type ..............................2-11 Selecting adjustment modes ............................... 2-12 Selecting a reference kind ..............................2-14 Specifying the phosphor type .............................. 5975636 ACTAS 2 170297... - Page 4 Initial installation ................................... To move the Sensor unit to other projectors .......................... Power connection ..........................Procedure for alignment ......................... Set Parameters ..................................Select / Learn Configuration ..............................Select / Edit Setup ................................Start Adjust ..................................Send Again ..................................5975636 ACTAS 2 170297...
- Page 5 Host computer communication problems ....................Trouble shooting ............................ APPENDIX A. SPECIFIC REMARKS ABOUT VIP CUBE APPENDIX B. SERIAL COMMUNICATION General ..............................Master-Slave configuration ..............................RS232 formats ..................................Communication protocol ............................... ACTAS specific commands ........................Use of the serial commands ........................5975636 ACTAS 2 170297...
-
Page 6: Introduction
Introduction INTRODUCTION BARCO presents to you this total new product ACTAS 2 - Automatic Color Temperature Alignment System. The ACTAS was developed to automatically align the color temperature and brightness for all BARCO present and future CRT projectors. The incorporation of a unique hardware and software system in the ACTAS ensures both a quick and highly accurate alignment. -
Page 7: Chapter 1 Setting Up The Actas
15 meter long cable with male-to-female D9-D9 connectors R3482602 Cable with 5 BNC-to-BNC connectors Z348331 Cable with male-to-male DIN mini 8 connectors Z3420076 Light cover R805734 Owner's manual R5975636 Light cover Sensor Cables Control Unit Interface 5975636 ACTAS 2 170297... -
Page 8: Composite Units Of The Actas
3-wire grounding plug for the power (mains) supply. There are 4 BNC connectors marked as TEST PICTURE OUTPUT. These connectors supply the test pictures for the ACTAS alignment. TEST PICTURE OUTPUT B G/Gs/Video C-Sync 5975636 ACTAS 2 170297... -
Page 9: The Actas Control Unit
The Control Unit is built in a rugged metal housing to increase protection against damage. The buttons are configured similarly to the adjustment buttons on a standard BARCO Remote Control Unit (RCU). ADJUST key : to enter the edit mode... -
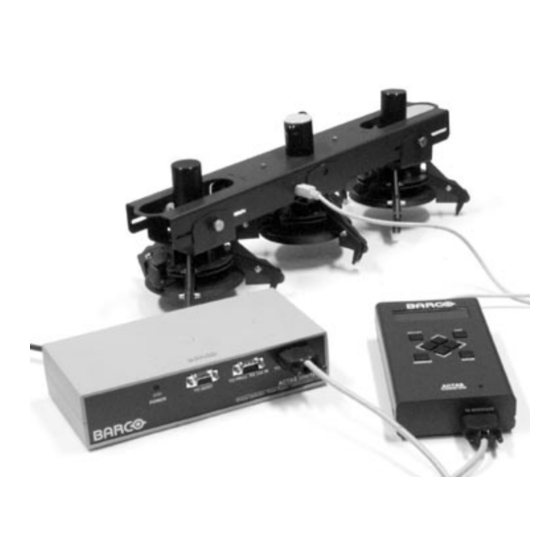
Page 10: The Actas Sensor
"TO CONTROL UNIT" : port for connecting the Control Unit Slots to turn around the grips One set of 3 claws to be attached to a lens Photo sensor of a projector 5975636 ACTAS 2 170297... -
Page 11: Interconnecting The Actas Units
Insert the connector at the other end into the port marked as 'TO CONTROL UNIT' located on the Sensor unit. After completing the above procedure, the three units are correctly interconnected. The ACTAS system is ready for use. 5975636 ACTAS 2 170297... -
Page 12: Power(Mains) Connection
Place the ACTAS Interface unit upside down on a table; Pry the four screw caps off using a screwdriver; Turn out the sunk screws using a Phillips screw- driver; Separate the bottom housing from the top hous- ing. 5975636 ACTAS 2 170297... - Page 13 Power cord with ANSI 73.11 plug ANSI 73.11 plug The wires of the power cord are colored in accord- ance with the following code : Green-and-yellow : Earth (safety earth) White : Neutral Black : Line (Live) 5975636 ACTAS 2 170297...
-
Page 14: Chapter 2 The Actas Software
ACTAS software THE ACTAS SOFTWARE ACTAS OVERVIEW FLOWCHART OF THE ACTAS (c) 1995, 1996 BARCO MENU start-up messages BARCO ACTAS The ACTAS software provides menus and display mes- CONTROL UNIT V 1.00 sages to guide you through the alignment process. -
Page 15: Set Parameters Menu
Press the <ENTER> key to save the parameter; Press the ' ' key or press the <EXIT> key to return without changing the parameter. Edit parameters Auto pause éê çè : change / : other ENT: save / EXIT: quit 5975636 ACTAS 2 170297... -
Page 16: Selecting Test Pictures
High Level White Balance and the "Cut-off" for the Low Level White Balance. There are 6 other test pictures used to examine the results: the pluge, the vertical bar, the horizontal bar, the gamma, the blocks and the corners. 5975636 ACTAS 2 170297... -
Page 17: Test Pictures Generated By The Actas Interface Unit
Note : The chosen picture pattern under the 'Edit pa- rameters' menu is the one which will be displayed 0% brightness on background when the ACTAS is idle, it is not the picture +5% brightness pattern used for adjustments. 5975636 ACTAS 2 170297... -
Page 18: Test Pictures Generated By A Host Computer Linked To The Actas
: for communicating the picture type, level, color and size to be generated and for switching the levels READ_SOURCE : for flicker compensation of the measurements Please refer to Appendix B for detailed description about the serial communication protocol among the ACTAS Control Unit, the ACTAS Interface or the host computer. 5975636 ACTAS 2 170297... -
Page 19: Test Pictures Generated By A Manually Controllable Source
The ACTAS imitates the RS232 high and low light level switching by manipulating the contrast setting. ACTAS Interface ACTAS Control unit This method normally lacks precision, and is mainly reserved for internal evaluation purposes. 5975636 ACTAS 2 170297... -
Page 20: Select / Learn Configuration Command Menu
An end message will be displayed to report the termina- tion of the process and number of projectors in the configuration will be shown. Press the <ENTER> key to repeat. Press the <EXIT> key to return. 5975636 ACTAS 2 170297... -
Page 21: Get Reference Menu
Or press the <EXIT> key to return without changes: Press the 'ENTER' key a message will be displayed to report the reverting Select setup process. 3 : ( auto auto ) éê ADJ : edit : change ENT : select / EXIT: quit 5975636 ACTAS 2 170297... -
Page 22: Editing The Setup Memory Blocks
Note : If the "Proj type" is "Auto" or "Search" , only "Mode" and "Ref kind" are displayed. Depending on the chosen reference kind, the menus shown inside the dotted box will vary (see p2-13 & p2-14 ). 5975636 ACTAS 2 170297... -
Page 23: Selecting The Projector Type
If no match - Select and edit the setup items which need special could be found, the ACTAS proceeds as if "Proj type" treatments; was set to "Auto". - Save this setup (press <ENTER>). 2-10 5975636 ACTAS 2 170297... -
Page 24: Selecting Adjustment Modes
If the reference kind "4C Temp" is selected, the steps -----------------#---------------------B from 3 to 5 will be repeated for the 4 color tempera- Gain / ENT: cut off / EX tures. Color adjusted in 4 iterations ENT: again / EXIT 2-11 5975636 ACTAS 2 170297... -
Page 25: Selecting A Reference Kind
RS232 input of the çè projector, or when the projector is not a member of the : other command BARCO digitally controlled projector family. Press the 'ENTER' key e.g. Adjust (mode manual After pressing the <ENTER> key in the 'Start adjust'... - Page 26 ENT: save EXIT: quit EXIT: quit è Press 'EXIT' Press ' Edit setup nr ENTER : select / edit Phosphor auto éê çè setup : change / : other çè EXIT: quit : other command 2-13 5975636 ACTAS 2 170297...
-
Page 27: Specifying The Phosphor Type
V701, V701BR, D701 T180 1101 9MSA VIP, CIO 1109, 1109/3 2208 800, 801s 7MSP 1208, 1208/2 M180 R801s 7MSPA 1208s, 1208s2 7MFP M180 1209, 1209/2, 1209/3 2208 808s 7MFP 1600 9MSA R808s M180 1609, 1609/3 2208 2-14 5975636 ACTAS 2 170297... -
Page 28: Initialization Brightness & Contrast On/Off
çè setup : change / : other cess. If the <EXIT> key is pressed, the changes will çè EXIT: quit : other command be discarded. A message will be displayed to report the reverting process. 2-15 5975636 ACTAS 2 170297... -
Page 29: Defocusing The Blue Picture Tube On/Off
: change / : other çè cess. If the <EXIT> key is pressed, the changes will : other command EXIT: quit be discarded. A message will be displayed to report the reverting process. 2-16 5975636 ACTAS 2 170297... -
Page 30: Tracking Correction On/Off
: change / : other ENT: save EXIT: quit é Press the ' ' key Press the ê Edit setup nr ' key Adjpict man. source éê çè : change / : other ENT: save EXIT: quit 2-17 5975636 ACTAS 2 170297... -
Page 31: Setting The Horizontal And Vertical Scan Frequencies For The Test Pictures
: change / : other ENT: save EXIT: quit é Press the ' ' key Edit setup nr Press the ê Sync RGB_S interlace ' key éê çè : change / : other ENT: save EXIT: quit 2-18 5975636 ACTAS 2 170297... -
Page 32: Setting Window Parameters
1 to 3 and the number of vertical Edit setup nr Edit setup nr segments from 1 to 3. H segments V segments éê çè éê çè : change / : other : change / : other EXIT: quit EXIT: quit 2-19 5975636 ACTAS 2 170297... -
Page 33: Setting Margins
éê çè éê çè Two given examples illustrate how to set the values. Out : change / : other : change / : other of range values will not be accepted. EXIT: quit EXIT: quit 2-20 5975636 ACTAS 2 170297... -
Page 34: Setting The Measuring Frequency
çè setup cess. If the <EXIT> key is pressed, the change will be : change / : other çè EXIT: quit : other command discarded. A message will be displayed to report the reverting process. 2-21 5975636 ACTAS 2 170297... -
Page 35: Setting The Adjustment Tolerance
Extra stab. time An example is given, which alters the extra stabilisation Saving ... time from 0s to 5s. Edit setup nr Extra stab. time éê çè : change / : other EXIT: quit 2-22 5975636 ACTAS 2 170297... -
Page 36: Start Adjust Menu
ENT: show addr / EXIT Press 'ENTER' Unadjusted projector The addresses of unadjusted projectors can be viewed ç è address: by using the ' ' and ' ' arrow keys. çè : show other / EXIT 2-23 5975636 ACTAS 2 170297... -
Page 37: Remote Control Command Menu
Press ' ç ' to unpause projector 6. Press ' ' to pause projector 6. é Press ' ' to unpause all projector. ê Press ' ' to pause all projector. Press 'EXIT' to quit. 2-24 5975636 ACTAS 2 170297... -
Page 38: The Stand-By/Operate Mode
Press ' ' to increment the brightness. ç Press ' ' to decrement the brightness. é Press ' ' to increment the contrast. ê Press ' ' to decrement the contrast. Press 'EXIT' to quit. 2-25 5975636 ACTAS 2 170297... -
Page 39: Chapter 3 Color Alignment Of A Single Stand-Alone Projector
Interface unit and the projector (or video splitter) Use the supplied cable with 5 BNC-to-BNC connectors: through the 'TEST PICTURE OUTPUT' (C-Sync, B, G/ Gs/Video, R) on the Interface unit to the projector's ports for connecting sources. C-Sync G/Gs/video 5975636 ACTAS 2 170297... -
Page 40: Installing The Actas Sensor Onto The Projector
Insert the plug of the power cord of the Interface unit into the wall outlet, please refer to Chapter 1 for details. Now, all preparatory works are complete, the ACTAS can be used to do the color alignment. 5975636 ACTAS 2 170297... -
Page 41: Procedure For Alignment
The projector must be either in the "Operate mode" or source. the "Pause mode" (use the 'Remote control' command). 5975636 ACTAS 2 170297... -
Page 42: Chapter 4 Color Alignment Of A Projector Wall
D9 connectors. RS232 Note : 3 X 2 Projectors In case of a wall system other than the MVGS/EOS, the host computer should be able to generate signals. ACTAS Interface ACTAS Control unit 5975636 ACTAS 2 170297... -
Page 43: The 'Host Computer
If the system is built around a PC with a multi-output graphics card, a software Windows application is available from BARCO, which generates the required adjustment pictures. POWER CONNECTION Connect all units requiring power to the mains to start up the adjustment. -
Page 44: Procedure For Alignment
There are 3 editable items. Most of them are set correctly by default. Fill in or edit the items as follows : Auto pause mode : 'On' to prevent burn-in Test picture : any Menu style : 'Short' (or 'Advanced') 5975636 ACTAS 2 170297... -
Page 45: Select / Learn Configuration
: 5Hz vance. Coarse adj : 'On' When the reference projector is operating as desired, Adj tolerance : 1 step place the ACTAS Sensor unit onto the next projector to be adjusted as described in Chapter 3. 5975636 ACTAS 2 170297... -
Page 46: Start Adjust
'Defocus' is 'On', a message will prompt for defocus- ing : turn the focus potentiometer until the bar scale indicator reaches its minimum value. Then the 'Defocus projector' menu will follow : turn the focus potentiometer clockwise until the '#' reaches '0'. 5975636 ACTAS 2 170297... -
Page 47: Send Again
This works best if no switching is done to the source types that involve different projector circuitry in the video path: for example, switching from RGBS to RGsB causes no changes, but switching from RGBS to Video could. 5975636 ACTAS 2 170297... -
Page 48: Chapter 5 Errors And Warning Messages
TOP BLANKING adjustment to suppress the horizontal lines sometimes occurring at the start of the field (Attention : since these lines are outside the active picture, and therefore invisible on the screen, this phenomenon should be verified by looking into the lenses). 5975636 ACTAS 2 170297... -
Page 49: Hardware Problems
Projector 6 was temporarily disturbed by a flash that had just occurred. ENT:retry / EX:abort Projector 6 was in stand by. In this case, the RS232 communication suffers from too much noise. ERROR: [7AH] Projector 6 gives bad checksum ENT:retry / EX:abort 5975636 ACTAS 2 170297... -
Page 50: Host Computer Communication Problems
Projector RWI software version is too old, use V4.08/ 'ADDR: to locate proj whose RCU is hit' doesn't work 5.08/1.17 or more recent versions. 5975636 ACTAS 2 170297... -
Page 51: Appendix A. Specific Remarks About Vip Cube
Nevertheless, if the option “Init bri & con” is switched on, the values will be correctly duplicated from the reference projector to the other ones. 5975636 ACTAS 2 170297... -
Page 52: Appendix B. Serial Communication
= (byte) checksum; /* store checksum in record */ After receiving the STX , an address byte is transmitted return ((unsigned char) (STX-count)); /* offset=STX-not_occuring_code */ by the Master. All the slaves compare this address byte 5975636 ACTAS 2 170297... - Page 53 Because only the signals RxD and TxD are used for the CMD = CMDe - OFFS communication, there is no way to detect if there is a slave listening or if there is one listening whether it receives the data correctly. Therefore, the communica- 5975636 ACTAS 2 170297...
-
Page 54: Actas Specific Commands
RS232 address hex answer from HOST : FC 4A 0F 3E 32 00 C5. with BGFX head address) tells BGFX host where to projector remove window address (correlates projector’s RS232 address with BGFX head address) 5975636 ACTAS 2 170297... -
Page 55: Use Of The Serial Commands
ACTAS and meant for the host, and although they will t_margin value never validate as a complete record, they could b_margin value mislead the host). corner value 5975636 ACTAS 2 170297...
Need help?
Do you have a question about the ACTAS 2 and is the answer not in the manual?
Questions and answers