Chore-Time C2 PLUS Installation And Operator's Manual
Proximity sensor feeding system
Hide thumbs
Also See for C2 PLUS:
- Installation and operator's manual (62 pages) ,
- Installation and operator's manual (68 pages)

Related Manuals for Chore-Time C2 PLUS


Summary of Contents for Chore-Time C2 PLUS
- Page 1 ® ™ MODEL C2 PLUS & MODEL G PLUS with Proximity Sensor Feeding System Installation and Operators Manual 1255-111 10/2000 September 2020 MF2495A...
-
Page 2: Chore-Time Warranty
Warranty period (“Extended Warranty Period”) with respect to certain Product parts (“Component Part”) as set forth in the table below. If such a defect is determined by Chore-Time to exist within the applicable period, Chore-Time will, at its option, (a) repair the Product or Component Part free of charge, F.O.B. the factory of manufacture or (b) replace the Product or Component Part free of charge, F.O.B. -
Page 3: Table Of Contents
Chore-Time Warranty ........ - Page 4 MODEL C2 PLUS Shallow with Two Piece Top ....... . .
-
Page 5: Manufacturer's Recommendations: Birds Per Pan
* NOTICE: The above Manufacturer’s recommendations do not constitute a product warranty and are in no way to be considered as a guarantee of performance for poultry production. In addition, the above information in no way alters or revises the terms and conditions of any applicable Chore-Time manufacturer’s warranty. MF2495A... -
Page 6: About This Manual
About This Manual MODEL C2® PLUS & MODEL G™ PLUS with Proximity Sensor Feeding System About This Manual The intent of this manual is to help you in two ways. One is to follow step-by-step in the order of assembly of your product. -
Page 7: Safety Instructions
General Support Information The Chore-Time MODEL C2® PLUS and, MODEL G™ PLUS Feeding System’s have been designed to feed poultry feed types. Using this equipment for any other purpose or in a way not within the operating recommendations specified in this manual will void the warranty and may cause personal injury. -
Page 8: Planning The Suspension System
Planning the Suspension System MODEL C2® PLUS & MODEL G™ PLUS with Proximity Sensor Feeding System Planning the Suspension System 1.Select the House Layout. A. Optional Mid Line Controls may be used for partial house brooding. See . 10' [3 m] 10' [3 m] Minimum Minimum... -
Page 9: General Installation Information
17 lbs [7.7 kg] per minute. This rating is based on feed with a density of 40 lbs per cubic foot [640 kg per cubic meter]. Single phase 60 Hz and single and three phase 50 Hz Power Units are available for the MODEL C2 PLUS and G PLUS Feeders. -
Page 10: Installing The Suspension System
Installing the Suspension System MODEL C2® PLUS & MODEL G™ PLUS with Proximity Sensor Feeding System B. For systems up to 350' [107 m] Figure 4. Suspension for systems up to350’ [107 m] 2.Locate the Power Lift Winch. The Power Lift Winch requires a support that will span, in a wood frame house at least 3 rafters, and in a steel frame house at least 2 rafters. -
Page 11: Installing The Main Winch Cable
MODEL C2® PLUS & MODEL G™ PLUS with Proximity Sensor Feeding System Installing the Suspension System 2) Rafter 1) Power Lift Winch Support Figure 7. Mounting the Power Lift Winch and Support to the Rafters Installing the Main Winch Cable The Suspension Systems are based on ceiling heights of 14' [4.3 m] with Suspension Drop points every 8' [2.4 m]. -
Page 12: Screw Hook Installation
Installing the Suspension System MODEL C2® PLUS & MODEL G™ PLUS with Proximity Sensor Feeding System 4.Route the cable through the Winch Drum Relief located near the bottom of the drum. Tighten the set screw to anchor the cable to the drum. See Figure 11. 3) Drum Direction of Rotation 1) Winch Drum Relief... -
Page 13: Ceiling Hook Installation
MODEL C2® PLUS & MODEL G™ PLUS with Proximity Sensor Feeding System Installing the Suspension System Ceiling Hook Installation Item Description Part No. Ceiling Hook 28550 Steel Truss Wood Truss 1/4-20 Lag Screw Cable Travel Direction Weld Figure 15.Ceiling Hook Installation 6.After securing the Ceiling Hook to the truss, slide the hook of a Swivel Pulley into the slot, as shown in Figure Wood Truss... -
Page 14: Hopper Assembly Procedure
Hopper Assembly Procedure MODEL C2® PLUS & MODEL G™ PLUS with Proximity Sensor Feeding System Hopper Assembly Procedure The 150 lb. Hopper Assembly is NOT designed for single-point suspension. The upper cross brace is designed for supporting the drop tube ONLY. This Hopper Assembly is to have Two-point suspension as stated. Assembly 1.Assemble the 1/4-20 x 1-1/2”... -
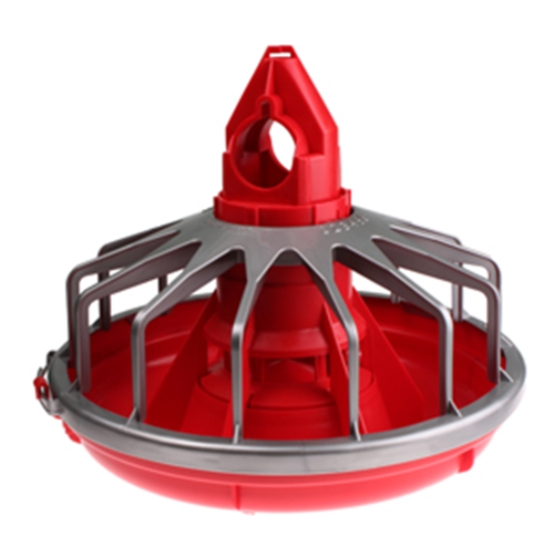
Page 15: Feeder Pan Assembly
Grill and Cones. Seat the Feeder Pan in the ring of the Grill. With the Feeder Pan fully seated rotate the pan clockwise to lock in place. Assemble the remaining Feeders. Rotate the Feeder Pan to lock into the Grill C2 Plus Grill Adjustment Cone Support Cone Feeder Pan 1255-114 4/2001 Figure 21. - Page 16 Figure 23. Hanger Installation Figure 21. Attaching Feeder Tube Assemblies 3.To achieve total feed drop out all along the system, the Chore-Time Logo should be centered at the crown of the tubes and all the Hangers should be installed as shown in Figure 24..
- Page 17 Figure 28.Cable Lock Threading if providing total drop out, tubes should be rotated so that the Chore-Time Logo is on crown of tube. make sure the clamps are located, as shown in Figure 26. Finally, tighten the Tube Clamps on the feeder tubes. Clamp the joints securely, but do not crush the tubes.
-
Page 18: Installing The End Control, Boot Assembly, And Auger
Installing the End Control, Boot Assembly, and Auger MODEL C2® PLUS & MODEL G™ PLUS with Proximity Sensor Feeding System Installing the End Control, Boot Assembly, and Auger The End Control Unit must be at least 10 feet [3 m] from the end of the building to allow birds access around the end of the feeder line. - Page 19 MODEL C2® PLUS & MODEL G™ PLUS with Proximity Sensor Feeding System Installing the End Control, Boot Assembly, and Au- To avoid kinking the auger, be careful not to drop the rolled auger when handling. Inspect the auger carefully as it is installed.
- Page 20 Installing the End Control, Boot Assembly, and Auger MODEL C2® PLUS & MODEL G™ PLUS with Proximity Sensor Feeding System Figure 32. Use the Driver Block to secure the auger to the Output Shaft. 3) Control Unit not shown for clarity 4) 1/4-20 x 1-1/2"...
- Page 21 MODEL C2® PLUS & MODEL G™ PLUS with Proximity Sensor Feeding System Installing the End Control, Boot Assembly, and Au- Conduit (Item 3) in the connectors. Connect the wires to the Feed Line Motor (Item 2). Figure 34.Installing Water Tight, Cutting and Installing Conduit 9.Attach all covers and wire according to the wiring section of this manual.
-
Page 22: Auger Installation
Auger Installation MODEL C2® PLUS & MODEL G™ PLUS with Proximity Sensor Feeding System Auger Installation Note: Use extreme caution when working with the auger. The auger is under tension and may spring causing personal injury. Wear protective clothing, gloves, and safety glasses when working with the auger. - Page 23 MODEL C2® PLUS & MODEL G™ PLUS with Proximity Sensor Feeding System Auger Installation 4.Slide the Drive Tube and flat washer over the output shaft on the Power Unit, as shown in Figure 38. 5.Continue installing auger until the auger reaches the Control Unit end of the feeder line. 6.Turn the Drive Tube Weldment into the auger, then attach to the output shaft of the Power Unit, as shown in Figure 38.
- Page 24 Auger Installation MODEL C2® PLUS & MODEL G™ PLUS with Proximity Sensor Feeding System 8.Install the Metal Water Tight Connector (item 1) in the Feed Line Motor (item 2). Cut the Flex Conduit (item 3) to length. Slide the wires from the end control through the Flex Conduit (item 3). Install the Flex Conduit (item 3) in the connectors.
-
Page 25: Auger Brazing
MODEL C2® PLUS & MODEL G™ PLUS with Proximity Sensor Feeding System Auger Installation 12.Insert the Anchor Assembly into the auger until it touches the washer at the back of the anchor. Tighten the setscrews in the center of the anchor until they touch the auger, then tighten a maximum of 1/2 turn. See Figure 43. -
Page 26: Mid-Line Control
Mid-Line Control MODEL C2® PLUS & MODEL G™ PLUS with Proximity Sensor Feeding System Mid-Line Control Mid-Line Control Units are available for the MODEL C2 PLUS & G PLUS Feeders. The Mid-Line Controls are shown in Figure 45. CHORE-TIME EQUIPMENT CHORE-TIME EQUIPMENT A DIVISION OF CTB INC. - Page 27 Assemble the Mid-Line Control to the Feeder Tube as shown in Figure 49. CHORE-TIME EQUIPMENT A DIVISION OF CTB INC. MILFORD, INDIANA 46542-2000 42663 MODEL C2 PLUS INTERMEDIATE CONTROL WITH PROXIMITY SWITCH 2529-711 DANGER b. Attach the Switch Box Assembly to the Feeder...
-
Page 28: Anti-Roost Assembly
Anti-Roost Assembly MODEL C2® PLUS & MODEL G™ PLUS with Proximity Sensor Feeding System Anti-Roost Assembly 6.Unroll the bulk anti-roost cable. Note: If the cable is unrolled as shown in Figure 50., taking 5 loops of the coil with one hand, then changing hands to remove 5 loops as it is unrolled, it will lie flat during installation. - Page 29 MODEL C2® PLUS & MODEL G™ PLUS with Proximity Sensor Feeding System Anti-Roost Assembly insulators. See Figure 53. 2) Clamp with Anti-Roost Bracket and Insulator 5) Wire Form 4) Spring should be Stretched 3) Insulator 3/4" to 1" [19 mm to 25 mm] 1) Clamp 1255-90 9/2000 Figure 53.Anti-Roost Installation at the Control Unit...
- Page 30 Anti-Roost Assembly MODEL C2® PLUS & MODEL G™ PLUS with Proximity Sensor Feeding System 3) Anti-Roost Wire 2) Insulated Charger Wire 1) Line Charger 1255-92 9/2000 Figure 55.Line Charger Installation 16.The anti-roost system must be on a separate electrical circuit, allowing the system to be disconnected by a switch near the door.
-
Page 31: Wiring
A DI VISION OF C TB IN C . M ILFO R D, IN DIA NA 46542-2000 42663 MOD EL C 2 PL US 42680 MODE L C2 PLUS IN TERME DIATE CONTR O L EN D CON TROL W ITH PR OXIMITY S WITCH... -
Page 32: Mechanical Switch Single Phase(Ø) Wiring Diagram
Wiring MODEL C2® PLUS & MODEL G™ PLUS with Proximity Sensor Feeding System Mechanical Switch Single Phase(Ø)Wiring Diagram FROM DISCONNECT OR FEEDER LINE MOTOR CONTROL DISCONNECT 220/230 VOLTS 50/60 HZ SINGLE PHASE WIRING DIAGRAM 220/230 VOLTS 50/60 HZ SINGLE PHASE MID LINE END CONTROL UNIT CONTROL... -
Page 33: Mechanical Switch Three Phase(Ø) Wiring Diagram: 220 V
MODEL C2® PLUS & MODEL G™ PLUS with Proximity Sensor Feeding System Wiring Mechanical Switch Three Phase(Ø) Wiring Diagram: 220 V. FROM DISCONNECT OR CONTROL DISCONNECT 220 VOLTS 50 HZ TO ADDITIONAL THREE PHASE FEEDER LINES PHASE PHASE PHASE SET OF FUSES SHORT CIRCUIT PROTECTION MID LINE... -
Page 34: Electronic Sensor Three Phase (Ø) Wiring
Electronic Sensor Three Phase (Ø) Wiring 2425-002 2/2014... -
Page 35: Troubleshooting
MODEL C2® PLUS & MODEL G™ PLUS with Proximity Sensor Feeding System Troubleshooting Troubleshooting ALWAYS DISCONNECT POWER TO THE SYSTEM WHEN SERVICING OR MAINTAINING THE EQUIPMENT. FAILURE TO DISCONNECT POWER MAY CAUSE INJURY OR DEATH. Service and maintenance work should be done by a qualified technician only. -
Page 36: Maintenance
MODEL C2® PLUS & MODEL G™ PLUS with Proximity Sensor Feeding System Maintenance Floor Feeding System Maintenance The MODEL C2 PLUS and MODEL G PLUS Feeders require minimum maintenance. However, a routine periodic inspection of the equipment will prevent unnecessary problems. Maintenance should be done by a qualified technician. -
Page 37: Mechanical Switch Adjustment Procedure For Control Units
MODEL C2® PLUS & MODEL G™ PLUS with Proximity Sensor Feeding System Maintenance Mechanical Switch Adjustment procedure for Control Units 1)Adjustment Nut Refer to See Figure 57. A. Turn the adjustment nut counter- clockwise until the switch clicks. B. Turn the adjustment nut clockwise until the switch clicks. -
Page 38: Feeder Line
Maintenance MODEL C2® PLUS & MODEL G™ PLUS with Proximity Sensor Feeding System Feeder Line Keep anti-roost cables tightly stretched. This increases the effectiveness of the electro-guard anti-roost system and keep the pans from being tilted when birds push against them. Remove all feed from the feeder when there are no birds in the house and when the building is washed and disinfected. -
Page 39: Management
MODEL C2® PLUS & MODEL G™ PLUS with Proximity Sensor Feeding System Management Management This section provides you with valuable information concerning feeder operation and management. It is important that you read this information and understand how the feeding system was designed to operate. Once you become familiar with the system, you may custom operate it to fit your individual needs. -
Page 40: General Operation Of The Model C2® Plus And Model G™ Plus Feeders
The MODEL C2 PLUS and G PLUS feeders have a feed flood windows which allows the feeder pan, when lowered to the floor, to be filled with feed for the brooding of young birds. Start young birds with the feeder line lowered so the feed pans are resting on the floor and the feed flood windows are completely open. -
Page 41: End Control And Mid Line Control Pans
The MODEL C2 PLUS and G PLUS Feeding Systems may be controlled by the #34385 Control Panel or the #34574 Time Clock Control. Refer to the instructions supplied with each control for information. -
Page 42: Parts List
Parts List MODEL C2® PLUS & MODEL G™ PLUS with Proximity Sensor Feeding System Parts List 150# Plastic Hopper Item Description 48926 49267 Hopper Hopper Switch Backup Plate 50966 50966 Plastic hopper half 49028 49028 Hopper cover 48675 Support cable assembly 2809-3 2809-3 Clevis pin... -
Page 43: 200# Hopper Components
MODEL C2® PLUS & MODEL G™ PLUS with Proximity Sensor Feeding System Parts List 200# Hopper Components 1660-02 10/2000 Item Description Part No. Hopper Cover (optional) 28206 Tube Support Assembly 14367 Hopper Side 2680 Boot Hanger 2671 Hanger Bracket Assembly 2681 Adjustment Bracket 2706... -
Page 44: 100 # Hopper Components
Parts List MODEL C2® PLUS & MODEL G™ PLUS with Proximity Sensor Feeding System 100 # Hopper Components 1660-01 10/2000 Description Part No. Hopper Cover (w/o hole) 28211 Hopper Cover (w/ hole) 28212 Hopper Hanger 28165 Adjustment Bracket 2706 Clevis Pin, 5/16'' x 1'' 2797-1 Hair Pin 2664... -
Page 45: Hopper Mount Bracket (Optional)
MODEL C2® PLUS & MODEL G™ PLUS with Proximity Sensor Feeding System Parts List Hopper Mount Bracket (Optional) Part Number 49358 - Hopper Suspension Kit Item Description Part No. Part No. Single Boot Twin Boot Clevis Pin, 5/16'' x 1'' 2797-1 2797-1 Adjustment Bracket... -
Page 46: Twin Boot Components Part No. 6824
Parts List MODEL C2® PLUS & MODEL G™ PLUS with Proximity Sensor Feeding System Twin Boot Components Part No. 6824 Item Description Part No. Item Description Part No. Boot Weldment 3932 Setscrew 47867 Tube Clamp 24063 Anchor and Bearing Ass’y 39372 29373 Cannonball... -
Page 47: Feeder Line Components
MODEL C2® PLUS & MODEL G™ PLUS with Proximity Sensor Feeding System Parts List Feeder Line Components 1660-06 10/2000 Item Description Part No. 1/16'' Cable 1922 Charger Wire (165') 28994-165 Charger Wire (330') 28994-330 Spring 7551 1/16'' Cable Clamp 1826 Auger 6820-0 Tube Clamp... -
Page 48: C2 Plus Standard With Two Piece Top
Parts List MODEL C2® PLUS & MODEL G™ PLUS with Proximity Sensor Feeding System C2 PLUS Standard with Two Piece Top 40689 40690 42698 Model Number 40689 40690 42698 C2 PLUS with C2 PLUS C2 PLUS Non Removable Top Non Window... -
Page 49: Model C2 Plus Shallow With Two Piece Top
MODEL C2® PLUS & MODEL G™ PLUS with Proximity Sensor Feeding System Parts List MODEL C2 PLUS Shallow with Two Piece Top 43472 42007 42699 42009 Model Number 42007 42009 43472 42699 C2 PLUS Shallow C2 PLUS Shallow C2 PLUS Shallow Non C2 PLUS Shallow W Window &... -
Page 50: Model C2 Plus And G Plus With Extended Fins
MODEL C2 PLUS and G PLUS with Extended Fins 52865 51405 51403 46817 40684 40688 Model Number 51403 46817 52865 40688 51405 40684 MODEL C2 and MODEL C2 and G MODEL C2 and G MODEL C2 and G MODEL C2 and G... -
Page 51: Model G Plus Standard With Two Piece Top
38603 38603 25052 MODEL G PLUS Grill 38599 38599 38599 Cone Assembly (Packed) 44346 Adjustment Cone 38604 C2 PLUS Cone 44352 39565 42705 Feeder Pan 41501 41501 41501 Shut-Off Slide 39564 MODEL G PLUS Standard with One Piece Top 42694... -
Page 52: Model G Plus Shallow With Two Piece Top
38603 25052 MODEL G PLUS Grill 38599 38599 38599 38599 Cone Assembly (Packed) 42011 43471 Adjustment Cone 41504 41504 C2 PLUS Cone 41503 41892 42238 42677 Shallow Feeder Pan 41500 41500 41500 41500 Shut-Off Slide 39564 39564 MODEL G PLUS Shallow with Two Piece Top... -
Page 53: Power Unit Assemblies
MODEL C2® PLUS & MODEL G™ PLUS with Proximity Sensor Feeding System Parts List Power Unit Assemblies Item Description 3259-84 3259-85 3259-98 3259-100 3259-128 Part No. Part No. Part No. Part No. Part No. Pinion Assembly 5046 5046 5046 5046 5046 - - - - - - - -... -
Page 54: Mechanical End Control
MODEL C2® PLUS & MODEL G™ PLUS with Proximity Sensor Feeding System Mechanical End Control CHORE-TIME EQUIPMENT A DIVISION OF CTB INC. MILFORD, INDIANA 46542-2000 40943 MODEL C2 PLUS END CONTROL WITH WINDOW CONTACT RATINGS: 1/2 H.P. @ 115 VAC 1 H.P. - Page 55 Anti-Roost Guard 2798 2798 2798 2798 Parts Package 40809 40809 40809 40809 *These items are included in the Parts Package. **Actuator Switch, Chore-Time part number 7114, is no longer available. When replacing, use 7114 Switch Replacement Kit Part Number 46678. MF2495A...
-
Page 56: Mechanical Mid Line Control
MODEL C2® PLUS & MODEL G™ PLUS with Proximity Sensor Feeding System Mechanical Mid Line Control CHORE-TIME EQUIPMENT A DIVISION OF CTB INC. MILFORD, INDIANA 46542-2000 40945 MODEL C2 PLUS INTERMEDIATE CONTROL WITH WINDOW CONTACT RATINGS: 1/2 H.P. @ 115 VAC 1 H.P. - Page 57 46123 Feeder Pan 41501 41500 41501 41500 Feeder Grill 39567 39567 38599 38599 Adjustment Cone 38604 41504 38604 41504 *Actuator Switch, Chore-Time part number 7114, is no longer available. When replacing, use 7114 Switch Replacement Kit Part Number 46678. MF2495A...
-
Page 58: Electronic Sensor End Control (56706)
Parts List MODEL C2® PLUS & MODEL G™ PLUS with Proximity Sensor Feeding System Electronic Sensor End Control (56706) MF2495A... - Page 59 6956 General Purpose Mach. Box 42627-12 Switch Box Cover 6776 Switch Box Gasket 6777 Omron Relay 28904 C2 Plus Proximity Sensor Holder 56768 C2 Plus w/Sensor Mach. Cone 56767 Slide Top Cap 38603 C2 Plus Grill 39567 Breeder Feeder Pan...
-
Page 60: Electronic Sensor Mid Line Control (56934)
Electronic Sensor Mid Line Control (56934) Item Description Part No. Item Description Part No. Mounting Bracket 52315 C2 Plus w/Sensor Mach. Cone 56767 Terminal Box Mounting Cover 6956 C2 Plus Proximity Sensor Holder 56768 Switch Box Gasket 6777 C2 Plus Grill... -
Page 61: Model G Plus Pan Extension (Optional)
MODEL C2® PLUS & MODEL G™ PLUS with Proximity Sensor Feeding System Parts List MODEL G PLUS Pan Extension (Optional) Item Description Part No. Pan Extension 29510 Lock Nut 24208 1/4” Carriage Bolt 22692 1255-54 4/1998 2883 Power Winch 1660-25 2/2001 Item Description Part No. -
Page 62: Miscellaneous Suspension Components
Parts List MODEL C2® PLUS & MODEL G™ PLUS with Proximity Sensor Feeding System Miscellaneous Suspension Components Miscellaneous Suspension Components Item Description Part No. 3/16 Cable 1213 Cable Lock 14337 Pulley with Swivel 3004 Heavy Duty Pulley Assembly 2014 Pulley 2500 3/16"... - Page 63 MODEL C2® PLUS & MODEL G™ PLUS with Proximity Sensor Feeding System Parts List This page left blank intentionally..MF2495A...
- Page 64 Revisions to this Manual Page No. Description of Change New Manual 34806 For additional parts and information, contact your nearest Chore-Time distributor or representative. Find your nearest distributor at: www.choretime.com/contacts CTB, Inc. PO Box 2000 Milford, Indiana 46542-2000 USA Phone (574) 658-4101 Fax (877) 730-8825 Email: choretime@choretime.com...
Need help?
Do you have a question about the C2 PLUS and is the answer not in the manual?
Questions and answers