Table of Contents
Advertisement
Quick Links
Advertisement
Table of Contents

Subscribe to Our Youtube Channel
Related Manuals for Chore-Time Control


Summary of Contents for Chore-Time Control
- Page 1 Installation and User Manual 5-21-18 Revision 0.18.05.21...
-
Page 2: Table Of Contents
3.2 Wiring 3.3 Backup Mode 3.4 Power Supply Redundancy 3.5 Installing and Moving Modules 4.0 Software Menu 4.1 Touch Screen Input Methods 5.0 Control Configuration 5.1 File Settings 5.2 Information 5.3 Time Settings 5.4 Security 5.5 Wi-Fi 5.6 Bin Scales 5.7 General Settings... -
Page 3: Introduction
Chore-Time Control is an electronic device used for environmental and building control in livestock applications. It allows the user to maintain a specified target temperature by controlling the operation of ventilation and heating equipment. The Chore-Time Control can be configured with the below I/O cards. Please check the ratings for each card before installation. -
Page 4: Importance Of The User / Installer Manual
However, PigTek Pig Equipment Group does not assume any liability for printing errors or other errors and any damage or loss resulting from such errors. PigTek and Chore-Time are registered trademarks of CTB, Inc. All brand names and product names mentioned in this document are trademarks or registered trademarks of their respective holders. -
Page 5: Service Warning
1.4 Service Warning Before servicing the control, switch power off at service panel and lock the switch, disconnecting mains to prevent power from being switched accidentally. When the service disconnecting mains cannot be locked, securely fasten a prominent warning device, such as a tag, to the service panel. -
Page 6: Terms Of Use
To avoid exposing the control to harmful gasses or excessive humidity, it is preferable to install it in a dedicated room. If the equipment is used in a manner not specified by the manufacturer, the protection provided by the equipment may be impaired. -
Page 7: Returning For Repair
2.3 Returning for Repair Made to work. Built to last.® Contact your nearby Chore-Time distributor or representative for additional parts and information. Distributor Contact Information Name: Phone Number: Email: PigTek, A Division of CTB, Inc. 401 East Syracuse Street P.O. Box 2000 • Milford, Indiana 46542-2000 • U.S.A. -
Page 8: System Overview
3.0 System Overview The control is a complete building automation system for livestock applications. Each control is composed of a master and optional slave units. Master and slave units are configured with optional cards to match site configuration requirements. The following table lists the control and card specifications. - Page 9 2X Relay Card Two high current relays (15 Amps) Integrated current sensing (AC only) Resistive and inductive loads Conformal coated Plastic enclosure Consumes 1 slot 4X Relay Card Four high current relays (10 Amps) ...
- Page 10 2X Curtain Card Four high current relays (7.5 Amps) Integrated whisker or wiper I/O Integrated current sensing (AC only) Resistive and inductive loads Conformal coated Plastic enclosure Consumes 1 slot 2X 4-20mA + Relays Card ...
- Page 11 Signal Relay Card NO Eight low current signal relays NO (3 Amps) Conformal coated Plastic enclosure Consumes 1 slot Signal Relay Card NC Eight low current signal relays NC (3 Amps) Conformal coated Plastic enclosure ...
- Page 12 2X Curtain Backpack Toggle switches for manual override Toggle switch for thermostat control of one or both curtains Thermostat connection with fixed move delay Build in redundant power supply Conformal coated Plastic enclosure ...
-
Page 13: Installation Guidelines
Attach the control to an adequate support structure behind drywall or similar. Clearance Around the Control A minimum wall space of 87 x 79cm (34” x 31”) is required. Allow 15cm (6”) clearance around the control from other objects or obstructions. -
Page 14: Backup Mode
3.5 Installing and Moving Modules Cards are designed to be easily added, moved, or removed from the control. Ensure the main power supply voltage is removed before proceeding. Each card is designed to occupy one of twelve slots in the spine. To move or remove a card, ensure the retaining screw is removed and slide the card away from the spine. -
Page 15: Software Menu
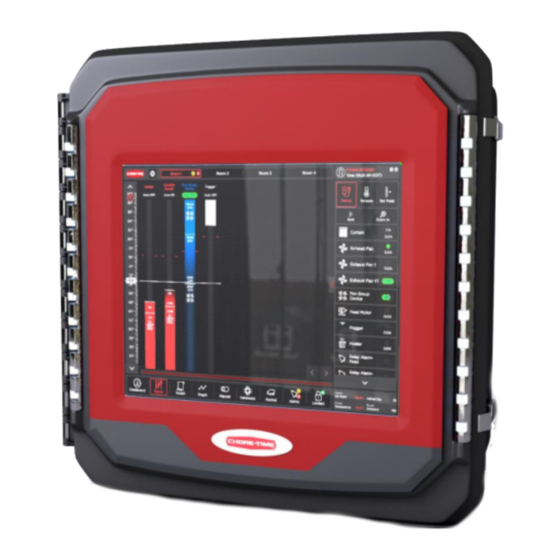
4.0 Software Menu The control can support up to ten rooms. Navigating between rooms is done using the top room toolbar. The below image is from a configured room page on a control with four rooms. - Page 16 The control software is broken up into several functional areas called pages. Navigate to different pages using the main toolbar. Main toolbar Dashboard: Configurable widgets to see room key indicators. Room: View and configure room settings. Script: View and configure control scripts.
-
Page 17: Touch Screen Input Methods
4.1 Touch Screen Input Methods Virtual keyboard The control system is touch screen based and some areas of the control require the use of a keyboard. The keyboard will automatically appear when the user presses on a text field. Virtual keypad Value field inputs will bring up a numeric keypad. -
Page 18: Control Configuration
5.0 Control Configuration In the rooms tab, define one or multiple rooms for this control. Additional rooms can be added by clicking on the ① Add New Program button. Rooms will automatically name sequentially. The user can click on an existing room ②... - Page 19 Edit room pop-up:...
-
Page 20: File Settings
5.1 File Settings The control operates based on a configuration file. This configuration file can be backed up, reloaded, wrote over and transferred to other controls. Use this screen to create a backup or reload a previously saved file. Create seasonal programs (ex. Winter, Spring, Summer, and Fall) and use the save and load functions to easily move between these unique programs. -
Page 21: Information
5.2 Information The information tab is primarily used by technicians to access technical information about the control. Set the ① Device Name to something related to the farm. ② The control can auto upgrade to the latest available software using the Smart Update button. -
Page 22: Time Settings
5.3 Time Settings ① Configure the current date and time for the control. Use the setup Slide Switch to configure time manually or ② automatically (requires internet). If setting automatically, first select the Region from the left panel. Next, select ③... -
Page 23: Security
5.4 Security The control can be configured to different security levels enabling the primary user to restrict access and limit changes to secondary users. Settings: Autolock: Returns the control to the Default lock level when the screen saver turns on. -
Page 24: Wi-Fi
5.5 Wi-Fi ① ② Use the Search button to scan for available Wi-Fi Networks. Click the Wi-Fi network from the list of available networks. A pop-up will appear to enter the network password and connect. Optional Requires Wi-Fi module. Wi-Fi password pop-up:... -
Page 25: Bin Scales
IP address of the BinTrac and click the Connect button. Click Enable for each bin that pertains to this control. Once a bin is enabled, select which room the bin belongs to using the Combo box ③. Lastly, define a ④ Bin Name which will be used throughout the control. -
Page 26: General Settings
Device State Over Block: Show device state bubble over block on room page. Location Information: Set the location of the control with zip-code or latitude and longitude coordinates. These settings are how the control calculates the sunrise and sunset times. -
Page 27: Dashboard Page
6.0 Dashboard Page The dashboard page shows the user valuable information from the control. Widgets can be configured and placed on the dashboard based on the user requirements. Each room has its own dashboard page and each can be configured uniquely. - Page 28 Add Widget: Click to display list of available widgets. Once the list is displayed, click and drag the widget to an available location on the widget grid. While add widget is enabled, a widget can be moved on the grid.
- Page 29 Edit Widgets: Once a widget is added to the grid, it might require additional setup. Click on the Edit Widget button, and then click on the widget you would like to edit. Next, click on the Pencil icon that appears and a pop-up will appear if additional settings are available. Follow the onscreen instructions. Widgets can be edited or deleted by clicking on the Edit Widget button in the main toolbar.
-
Page 30: Room Page
7.0 Room Page The room page is the primary page for accessing and configuring devices. The room page is broken into two main ① and Device and Sensor Panel ②. panels: Block Panel... - Page 31 Block Panel The block panel consists of temperature based blocks which indicate when a device will operate. The block consists of several elements: block minimum and maximum operating range, operating state at the minimum and maximum temperatures, current block temperature and the block set point. The color of the block indicates if the block is a heating or cooling device.
- Page 32 Elements of a Block ⑤ ② A block consists of several elements: Bottom of Block and Top of Block determines the operating range of ③ and the Block Set Point ④. The color of the block indicates if the block the device.
- Page 33 Device and Sensor Panel Device & Sensor Panel: This panel lists the devices and sensors assigned to the room. If a device or sensor is selected from the panel by touching it, additional options will appear. By default, the device list is shown. To view sensors, touch on the sensors icon at the top of this panel to view the sensor list.
- Page 34 Device and Sensor Panel: Compact Status Within the device and sensors panel you see a list of items, these items are referred to a compact statuses. If you click on a compact status if will expand to offer some links specific to this device or sensor. Below is an example of a compact status for an exhaust fan.
-
Page 35: Device Configuration Types
7.1 Device configuration Types There are three different types of device configurations: Block – Operate a heating or cooling device using a temperature block. Detailed in section 7.2 & 7.3. Fan Group – Operate a group of fans from a block. Detailed in section 7.4. Scheduled Device –... -
Page 36: Block
7.3 Block Under the Block tab the operating parameters for the device are configured. The device will run based off of the temperature feedback from the probes assigned on the Sensors tab or in the case of a sensor failure, the Backup tab. - Page 37 Below is an example of a ramping device set point. Multiple temperature points can be defined by animal day. The control will adjust the set point for the device as the room animal day increases. The temperature will ramp linearly between defined days.
- Page 38 Device Cycle Timer Below is an example of a cycle timer which can be applied to a block to reduce minimum ventilation. The cycle timer will adjust its on-time based on the temperature feedback of the block. Cycle Time: Duration of one full cycle (on-time plus off-time). Low temperature percentage on: percent of the cycle the device is on at the bottom of the block.
-
Page 39: Device Configuration - Fan Group
CFM requested from the block. Fan Group – Control Mode Name: Define name for fan group. Mode Selection: Define if the group will operate based on temperature or pressure feedback. Depending on mode type, different tabs will become available in the fan group pop-up. - Page 40 Fan Group – Group Using the Group tab found in the fan group device configuration pop-up, define the group of fans. The left column ① ② lists the available fans. The right column lists the fans in the group. Add and remove devices from the fan group using the Left/Right Arrow keys ③.
- Page 41 Fan Group – Performance Using the Performance tab found in the fan group device configuration pop up, configure each fans operating characteristics. Requested & Actual CFM: Displays the CFM requested from the block and the fan delivered CFM. Minimum Speed: Minimum fan speed the fan group can operate this device. Current &...
-
Page 42: Device Configuration - Scheduled Devices (Feed Motor, Light, Clock)
Scheduled Times: Click on the pencil icon to add a new scheduled run time. Advanced programs can operate based on sunrise and sunset accessed through the Sun icon. Once two schedule times have been configured, the control will see a pattern of start, stop and run times. Use the duplicate key to replicate this pattern. - Page 43 Schedule Based Devices – Light A light device schedule varies some from the above start and stop time schedule. In a lighting device, the schedule uses start times and light intensity. The controller will operate the light based on the lighting intensity defined at a start time.
- Page 44 Schedule Based Devices – Feed Motor Timers ① ② The feed motor device has integrated Max Run and Max Idle timers. When these timers expire, they can be configured to generate alarms through the alarm system. Max Run Timer: Time device can operate continuously with amps before being disabled. Max Idle Timer: Time device has no amps during a schedule run time.
-
Page 45: Script
Scripts can be accessed under the Script icon in the main toolbar. Scripts are user defined conditional statements that can operate a device based on if/then logic. If multiple scripts are trying to control a device with conflicting signals, the script in the highest priority group and the highest priority script in that group will prevail. -
Page 46: Script Editor
8.1 Script Editor The second step in creating a script is to define the Conditional Statement ③. Complete each unknown box in the ④ order as you would read the script. When you highlight an unknown box, the right panel will List the available options for this field. -
Page 47: Graphs
9.0 Graphs Graphs can be accessed under the Graph icon in the main toolbar. Historical information can be viewed using the graphing tool and overlaid upon multiple devices and sensors. In the right hand panel graph options are grouped by devices and sensor types. Different items are stored under these groups. -
Page 48: Manual Mode
10.0 Manual Mode Manual control can be accessed under the Toggle Switch icon in the main toolbar. Virtual toggle switches are available here to manually operate devices. By default, all devices are shown. Use the device type filter in the right hand panel to view only devices of this type. -
Page 49: Hardware
11.0 Hardware The hardware configuration of the control is represented virtually under the hardware icon in the main toolbar. Virtual hardware appears automatically as new hardware is added. To setup a sensor or device click on the green box in the virtual hardware. This will open a configuration screen specific to the card type Virtual Backplane: View installed hardware virtually. -
Page 50: Hardware - Input Card
Some input types will have additional configuration requirements. The first eight channels of the input card can be setup as resistive or pulse type sensors. Below is an example of a temperate probe setup. Name: Sensor name used throughout control. Type: Define connected probe type. - Page 51 The last two channels of the input card can be setup as 4-20mA sensors. Name: Sensor name used throughout control. Type: Define connected probe type. Location: Indoor / outdoor. Room: Define what rooms probe will be used in. Note Sensor types: Static Pressure, Pressure gauge, Current, Ammonia, C02, and Water level have additional options settings.
-
Page 52: Hardware - Output Cards
11.2 Hardware – Output Cards Depending on the type of card and the devices it operates, different options will be available in the Configuration Panel ②. Described below are the common components seen when setting up an output type card. To open the ①... - Page 53 Type: Define connected device type. Room: Define what room device is located in. Tunnel Fan: Threshold that control enters tunnel mode. Require Amperage: Device must pull amps to be considered in working condition. Otherwise the control will bypass the fan for another fan in working condition.
-
Page 54: Hardware - Curtain Cards
11.3 Hardware – Curtain Cards Curtain devices have special settings listed below: Name: Device name used throughout control. Type: Define curtain/inlet type. Room: Define what room the device is located in. Input Mode: Define card feedback sensor type. Navigation Mode: Define the mode the curtain uses for navigation. -
Page 55: Animal Page
Animal Day – Adjust the animal day. 12.1 Animal Inventory Animal inventory data can be recorded in the control based on animal group. The basic process for recording data goes as follows: Add / Remove: Select the inventory action. This will update the addition/removal Reasons List (3). - Page 56 Record: Save this inventory record. Animal Inventory – Settings Group Settings: Pop-Up to configure group name and add a new animal group. The active animal group is the most recently created group. Reasons Settings: Pop-Up to configure custom removal reasons. Inventory Journal: View inventory records for the group.
-
Page 57: Animal Day
12.2 Animal Day Animal Day: Manually set animal day. Once set, animal day will automatically increment each day. New Group: Sets animal day to zero. All devices set to automatic. Pause Animal Day: Pauses animal day from incrementing. Clean Mode: Disables alarm generation. -
Page 58: Temperature Curve
12.3 Temperature Curve The room set point can ramp based on a temperature curve. To enable this feature, check the Enable Temperature ① Curve box. Enable Temperature Curve: Room set point comes from temperature curve if enabled. If disabled, room set point is set manually from the room page. -
Page 59: Alarm
Alarms can be accessed under the Alarm icon in the main toolbar. Alarms are user defined parameters that generate alerts to the user via phone, relay outputs and visual display on the control. The alarm page is setup as two panels. The right panel is used to sort and filter available alarms while the left panel is used to display the alarm detail. -
Page 60: Alarm Settings
13.1 Alarm Settings ③ Each device and sensor has a unique list of available alarms. Click the Gear icon of an alarm to configure the alarm settings. The alarm header (below) provides a summary of the alarm settings. If the alarm is active, it will also display the ①... - Page 61 ⑪ The third setup section defines the outputs of the alarm. Alarm Relay defines which relay will activate when the ⑫ ⑬ alarm is active. Alarm Group defines which group of users will receive this alarm. Send Text Message will send the alarm out the user group as SMS versus through the Flightline app.
-
Page 62: Lock
Changing the lock level can be accessed under the Lock icon in the main toolbar. Lock levels are used to enable or disable users for making changes to the control outside of their permission level. Clicking on the lock icon will open the keypad for the user to enter their PIN. -
Page 63: Toolbar Widgets
15.0 Toolbar Widgets ① Press and hold in the center of the Toolbar Widgets display to open the room sensor configuration pop-up. From this screen, toolbar widgets can be configured. Widgets: The middle section lists the widgets which can be placed in the bottom toolbar. To place a widget in the toolbar, click on the widget name.
Need help?
Do you have a question about the Control and is the answer not in the manual?
Questions and answers