
Related Manuals for COMAC Innova Comfort


Summary of Contents for COMAC Innova Comfort
- Page 1 SCRUBBING MACHINES USE AND MAINTENANCE MANUAL ORIGINAL INSTRUCTION DOC. 10084230 - Ver. AA - 05-2020...
-
Page 3: Table Of Contents
CONTENTS CONTENTS ................................. 3 GENERAL SAFETY REGULATIONS ......................... 5 SYMBOLS USED IN THE MANUAL .......................... 5 MAIN MACHINE COMPONENTS ..........................6 GENERAL DESCRIPTION ............................8 PURPOSE AND CONTENT OF THE MANUAL ..............................8 TARGET GROUP ........................................8 STORING THE USE AND MAINTENANCE MANUAL ............................8 ON CONSIGNMENT OF THE MACHINE ................................ - Page 4 SCRUBBING WITHOUT DRYING ..................................24 ADDITIONAL FUNCTIONS ............................25 HOUR METER........................................25 BATTERY CHARGE LEVEL INDICATOR ................................25 ECO-MODE (automatic versions)..................................26 ACTIVATING/DEACTIVATING ECO-MODE (automatic versions) ........................26 REGULATING THE DETERGENT SOLUTION ..............................26 MOVEMENT COMMAND PEDALS ..................................27 SERVICE BRAKE ........................................ 27 PARKING BRAKE ........................................
-
Page 5: General Safety Regulations
The descriptions contained in this document are not binding. The company therefore reserves the right to make any modifications at any time to elements, details, or accessory supply, as considered necessary for reasons of improvement or manufacturing/commercial requirements. The reproduction, even partial, of the text and drawings contained in this document is prohibited by law. The company reserves the right to make any technical and/or supply modifications. -
Page 6: Main Machine Components
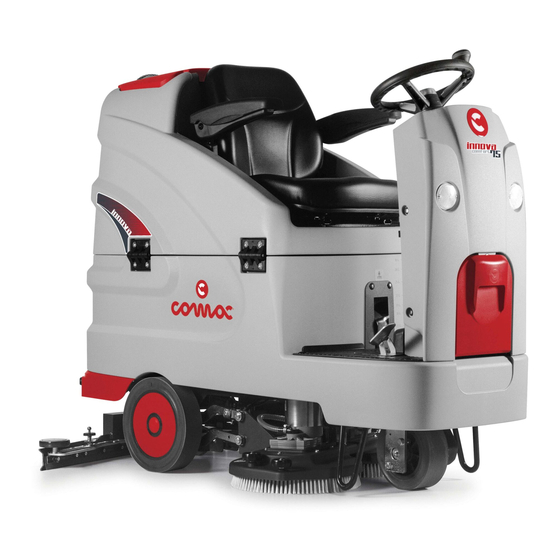
MAIN MACHINE COMPONENTS... - Page 7 The machine's main components are the following: 1. Steering wheel. 2. Headlight (automatic versions). 3. Detergent canister compartment carter (versions with automatic dosing system). 4. Solution tank. 5. Driving wheel. 6. Blinking light. 7. Operator seat. 8. Recovery tank. 9. Solution tank filler shaft cap. 10.
-
Page 8: General Description
TECHNICAL DESCRIPTION The Innova Comfort is a floor scrubbing machine that can handle a wide variety of floors and types of dirt thanks to the mechanical action of two disc brushes and the chemical action of a water-detergent solution. As it advances, it collects the dirt removed and the detergent solution not absorbed by the floor. -
Page 9: Definition Of Levels Of Warning
DEFINITION OF LEVELS OF WARNING DANGER: indicates an imminent dangerous situation that, unless avoided, will result in death or serious injuries. WARNING: Indicates a potentially dangerous situation that, unless avoided, could cause death of serious injury. ATTENTION: Indicates a potentially dangerous situation that, unless avoided, could cause slight or moderate injuries. N.B.: instructs the reader to pay particular attention to the topic that follows. -
Page 10: Symbols Used On The Machine
SYMBOLS USED ON THE MACHINE SERIAL NUMBER PLATE The serial number plate is located at the rear of the steering column, and indicates the machine's general characteristics, including its serial number. The serial number is a very important piece of information and should always be provided together with any request for assistance or when purchasing spare parts. -
Page 11: Symbols On The Control Panel (Automatic Version)
Label prohibiting the vacuuming of flammable or incandescent substances: ATTENZIONE! È fatto assoluto divieto di aspirare/raccogliere con questo This is used in the rear part of the steering column to warn the user that there is an absolute obligation not to vacuum flammable or apparecchio polveri e/o liquidi infiammabili e/o esplosivi o particelle incandescenti. -
Page 12: Symbols On The Control Panel (Manual Version)
SYMBOLS ON THE CONTROL PANEL (manual version) Main switch symbol: Located on the control panel to indicate in which direction to turn the key to activate or deactivate the machine's general switch. Open book caution symbol: Located on the control panel to tell the operator to read the manual before using the machine. Indicator light for activation of extra pressure on the brushes (M versions): Located on the control panel to identify the indicator light for the activation of the extra-pressure function on the brushes. -
Page 13: Technical Data
TECHNICAL DATA INNOVA INNOVA Unit of TECHNICAL DATA COMFORT COMFORT measure- ment [SI] 75 B 85 B Nominal input power [IEC 60335-2-72; IEC 62885-9] 1,81 Solution tank capacity [IEC 62885-9] Recovery tank capacity [IEC 62885-9] Maximum solution tank capacity (versions with incorporated dosing system) Minimum inversion corridor [IEC 62885-9] 1895 1570... -
Page 14: Preparation Of Machine
PREPARATION OF MACHINE HANDLING THE PACKAGED MACHINE The machine's overall weight including packaging is 268kg or 591lb. The overall dimensions of the package are: Length = 1600mm or 63in Width = 730mm or 29in Height = 1630mm or 64in ATTENTION: it is recommended that all the packaging components be kept for any future machine transportation. ATTENTION: Move the packaged product with handling equipment that complies with legal requirements regarding size and mass of the packaging. -
Page 15: How To Move The Machine
WARNING: The machine is contained in specific packaging materials, whose elements (plastic bags, staples, etc.) can pose potential hazards, and must not be left within reach of children, disabled persons, etc. CAUTION: It is recommended to wear the appropriate PPE (Personal Protective Equipment), suitable for the work to be carried out. 3. -
Page 16: Inserting The Batteries Into The Machine
The batteries must be charged prior to first use, and whenever they no longer provide sufficient power. ATTENTION: If the control board and battery charger are fitted, they are set for lead-acid batteries. Contact your nearest COMAC assistance centre to modify the setting if you want to use gel batteries. -
Page 17: Filling The Solution Tank With Water
ATTENTION: park the machine in an enclosed place, on a flat and level surface; near the machine there must be no objects that could either damage it, or be damaged through contact with it. ATTENTION: the room used to recharge the batteries must be adequately ventilated to prevent the accumulation of gases that leak from batteries. -
Page 18: Detergent Solution
• Remove the filler hose (14) from its seat (Fig.18), then remove the closure cap (15) and insert the water filler hose. • Remember to remove the cap (12) so the air can be properly vented. N.B.: the filler pipe (14) supports the water filler pipe. C) filling through the optional quick filling kit: •... -
Page 19: Assembling The Squeegee Body
ASSEMBLING THE SQUEEGEE BODY For packaging reasons, the squeegee body comes disassembled from the machine. To assemble it on the squeegee body support, proceed as follows: 1. Carry out the steps necessary to secure the machine, see paragraph "MACHINE SAFETY" on page 15. CAUTION: It is recommended to wear the appropriate PPE (Personal Protective Equipment), suitable for the work to be carried out. -
Page 20: Preparing To Work
PREPARING TO WORK Before beginning to work, it is necessary to: 1. Make sure the recovery tank is empty; if not, empty it completely. See paragraph "DRAINING THE RECOVERY TANK" on page 31. 2. Check that the quantity of detergent solution in the solution tank is correct for the type of work to be carried out; if not, refill the solution tank - see "FILLING THE SOLUTION TANK WITH WATER"... -
Page 21: Starting Work
STARTING WORK To begin working with a manual machine, proceed as follows: 1. Carry out all the checks listed in the chapter "PREPARING TO WORK" on page 20. 2. Sit on the driver’s seat. 3. Move the main switch to position "I" and make a quarter turn clockwise with the key (1) (Fig.1). 4. -
Page 22: Overflow Device
A. Transfer B. Drying C. Scrubbing with drying D. Scrubbing without drying 5. Make sure the detergent solution tap is completely open. If this is not the case, shift the knob (4) on the right-hand side of the steering column downwards (Fig.6). -
Page 23: Working Programs
WORKING PROGRAMS TRANSFER The machine can be moved from one work area to another when the "transfer" working program is enabled. The only main actuator active is that of the traction motorwheel. To activate the "transfer" program on a manual machine, proceed as follows: 1. -
Page 24: Scrubbing With Drying
SCRUBBING WITH DRYING With the selector in the scrubbing with drying mode it is possible to both scrub and dry the floor at the same time. To activate the "scrubbing with drying" program on a manual machine, proceed as follows: 1. -
Page 25: Additional Functions
ADDITIONAL FUNCTIONS HOUR METER The usage time of the manual machine can be checked in the following way: The control panel contains a display, and the second screen that appears after machine start-up shows the total usage time (1) (Fig.1). N.B.: The digits that precede the "."... -
Page 26: Eco-Mode (Automatic Versions)
N.B.: When the minimum remaining charge is reached, the graphic symbol (6) will start to flash and will turn off after a few seconds, after which the symbol (5) will start to flash. In these conditions, the machine must be taken to the designated battery charging area. N.B.: A few seconds after the battery charge reaches the critical level, the brush motors switch off automatically. -
Page 27: Movement Command Pedals
N.B.: The water flow rate level refers to the flow delivered at maximum machine speed, at intermediate speeds, the flow is reduced and is proportional to the value set. 4. The percentage of chemical product in the machine's water system is regulated by means of the button (13) on the control panel (Fig.5). N.B.: The control display shows a graphic symbol (14) indicating the percentage currently being used (Fig.3). -
Page 28: Extra-Pressure Function On The Brushes
N.B. : Each time the button (20) is pressed, the speed level of the machine's movement is increased, once the maximum level has been reached, the speed will start again from the first level. Pressing the button subsequently changes the movement speed of the machine, there are three selectable levels (50% - 75% - 100%). -
Page 29: At The End Of The Work
AT THE END OF THE WORK At the end of the work, and before carrying out any type of maintenance, perform the following operations: 1. For the manual machine versions, raise the squeegee body and rotate the lever (1) in the rear part of the steering column clockwise (Fig.1). 2. -
Page 30: Routine Maintenance
ROUTINE MAINTENANCE INTERVAL MACHINE COMPONENTS PROCEDURE Clean the vacuum chamber; the squeegee rubber blades; the suction nozzle (see Squeegee "CLEANING THE SQUEEGEE BODY" on page 31). Clean the brushes in the scrubbing brush head body (see "CLEANING THE Scrubbing brush head body brushes BRUSH HEAD BODY BRUSHES"... -
Page 31: Draining The Recovery Tank
Before performing any routine or extraordinary maintenance operation, proceed as follows: 1. Take the machine to the maintenance area. N.B.: the place designated for this operation must comply with current regulations concerning safety at work and current environmental protection regulations. 2. -
Page 32: Cleaning The Brush Head Body Brushes
CLEANING THE BRUSH HEAD BODY BRUSHES Careful cleaning of the brush guarantees better cleaning of the floor as well as a longer brush head gearmotor lifespan. To clean the brush on manual machine versions, proceed as follows: 1. Stand on the left side of the machine. 2. -
Page 33: Emptying The Solution Tank
EMPTYING THE SOLUTION TANK Proceed as follows to empty the solution tank: 1. Release the solution tank drainage tube (18), on the left-hand side of the machine, from its retainers (Fig.25). Remove the cap and place it on the ground. 2. -
Page 34: Extraordinary Maintenance Work
EXTRAORDINARY MAINTENANCE WORK Before performing any routine or extraordinary maintenance operation, proceed as follows: 1. Take the machine to the maintenance area. N.B.: the place designated for this operation must comply with current regulations concerning safety at work and current environmental protection regulations. - Page 35 3. Repeat the operations described for the right-hand front brush as well. 4. To replace the brushes, refer to "ASSEMBLING THE BRUSH HEAD BODY BRUSHES" on page 19. To clean the brush on automatic machine versions, proceed as follows: 1. Unhook the tank rotation stop lever (9) (Fig.8) and turn the recovery tank to its maintenance position (Fig.9). 2.
-
Page 36: Adjustment Interventions
ADJUSTMENT INTERVENTIONS ADJUSTING THE SQUEEGEE BODY'S RUBBER BLADES The careful adjustment of the squeegee body rubber blades guarantees better cleaning of the floor. To adjust the squeegee body blades, proceed as follows: 1. Sit on the driver’s seat. 2. Insert the key (1) into the main switch on the control panel. Set the main switch to "I" (Fig.1). 3. -
Page 37: Choosing And Using Brushes
CHOOSING AND USING BRUSHES POLYPROPYLENE BRUSH (PPL) Used on all types of floors. Good resistance to wear and tear, and hot water (no greater than 50°C.). PPL is non-hygroscopic and therefore retains its characteristics even when working in wet conditions. ABRASIVE BRUSH The bristles of this type of brush are charged with highly aggressive abrasives. -
Page 38: Troubleshooting
TROUBLESHOOTING This chapter lists the most common problems linked with the use of the machine. If you are unable to resolve the problems with the information given here, please contact your nearest assistance centre. PROBLEM POSSIBLE CAUSE SOLUTION The main switch is set to “0”. Make sure that the main switch is set to "I". - Page 39 PROBLEM POSSIBLE CAUSE SOLUTION Make sure the squeegee is free of obstructions - see "CLEANING THE SQUEEGEE BODY" on page 31. Make sure the vacuum tube is free of obstructions - see "CLEANING THE SQUEEGEE BODY" on page 31 and The vacuum unit is obstructed.
-
Page 40: Ec Declaration Of Conformity
SCRUBBING MACHINES - mod. INNOVA COMFORT 75B 2018 - INNOVA COMFORT 75B 2018 INNOVA COMFORT 75B 2018 M - INNOVA COMFORT 75B 2018 M comply with the provisions of Directives: 2006/42/EC: Machinery Directive. - Page 41 SCRUBBING MACHINES - mod. INNOVA COMFORT 75B 2018 CB - INNOVA COMFORT 75B 2018 CB INNOVA COMFORT 75B 2018 M CB - INNOVA COMFORT 75B 2018 M CB comply with the provisions of Directives: 2006/42/EC: Machinery Directive.
- Page 44 COMAC S.p.A. Via Maestri del Lavoro, 13 - 37059 Santa Maria di Zevio - Verona - ITALY Tel. 045 8774222 - Fax 045 8750303 - www.comac.it - com@comac.it Organization certified by Q.C.B. Italia ISO 9001:2008, ISO 14001:2015, OHSAS 18001:2007...
Need help?
Do you have a question about the Innova Comfort and is the answer not in the manual?
Questions and answers