
Related Manuals for COMAC ANTEA 50 B


Summary of Contents for COMAC ANTEA 50 B
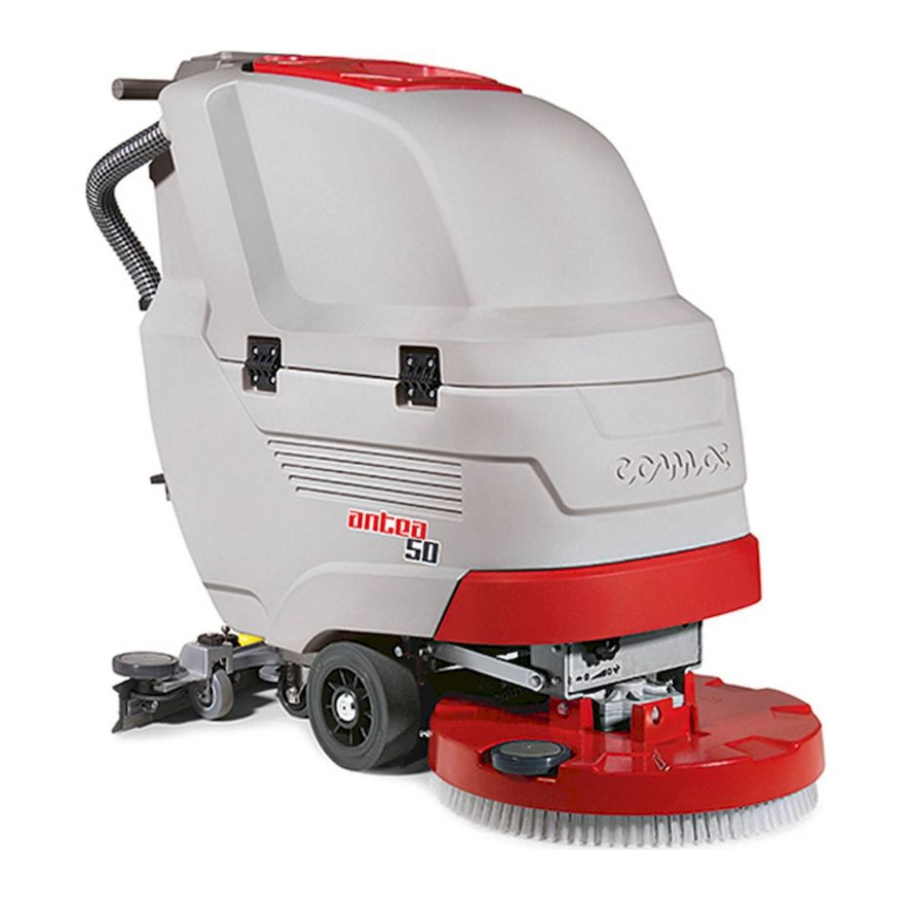
- Page 1 ANTEA - VERSA SCRUBBING MACHINES USE AND MAINTENANCE MANUAL ORIGINAL INSTRUCTIONS Doc. 10056728-AD DATE 2018-06...
-
Page 3: Table Of Contents
SCRUBBING WITHOUT DRYING (BT - BTS - BTO VERSIONS) ...........24 CONTENTS DRYING WITHOUT SCRUBBING (BT - BTS - BTO VERSIONS) ...........25 CONTENTS ......................3 ADJUSTING THE DETERGENT SOLUTION (versions without CDS system) ........25 SYMBOLS USED IN THE MANUAL ..............4 ADJUSTING THE DETERGENT SOLUTION (versions with CDS system) ........25 PURPOSE AND CONTENT OF THE MANUAL ..........4 FORWARD SPEED REGULATION (B versions) ................26 TARGET GROUP ....................4... -
Page 4: Symbols Used In The Manual
It includes information concerning technical Each design is based on the objective or giving the client a new reason for choosing Comac spa aspects, safety, operation, appliance downtime, maintenance, spare parts and scrapping. Operators... -
Page 5: Technical Data
ANTEA 50 BTO TECHNICAL DATA ANTEA 50 B ANTEA 50 BT ANTEA 50 BTS Orbital Rated power of the device 1100 1200 1000 Working width Working capacity up to 1250 1780 1750 1780 Maximum gradient with full load Standard squeegee width Disc brush (number / diameter) No. -
Page 6: Technical Data (Versa)
TECHNICAL DATA (VERSA) VERSA 55 BT VERSA 65 BT VERSA 65 BTS Rated power of the device 1415 1415 1580 Working width Working capacity up to 1960 2295 2275 Maximum gradient with full load Standard squeegee width Disc brush (number / diameter) No. -
Page 7: General Safety Regulations
GENERAL SAFETY REGULATIONS The following symbols are used to indicate any potentially hazardous situations. Always read this information carefully and take the necessary precautions to protect any people and/or objects that may be present. Operator cooperation is paramount for accident prevention. No accident prevention programme can be effective without the full co-operation of the operator who is directly responsible for the operation of the appliance. -
Page 8: Using The Appliance
• Keep the battery charger's cable at a safe distance from any hot surfaces. • Never smoke near the machine while the batteries are charging. • Before starting the charging operation, carefully read the user manual of the battery charger that you want to use. - Page 9 CAUTION: • The appliance should not be used by people (including children) with reduced physical, sensory or mental capabilities or who do not have the necessary experience or knowledge of the appliance. • Children must be supervised to ensure they do not play with the machine. •...
-
Page 10: Deactivation Of The Machine
DEACTIVATION OF THE MACHINE WARNING: • Always protect the appliance from the sun, rain and other bad weather, when it is operating and when it is not. Store the appliance in a covered, dry place: this appliance is only for dry use and should never be used or kept outdoors in damp conditions. -
Page 11: Transport
All repairs must be carried out by qualified personnel. • Do not physically change the design characteristics of the machine. • Use spare parts supplied by Comac or by Comac service centres. • Wear personal protective equipment as required and as suggested in the manual. TRANSPORT WARNING: •... - Page 12 • Use a winch to put the machine on the transport vehicle. Do not drive the machine onto a truck or a trailer. • In order to put the machine on the transport vehicle, the ramp should not have such an inclination that the machine gets damaged.
-
Page 13: Symbols Used On The Appliance
SYMBOLS USED ON THE APPLIANCE Water system use warning label (versions with on-board CDS): Affixed to the appliance in order to warn the operator to read the user and maintenance SYMBOLS PRESENT ON THE REGISTRATION PLATE manual (this document) before using the appliance with the automatic detergent solution dosing system. -
Page 14: Display Screens (Versions Bt - Bts - Bto)
The adjacent image shows the “SCRUBBING DISPLAY SCREENS (versions BT - BTS - BTO) ONLY” work screen for the PM versions. The adjacent image identifies the “WORK The symbol in the middle of the screen identifies PANEL” screen, the icon in the top right the type of work being carried out. -
Page 15: Preparing The Appliance
The adjacent image indicates “ELECTRONIC The packaging dimensions are: BRAKE DISENGAGED”. • A=610mm B=1250mm C=1135mm for Antea 50 B-BT-BTO The symbol that appears in the middle of the • A=730mm B=1330mm C=1220mm for Antea 50BTS and Versa 55-65 BT screen indicates that the appliance's electric brake is not currently engaged. -
Page 16: How To Transport The Appliance
5. Connect the battery hopper connector (4) to the connector of the general system (5) (Fig. 4). 4. Grip the handle (4) on the left side of the recovery tank (Fig. 3) and turn the tank as far as it will go, until it reaches the maintenance position (Fig. -
Page 17: Appliance Safety
27. Knob for adjusting the operation control potentiometer (BT versions) (Fig. 8). 6. For BT and PM versions, switch off the machine by bringing the main switch (4) to “0” and making a 28. Dead man's lever (Fig. 8). quarter turn to the left with the key (5) Fig. 6)). Remove the key from the instrument panel. 29. -
Page 18: Connecting Batteries To The System Of The Appliance
3. For B versions, make sure the device is switched off. If it isn't, press the main switch (3) on the back To recharge the batteries without the built-in battery charger, proceed as follows: of the device (Fig. 3). 1. Bring the appliance to the zone where the batteries are charged. 2. -
Page 19: Hour Meter (B Versions)
5. Connect the battery connector (2) to the electric system connector (3) (Fig. 3). BATTERY CHARGE LEVEL INDICATOR (B versions) The instrument panel contains the display (3) indicating the battery charge status (Fig. 3). The battery charge level is represented by five numbers from 0 to 4, where 0 corresponds to a critical charge level and 4 corresponds to a fully charged battery. -
Page 20: Installing The Brush (Bt Double Brush Versions)
7. Insert the hub (3) into the brush, taking care to properly position the drive pins (6) in the slits on the INSTALLING THE BRUSH (BT double brush versions) brush (Fig. 5). For packaging reasons, the brush is supplied disassembled from the device. To assemble it on the brush head unit, proceed as follows: 1. -
Page 21: Assembling The Squeegee Body
ATTENTION: acid or alkaline maintenance detergent tank be used with pH values between 4 and ASSEMBLING THE SQUEEGEE BODY 10 and that do not contain: oxidising agents, chlorine or bromine, formaldehyde, mineral solvents. The detergents used must be suitable for use with scrubbing machines. For packaging reasons, the squeegee unit is supplied disassembled from the device, and must be assembled on the squeegee support as follows: NOTE: always use low-foam detergent. -
Page 22: Preparing To Work
7. Grip the handle (4) on the left side of the recovery tank (Fig. 3) and turn the tank as far as it will go, PREPARING TO WORK until it reaches the maintenance position (Fig. 4). Before beginning to work, with the versions without CDS, it is necessary to: 1. -
Page 23: Work
WORK SCRUBBING WITHOUT DRYING (B versions) STARTING WORK (B versions) To carry out “SCRUBBING WITHOUT DRYING” tasks, proceed as follows: To start working, do as follows: 1. Carry out all the checks indicated in the section “STARTING WORK (B versions)”. 2. -
Page 24: Starting The Work Activities (Bt - Bts - Bto Versions)
N.B.: If, during work, there is the need to exert more pressure on the brushes (versions with PM) STARTING THE WORK ACTIVITIES (BT - BTS - BTO VERSIONS) simply press the “BRUSH HEAD COMMAND” button (2) on the control panel (Fig. 2) for more than three seconds, the command display shows the symbol (9) (Fig. -
Page 25: Drying Without Scrubbing (Bt - Bts - Bto Versions)
DRYING WITHOUT SCRUBBING (BT - BTS - BTO VERSIONS) ADJUSTING THE DETERGENT SOLUTION (versions with CDS system) To carry out “DRYING WITHOUT SCRUBBING” tasks, proceed as follows: To regulate the amount of detergent solution on the brushes, proceed as follows: 1. -
Page 26: Forward Speed Regulation (B Versions)
4. Turn the main machine switch to “I”, making a quarter turn to the right with the key (4) (Fig. 4). FORWARD SPEED REGULATION (B versions) 5. Press the “REVERSE MOVEMENT ACTIVATION - DEACTIVATION” button (5) on the control panel (Fig. -
Page 27: Overflow Device (B Versions)
WARNING: If the machine is used in dangerous areas (e.g. petrol stations), the relative safety OVERFLOW DEVICE (B versions) standards must be observed. It is forbidden to use the machine in environments with a potentially explosive atmosphere. The appliance is equipped with a mechanical device (float) under the recovery tank cap that, when the recovery tank is full, shuts off the air to the vacuum motor intake to protect it;... -
Page 28: Maintenance
6. For the BT - BTS - BTO versions, switch off the appliance, set the main switch (5) to “0” by turning the EMPTYING THE RECOVERY TANK key (6) a quarter turn to the left (Fig. 5). Remove the key from the instrument panel. Proceed as follows to empty the recovery tank: 1. -
Page 29: Emptying The Debris Hopper (65 Bts Double Brush Versions)
To clean the squeegee body with the spray gun, for versions with the SST system, proceed as follows: EMPTYING THE DEBRIS HOPPER (65 BTS double brush versions) 1. Take the device to the dedicated maintenance area. To empty the debris hopper, proceed as follows: 2. -
Page 30: Cleaning The Recovery Tank Filter-Float
21. For refitting the squeegee unit read the paragraph “FITTING THE SQUEEGEE UNIT”. 5. Bend the end of the drainage tube, so as to create a choke and prevent the content from coming out (Fig. 4), put the tube on the discharge surface and gradually release the tube. N.B.: the place designated for this operation must comply with current environmental protection regulations. -
Page 31: Cleaning The Brush (B Single Brush Version)
CAUTION: these operations must be carried out using protective gloves to avoid any possible CLEANING THE BRUSH (B single brush version) contact with the edges or tips of metal objects. Careful cleaning of the brush guarantees better cleaning of the floor as well as a longer brush head N.B.: the place designated for this operation must comply with current environmental protection gearmotor lifespan. -
Page 32: Cleaning The Brush (50Bts Double Brush Versions)
14. Position yourself at the front of the appliance. 7. Clean the brush under a stream of running water to remove any impurities from its bristles. Check 15. Press the brush-holder plate latch (6) and simultaneously rotate the brush (7) according to the that the bristles are not worn;... -
Page 33: Cleaning The Debris Hopper (50Bts Double Brush Versions)
N.B.: the place designated for this operation must comply with current environmental protection 5. Extract the debris hopper (4) from the brush head unit (Fig. 4). regulations. N.B.: To do this, use the moulded handle on the lower part of the debris hopper. 13. -
Page 34: Emptying The Solution Tank
CAUTION: these operations must be carried out using protective gloves to avoid any possible CLEANING THE WATER SYSTEM FILTER contact with the edges or tips of metal objects. A thorough cleaning of the solution tank filter guarantees a longer life span of the appliance's water 4. -
Page 35: Cleaning The Water System (Versions Bt - Bts - Bto)
12. Activate the brush head gearmotor using the brush control switch (7) (Fig. 10). 13. Check that the potentiometer knob (9) is set to minimum. If it isn't, turn it completely counter- 13. When the dead man's lever (8) is engaged, the machine will start to move (Fig. 11). clockwise (Fig. -
Page 36: Cleaning The Water System (Versions Bt - Bts - Bto With Cds System)
11. Turn on the appliance: bring the main switch (6) to its “I” position by turning the key (7) a quarter turn N.B.: fill with clean water, at a temperature no greater than 50 °C and no less than 10 °C. to the right Fig. -
Page 37: Cleaning The Water System (Versions Bt - Bts - Bto With Pm And Cds System)
22. After adjusting the amount of water in the dosing circuit, press the button (15) for adjusting the N.B.: fill with clean water, at a temperature no greater than 50 °C and no less than 10 °C. detergent percentage supplied by the dosing system (Fig. 23). 8. -
Page 38: Cleaning The Recovery Tank
22. After adjusting the amount of water in the dosing circuit, press the button (15) for adjusting the 8. Rinse the inside with a jet of water, if necessary use a spatula to remove the sludge that has detergent percentage supplied by the dosing system (Fig. 23). accumulated at the bottom of the tank. -
Page 39: Cleaning The Solution Tank
9. Make sure you tighten the cap (4) properly to avoid any liquid leaks during the work activities (Fig. 6). CLEANING THE SOLUTION TANK Also make sure that the detergent suction filter (7) is correctly positioned on the bottom of the canister (Fig. -
Page 40: Extraordinary Maintenance
FLOOR SCRUBBING MACHINES mod. ANTEA 50 B CB, ANTEA 50 BT CB, ANTEA 50 BTS CB, ANTEA 50 BTO CB VERSA 55BT CB, VERSA 55BT PM CB, VERSA 65BT CB, VERSA 65BT PM CB, VERSA... -
Page 41: Troubleshooting
TROUBLESHOOTING This chapter lists the most common problems linked with the use of the appliance. If you are unable to resolve the problems with the information given here, please contact your nearest assistance centre. PROBLEM POSSIBLE CAUSE SOLUTION Make sure the main switch is in the work position, the LED inside it is ON, and the ON symbol is The main switch is in the rest position (B versions). -
Page 42: Choosing And Using Brushes
PROBLEM POSSIBLE CAUSE SOLUTION Make sure the squeegee is free of obstructions (read “CLEANING THE SQUEEGEE BODY”). Make sure the vacuum tube is free of obstructions (see “CLEANING THE VACUUM TUBE”). The vacuum unit is obstructed. THE SQUEEGEE Make sure that the vacuum cap filter is free of any obstructions DOES NOT DRY (see the section “CLEANING THE RECOVERY TANK'S... - Page 44 COMAC S.p.A. - Via Maestri del Lavoro, 13 - 37059 S. Maria di Zevio - Verona - Italy Tel. +39 045 8774222 – Fax +39 045 8750303 – E-mail: com@comac.it www.comac.it...
Need help?
Do you have a question about the ANTEA 50 B and is the answer not in the manual?
Questions and answers