
Related Manuals for A-Neuvideo ANI-8X2MFS


Summary of Contents for A-Neuvideo ANI-8X2MFS
- Page 1 ANI-8X2MFS 8x2 4K@60Hz MULTI-FORMAT HDMI/DP/USB-C/VGA to HDMI/HDBaseT SCALER PRESENTATION SWITCH w/ AUDIO A-NeuVideo.com Frisco, Texas 75036 AUDIO / VIDEO MANUFACTURER...
- Page 2 SAFETY INFORMATION To ensure the best results from this product, please read this manual and all other documentation before operating your equipment. Retain all documentation for future reference. Follow all instructions printed on unit chassis for proper operation. To reduce the risk of fire, do not spill water or other liquids into or on the unit, or operate the unit while standing in liquid. Make sure power outlets conform to the power requirements listed on the back of the unit.
-
Page 3: Table Of Contents
NEUVIDEO TABLE OF CONTENTS CONTENTS INTRODUCTION ................1 SAFETY PRECAUTIONS FEATURES & CONTENTS ............2 Please read all instructions before attempting to unpack, install or SPECIFICATIONS ................3 operate this equipment and before connecting the power supply. Please keep the following in mind as you unpack and install this VIDEO SPECIFICATIONS ............4 equipment: AUDIO SPECIFICATIONS ............6... -
Page 4: Features & Contents
PACKAGE CONTENTS Before attempting to use this unit, please check the packaging and make sure the following items are contained in the shipping carton: • ANI-8X2MFS UHD+ 8x2 Multi-Format to HDMI/HDBaseT™ Switcher with Scaler • 24V/6.25A DC Power Adapter • Rackmount Ears (Set of 2) •... -
Page 5: Specifications
NEUVIDEO SPECIFICATIONS Specifications • HDMI Bandwidth: 18Gbps • DisplayPort Bandwidth: 21.6Gbps • USB-C Bandwidth: 21.6Gbps • VGA Bandwidth: 165MHz • HDBaseT™ Bandwidth: 10.2Gbps • Input Ports • USB (Type-C) • DisplayPort • (5) HDMI (Type-A) • VGA (HD-15) • (6) Stereo Audio (3.5mm) •... -
Page 6: Video Specifications
NEUVIDEO Video Specifications Bypass Output BYPASS INPUT SUPPORTED RESOLUTIONS OUTPUT (HZ) HDMI USBC HDMI HDBT 720x400p@70/85 ü ü ü ü ü ü 640x480p@60/72/75/85 ü ü ü ü ü ü 720x480i@60 ü ü ü ü ü 720x480p@60 ü ü ü ü ü... - Page 7 NEUVIDEO Video Specifications Bypass Output BYPASS INPUT SUPPORTED RESOLUTIONS OUTPUT (HZ) HDMI HDBT USBC HDMI HDBT 8-bit 3840x2160p@50/60 (4:2:0), HDR10 ü ü ü ü 3840x2160p@50/60 ü ü ü ü ü 4096x2160p@24/25/30 ü ü ü ü ü 4096x2160p@50/60 (4:2:0) ü ü ü...
-
Page 8: Audio Specifications
NEUVIDEO Audio Specifications Digital Audio HDMI INPUT / OUTPUT | DISPLAYPORT INPUT | USB-C INPUT | HDBASET™ OUTPUT LPCM Max Channels 2 Channels (8 Channels in bypass) Sampling Rate (kHz) 32, 44.1, 48, 88.2, 96, 176.4, 192 Bitstream (Bypass Only) Supported Formats Standard &... -
Page 9: Cable Specifications / Hdbaset™ Features
NEUVIDEO Cable Specifications / HDBaseT™ Features Cable Specifications 1080P 4K30 4K60 CABLE LENGTH 8-bit 12-bit 8-bit (4:4:4) 8-bit (4:4:4) High Speed HDMI Cable ~16 ft / 5M ~16 ft / 5M ~16 ft / 5M ~6.5 ft / 2M HDMI Input ~16 ft / 5M ~16 ft / 5M ~16 ft / 5M... -
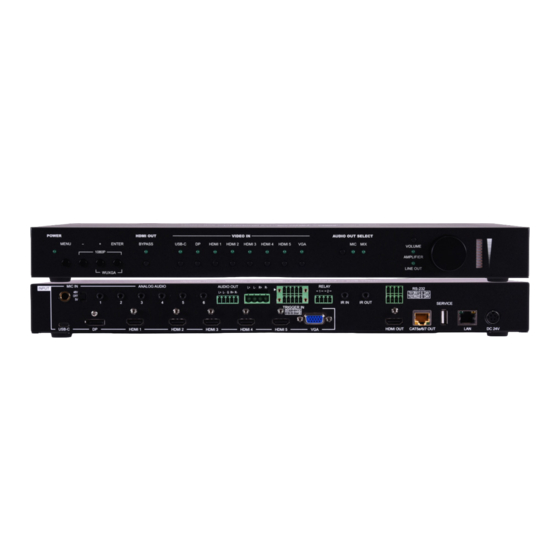
Page 10: Front Panel
NEUVIDEO FRONT PANEL FRONT PANEL POWER LED: This LED will illuminate to indicate the unit is on and receiving power. MENU BUTTON: Press to enter the OSD menu, or to back out from menu items. MINUS (-) BUTTON: Press to move down or adjust selections within OSD menus. PLUS (+) BUTTON: Press to move up or adjust selections within OSD menus. - Page 11 NEUVIDEO REAR PANEL REAR PANEL MIC IN PORT & 48V/OFF/5V SWITCH: Connect to a standard microphone using a 6.35mm plug. Set the switch based on the phantom power requirements of the connected microphone. Note: If no phantom power is required, this switch should remain in the “Off” position to avoid potential damage to connected equipment. ANALOG AUDIO INPUT 1~6 PORTS: Connect to the analog stereo output of a device such as an audio player or PC.
-
Page 12: Back Panel
NEUVIDEO BACK PANEL BACK PANEL CAT5E/6/7 OUT PORT: Connect to a compatible HDBaseT™ receiver with a single CAT5e/6/7 cable for transmission of all data signals. PoH will also be supplied to a connected compatible PD receiver. (ANI-7251RX) SERVICE PORT: This port is reserved for firmware update use only. LAN PORT: Connect directly, or through a network switch, to your PC/ laptop to control the unit via Telnet/WebGUI and to extend the network across the HDBaseT™... -
Page 13: Ir Cable Pinouts & Rs-232 Pinout & Defaults
NEUVIDEO IR Cable Pinouts & RS-232 Pinout & Defaults IR Cable Pinouts RS-232 PINOUT AND DEFAULTS Serial Port Default Settings Baud Rate 19200bps Data Bits 8bit Parity Bits None Stop Bits 1bit Flow Control None RS-232 Port 1 (Unit control) RS-232 Port 2 (HDBaseT extension) ™... -
Page 14: Osd Menu
NEUVIDEO OSD Menu OSD Menu All functions of this unit can be controlled by using the OSD (On Screen Display) which is activated by MAIN MENU pressing the MENU button on the front of the unit. Use the + (PLUS), − (MINUS), and ENTER buttons Video to navigate the OSD menu. - Page 15 NEUVIDEO OSD Menu VIDEO 2ND LEVEL 3RD LEVEL 4TH LEVEL HDMI 2 HDMI 3 Output Route HDMI 4 HDMI 5 NATIVE HDMI Native HDBT 640x480@60 800x600@60 1024x768@60 1280x768@60 1360x768@60 1280x720@60 1280x800@60 1280x1024@60 1440x900@60 1400x1050@60 1680x1050@60 1600x1200@60 Output Resolution 1920x1080@60 1920x1200@60RB 2560x1600@60RB 720x480p 720x576p...
- Page 16 NEUVIDEO OSD Menu VIDEO 2ND LEVEL 3RD LEVEL 4TH LEVEL 3840x2160p50 3840x2160p60 3840x2160p50(420) 3840x2160p60(420) 4096x2160p24 Output Resolution 4096x2160p25 4096x2160p30 4096x2160p50 4096x2160p60 4096x2160p50(420) 4096x2160p60(420) BEST FIT Aspect Pan Scan Letterbox Under 1 Under 2 Aspect Follow In Overscan Full BLACK White No Signal Color Blue Green...
- Page 17 NEUVIDEO OSD Menu VIDEO 2ND LEVEL 3RD LEVEL 4TH LEVEL Refer to Source HDCP On USB-C REFER TO DISPLAY Support Off Refer to Source REFER TO DISPLAY HDCP On DP Support Off Refer to Source REFER TO DISPLAY HDCP On HDMI 1 Support Off Refer to Source HDCP Setting...
- Page 18 NEUVIDEO OSD Menu PICTURE 6. RESET PICTURE: Reset all picture settings back to their factory defaults. Select “Execute” to activate the reset. 2ND LEVEL 3RD LEVEL 4TH LEVEL Color Gain R 0~1023 (512) Color Gain G 0~1023 (512) Color Gain B 0~1023 (512) Color Offset R 0~1023 (512)
- Page 19 NEUVIDEO OSD Menu AUDIO Note: When HDMI Out Bypass for audio is enabled, all audio will automatically behave as if in “Follow Video” mode. 3. FOLLOW USER SETTING: Options for defining the audio routing to use when the “Follow User” mode is enabled. Select the preferred Follow User source for each input.
- Page 20 NEUVIDEO OSD Menu AUDIO 2ND LEVEL 3RD LEVEL 4TH LEVEL Analog 3 Analog 4 Follow User Setting Audio On VGA Analog 5 Analog 6 MIXER OFF Output Mixer Mixer On Mic Only Mic Gain 0~100 (0) HDMI Out Volume 0~100 (85) Analog Out Volume 0~100 (85) Speaker Out Volume...
- Page 21 NEUVIDEO OSD Menu 2ND LEVEL 3RD LEVEL 4TH LEVEL OSD Menu Timeout INFO Display ETHERNET 1. IP MODE: Set the unit to Static or DHCP mode. When DHCP mode is selected, all IP address information will be assigned automatically by the local DHCP server. When Static is selected, the IP address, netmask and gateway must be set manually and additional menu items become available.
- Page 22 NEUVIDEO OSD Menu ETHERNET 2ND LEVEL 3RD LEVEL 4TH LEVEL Static IP Setting Gate 0~255 (50) [Current IP address] [Unit’s MAC address] EDID 1. EDID SELECTION: Select the EDID to use with each input. Note: In most cases, assigning a new EDID to an input will cause the affected input to briefly blink out while the source adapts to the new information.
- Page 23 NEUVIDEO OSD Menu EDID 1. EDID SELECTION: Select the EDID to use with each input. Note: In most cases, assigning a new EDID to an input will cause the affected input to briefly blink out while the source adapts to the new information.
- Page 24 NEUVIDEO OSD Menu FACTORY 1. RESET ALL: Selecting “Execute” will reset all of the unit’s settings back to their factory defaults. 2. FW UPDATE FROM USB: Provides a way to update the unit’s firmware. Insert a USB thumb drive, with a valid firmware file (*.bin format) in the root directory, into the unit’s USB service port then select this option.
-
Page 25: Webgui Control
NEUVIDEO WebGUI Control Device Discovery Please obtain the “Device Discovery” software from your authorized dealer and save it in a directory where you can easily find it. Connect the unit and your PC/Laptop to the same active network and execute the “Device Discovery” software. Click on “Find Devices on Network”... - Page 26 NEUVIDEO WebGUI Control Video Tab This page provides video routing settings, I/O renaming options and control over the video output signal’s format and behavior. To begin assigning a new video route, please click an output button and then click on the button of the preferred input port. As you select each button they will change their color to orange.
- Page 27 NEUVIDEO WebGUI Control HDCP Tab Provides control over the HDCP behavior of each input. To enable or disable HDCP support on one or more inputs, select the preferred inputs on the left, and then select the HDCP mode on the right. The change will occur immediately.
- Page 28 NEUVIDEO WebGUI Control Picture Tab 3. PICTURE SETTINGS (VGA SOURCE): ■ PC Auto: Provides a way to manually activate the auto detection of the VGA source’s settings. ■ PC H/V Position: Set the horizontal and vertical position setting for the current VGA input. ■...
- Page 29 NEUVIDEO WebGUI Control Audio Tab Note: When HDMI audio Out Bypass is enabled, all audio will automatically behave as if in “Follow Video” mode. 2. FOLLOW USER SETTING: These routing settings are only enforced when Audio Routing has been set to “Follow User”. Note: Not active when HDMI audio Out Bypass is enabled.
- Page 30 NEUVIDEO WebGUI Control EDID Tab 2. SINK EDID DOWNLOAD: To save the EDID from one of the connected displays to your local PC, select the appropriate sink from the dropdown list then press the “Download” button. Depending on your browser settings you will either be asked where to save the downloaded file, or the file will be transferred directly to the default download location on your PC.
- Page 31 NEUVIDEO WebGUI Control System Tab ■ IR: Use the dropdown to select which HDBaseT port the local IR ports should route across. Available choices are: HDBT Out, HDBT ™ In1, and HDBT In2. 4. RESET TO DEFAULT: Press the “ALL Reset” button to reset the unit to its factory default state. After the reset is complete, the unit will reboot automatically.
-
Page 32: Telnet Control / Serial & Telnet Commands
NEUVIDEO Telnet Control / Serial & Telnet Commands Telnet Control Before attempting to use Telnet control, please ensure that both the unit and the PC/laptop are connected to the same active network. To Access Telnet Windows 7 Click START, type “cmd” in the search field and press ENTER. Windows 10 1. - Page 33 NEUVIDEO Serial & Telnet Commands Serial and Telnet Commands COMMAND DESCRIPTION AND PARAMETERS SET FACTORY DEFAULT 8 Reset the unit to the factory defaults. Reboot the unit. SET SYSTEM REBOOT 8 SET IP MODE STATIC 8 Set the IP address assignment mode to static. SET IP MODE DHCP 8 Set the IP address assignment mode to DHCP.
- Page 34 NEUVIDEO Serial & Telnet Commands Serial and Telnet Commands COMMAND DESCRIPTION AND PARAMETERS Show the index number and description of the current resolution detected on the specified input. Available values for N1: [HDMI input 3] GET IN N1 TIMING STRING 8 [USB-C input] [HDMI input 4] [DisplayPort input]...
- Page 35 NEUVIDEO Serial & Telnet Commands Serial and Telnet Commands COMMAND DESCRIPTION AND PARAMETERS GET OUT A HUE 8 Show the hue value when the output is scaled. Set the scaled output’s sharpness level. SET OUT A SHARPNESS N1 8 N1 = 0~63 [Sharpness level] GET OUT A SHARPNESS 8 Show the sharpness level when the output is scaled.
- Page 36 NEUVIDEO Serial & Telnet Commands Serial and Telnet Commands COMMAND DESCRIPTION AND PARAMETERS GET IN 8 PHASE 8 Show the current PC phase value for the VGA input. Set the PC clock value for the VGA input. SET IN 8 CLOCK N1 8 N1 = 0~250 [PC clock] GET IN 8 CLOCK 8...
- Page 37 NEUVIDEO Serial & Telnet Commands Serial and Telnet Commands COMMAND DESCRIPTION AND PARAMETERS GET OUT A OSD TRANSPARENCY Show the current transparency level of the OSD menu. LEVEL 8 Enable/disable the info OSD, or set it to display briefly. Available values for N1: [Always off] SET OUT A OSD DISPLAY N1 8 [Always on]...
- Page 38 NEUVIDEO Serial & Telnet Commands Serial and Telnet Commands COMMAND DESCRIPTION AND PARAMETERS Show the current volume level of the specified output’s audio. Available values for N1: [HDMI audio output] GET AUDIO OUT N1 VOLUME 8 [HDBaseT audio output] ™ [Standard analog audio output] [Amplified analog audio output] GET AUDIO IN TYPE LIST 8...
- Page 39 NEUVIDEO Serial & Telnet Commands Serial and Telnet Commands COMMAND DESCRIPTION AND PARAMETERS Available values for N2: [Default UHD+ MCH] [Default FHD 2CH] [Default VGA] [Default FHD MCH] [User EDID 1] SET IN N1 EDID N2 8 [Default UHD 2CH] [User EDID 2] [Default UHD MCH] [HDMI sink]...
- Page 40 NEUVIDEO Serial & Telnet Commands Serial and Telnet Commands COMMAND DESCRIPTION AND PARAMETERS Open or close the specified relay. N1 = 1~2 [Relay port number] SET RELAY N1 N2 8 Available values for N2: [Closed] [Open] Show the current state of the specified relay. GET RELAY N1 8 N1 = 1~2 [Relay port number]...
-
Page 41: Connection Diagram
NEUVIDEO CONNECTION DIAGRAM CONNECTION DIAGRAM... -
Page 42: Optional Receiver
NEUVIDEO optional RECEIVER ANI-7251RX RECEIVER (OPTIONAL) - Page 43 THIS PAGE IS INTENTIONALLY LEFT BLANK.
- Page 44 BY, THROUGH OR UNDER A-NeuVideo, INC (COLLECTIVELY, THE “PRODUCT”). By using installing or using the Product, you unconditionally signify your agreement to these Terms and Conditions. If you do not agree to these Terms and Conditions, do not use the Product and return the Product to A-NeuVideo, Inc. at the return address set forth on the Product’s packing label at your expense.
Need help?
Do you have a question about the ANI-8X2MFS and is the answer not in the manual?
Questions and answers