
Related Manuals for A-Neuvideo ANI-8MFS


Summary of Contents for A-Neuvideo ANI-8MFS
- Page 1 ANI-8MFS 8 INPUT MULTI-FORMAT SCALER SWITCH w/ VOLUME CONTROL MIRRORED HDMI/VGA OUTPUT A-NeuVideo.com Frisco, Texas 75034 (469) 277-7606 AUDIO / VIDEO MANUFACTURER...
- Page 2 SAFETY INFORMATION To ensure the best results from this product, please read this manual and all other documentation before operating your equipment. Retain all documentation for future reference. Follow all instructions printed on unit chassis for proper operation. To reduce the risk of fire, do not spill water or other liquids into or on the unit, or operate the unit while standing in liquid. Make sure power outlets conform to the power requirements listed on the back of the unit.
-
Page 3: Table Of Contents
INTRODUCTION PSU if it is damaged. The ANI-8MFS is a multi input scaler has Composite Video, • Do not allow anything to rest on the power cabling or allow any Component Video, PC (VGA) and HDMI inputs and can switch and weight to be placed upon it or any person walk on it. -
Page 4: Features & Specifications
NEUVIDEO FEATURES & SPECIFICATIONS FEATURES • Supports switching and scaling of multiple AV inputs to HDMI or PC/HD outputs • Supports EDID and HDCP • Supports 3D de-interlace, noise reduction and 3D comb filter • Supports frame rate conversion • Supports RS-232, IP (Telnet/WebGUI) and IR controls •... -
Page 5: Front Panel
NEUVIDEO FRONT PANEL FRONT PANEL POWER & LED: Press this button to switch the device on or to set it to standby mode. Once the device is connected to an active power supply and the Power Switch on the back panel is turned on, the LED will illuminate and the device will switch on automatically. IR WINDOW: Receives only the IR signal from the remote control included in the package. -
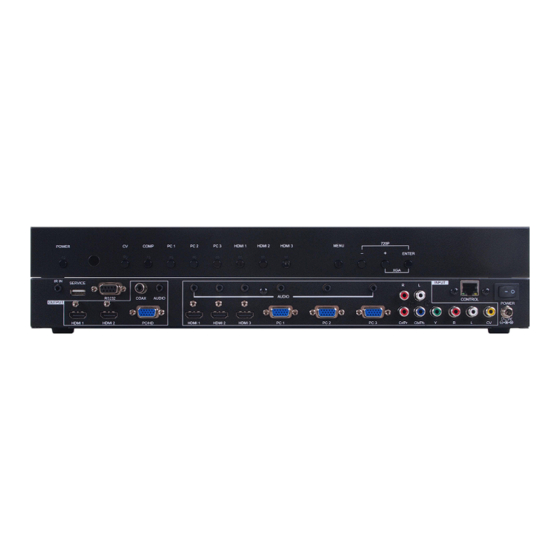
Page 6: Back Panel
NEUVIDEO BACK PANEL BACK PANEL IR IN: Connect the supplied IR extender to receive the IR signal from the included IR remote. Ensure that the remote is within the direct line-of-sight of the IR extender. SERVICE: Reserved for manufacturer use only. RS-232: Connect to a PC/Laptop or RS-232 control system to use RS-232 commands to control the device. -
Page 7: Remote Control
NEUVIDEO Remote Control Remote Control POWER: Press this button to switch the device on or to set it to standby mode. HDMI 1~3, PC 1~3, CV & COMP: Direct source selection keys. Press one of these keys to switch to the required source. MENU: Press this button to enter the OSD menu. - Page 8 NEUVIDEO IR CODES IR CODES CUSTOM CODE: 807F POWER KEY: 807F 82 HDMI 1: 807F 88 HDMI 2: 807F 89 HDMI 3: 807F 8A PC 1: 807F 8C PC 2: 807F 8D PC 3: 807F 8E 807F 90 COMP: 807F 92 EXIT: 807F C2 MENU:...
-
Page 9: Osd Menu
NEUVIDEO OSD Menu OSD Menu MAIN MENU SUB MENU 3RD MENU 4TH MENU 640x480 60 800x600 60 1024x768 60 1280x768 60 1360x768 60 1280x720 60 1280x800 60 1280x1024 60 1440x900 60 1400x1050 60 OUTPUT 1680x1050 60 1600x1200 60 1920x1080 60 1920x1200 60 1280x720p 60* 1920x1080i 60... - Page 10 NEUVIDEO OSD Menu OSD Menu MAIN MENU SUB MENU 3RD MENU 4TH MENU AUTO SETUP H_POSITION V_POSITION PHASE PC (PC source only) CLOCK DISPLAY XGA* WXGA/XGA WXGA RESET OFF* TIMING SHIFT CONTRAST 0~60 (30) BRIGHTNESS 0~60 (30) R 0~1023 (512) G 0~1023 (512) B 0~1023 (512) COLOR...
- Page 11 NEUVIDEO OSD Menu OSD Menu MAIN MENU SUB MENU 3RD MENU 4TH MENU FACTORY RESET* OFF* KEY LOCK OFF* POWER SAVE DHCP* SETUP IP MODE STATIC IP ADDRESS 0.0.0.0.~ 255.255.255.255* SET STATIC IP SUBNET MASK 0.0.0.0.~255.255.255.255* DEF. GETWAY 0.0.0.0.~255.255.255.255* BLACK FREERUN COLOR BLUE* INPUT...
-
Page 12: Rs-232 & Telnet Commands
NEUVIDEO RS-232 & Telnet Commands RS-232 & Telnet Commands COMMAND ACTION S POWER 0/1 0=OFF 1=ON R POWER Reports the numeric equivalent for POWER S SOURCE 1~8 1=HDMI 1 3=HDMI 3 5=VIDEO 7=PC 2 2=HDMI 2 4=YPbPr 6=PC 1 8=PC 3 R SOURCE Reports the numerical equivalent for SOURCE setting (as above) S OUTPUT 0~21*... - Page 13 NEUVIDEO RS-232 & Telnet Commands RS-232 & Telnet Commands COMMAND ACTION S HDMI AUDIO 0/1 0=AUTO 1=EXT R HDMI AUDIO Reports the numeric equivalent for HDMI AUDIO setting (as above) S KEY LOCK 0/1 0=ENABLE 1=DISABLE R KEY LOCK Reports the numeric equivalent for KEY LOCK setting (as above) S FREERUNCOLOR 0/1 0=BLACK 1=BLUE...
-
Page 14: Rs-232 Pin Assignment
NEUVIDEO RS-232 & IR CABLE Pin Assignment RS-232 Pin Assignment ANI-8MFS Remote Control Console Assignment Assignment Baud Rate: 19200bps Data bit: 8 bits Parity: None Flow Control: None Stop Bit: 1 IR CABLE PIN ASSIGNMENT... -
Page 15: Telnet Control
NEUVIDEO TELNET Control TELNET Control Before attempting to use TELNET control, please ensure that both the Scaler (via the LAN port) and the PC/Laptop r control system being used are connected to the same active network. To access TELNET in Windows 7, click on the “Start”... -
Page 16: Webgui
NEUVIDEO WebGUI Control WebGUI Control On a PC/Laptop that is connected to same active network as the Scaler, open a web browser and type device’s IP address on the web address entry bar. The browser will bring up the control page of the Scaler (see below for reference). NOTE: The IP address can be obtained from the OSD menu under Information. -
Page 17: Input & Output Resolutions
NEUVIDEO Input & output Resolutions Input ResolutionS RESOLUTION YCbCr/YPbPr HDMI ü NTSC/PAL ü ü 480i/576i ü ü 480p/576p ü ü 720p@50/60 ü ü 1080i@50/60 ü ü 1080p@50/60 ü ü VGA@60/72/75 ü ü SVGA@56/60/72/75 ü ü XGA@60/70/75 ü ü SXGA@60/75 ü ü... -
Page 18: Connection Diagram
NEUVIDEO CONNECTION DIAGRAM CONNECTION DIAGRAM... - Page 19 THIS PAGE IS INTENTIONALLY LEFT BLANK.
- Page 20 BY, THROUGH OR UNDER A-NeuVideo, INC (COLLECTIVELY, THE “PRODUCT”). By using installing or using the Product, you unconditionally signify your agreement to these Terms and Conditions. If you do not agree to these Terms and Conditions, do not use the Product and return the Product to A-NeuVideo, Inc. at the return address set forth on the Product’s packing label at your expense.
Need help?
Do you have a question about the ANI-8MFS and is the answer not in the manual?
Questions and answers