
Related Manuals for A-Neuvideo ANI-88UHD


Summary of Contents for A-Neuvideo ANI-88UHD
- Page 1 ANI-88UHD 8x8 HDMI 4K UHD Matrix w/ HDCP 2.2 A-NeuVideo.com Frisco, Texas 75036 AUDIO / VIDEO MANUFACTURER...
- Page 2 SAFETY INFORMATION To ensure the best results from this product, please read this manual and all other documentation before operating your equipment. Retain all documentation for future reference. Follow all instructions printed on unit chassis for proper operation. To reduce the risk of fire, do not spill water or other liquids into or on the unit, or operate the unit while standing in liquid. Make sure power outlets conform to the power requirements listed on the back of the unit.
-
Page 3: Table Of Contents
We make no commitment to update or • ANI-88UHD 8x8 HDMI 4K UHD Matrix to keep current the information contained in this document. • IR Extender •... -
Page 4: Features & Specifications
NEUVIDEO FEATURES & SPECIFICATIONS FEATURES • HDMI with 4K2K supported, HDCP 2.2 and DVI compliant • Supports PC resolutions up to WUXGA and HDTV resolutions up to 4K2K (3840x2160@24/25/30 & 3840x2160@50/60_YUV420, 4096x2160@24/25/30 & 4096x2160@50/60Hz _YUV420) • Supports 3D signal bypass •... -
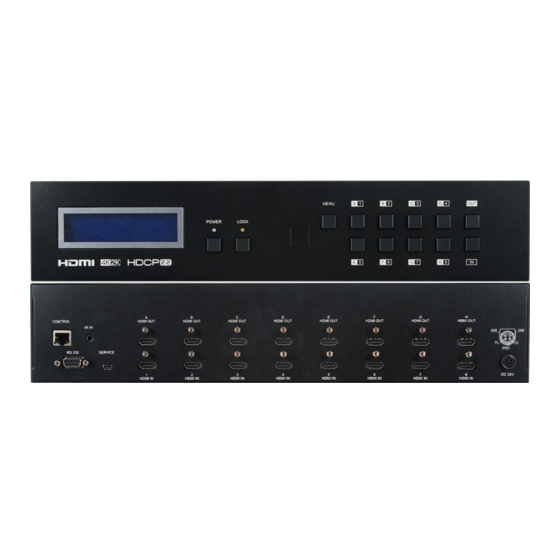
Page 5: Operation Controls & Functions
NEUVIDEO OPERATION CONTROLS & FUNCTIONS FRONT PANEL LCM: Displays the setting information of each Input and Output setting. POWER: Press this button to power the device on/standby. The LED will illuminate green when the power is on, red when it is in ‘Standby’... - Page 6 NEUVIDEO OPERATION CONTROLS & FUNCTIONS Rear Panel CONTROL: This port is the link for Telnet and WebGUI controls. Connect to an active Ethernet link with an RJ-45 terminated cable (for further details, please refer to the Telnet Control section). WARNING: Please do not connect this port directly to the PC/Laptop as the Telnet function will not work. RS-232: Connects to a PC or control system with a D-Sub 9-pin cable for the transmission of RS-232 commands.
-
Page 7: Remote Control & Ir Cable Pin Assignment
NEUVIDEO Remote Control & IR Cable Pin Assignment Remote Control POWER: Press this button to switch on the device or to set it to standby mode. Input ports 1~8. OUT: Output ports A~H. IR Cable Pin Assignment IR Signal Power Grounding... -
Page 8: Connection Diagram
NEUVIDEO CONNECTION DIAGRAM CONNECTION DIAGRAM... -
Page 9: Rs-232 Protocols
NEUVIDEO RS-232 ProtocolS RS-232 Protocol MATRIX REMOTE CONTROLLER Assignment Assignment Baud Rate: 115200bps Data Bit: 8 bits Parity: None Flow Control: None Stop Bit: 1... -
Page 10: Rs-232 & Telnet Commands
NEUVIDEO RS-232 & Telnet Commands RS-232 & Telnet Commands COMMAND DESCRIPTION PARAMETER Switch Output A to Input N N=1~8 Switch Output B to Input N N=1~8 Switch Output C to Input N N=1~8 Switch Output D to Input N N=1~8 Switch Output E to Input N N=1~8 Switch Output F to Input N... -
Page 11: Telnet Control
NEUVIDEO Telnet Control Telnet Control Before attempting to use the Telnet control, please ensure that both the Matrix (via the ‘LAN /CONTROL’ port) and the PC/Laptop are connected to the same active networks. To access the Telnet control in Windows 7, click on the ‘Start’ menu and type “cmd” in the search field then press ENTER. -
Page 12: Webgui Control
NEUVIDEO WebGUI Control WebGUI Control On a PC/Laptop which is connected to an active network system, open a web browser and type device’s IP address (available from LCM monitor or OSD menu) on the web address entry bar. The browser will display the device’s Switch, Data Routing, EDID Settings and System Settings. - Page 13 NEUVIDEO WebGUI Control WebGUI Control Click on ‘EDID Settings’ page to Setting EDID mode or update EDID. Click on ‘System Settings’ to control power On / Off, Network status settings and to reset to default settings. NOTE: You will need to click on the SAVE button once you’ve finished the network parameters setting.
-
Page 14: Supported Resolutions
NEUVIDEO Supported Resolutions WebGUI Control RESOLUTION INPUT OUTPUT 640x480@60 720x480p@60 720x576p@50 800x600@60 1024x768@60 1280x720p@50 1280x720p@60 1280x1024@60 1600x1200@60 1920x1080i@50 1920x1080i@60 1920x1080p@24 1920x1080p@24FP 1920x1080p@25 1920x1080p@30 1920x1080p@50 1920x1080p@60 1920x1200@60 (RB) 3840x2160@24 3840x2160@25 3840x2160@30 3840x2160@50 (YUV420) 3840x2160@60 (YUV420) 4096x2160@24 4096x2160@50 (YUV420) 4096x2160@60 (YUV420) - Page 15 THIS PAGE IS INTENTIONALLY LEFT BLANK.
- Page 16 BY, THROUGH OR UNDER A-NeuVideo, INC (COLLECTIVELY, THE “PRODUCT”). By using installing or using the Product, you unconditionally signify your agreement to these Terms and Conditions. If you do not agree to these Terms and Conditions, do not use the Product and return the Product to A-NeuVideo, Inc. at the return address set forth on the Product’s packing label at your expense.
Need help?
Do you have a question about the ANI-88UHD and is the answer not in the manual?
Questions and answers