Table of Contents
Advertisement
Quick Links
WARNING
To prevent fire or shock hazard, do not
expose the unit to rain or moisture.
For the customers in U.S.A.
This equipment has been tested and found to comply with
the limits for a Class A digital device, pursuant to Part 15 of
the FCC Rules. These limits are designed to provide
reasonable protection against harmful interference when the
equipment is operated in a commercial environment. This
equipment generates, uses, and can radiate radio frequency
energy and, if not installed and used in accordance with the
instruction manual, may cause harmful interference to radio
communications. Operation of this equipment in a
residential area is likely to cause harmful interference in
which case the user will be required to correct the
interference at his or her own expense.
You are cautioned that any changes or modifications not
expressly approved in this manual could void your authority
to operate this equipment.
The shielded interface cable recommended in this manual
must be used with this equipment in order to comply with
the limits for a digital device pursuant to Subpart B of Part
15 of FCC Rules.
For the customers in Europe
WARNING
This is a Class A product. In a domestic environment, this
product may cause radio interference in which case the user
may be required to take adequate measures.
Pour les utilisateurs en Europe
AVERTISSEMENT
Il s'agit d'un produit de Classe A. Dans un environnement
domestique, cet appareil peut provoquer des interférences
radio, dans ce cas l'utilisateur peut être amené à prendre
des mesures appropriées.
Per gli acquirenti in Europa
ATTENZIONE
Questo è un apparecchio di classe A e come tale, in un
ambiente domestico, può causare interferenze radio.
É necessario quindi che l'utilizzatore adotti gli accorgimenti
adeguati.
Para los clientes de Europa
ADVERTENCIA
Éste es un producto de clase A. En un ambiente
doméstico, este producto puede causar interferencias
radioeléctricas, en cuyo caso el usuario puede tener que
tomar las medidas adecuadas.
CAUTION
Danger of explosion if battery is incorrectly replaced.
Replace only with the same or equivalent type
recommended by the manufacturer.
Dispose of used batteries according to the
manufacturer's instructions.
ATTENTION
II y a danger d'explosion s'il y a remplacement
incorrect de la batterie.
Remplacer uniquement avec une batterie du même
type ou d'un type équivalent recommandé par le
constructeur.
Mettre au rebut les batteries usagées comformément
aux instructions du fabricant.
ADVARSEL!
Lithiumbatteri - Eksplosionsfare ved fejlagtig
håndtering.
Udskiftning må kun ske med batteri af samme fabrikat
og type.
Levér det brugte batteri tilbage til laverandøren.
ADVARSEL
Eksplosjonsfare ved feilaktig skifte av batteri.
Benytt samme batteritype eller en tilsvarende type
anbefalt av apparatfabrikanten.
Brukte batterier kasseres i henhold til fabrikantens
instruksjoner.
VARNING
Explosinonsfara vid felaktigt batteribyte.
Använd samma batterityp eller en ekvivalent typ
som rekommenderas av apparattillverkaren.
Kassera använt batteri enligt fabrikantens
instruktion.
VAROITUS
Paristo voi räjähtää jos se on virheellisesti asennettu.
Vaihda paristo ainoastaan laitevalmistajan
suosittelemaan tyyppiin.
Hävitä käytetty paristo valmistajan ohjeiden
mukaisesti.
Letter Ver.3.0
3-810-005-11(1)
Advertisement
Table of Contents

Related Manuals for Sony BVP-550


Summary of Contents for Sony BVP-550
- Page 1 WARNING CAUTION Danger of explosion if battery is incorrectly replaced. Replace only with the same or equivalent type To prevent fire or shock hazard, do not recommended by the manufacturer. expose the unit to rain or moisture. Dispose of used batteries according to the manufacturer’s instructions.
- Page 2 The material contained in this manual consists of information that is the property of Sony Corporation and is intended solely for use by the purchasers of the equipment described in this manual. Sony Corporation expressly prohibits the duplication of any...
- Page 3 COLOR VIDEO CAMERA BVP-550 OPERATION MANUAL [English] 2nd Edition Serial No. 11001 and Higher Letter Ver.3.0 3-810-005-11(1)
- Page 4 Sony Corporation Printed in Japan BVP-550 (SY, 1995.11.13 Broadcast Products Company © 1995 3-810-005-11(1) Published by Broadcast Products Company Letter Ver.3.0 3-810-005-11(1)
-
Page 5: Table Of Contents
Table of Contents Table of Contents 1-1 Features ................... 1-1 Chapter 1 1-2 System Configuration ..............1-4 Overview 2-1 Accessory Attachments ..............2-1 Chapter 2 2-2 Controls ................... 2-2 Locations and Functions of Parts and Controls 3-1 Notes on Handling ................3-1 Chapter 3 3-1-1 Precautions ................ - Page 6 Table of contents 4-7 Setup by OPERATION Menu ............. 4-14 Chapter 4 4-7-1 Selecting Display Items ............4-14 Adjustments and Settings 4-7-2 Setting the Marker Display ..........4-15 for Recording 4-7-3 Setting the GAIN Selector Values ........4-16 4-7-4 Selecting the Aspect Ratio (For OHB-550WS/550WSP only) ........
-
Page 7: Features
Betacam SP (Superior Performance) Series Portable Production. The various CCD units share the following Video Cassette Recorder. characteristics: The principle features of the BVP-550 are as follows: • High sensitivity: 2000 lx (F8) • High signal-to-noise ratio: 62 dB (standard) • Very low smear Digital signal processing •... - Page 8 .......................................... 1) CLS 4) Zebra pattern “Clear Scan” is a trademark of Sony Corporation. A striped pattern on the viewfinder screen that allows 2) Safety zone marker you to ascertain the video level of the subject by...
- Page 9 Wide range of selectable video amplifier Automatic iris closing mechanism gain values The lens iris closes automatically when: • the black balance is adjusted automatically, or Nine gain values ranging from –3 dB to +30 dB can be • the black shading is adjusted automatically. selected for the video amplifier.
-
Page 10: System Configuration
Adapter CA-50A/50AP CCU-350/350P BKDW-701 Servo Filter Unit BKW-401 OHB-550WS/550WSP Rotary Bracket CCD unit CA-3A BVW-50/50P O/ O / O / O / BVP-550 BVV-5/5PS BKDW-701 Servo Filter Unit Zoom lens VCS-700 Video RM-P9 Selector VCT-14 Tripod Remote Adaptor Control Unit... -
Page 11: Accessory Attachments
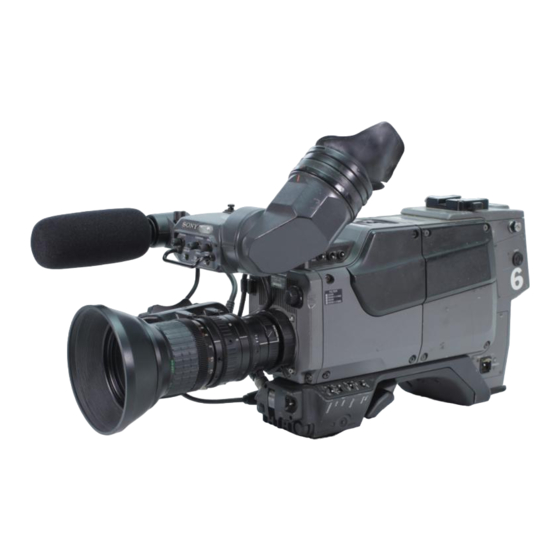
2-1 Accessory Attachments Grip 1 1/4" screw 2 Shoulder strap fitting 3 Lens fixing lever 4 Lens mount cap 5 Lens mount 6 Tripod mount 7 LENS connector Note This illustration shows the video camera with an optional CCD unit attached. 1 1/4"... -
Page 12: Controls
2-2 Controls 2-2 Controls 1 Viewfinder front-rear positioning lever 2 Viewfinder left-right positioning lever 3 Viewfinder stopper 4 Microphone (supplied with the BVF-10/10CE) 5 Diopter adjustment ring 7 MENU SEL control/button 6 Viewfinder 8 CANCEL switch 9 PEAKING control !º CONTRAST control !¡... - Page 13 1 Viewfinder front-rear positioning lever !™ TALLY switch Loosen to adjust the viewfinder position in the front- Controls the tally lamps as follows: to-rear direction. HIGH: The tally lamps’ brightness is set to high. OFF: The tally lamps are disabled. 2 Viewfinder left-right positioning lever LOW: The tally lamps’...
- Page 14 2-2 Controls Eyecup @¢ CA mount !∞ FILTER selector !§ VF DISP selector !¶ R/G/B selector !• ENC/RGB selector @∞ VTR/CA connector !ª AUTO W/B BAL switch @§ Batacam adaptor mounting screw @º CAMERA/VTR selector @¡ GAIN selector @™ OUTPUT/DCC selector @£...
- Page 15 !¶ R/G/B (red/green/blue) selector @º CAMERA/VTR selector Selects the component signal to be output from the Selects the mode which determines if a Betacam SP TEST OUT connector when the ENC/RGB selector is VTR attached to the video camera starts recording and set to RGB.
- Page 16 2-2 Controls @™ OUTPUT/DCC (output signal/Dynamic @£ WHITE BAL (white balance memory) selector Contrast Control) selector Selects the white balance adjustment method and the Selects the signal (color bar signal or video signal) to white balance memory bank to be used. be output to the viewfinder, the VTR connector and PRST (preset): The video camera is adjusted to the the TEST OUT connector while turning on or off the...
- Page 17 #¢ VF connector @• TEST OUT connector @ª REMOTE connector #£ MIC LEVEL control #™ SHUTTER switch #º MIC connector #¡ VTR START button @• TEST OUT connector (BNC type) @ª REMOTE connector (6-pin) Outputs the signal selected by the ENC/RGB selector Connects the optional RM-P9 Remote Control Unit.
- Page 18 2-2 Controls #º MIC (microphone) connector (XLR type, 3-pin, female) Connects a microphone able to accept a phantom power supply. Power to the microphone is supplied through this connector. #¡ VTR START button Press this button to start recording, and press it again to stop.
-
Page 19: Notes On Handling
3-1 Notes on Handling 3-1-1 Precautions To keep the video camera in good operating condition, take the following precautions: Do not subject the video camera to strong shocks or vibrations This may damage the exterior of the video camera as well as its internal circuits. -
Page 20: Attaching An Optional Ccd Unit
3-2 Attaching an Optional CCD Unit 4-3 Delete play The BVP-550 is used in conjunction with one of four Connect one normal and two flat cables to the different CCD units (OHB-450/450P/451/451P/550/ connectors on the CCD unit, making sure the 550P/550WS/550WSP), depending on the purpose. -
Page 21: Attaching The 4:3/16:9 Aspect Ratio-Switching Board
Note 3-2-2 Attaching the 4:3/16:9 The eye piece with a threefold lens as an accessory for aspect ratio-switching board attaching OHB-550WS/550WSP to the BVP-550 is (OHB-550WS/550WSP only) available. For details, refer to the maintenance manual. Remove the left side panel of the video camera. -
Page 22: Connections
3-3 Connections 3-3 Connections You can attach either a Betacam SP VTR or a camera Attach the CA-553 to the video camera. adaptor to the video camera. Attaching a camera adaptor allows you to connect other equipment such as a VTR, a camera control unit, and an AC adaptor. CA-553 3-3-1 Attaching a Betacam SP Attaching a BVV-5/5PS Betacam SP VTR to the video... -
Page 23: Attaching A Camera Adaptor
Securely tighten the CA screw supplied with the Securely tighten the two screws supplied with the VTR. camera. Tighten the screws. Tighten the CA screw. Removing a Camera Adaptor 3-3-2 Attaching a Camera Adaptor Completely loosen the CA screw on the video camera until it idles and then remove the camera adaptor while When the CA-550/550P Camera Adaptor is attached to pushing the CA screw. - Page 24 You cannot use a camera control unit and an RM-P9 Remote Control Unit connected to the video camera at CA-550/550P Camera Adaptor the same time. If you do, operation errors will occur. 26-pin CA-550/550P Camera Adaptor BVP-550 Connecting Cable Portable Video Cassette CCZ-2 (2 m) BVP-550 Recorder...
- Page 25 • Turning off the video camera while color bars or a test signal is being output ends the output of the color bars or test signal. For details, refer to the optional BVP-550 system manual. Chapter 3 Setting Up the Video Camera Letter Ver.3.0...
-
Page 26: Power Supply
AC-500/500CE/ Camera Adaptor 550/550CE DC IN AC Adaptor Power Input 4-pin DC OUT AC-500/500CE/ 550/550CE DC power cable (supplied with the AC-500/500CE/ BVP-550 550/550CE) Battery Adaptor DC-300 Battery Pack BP-90A Chapter 3 Setting Up the Video Camera Letter Ver.3.0 3-810-005-11(1) -
Page 27: Mounting A Lens
3-5 Mounting a Lens Use the procedure described below to mount a lens (not supplied) on the video camera. Handle the lens with care, referring to the manual supplied with it. Push up the lens fixing lever and remove the lens mount cap from the lens mount. -
Page 28: Adjusting The Flange Focal Length
3-6 Adjusting the Flange Focal Length 4-3 Delete play You should adjust the flange focal length when: Note •mounting a lens for the first time; The location of the controls for adjusting the flange •changing the lens; or local length differ according to lens. For details on the •the lens does not stay in focus when zooming from location of the controls, refer to the instruction manual telephoto to wide angle. -
Page 29: Adjusting The Viewfinder
3-7 Adjusting the Viewfinder You can adjust the viewfinder position towards the left Moving front and back or right, and towards the front or back to facilitate viewing through the viewfinder. 3-7-1 Moving the Viewfinder Moving left and right Loosen the front-rear positioning ring of the viewfinder. -
Page 30: Adjusting The Focus And Screen Of The Viewfinder
3-7 Adjusting the Viewfinder Preventing the viewfinder from hitting 3-7-2 Adjusting the Focus and your leg Screen of the Viewfinder To prevent the viewfinder from hitting your leg as you Adjusting the viewfinder focus walk while carrying the video camera by the grip, use the BKW-401 Viewfinder Rotation Bracket (not supplied) to turn the viewfinder upward as illustrated To adjust the viewfinder focus for your particular... -
Page 31: Detaching The Viewfinder
3-7-3 Detaching the Viewfinder 3-7-4 Detaching the Eyepiece While shooting with your eye away from the viewfinder, you can detach the eyepiece to get a clearer view of the entire screen. The CRT screen and mirror can also be cleaned more easily when the eyepiece is detached. - Page 32 3-7 Adjusting the Viewfinder Refitting the eyepiece Align the match mark on the eyepiece locking ring with the match mark on the viewfinder barrel. Align the match mark on the eyepiece end (see illustration in step 2 on the previous page) with the match marks on the eyepiece locking ring and viewfinder barrel, then insert the eyepiece into the viewfinder barrel.
-
Page 33: Connecting A Microphone
3-8 Connecting a Microphone This section describes how to attach an external Attach the microphone holder (A). microphone (not supplied) in addition to the supplied one, and how to detach the supplied microphone. Using a CRS-3P Microphone Suspension (not supplied) will reduce the effect that vibration (such as that generated by an attached Betacam SP VTR) has on recording. -
Page 34: Mounting On A Tripod
3-9 Mounting on a Tripod 2-2 Controls To mount the video camera on a tripod using the VCT- Taking the video camera off the tripod 14 tripod adaptor, proceed as follows: adaptor Attach the tripod adaptor to the tripod. While pressing the red button against the lever, move Select the screw hole in the tripod adaptor that fits the lever in the direction of the arrow. -
Page 35: Attaching The Shoulder Strap
3-10 Attaching the Shoulder Strap Use the following procedure to attach the shoulder Attaching the shoulder strap strap supplied with the OA-550/550P for carrying the video camera. clip Shoulder strap post Pull up on the strap to lock it. Removing the shoulder strap Press here to release. -
Page 36: Adjusting The Shoulder Pad Position
3-11 Adjusting the Shoulder Pad Position 2-2 Controls Depending on the types of a lens, the center of gravity moves to the front. Adjust the shoulder pad position as shown below: Shoulder pad (small) Shoulder pad (large) Lift up the small shoulder pad. You can also use the small shoulder pad temporally as the chest pad while keeping it lifted While pushing down the large shoulder pad, move... -
Page 37: Connecting A Remote Control Unit
Note Before connecting the remote control unit to the video camera, turn the camera off. BVP-550 To REMOTE connector (6-pin) Camera Adaptor Remote control cable (10m (about 33 ft), supplied with RM-P9) -
Page 38: Adjusting The Black Balance And White Balance
4-1 Adjusting the Black Balance and White Balance To obtain consistently high picture quality as you use 4-1-1 Adjusting the Black the video camera, it may become necessary to adjust Balance the black balance and white balance, depending on the conditions. - Page 39 4-1 Adjusting the Black Balance and White Balance If automatic black balance adjustment is not During the adjustment, the following messages appear possible on the viewfinder screen: If the black balance adjustment cannot be completed normally, an error message will appear for about three seconds on the viewfinder screen.
-
Page 40: Adjusting The White Balance
Adjust the FILTER selector to suit the lighting Black balance memory conditions. Values stored in memory are saved for about one week When the OHB-450/450P/451/451P is attached: when the video camera is turned off. You can select one of eight difference combinations of temperature conversion filter and ND filter and WHITE BAL selector A,B. - Page 41 4-1 Adjusting the Black Balance and White Balance Place a white test card under the same lighting After about one second, the message below conditions as the subject to be shot, and zoom up appears, and the white balance adjustment is to it.
- Page 42 If automatic white balance is not possible If there is no time for white balance adjustment If the white balance adjustment cannot be completed normally, an error message will appear for about three Set the WHITE BAL selector to PRST. The white seconds on the viewfinder screen.
-
Page 43: Setting The Electronic Shutter
4-2 Setting the Electronic Shutter 4-1 Adjusting the Black Balance and White Balance This section describes the shutter modes that can be Notes used with the electronic shutter of the video camera, • When using the electronic shutter in any mode, the and explains the procedure for selecting the shutter iris opening widens as the shutter speed is increased, speed and mode. -
Page 44: Setting The Shutter Mode/Speed
Note that all modes and all standard-mode speeds 4-2-2 Setting the Shutter Mode/ listed in the table on page 4-6 are preselected at the Speed time of shipping. You can change these preselected settings with the SHUTTER SPEED Use the SHUTTER selector to select a shutter mode or page of the setup menu. -
Page 45: Changing The Reference Value For Automatic Iris Adjustment
4-3 Changing the Reference Value for Automatic Iris Adjustment 4-4 OPERATION Menu Display on the Viewfinder Screen The reference value for automatic iris adjustment can be changed to enable the shooting of clear pictures of back-lit subjects, or to obtain special effects. To change the reference value, set IRIS OVERRIDE to ON (from the factory setting of OFF) on page of STAND ALONE1 in the OPERATION menu. -
Page 46: Operation Menu Display On The Viewfinder Screen
4-4 OPERATION Menu Display on the Viewfinder Screen When you set the DISP switch to MENU, the TOP Menu OPERATION menu appears on the viewfinder screen. Use this menu to select settings, select items to be The TOP menu screen indicates the entire displayed on the viewfinder screen, and the way the configuration of menu items. -
Page 47: Basic Use Of Operation Menu
4-4 OPERATION Menu Display on the Viewfinder Screen Turn the MENU SEL control/button to move the m REFERENCE menu: For initial customization of reference settings to suit user’s requirements. cursor to the item to be set. TRIMMING menu: For adjustments after changing of parts. -
Page 48: Indicators In The Viewfinder
4-5 Indicators in the Viewfinder Indicators in the viewfinder indicate the status of the video camera and the results of adjustments. These indicators are arranged along the top and bottom edges of the viewfinder. 1 TALLY indicator 2 REC indicator 3 BATT indicator TALLY / REC BATT... -
Page 49: Status Display On The Viewfinder Screen
!™ !™ adjustment. !∞ BVP-550 For details on display item selection, see “4-7-1 Selecting !¢ '95/10/17 Display Items” on page 4-14; and for details on the marker W:A 9 dB 1/1000 15-10 F5.6... - Page 50 ! ¡ Appears during recording to indicate the amount of Indicates the currently selected filter types. A number tape remaining in minutes. (from 1 to 4) shows which ND filter is selected and a letter (from A to D) shows which CC filter is selected. The meaning of the indication on the viewfinder screen are as follows: (When an OHB-450/450P/451/451P is attached, a...
-
Page 51: Setup By Operation Menu
4-7 Setup by OPERATION Menu 4-7 Setup by OPERATION Menu On this video camera, the OPERATION menu is used Selecting the display items for adjusting or making basic settings (default settings). Do the following procedure to select the items to be The items you can adjust or set with the OPERATION displayed on the viewfinder screen. -
Page 52: Setting The Marker Display
Turn the MENU SEL control/button to move the m Turn the MENU SEL control/button to display the cursor to the item you want to set, then press the MARKER page, then press the MENU SEL MENU SEL control/button. control/button. The m cursor changes to a ? mark. CENTER: Set to ON to display the center marker. -
Page 53: Setting The Gain Selector Values
4-7 Setup by OPERATION Menu Turn the MENU SEL control/button to the value 4-7-3 Setting the GAIN Selector that you want, then press the MENU SEL control/ Values button. Before using the video camera for the first time, use The ? mark changes back to the m cursor and the the GAIN SW page of the OPERATION menu to set setting is entered. -
Page 54: Selecting The Aspect Ratio
16:9 ID ON VF: Turns on and off to display 16:9 4-7-4 Selecting the Aspect Ratio indication in the viewfinder screen. (for OHB-550WS/550WSP only) 16:9 ID ON BARS: Turns on and off to display Use the WIDE SCREEN page of the OPERATION 16:9 indication on the color bar. -
Page 55: Selecting The Test Signal Output
4-7 Setup by OPERATION Menu Turn the MENU SEL control/button to move the m 4-7-5 Selecting the Test Signal cursor to item that you want to change, then press Output the MENU SEL control/button. Use the MON OUT page of the OPERATION menu to The m cursor changes to a ? mark. -
Page 56: Automatic Setting Of Iris Opening/Knee
Turn the MENU SEL control/button to the setting 4-7-6 Automatic Setting of Iris that you want, then press the MENU SEL control/ Opening/Knee button. Use the AUTO IRIS/AUTO KNEE (DCC) page of the The ? mark changes back to the m cursor and the OPERATION menu to set the reference value during setting is entered. -
Page 57: Selecting Functions
4-7 Setup by OPERATION Menu Turn the MENU SEL control/button to move the m 4-7-7 Selecting Functions cursor to item that you want to change, then press the MENU SEL control/button. The STAND ALONE page of the OPERATION menu is usually used when an CCU is not connected. This The m cursor changes to a ? mark. -
Page 58: Auto Setup
4-7-8 Auto Setup TEST: Test signal selection (“1”: outputs a sawtooth waveform test signal; “2”: outputs a Use the AUTO SETUP page of the OPERATION 3-step waveform test signal; “OFF”: no test menu to do the three types of auto setup operations: signal output) •... -
Page 59: Diagnosis
DIAGNOSIS page of OPERATION menu. Note When a failure is detected on a board, contact your Sony representative. VF DISP switch MENU SEL control/button Set the VF DISP switch to MENU. Turn the MENU SEL control/button to display the DIAGNOSIS page. -
Page 60: Setting The Camera Id
Set the VF DISP switch to MENU. Turn the MENU SEL control/button to display the CAMERA ID page, then press the MENU SEL control/button. <Camera ID> µ : BVP-550 Camera ID ID On Bars: ON (Squares indicate spaces, which $%&'()*+,-./0123456789:;... -
Page 61: Paint Menu
4-8 PAINT Menu 4-8 PAINT Menu The PAINT menu is used for white and other paint Activating the PAINT menu adjustment items. Set the VF DISP switch from OFF to MENU while By using the SCENE FILE page, you can save five holding down the MENU SEL control/button. - Page 62 Page Item Settings Contents DETAIL2 [ON], OFF Turns the function on and off to improve resolution by DETAIL adding detail signal. H/V RATIO –99 to 99 ([00]) Adjusts the mix ratio of H and V detail signal. FREQUENCY –99 to 99 ([00]) Adjusts the boost frequency for H detail signal.
- Page 63 4-8 PAINT Menu Page Item Settings Contents KNEE/W.CLIP POINT –99 to 99 ([00]) Adjusts the knee point level when the function is OFF. SLOPE –99 to 99 ([00]) Adjusts the knee slope level when the function is OFF. KNEE [ON], OFF Turns the knee function on and off.
-
Page 64: Shooting Operations
5-1 Shooting Operations To make the most of the functions of your video camera during shooting, check in advance that the functions are operating normally. For details on pre-shooting checks, see “Testing the Video Camera Before Shooting” on page A-2. For details on lenses and VTR operations, refer to the manuals for the res equipment. - Page 65 5-1 Shooting Operations Adjust the black balance and the white balance. If the black balance and white balance settings are already in memory: Set the the WHITE BAL selector to A or B. If the black balance and white balance settings are not already in memory, and there is not enough time to adjust the white balance: Set the AUTO W/B BAL switch to BLK for the black balance, and set...
- Page 66 Checking the video level By doing the following procedure, you can display a zebra pattern on the viewfinder screen to allow checking of the video level. Though the zebra pattern is set at the time of shipping to indicate areas with a video level of 70% IRE units (NTSC) or 490 mV (PAL), it can be set to also indicate areas with a video level of 100% IRE units (NTSC) or 700 mV (PAL) or more.
- Page 67 5-1 Shooting Operations To monitor playback in the viewfinder while recording Press the RET button on the lens. While the button is pressed, you can monitor playback on the VTR through the viewfinder even as you continue to record. Checking the brightness signal in the viewfinder during playback Press the RET button on the lens for the playback picture to be appeaared in the viewfinder.
-
Page 68: Operation Warnings
After Clean the heads. head gap detecting If recording is still clogged head substandard, turn clogging the power off and problem recording consult your Sony continues representative. recording but quality circuit. is not consistent. SERVO Continuous Servo Recording Turn the power off lock lost. - Page 69 6-1 Operation Warnings TAPE Flashing Close to Operation Change the the end continues. cassette, if of tape. necessary. TAPE Continuous End of Record, Change the tape. playback cassette or or fast rewind the tape. forward stops. BATT Flashing Battery Operation Change the close to continues.
-
Page 70: Cleaning The Viewfinder
6-2 Cleaning the Viewfinder To ensure a clear view while shooting, you must keep Fog-proof filter the interior of the viewfinder clean. When cleaning the viewfinder, take care not to scratch any of the Depending on the temperature and humidity, the components within the viewfinder. -
Page 71: Specifications
Specifications C-74 Microphone General CRS-3P Cradle Suspension BVF-10/10CE 1.5-inch Viewfinder Operating temperature VCT-14 Tripod Adaptor –20 °C to +45 °C (–4°F to +113°F) Storing temperature Design and specifications are subject to change –20 °C to +50 °C (–4°F to +122°F) without notice. -
Page 72: Testing The Video Camera Before Shooting
Testing the Video Camera Before Shooting Glossary Check that the functions of the video camera are operating normally before each shooting session. Switch settings for testing the camera Turn on the power and set the switches and selectors as follows: Iris: automatic Zoom: automatic CAMERA/VTR: ON, STBY... - Page 73 Testing the viewfinder Testing the iris and zoom functions Adjust the viewfinder position. (1) Set the zoom to automatic. (2) Check that lens changes to telephoto and wide- Check that the color bars are displayed in the angle through electronic operation, and that the viewfinder, and adjust the BRIGHT, CONTRAST, zoom position indication on the viewfinder and PEAKING controls to obtain the best color bar...
-
Page 74: Glossary
Glossary Glossary Aliasing I signal Distortion of a demodulated signal caused One of the two color signals, containing by the overlap of the base band signal and reddish orange and bluish green the lower sideband signal. components to which the human eye is sensitive. -
Page 75: Index
Index Color temperature conversion filter 2-4, Accessory attachments 2-1 Indication Condensation 6-1 adjustment Audio channel 1 level 4-13 Configuration of OPERATION menu Black balance 4-1 Audio level 4-13, 4-14 4-17 Chest pad position 3-18 BATT (battery) 4-11 Connecting a microphone 3-15 Color bar 2-6 Extender 4-12, 4-14 Connecting a remote control unit 3-19... - Page 76 Index W,X,Y PAINT menu 4-23 White balance Picture GAIN see GAIN Adjusting 4-3 Power supply 3-8 Error message 4-5 With a Betacam SP VTR attached 3-8 If there is no time for white balance With a camera adaptor attached 3-8 adjustment 4-5 Memory 4-5 WIDE SCREEN page 4-17...
Need help?
Do you have a question about the BVP-550 and is the answer not in the manual?
Questions and answers