
Related Manuals for Siemens SITRANS FSS200


Summary of Contents for Siemens SITRANS FSS200
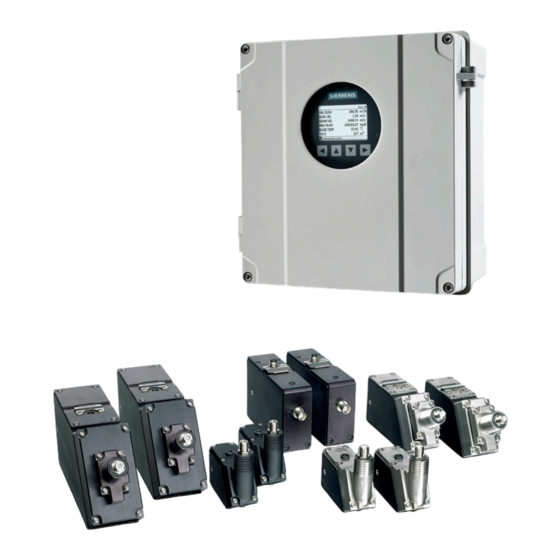
- Page 1 SITRANS F Ultrasonic Flowmeters FSS200 ultrasonic clamp-on sensors Installation Manual Edition 08/2017 Answers for industry.
- Page 3 Introduction Safety notes Installation overview SITRANS F Installing/mounting Ultrasonic Flowmeters FSS200 clamp-on sensors Connecting Service and maintenance Installation Manual Technical data Dimensions and weight Certificates and support Additional Installation Instructions 08/2017 A5E36255466-AC...
- Page 4 Note the following: WARNING Siemens products may only be used for the applications described in the catalog and in the relevant technical documentation. If products and components from other manufacturers are used, these must be recommended or approved by Siemens. Proper transport, storage, installation, assembly, commissioning, operation and maintenance are required to ensure that the products operate safely and without any problems.
-
Page 5: Table Of Contents
Table of contents Introduction ............................. 7 Purpose of this documentation ....................7 Document history ........................7 Preliminary Information ......................8 Items supplied ........................... 8 Required Tools .......................... 9 Checking the consignment ..................... 10 Security information ........................ 10 Safety notes ............................11 Precondition for safe use ...................... - Page 6 Table of contents Chapter overview ........................43 Basic safety instructions ......................43 5.2.1 Unsuitable cables, cable glands and/or plugs ............... 43 5.2.2 Lack of equipotential bonding ....................44 5.2.3 Unprotected cable ends ......................44 5.2.4 Insufficient isolation of intrinsically safe and non-intrinsically safe circuits ......44 5.2.5 Connecting device in energized state in hazardous areas ............
- Page 7 Table of contents Sensor dimensions ......................... 85 Certificates and support ........................87 Certificates ..........................87 Sensor markings ........................87 Technical support ........................87 Additional Installation Instructions ......................89 Direct mount ..........................89 Mounting tracks for Size A and B sensors ................94 Magnetic mounting ........................
- Page 8 Table of contents FSS200 clamp-on sensors Installation Manual, 08/2017, A5E36255466-AC...
-
Page 9: Introduction
Introduction Note This manual applies to the SITRANS FSS200 ultrasonic clamp-on sensors only. Use the device to measure process media in accordance with the information in the Operating Instructions. In order to operate an ultrasonic flowmeter, you need both transmitter Operating Instructions and sensor Installation Instructions, see Flow documentation (https://support.industry.siemens.com/cs/products?pnid=17317&lc=en-WW). -
Page 10: Preliminary Information
Knowledge about process conditions and application parameters are prerequisite, including knowledge of the functional principles of these flowmeters. Further information: Siemens provides special training and other information via the Internet, including helpful installation videos. Helpful links will be listed inside this manual separately. Items supplied Note Scope of delivery may vary, depending on version and add-ons. -
Page 11: Required Tools
Introduction 1.5 Required Tools Figure 1-1 Mounting frames Required Tools It is helpful to have common electric and hand tools available for installation of the sensors. ● For easy programming, a PC would also be helpful and can be used later for diagnostics and documentation. -
Page 12: Checking The Consignment
In order to protect plants, systems, machines and networks against cyber threats, it is necessary to implement – and continuously maintain – a holistic, state-of-the-art industrial security concept. Siemens’ products and solutions only form one element of such a concept. Customer is responsible to prevent unauthorized access to its plants, systems, machines and networks. -
Page 13: Safety Notes
Safety notes Precondition for safe use This device left the factory in good working condition. In order to maintain this status and to ensure safe operation of the device, observe these instructions and all the specifications relevant to safety. Observe the information and symbols on the device. Do not remove any information or symbols from the device. -
Page 14: Fcc Conformity
Safety notes 2.2 Laws and directives Further provisions for hazardous area applications are for example: ● IEC 60079-14 (international) ● EN 60079-14 (EC) 2.2.1 FCC Conformity US Installations only: Federal Communications Commission (FCC) rules Note • This equipment has been tested and found to comply with the limits for a Class A digital device, pursuant to Part 15 of the FCC Rules. -
Page 15: Use In Hazardous Locations
Safety notes 2.3 Use in hazardous locations Note CE declaration The CE declaration certificate is available on the SensorFlash SD card delivered with the device. Use in hazardous locations Qualified personnel for hazardous area applications Persons who install, connect, commission, operate, and service the device in a hazardous area must have the following specific qualifications: ●... -
Page 16: Loss Of Safety Of Device With Type Of Protection "Intrinsic Safety Ex I
● Sensor and transmitter are connected to the potential equalization throughout the hazardous area. ● EN/IEC 60079-14 is considered for installation in hazardous areas. Must be installed in accordance with Siemens control drawing A5E42071597A. WARNING Laying of cables Risk of explosion in hazardous areas. May cause death or serious injury. -
Page 17: Installation In Hazardous Areas
Safety notes 2.4 Installation in hazardous areas WARNING Field wiring installation Risk of explosion in hazardous areas. May cause death or serious injury. Ensure that the national requirements of the country in which the devices are installed are met. Installation in hazardous areas WARNING Equipment used in hazardous areas Risk of explosion in hazardous areas. - Page 18 Safety notes 2.4 Installation in hazardous areas Class III Division 1 Class I Zone 2 and Zone 22 Transmitter FST020 Not for hazardous areas Sensor Class I+II+III Division 1 Groups A, B, C, D, E, F, G. Class I Zone 0, Zone 20/21 Note Control drawing * See Control drawing A5E37305975A...
-
Page 19: Installation Overview
Installation overview FST030 system The illustration below shows a typical transmitter and clamp-on sensor flowmeter configuration. ① ⑤ FST030 wall mounted transmitter Sensors ② ⑥ Power cable Flow direction ③ ⑦ Upstream sensor cable (1A) Path 1 Ports for I/O, Communications, RTDs ④... - Page 20 Installation overview Figure 3-1 Wall mount transmitter overview (Reflect mount) FST020 system The illustration below shows a typical transmitter and clamp-on sensor flowmeter configuration. ① ⑤ FST020 wall mounted transmitter Upstream sensor cable (1A) Path 1 ② ⑥ Downstream sensor cable (1B) Path 1 Sensors ③...
-
Page 21: System Configuration
Installation overview 3.1 System configuration Generally after deciding on the necessary flow measurements an evaluation should be done. In this way, the best economical solution can be obtained since configurations and accuracy measurement requirements can be in conflict with the overall system costs. In particular when using Clamp-on systems it’s important to perform a very detailed evaluation. - Page 22 Installation overview 3.1 System configuration FSS200 clamp-on sensors Installation Manual, 08/2017, A5E36255466-AC...
-
Page 23: Installing/Mounting
Installing/mounting This chapter describes how to install the sensors. The following installation steps must be carried out: ● Determine a suitable installation location for the sensors and transmitter. See Determining a location (Page 23). Note IMPORTANT This step should have been done prior to ordering the clamp-on system ●... -
Page 24: Installation Safety Precautions
Note Material compatibility Siemens can provide you with support concerning selection of sensors. However, you are responisible for the selection of components. Siemens accepts no liability for faults or failures resulting from incompatible materials. -
Page 25: Determining A Location
Installing/mounting 4.4 Determining a location ● Sensor data: Sensor type and size (indicated on label), length of sensor cable pair. ● Environment conditions: Mounting location transmitter/sensors, distance and required cable lengths, temperature, sun protection/rain, protection against dirt, vibrations, corrosion, easy access for maintenance: ladder or scaffolding, below ground or submersible. - Page 26 Installing/mounting 4.4 Determining a location ● Avoid, if possible, the following installations: – Installation at the highest point of the pipe system – Installation in vertical pipes with free outlet or downwards flow Selecting a location for the sensors 1. Locate the sensors downstream from the center of the longest available straight run. A location ten pipe diameters or greater downstream from the nearest bend will provide adequate flow profile conditions.
- Page 27 Installing/mounting 4.4 Determining a location 5. Do not mount sensors from different ultrasonic flowmeters on the same pipe. Also, do not run the sensor cables in common bundles with cables from other instrumentation. You can run these cables through a common conduit ONLY if they originate at the same flowmeter.
-
Page 28: Orienting The Sensors
"A" sensor to the downstream "B" sensor, whereas negative flow is in the reverse direction. Orienting the sensors Siemens recommends orienting the sensors in one of the following ways: Note IMPORTANT Avoid installing sensors on top or on the bottom of a horizantal pipe. -
Page 29: Installation Instructions
Installing/mounting 4.6 Installation instructions Installation instructions 4.6.1 Preliminary installation procedures Introduction To install the sensors these basic steps must be followed: 1. Program parameters into transmitter 2. Mount the sensors on pipe using parameters from transmitter 3. Connect sensor cables from sensor to transmitter Clamp-on sensor mounting modes All though the transmitter recommends a mounting mode after analyzing your pipe and liquid data entries you can still install clamp-on sensors in the way that best suits your application... - Page 30 Installing/mounting 4.6 Installation instructions ① ④ Upstream sensor Downstream sensor ② ⑤ Pipe Sonic path ③ Flow direction Figure 4-4 Direct mount (Pipe shown from above in 12 o'clock position) Mounting supplies The following items will be needed to mount the sensors (most materials are supplied): ●...
-
Page 31: Initial Startup Procedure
Installing/mounting 4.6 Installation instructions Preparing the pipe Note Make sure you picked a mounting location with the longest straight run. You must have easy access to at least one side of your pipe. The pipe at the mounting location must remain full, even at zero flow. -
Page 32: Wizard Sensor Setup Procedure
Installing/mounting 4.6 Installation instructions 4.6.3 Wizard sensor setup procedure Referring to the Operation Instuction manual for your transmitter, use the Wizard sensor setup procedure to set up the clamp-on sensors for your unit. 4.6.4 Installing sensors in Reflect mount Reflect mount - Sensor installation using mounting frames and spacer bar 1. - Page 33 Installing/mounting 4.6 Installation instructions Installing the mounting frames 1. On a flat surface, attach the spacer bar to a mounting frame so that the reference hole on the spacer bar aligns with the hole on the mounting frame and attach using supplied screw stored on end of spacer bar.
- Page 34 Installing/mounting 4.6 Installation instructions Installing the sensor 1. Take either sensor and apply a continuous lengthwise 3 mm (1/8-inch) bead of coupling compound across the center of the sensor emitting surface. Note Small diameter pipes Use the tip of the finger to apply a light film of coupling compound on sensor emitting surfaces that are to be installed on small diameter pipes.
-
Page 35: Dry Film Couplant/Damping Material
4.6.5 Dry Film Couplant/Damping Material Siemens dry film couplant/damping material is an adhesive backed viscoelastic polymer sheet that provides excellent acoustic coupling without concern for couplant washout. For clamp-on gas applications this material effectively absorbs unwanted pipe noise to lower the minimum pressure required for flow measurement. - Page 36 Installing/mounting 4.6 Installation instructions 4. If necessary, use the abrasive material provided to create a smooth contact surface for the sensors (see diagram below). ① Damping material ② Pipe ③ Smoothed Areas. If necessary, smooth an area large enough to accommodate sensors and also several centimeters (inches) around the locations where the sensors are to be mount- ed.
- Page 37 Installing/mounting 4.6 Installation instructions Table 4- 1 Damping material thickness for clamp-on gas systems Sensor size Kit P/N Required layers Final thickness (in) Final thickness (mm) 7ME39600 DM10 0.027 0.69 7ME39600 DM10 0.027 0.69 7ME39600 DM10 0.027 0.69 7ME39600 DM10 0.027 0.69 7ME39600 DM10...
- Page 38 Installing/mounting 4.6 Installation instructions 3. Thoroughly clean and degrease the selected pipe area with a suitable solvent (see "Cautions on the use of dry film couplant" below). 4. After determining the best sheet cutting pattern from suggestions above, mark the pipe for the starting edge of the dry couplant sheet position.
- Page 39 Installing/mounting 4.6 Installation instructions ① ④ At least 4 inches (10.16 cm) both sides If film is applied in pieces, seam may be between, BUT NOT UNDER SENSORS. ② ⑤ Flowing pipe Mounting assemblies and straps are installed after the film ③...
- Page 40 ② 2-Beam ③ 4-Beam ④ Wrap damping material all around pipe ⑤ Small pipes Note Contact Siemens Technical Services Group (1 800 275-8480) for additional recommendations on use of Dry Film Couplant/Damping Compound. FSS200 clamp-on sensors Installation Manual, 08/2017, A5E36255466-AC...
- Page 41 Refer to the web site (www.graceconstruction.com) for a local distributors of this roofing underlayment material. The installation and sizing of the Grace material is identical to that of Siemens damping material. Refer to table below for the recommended number in layers for each sensor size.
-
Page 42: Sensor Dry Coupling Pad Installation Procedure
Installing/mounting 4.6 Installation instructions 4.6.6 Sensor Dry Coupling Pad Installation Procedure The following illustrates the proper procedure for installing a dry coupling pad between the sensor and pipe surface. The dry coupling pads replace the standard grease coupling supplied with the sensor. Note In some rare cases the dry pad may yield a lower than expected signal strength. - Page 43 Adhesive tape may remain on sensor and pipe after installation is complete. Tape should not protrude more than 6 mm (1/4-inch) from sensor sides. Refer to the appropriate Operating Instructions manual for the final sensor installation http://www.siemens.com/automation/support- procedure. For additional technical support: request...
- Page 44 Installing/mounting 4.6 Installation instructions FSS200 clamp-on sensors Installation Manual, 08/2017, A5E36255466-AC...
-
Page 45: Connecting
Connecting Chapter overview This chapter describes how to wire the sensors for operation with a wall mounted transmitter. 1. Sensor wiring (Page 48) 2. Connecting sensors to transmitter (Page 61) Basic safety instructions 5.2.1 Unsuitable cables, cable glands and/or plugs WARNING Unsuitable cables, cable glands and/or plugs Risk of explosion in hazardous areas. -
Page 46: Lack Of Equipotential Bonding
Connecting 5.2 Basic safety instructions 5.2.2 Lack of equipotential bonding WARNING Lack of equipotential bonding Risk of explosion through compensating currents or ignition currents through lack of equipotential bonding. May cause death or serious injury. • Ensure that the device is potentially equalized. Exception: It may be permissible to omit connection of the equipotential bonding for devices with type of protection "Intrinsic safety Ex i". -
Page 47: Connecting Device In Energized State In Hazardous Areas
Connecting 5.2 Basic safety instructions 5.2.5 Connecting device in energized state in hazardous areas WARNING Connecting device in energized state Risk of explosion in hazardous areas. May cause death or serious injury. • Connect devices in hazardous areas only in a de-energized state. Exceptions: •... -
Page 48: Wiring In Hazardous Locations
Connecting 5.2 Basic safety instructions Note Electromagnetic compatibility (EMC) You can use this device in industrial environments, households and small businesses. For metal housings there is an increased electromagnetic compatibility compared to high- frequency radiation. This protection can be increased by grounding the housing, see Connecting sensors to transmitter (Page 61). -
Page 49: Sensor Nameplate
● product specifications ● certificates and approvals The transmitter is identified as "Ultrasonic transmitter SITRANS FST030 or FST020" and the sensors as "Ultrasonic sensor SITRANS FSS200". Sensor nameplate Note Check to make sure that the sensors are a matched set with the same serial numbers and marked with an "A"... -
Page 50: Sensor Wiring
Connecting 5.4 Sensor wiring Sensor wiring The sensor wiring steps depend on the configuration. ● Sensor cable types (Page 48) ● Coaxial cables (Page 49) ● Triaxial cable (Page 51) (for FST030 only) ● RTD Sensor cables (Page 55) (for FST030 only) ●... -
Page 51: Coaxial Cable
Connecting 5.4 Sensor wiring 5.4.2 Coaxial cable 5.4.2.1 Preparing coaxial sensor cable Note IMPORTANT ① ② Make sure the cable gland and NPT Adapter have been threaded onto the sensor cable BEFORE beginning to strip cable. Prepare unterminated coaxial cable ends as follows: ③... -
Page 52: Connecting Coaxial Cable
Connecting 5.4 Sensor wiring Assemble the cable and F-connector as follows: ⑦ 4. Push and twist the F-connector on the cable until secure. ⑥ 5. Ensure the dielectric is flush to 1mm (.04 in) beyond barrel end and that the center ⑤... -
Page 53: Triaxial Cable
Connecting 5.4 Sensor wiring 5.4.3 Triaxial cable 5.4.3.1 Preparing Triaxial sensor cable Note Triaxial cables are optionally available for the FST030 only. Note IMPORTANT ① ② Make sure the cable gland and NPT Adapter have been threaded onto the sensor cable BEFORE beginning to strip cable. - Page 54 Connecting 5.4 Sensor wiring Prepare unterminated cable ends as follows: ③ ④ ⑤ 1. Strip unterminated outer jacket , outer shield , and inner jacket to shown lengths (mm/in). ⑥ 2. Trim exposed inner shield to shown length (mm/in). ⑥ ⑤...
-
Page 55: Connecting Triaxial Cables
Connecting 5.4 Sensor wiring Triaxial cable and F-connector assembly Assemble the cable and F-connector as follows: ⑨ 1. Push and twist the F-connector on the cable until secure. ⑦ 2. Ensure the dielectric is flush to 1mm (.04 in) beyond barrel end and that the center ⑧... - Page 56 Connecting 5.4 Sensor wiring ① ⑤ Label Instruction sheet ② ⑥ Plastic bag Earth clamp ③ ⑦ Screw - ISO 7045 U-clamp ④ Spring washer DIN 127B Figure 5-3 Triaxial ground wire clamp parts Ground wire clamp assembly 1. Take the prepared sensor cable end and fill the F-connector with Super Lube coupling ①...
-
Page 57: Preparing Rtd Sensor Cables
Connecting 5.4 Sensor wiring ⑧ ⑫ Sensor User supplied ground wire (see note) ⑨ ⑬ Gland cap nut Screw, spring washer and U-clamp ⑩ ⑭ Sensor cable Gland body hex ⑪ ⑮ Sealing gasket NPT Adapter Figure 5-4 Cable gland clamp and ground wire Note Important The user supplied grounding wire that is connected to earth ground must be 4mm... -
Page 58: Mounting Temperature Sensors
Connecting 5.4 Sensor wiring Preparing the cable ① ② ③ ④ 1. Slide the insulated sleeve onto the cable over wires but NOT the blue ⑤ wire . Fold back the blue wire. ⑤ 2. Attached the wall mount RTD crimp lug to the blue wire on the cable using a crimping tool or equivalent. - Page 59 Connecting 5.4 Sensor wiring Table 5- 1 Temperature sensors Description Part number Standard clamp-on RTD 7ME39501TA00 Submersible clamp-on RTD 7ME39501TB00 Standard clamp-on RTD pair for energy system 7ME39501TA10 Insertion style RTD (size 1): 140 mm (5.5 in) 7ME39501TJ00 Insertion style RTD (size 2): 216 mm (8.5 in) 7ME39501TJ01 Insertion style RTD (size 3): 292 mm (11.5 in) 7ME39501TJ02...
- Page 60 Connecting 5.4 Sensor wiring ① ③ 7ME39600CR series cable Thermal couplant ② ④ Clamp-on temperature sensor Pipe ⑤ Mounting assembly Figure 5-6 Clamp-on temperature sensor RTD cable to wall mount transmitter wiring Note RTD temperature sensor are for the FST030 only. Note RTD Channels 5 and 6 RTD sensors can be connected to Channel 5, Channel 6 or to both channels depending on...
- Page 61 Connecting 5.4 Sensor wiring 1. Prepare the RTD cable. Make sure that the insulated sleeve is placed over the cable and the correct crimp lug (A5E39272102) is connected to the blue ground wire. 2. Attach the wires of the cable to the RTD connector to the transmitter as shown. ①...
-
Page 62: Finalizing Cable Wiring
Connecting 5.4 Sensor wiring ① ⑤ Temperature sensor connector head as- Thermal couplant sembly ② ⑥ 7ME39600CR series cable Spring loaded sensing element ③ ⑦ Threaded pipe fitting Pipe wall ④ Thermowell Figure 5-8 Insert temperature sensor 5.4.6 Finalizing cable wiring Tighten the cable glands to obtain optimum sealing. -
Page 63: Connecting Sensors To Transmitter
Connecting 5.5 Connecting sensors to transmitter Connecting sensors to transmitter 5.5.1 Transmitter FST030 Preparing for the connection 1. Loosen the four lid screws. 2. Open the lid. 3. Remove F-connector tool from wall mount housing. Figure 5-10 F-connector tool location FSS200 clamp-on sensors Installation Manual, 08/2017, A5E36255466-AC... - Page 64 Connecting 5.5 Connecting sensors to transmitter Connecting the flow sensor cables For the system to function properly, the sensor cables must be connected correctly. Each sensor cable should be connected to its own port assignment. ① 1-1A ② 2-2B ③ 3-2B ④...
-
Page 65: Wall Mount Fst030
Connecting 5.5 Connecting sensors to transmitter 5.5.2 Wall mount FST030 Connecting to FST030 transmitter Note The following example is shown in the Reflect mount sensor configuration. Connect sensor cables to the wall mounted transmitter as follows: 1. Fill connector end with Super Lube prior to connecting. 2. - Page 66 Connecting 5.5 Connecting sensors to transmitter ④ 4. Connect the downstream sensor cable to the transmitter port (1B) and make connection snug. ① ⑤ Wall mounted transmitter Sensors ② ⑥ Power cable Flow direction ③ ⑦ Upstream sensor cable (1A) Path 1 Ports for I/O, Communications, RTDs ④...
-
Page 67: Transmitter Fst020
Connecting 5.5 Connecting sensors to transmitter 5.5.3 Transmitter FST020 Preparing for the connection 1. Loosen the six lid screws. 2. Open the lid. Connecting the flow sensor cables For the system to function properly, the sensor cables must be connected correctly. The sensor cables should be connected as upstream 1A and downstream 1B. -
Page 68: Hi Precision Mount Fst030
Connecting 5.5 Connecting sensors to transmitter 5. Push the right-angle F-connector onto to the connector on the transmitter PC board. 6. Screw the gland and nut together to secure the cables. Note Sensor ports are labeled A and B. ① Right-angle F-connector ②... - Page 69 Connecting 5.5 Connecting sensors to transmitter ④ 4. Connect downstream sensor cable to the transmitter port (1B) and make connection snug. ① ③ Wall mounted transmitter Flow direction ② ④ Upstream sensor cable to internal Downstream sensor cable to transmitter port (1B) DSL port (1A) Path 1 Path 1 ⑤...
- Page 70 Connecting 5.5 Connecting sensors to transmitter Dual enclosure Reflect mount wiring Referring to the Hi Precision single enclosure reflect mount figure above, connect the Hi Precision mount reflect Dual enclosure sensor cables to the transmitter ports as follows: ③ 1. Observing the upstream and downstream orientation , connect sensor cables to transmitter ports.
- Page 71 Connecting 5.5 Connecting sensors to transmitter ⑤ 4. Connect downstream sensor cable to transmitter port (1B) and make connection snug. ① ③ Wall mounted transmitter Flow direction ② ④ Upstream sensor cable to transmitter Ltn (spacing distance between sensors) port (1A) Path 1 ⑤...
-
Page 72: Wall Mount Fst020
Connecting 5.5 Connecting sensors to transmitter 5. Tighten all cable glands to obtain optimum sealing. 6. Refer to transmitter FST030 Operating Instructions to program transmitter. 5.5.5 Wall mount FST020 Connecting to FST020 transmitter Note The following example is shown in the Reflect mount sensor configuration. Connect sensor cables to the wall mounted transmitter as follows: 1. - Page 73 Connecting 5.5 Connecting sensors to transmitter ② 5. Connect the downstream sensor cable to the transmitter port (1B) and make connection snug. ① ④ Wall mounted transmitter Downstream sensor cable (1B) Path 1 ② ⑤ Upstream sensor cable (1A) Path 1 Sensors ③...
-
Page 74: Hi Precision Mount Fst020
Connecting 5.5 Connecting sensors to transmitter 5.5.6 HI Precision mount FST020 Single enclosure Reflect mount wiring Connect sensor cables to the transmitter as follows: 1. Refer to Transmitter FST020 (Page 65) sensor cable preparation and connections. 2. To connect the sensor cables to the sensors, fill connector end with Super Lube prior to connecting. - Page 75 Connecting 5.5 Connecting sensors to transmitter ④ 5. Connect downstream sensor cable to the transmitter port (1B) and make connection snug. ① ③ Wall mounted transmitter Flow direction ② ④ Upstream sensor cable to transmit- Downstream sensor cable to transmitter port (1B) ter port (1A) Path 1 Path 1 ⑤...
- Page 76 Connecting 5.5 Connecting sensors to transmitter Dual enclosure Reflect mount wiring Referring to the Hi Precision single enclosure reflect mount figure above, connect the Hi Precision mount reflect Dual enclosure sensor cables to the transmitter ports as follows: ③ 1. Observing the upstream and downstream orientation , connect sensor cables to transmitter ports.
- Page 77 Connecting 5.5 Connecting sensors to transmitter ⑤ 5. Connect downstream sensor cable to transmitter port (1B) and make connection snug. ① ③ Wall mounted transmitter Flow direction ② ④ Upstream sensor cable to transmitter Ltn (spacing distance between sensors) port (1A) Path 1 ⑤...
- Page 78 Connecting 5.5 Connecting sensors to transmitter 6. Tighten all cable glands to obtain optimum sealing. 7. Refer to transmitter FST020 Operating Instructions to program transmitter. FSS200 clamp-on sensors Installation Manual, 08/2017, A5E36255466-AC...
-
Page 79: Service And Maintenance
Risk of explosion in hazardous areas. May cause death or serious injury. • Repair must be carried out by Siemens authorized personnel only. Recalibration Siemens offers to recalibrate the system. The following calibrations are offered as standard: ● Standard intrinsic calibration ● Accredited flow calibration Note For recalibration the transmitter must always be returned with the sensors. -
Page 80: Maintenance And Repair Work
6.4.1 Original packaging If the original packaging is no longer available, ensure that all shipments are properly packaged to provide sufficient protection during transport. Siemens cannot assume liability for any costs associated with transportation damages. CAUTION Insufficient protection during storage The packaging only provides limited protection against moisture and infiltration. -
Page 81: Disposal
– Number of returned devices/replacement parts – Reason for returning the item(s) ● Decontamination declaration (http://www.siemens.com/sc/declarationofdecontamination) With this declaration you warrant "that the device/replacement part has been carefully cleaned and is free of residues. The device/replacement part does not pose a hazard for humans and the environment."... - Page 82 Service and maintenance 6.5 Disposal FSS200 clamp-on sensors Installation Manual, 08/2017, A5E36255466-AC...
-
Page 83: Technical Data
Technical data Sensor specifications Note Based on pipe wall thickness (steel pipes only) Note All sensors are stainless steel construction. Table 7- 1 Hi Precision sensors Sensor Size Pipe wall (mm) Pipe wall (inch) Pipe wall min. max. min. max. 0.64 1.02 0.25... -
Page 84: Coaxial Cable Specifications
Technical data 7.2 Coaxial cable specifications Coaxial cable specifications Submersible coaxial cable Cable (93 Ω) coaxial cable terminated at both ends with F connectors Outside diameter Ø 10 mm (0.24") Length 10m (32.81 ft), 20m (65.62 ft) Material (outside jacket) HDPE - High Density Polyethylene Ambient temperature -55 - +80°C (-67 - +176°F) - Page 85 Technical data 7.3 Triaxial cable specifications High Temperature triaxial cable Cable (75 Ω) Triaxial cable terminated on both ends with F connectors Outside diameter Ø 7.0 mm (0.276") Length 5, 20m (16.40, 65.62 ft) between sensor and transmitter. Material (outside jacket) Yellow FEP Perfluorethylenpropylen jacket Ambient temperature -55 - +204°C (-67 - +400°F)
- Page 86 Technical data 7.3 Triaxial cable specifications FSS200 clamp-on sensors Installation Manual, 08/2017, A5E36255466-AC...
-
Page 87: Dimensions And Weight
Dimensions and weight Sensor dimensions Note Sensors are supplied in matched pairs. Each sensor in a matched pair has the same serial number and is marked with an "A" and "B" (e.g., 19256A and 19256B). Part Number * Length Width Height Weight inch... - Page 88 Dimensions and weight 8.1 Sensor dimensions Part Number * Length Width Height Weight inch inch inch Net Weight (Pair) 1011HNFS - C1 / 0.86 kg (1.9 lbs 1011GCHNFS - C2 7ME39505GN* 7ME39505LD* 7ME39505LM* 7ME39505LN* 1011GCHNFS - C1 0.64 kg 7ME39505GM* (1.4 lbs) 1011HNFS - D1 / 2.2 kg...
-
Page 89: Certificates And Support
Internet Service & Support In addition to our documentation, Siemens provides a comprehensive support solution at: ● Online Support (http://www.siemens.com/automation/service&support) Personal contact If you have additional questions about the device, please contact your Siemens personal contact at: ● Partner (http://www.automation.siemens.com/partner) FSS200 clamp-on sensors... - Page 90 In order to find the contact for your product, select under 'All Products and Branches' the path 'Automation Technology > Sensor Systems'. Documentation You can find documentation on various products and systems at: ● Instructions and manuals Instructions and manuals (http://www.siemens.com/processinstrumentation/documentation) FSS200 clamp-on sensors Installation Manual, 08/2017, A5E36255466-AC...
-
Page 91: Additional Installation Instructions
Additional Installation Instructions Additional installation and sensor mounting instructions including direct mount, track mount, magnetic mount, Hi Precision mount and temperature sensor mounting are listed in this appendix. Direct mount Sensor installation using mounting frames, spacer bar and spacing guides The combination of mounting frames, spacer bar and spacing guides is the recommended way to mount Direct mode sensors. - Page 92 Additional Installation Instructions B.1 Direct mount 4. Check to ensure that you have a matched set of sensors. They both should have the same S/N number but marked with either an "A" or "B" (e.g., 100A and 100B). 5. Temporarily position one of the frames on the pipe where you will be mounting it. Ensure that this is a smooth area without any raised areas (seams, etc.).
- Page 93 Additional Installation Instructions B.1 Direct mount 10.Now attach the free end of the spacer bar by inserting an index spacer screw through the REF hole on the spacer bar and then into the hole on the mounted frame. Tighten. Sight to ensure that this frame is lined up in center of pipe and while holding alignment, place a dot (with pencil or chalk) in the center of the tapered roller at the bottom of the frame (see A below).
- Page 94 Additional Installation Instructions B.1 Direct mount 11.Disassemble the spacer bar and the unmounted frame. Use the bar as a straight edge and, with one edge against the mounted frames tapered roller center and the other crossing the dot you drew, draw a line crossing the dot (see "B" above). Set the bar aside.
- Page 95 Additional Installation Instructions B.1 Direct mount 16.Temporarily position the frame (in the 3 o’clock position opposite the mounted frame - see below) where it will be mounted. Ensure that this is a smooth area without any raised spots (seams, etc.). Mark a generous area of 13 mm (1/2-inch) all around the mounting frames with a pencil or chalk.
-
Page 96: Mounting Tracks For Size A And B Sensors
Additional Installation Instructions B.2 Mounting tracks for Size A and B sensors Mounting tracks for Size A and B sensors Using sensor mounting tracks The FSS200 Universal and Hi Precision mounting tracks provide a rigid mounting platform for Series 1011 Universal or Hi Precision size A or B sensors. The mounting tracks service pipe sizes up to a maximum of 140 mm (5.00") outer diameter. - Page 97 Additional Installation Instructions B.2 Mounting tracks for Size A and B sensors 4. Check to ensure that you have a matched set of sensors. They both should have the same serial number but marked with either an "A" or "B" (e.g. 100A and 100B). Note Index pins are used as stops against each sensor inserted at the reference hole for one ⑪...
- Page 98 Additional Installation Instructions B.2 Mounting tracks for Size A and B sensors 8. With a pencil or chalk mark a generous area around the perimeter of the track assembly. Loosen and move the assembly away from marked area. 9. Prepare the area you marked by degreasing the surface, if needed, and removing any grit, corrosion, rust, loose paint or surface irregularities with the abrasive pipe conditioning material provided.
- Page 99 Additional Installation Instructions B.2 Mounting tracks for Size A and B sensors The Direct mount configuration uses a set of two track rail assemblies; one for each sensor, installed 180° apart on the pipe. The set includes: ● Reflect mode track assembly - This track rail includes the tension screw and REF hole to position one sensor.
- Page 100 Additional Installation Instructions B.2 Mounting tracks for Size A and B sensors 1. Use the Wizard setup procedure to program the transmitter for the sensors that were selected. 2. After receiving the spacing number index from the transmitter, make a note of the number displayed.
- Page 101 Additional Installation Instructions B.2 Mounting tracks for Size A and B sensors Positioning track assemblies 1. Wrap a length of the Mylar spacing guide around the pipe and against the end of the track assemblies. Ensure that the spacer guide edges on both sides align. Arrange so that one end overlaps the other by at least 8 cm (3 inches).
- Page 102 Additional Installation Instructions B.2 Mounting tracks for Size A and B sensors 3. Use the edge of the spacer guide as a stop for both tracks to keep them parallel. Adjust tracks as necessary. ① Align tracks with spacer guide edge ②...
- Page 103 Additional Installation Instructions B.2 Mounting tracks for Size A and B sensors Sensor installation 1. Insert an index pin into the REF hole of the track marked "Reflect Mode Spacing." 2. Take one of the sensors and insert it between the track rails and to the left of the index pin with the cable connector pointing away from the pin.
-
Page 104: Magnetic Mounting
The following instructions are for installing the Magnetic mounting frames on 8-inch (DN200) or larger size carbon steel pipes in the Reflect and Direct modes. The mounting frames are compatible with all Siemens SITRANS F clamp-on C, D and E FSS200 Universal and FSS200 Hi Precision sensors. -
Page 105: Preliminary Procedures
Additional Installation Instructions B.3 Magnetic mounting 1. Unpack and disassemble the Magnetic mounting frames. WARNING Impact hazard Magnets may shatter during installation and may cause injury. KEEP FRAMES SEPARATED (until installation) in order to prevent the magnets from colliding with excessive force. This may cause the magnets to shatter. 2. -
Page 106: Reflect Mount
Additional Installation Instructions B.3 Magnetic mounting 8. Prepare the surface of the pipe. De-grease the surface, if necessary, and remove any grit, corrosion, rust, loose paint, etc. Use abrasive material provided to provide a clean contact surface for the sensors. 9. - Page 107 Additional Installation Instructions B.3 Magnetic mounting 3. Determine which sensor type will be installed into the magnetic mounting frame. Note C and D-size FSS200 Universal sensor mounting To mount C or D-size FSS200 Universal sensors the spacer plates must be attached to the side panels of the mounting frames.
- Page 108 Additional Installation Instructions B.3 Magnetic mounting Mounting frame assemblies without a spacer bar The recommended procedure to mount the frame assemblies is by using a spacer bar. If this is not available you can mount the Magnetic frame assemblies using the following method. 1.
- Page 109 Additional Installation Instructions B.3 Magnetic mounting 7. Carefully place the frame assembly on the cleaned pipe location. Ensure that the frame assembly is straight along the pipe axis. 8. Temporary insert a sensor into the frame assembly and push it up to the frame stop. Figure B-16 Finding the second frame location ①...
- Page 110 Additional Installation Instructions B.3 Magnetic mounting 13.Carefully place the second frame assembly on the pipe. Temporarily insert the sensor into the frame and push it up to the frame stop. 14.If feasible, use a non-metallic straight edge (length of wood, plastic ruler) to adjust the two mounting frames so they are aligned with each other and the horizontal axis of the pipe.
-
Page 111: Direct Mount
Additional Installation Instructions B.3 Magnetic mounting Optional clamp-on mounting straps Note IMPORTANT If magnetic mounting frames are to be used in temperatures above 100°C (212°F) clamp-on mounting straps are recommended. The use of clamp-on mounting straps to mount the frames to the pipe is optional. Their use is dependent upon the environment and location of the pipe. -
Page 112: Installing The Sensors
Additional Installation Instructions B.3 Magnetic mounting B.3.5 Installing the sensors Sensor installation 1. Take either sensor and apply a continuous lengthwise 3 mm (1/8-inch) bead of coupling compound across the center of the sensor emitting surface ① ④ F-connector Front face ②... - Page 113 Additional Installation Instructions B.3 Magnetic mounting 3. Align the mounting pins of the clamp plate assembly with the frame and insert into the frame. 4. Select the desired sensor hole and screw in the Clamping Screw. Figure B-23 Clamp plate assembly ①...
-
Page 114: Hi Precision Mount
Additional Installation Instructions B.4 Hi Precision mount Hi Precision mount B.4.1 Pre-assembly procedures The following instructions are for installing Hi Precision mounts on various size pipes in the Reflect and Direct modes. Note It is recommended that two persons be available to perform these installation procedures. Unpacking Note Refer to Figure 2-1 when unpacking unit, if necessary. -
Page 115: Pipe Preparation And Flowmeter Setup
Additional Installation Instructions B.4 Hi Precision mount B.4.2 Pipe preparation and flowmeter setup Preliminary pipe and flowmeter setup 1. Use the Wizard setup procedure to program the transmitter for the sensors that were selected. 2. Refer to the transmitter to confirm that the appropriate sensors and enclosure settings have been selected for operation on the chosen pipe. -
Page 116: Reflect Mount
Additional Installation Instructions B.4 Hi Precision mount B.4.3 Reflect mount B.4.3.1 Reflect mount installation Overview ① ⑩ Strap retainer Clamp plate ② ⑪ Sensor D and E name plate ③ ⑫ Cable gland REF sensor spacer bar screw ④ ⑬ Sensor cable Spacer bar ⑤... - Page 117 Additional Installation Instructions B.4 Hi Precision mount Note ⑯ Applying sealant - Refer to in figure above. In environmentally challenging conditions it is an accepted practice to apply a heavy bead of sealant material such as silicone caulking or other environment appropriate material between the enclosure and the pipe surface that leaves an area at the lowest elevation free for drainage.
- Page 118 Additional Installation Instructions B.4 Hi Precision mount 3. Place the enclosure housing on the pipe and mark pipe at each strap location using chalk or a grease pencil. 4. Prepare straps for mounting by cutting to required length. Strap length should be twice the pipe circumference plus 15.24 cm (6 inches).
-
Page 119: Single Enclosure - Reflect Mount
Additional Installation Instructions B.4 Hi Precision mount 8. Repeat for second strap by looping strap around pipe and feeding open end through strap fastener and strap retainer. Pull loose end of strap tight to remove slack. Note Keep strap fastener in the center between the two strap retainers. See figure below. Figure B-28 Typical strap and strap retainer setup 9. - Page 120 Additional Installation Instructions B.4 Hi Precision mount holes. Be aware of the flow direction and the upstream side (reference) and downstream side (adjustable). Figure B-29 Stand off adjustment Note When more than one path is installed, position the enclosure housing so the Reference sensor (REF) of each path is on the same end of the pipe.
- Page 121 Additional Installation Instructions B.4 Hi Precision mount 7. Fully tighten and torque all stand off strap retainer nuts to approximately 2.25 - 2.8 newton/meters (20-25 in/lbs). Lock stand offs in place with second nut. Figure B-30 Installed Hi Precision mount single enclosure housing 8.
-
Page 122: Dual Enclosure - Reflect Mount
Additional Installation Instructions B.4 Hi Precision mount B.4.3.3 Dual enclosure - Reflect mount Installation procedure 1. Install strap retainers and straps on pipe as shown. Note Where possible adjust the strap retainers in the 10 and 2 o'clock positions. See figure below. -
Page 123: Sensors - Single Enclosure
Additional Installation Instructions B.4 Hi Precision mount 10.Attach spacer bar by inserting reference sensor pin into the REF hole. Insert Index Number pin into appropriate Index Number hole. Note There are two threaded holes in each enclosure housing, labeled "D" and "E". Use the hole that matches the sensor size. - Page 124 Additional Installation Instructions B.4 Hi Precision mount 1. Thread unterminated sensor cable through enclosure housing grommet and terminate cable end with F-connector and cable gland assembly. For sensor cable selection refer to Technical data (Page 81). For sensor assembly instructions refer to Sensor wiring (Page 48).
- Page 125 Additional Installation Instructions B.4 Hi Precision mount 7. Lower the fixed reference sensor into the enclosure housing with one hand and then, with the other hand, insert the threaded end of the screw pin through the REF slot and into the sensor.
- Page 126 Additional Installation Instructions B.4 Hi Precision mount 10.Tighten clamp plate screw to secure sensor and torque to 1.7 newton/meters (15 in/lbs). Ensure plate screw aligns with detent in top of sensor. Secure with locking nut. Figure B-37 Sensor detent 11.Insert second unterminated sensor cable through other enclosure housing grommet and terminate cable.
-
Page 127: Sensors - Dual Enclosure
Additional Installation Instructions B.4 Hi Precision mount 17.Install enclosure housing cover using a flat blade screwdriver and cover screws. Figure B-39 Installed Hi Precision mount single enclosure 18.Proceed to Sensor wiring (Page 48) to connect sensor cables to the transmitter. 19.Complete the flowmeter make-up process and verify that the sensor installation is complete before continuing to the final step. - Page 128 Additional Installation Instructions B.4 Hi Precision mount ① ⑦ Fixed reference sensor Clamp plate nut ② ⑧ Sensor cable Clamp plate ③ ⑨ Cable gland D and E name plate ④ ⑩ Grommet REF sensor spacer bar screw ⑤ ⑪ Enclosure housing cover Spacer bar ⑥...
- Page 129 Additional Installation Instructions B.4 Hi Precision mount 5. Take either sensor and apply a continuous lengthwise 3 mm (1/8-inch) bead of coupling compound across the center of the sensor emitting surface. Note Within the side walls of the enclosure housing there is a short vertical slot and a long horizontal slot.
- Page 130 Additional Installation Instructions B.4 Hi Precision mount 10.Tighten clamp plate screw to secure sensor and torque screw to 1.7 newton/meters (15 in/lbs). Ensure plate screw aligns with detent in top of sensor. Secure with locking nut. Figure B-42 Sensor detent 11.Thread second unterminated sensor cable through enclosure housing grommet and terminate cable.
-
Page 131: Direct Mount
Additional Installation Instructions B.4 Hi Precision mount B.4.4 Direct mount B.4.4.1 Direct mount installation Direct mode - Dual enclosure ① ③ Strap Stand off strap retainer nuts and washer ② ④ Stand off Enclosure housing ⑤ Spacing index Figure B-44 Hi Precision mount Direct mode Dual enclosure (for index spacing greater than minimum values) FSS200 clamp-on sensors... -
Page 132: Positioning Strap Retainers And Straps
Additional Installation Instructions B.4 Hi Precision mount Figure B-45 Hi Precision mount Direct mode Dual enclosure (for minimum index spacing) B.4.4.2 Positioning strap retainers and straps Installation procedure Straps should be cut to length and installed with strap retainers on the pipe. 1. -
Page 133: Direct Mount Enclosure Housings
Additional Installation Instructions B.4 Hi Precision mount 7. Reinstall the Mylar template on the pipe and tape it together. 8. Align the marks on the template with the horizontal plane of the pipe. Align the strap retainers, on center, with the marks on the Mylar template. Figure B-47 Mylar template 9. -
Page 134: Sensor Installation - Dual Enclosure Direct Mount
Additional Installation Instructions B.4 Hi Precision mount B.4.4.4 Sensor installation - Dual enclosure direct mount Installation Procedure 1. Thread unterminated cable through first enclosure housing grommet and terminate cable end with F connector and cable gland assembly. For sensor cable selection refer to Technical data (Page 81). -
Page 135: Direct-X Mount - Dual Enclosure
Additional Installation Instructions B.4 Hi Precision mount 9. Using the hex key tighten clamp plate screw to secure sensor and torque screw to 1.7 newton/meters (15 in/lbs). Ensure that center plate screw is aligned with the sensor detent. Secure with locking nut. Figure B-49 Sensor detent 10.Fully tighten and torque all stand off strap retainer nuts for second enclosure housing to... - Page 136 Additional Installation Instructions B.4 Hi Precision mount 3. Referring to figure below, install straps for UP/DN path and then set the second set of straps for the DN/UP path. Refer to the index spacing to space the second set of straps. ①...
-
Page 137: Index
Index Items supplied, 8 Certificates, 11 Correct usage, (See improper device modifications) Magnetic mount, 102 Customer Support Hotline, 87 Magnetic Mount Reflect Moount, 104 Sensor installation, 110 Maintenance, 78 mounting tracks Document history, 7 Reflect mode, 94 Mounting Tracks Direct Mode, 96 Electrical connection In hazardous area, 46 Safety, 43... - Page 138 Index Technical data FSS200, 81 Temperature Sensors Mounting, Clamp-on, Insert (Thermowell), 56 Test certificates, 11 Using sensor mounting tracks, 94 Wall Mounted Transmitter, 63, 70 Warning symbols, 11 Wiring, (See Electrical connection) FSS200 clamp-on sensors Installation Manual, 08/2017, A5E36255466-AC...
- Page 140 For more information www.siemens.com/flow Siemens AG Subject to change without prior notice Process Industries and Drives Order No.: A5E36255466 Process Automation Lit. No.: A5E36255466-AC 76181 Karlsruhe © Siemens AG 08.2017 GERMANY A5E36255466 www.siemens.com/processautomation...
Need help?
Do you have a question about the SITRANS FSS200 and is the answer not in the manual?
Questions and answers