Table of Contents
Advertisement
Advertisement
Table of Contents

Related Manuals for Zimmer Cryo 6


Summary of Contents for Zimmer Cryo 6
- Page 1 Instructions for Use Cryo 6...
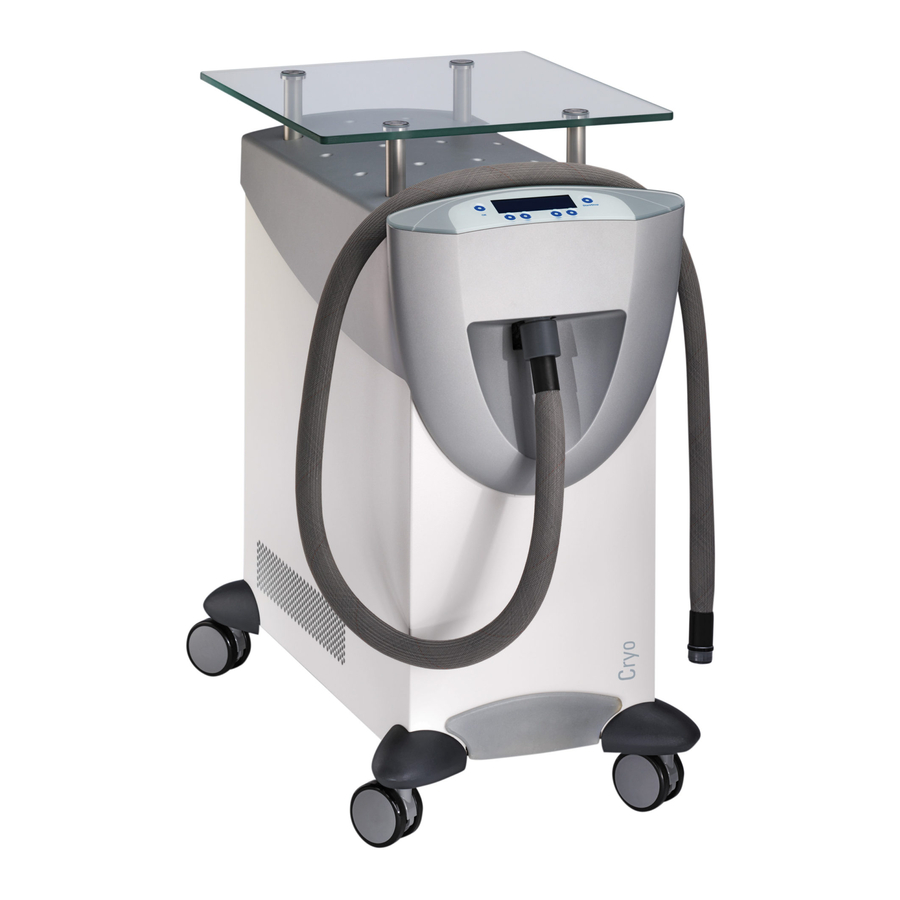
- Page 2 Illustrations Front of the device Fig. 1 Device and 1 Castors operating elements 2 Castor guards 3 Control panel 4 Shelf plate 5 Treatment tube connection 6 Treatment tube 7 Defrost water container 8 Defrost opening...
- Page 3 Illustrations Rear of the device Fig. 2 Device and 9 Air filter operating 10 Mains switch elements 11 Mains connection 12 Identification plate...
- Page 4 Illustrations Screens and display Fig. 3 10:00 Start/ Stop Operating 13 OK key elements display 14 Arrow for navigation / changing parameters 15 Arrow for navigation / changing parameters 16 Arrow for navigation / changing parameters 17 Arrow for navigation / changing parameters 18 Start/stop key Fig.
-
Page 5: Explanation Of Symbols
Explanation of symbols In the instructions for use this symbol indicates “Danger”. In the instructions for use this symbol indicates “Caution” with regard to possible Caution damage of the device. Applied part type B do not push sideways max. permitted load on glass plate 35 kg Max 35kg/ 77.16lb Follow instructions for use. -
Page 6: Table Of Contents
Front of the device Rear of the device Screens / display Explanation of symbols Page Indications / Contraindications 1.1 Indications / Contraindications for Cryo 6 Physio 1.2 Indications / Contraindications for Cryo 6 Derma Side effects Application information 3.1 General 3.2 Cryotherapy Warnings Cryo 6 –... - Page 7 Content Technical information Cleaning / Disinfection CE mark / manufacturer Scope of delivery and accessories Device combinations Safety and maintenance 15.1 Safety 15.2 Maintenance Functional test Safety check / metrological check Error messages / troubleshooting / disposal EMC declaration These instructions for use are an integral part of the device. They must be stored with the device and kept accessible at all times for anyone authorised to operate this device.
-
Page 8: Indications / Contraindications
Indications / Contraindications 1.1 Indications / Contraindications for Cryo 6 Physio Indications Cryo 6 Physio is designed for the following uses: Reduction of pain and stiffness and to support treatment of acute and chronic painful conditions of the musculoskeletal system... -
Page 9: Indications / Contraindications For Cryo 6 Derma
Do not treat the face or trunk if the patient has severe arterial hypertension and severe cardiac insufficiency. The patient should not become excessively cold during treatment. When using Cryo 6 with ablative lasers, make sure that the wound produced is given Note: appropriate antiseptic care after the treatment. -
Page 10: Side Effects
Side effects Side effects Cold-related skin damage such as skin reddening and even mild frostbite and chilblains can occur, especially in sensitive patients. Page 3... -
Page 11: Application Information
Cryo 6 in the vicinity of devices which generate strong electromagnetic fields (X-ray or diathermy equipment, MRI machines). Please keep a safe distance of several meters. Cryo 6 is not suitable for use in areas with an explosive, flammable or combustive Caution atmosphere. -
Page 12: Cryotherapy
3.2 Cryotherapy Patients should be given an explanation of the aims and effects of cold air therapy with Cryo 6 prior to treatment. Tell patients that if they experience any discomfort, such as a sensation of extreme cold during treatment, they must tell the therapist immediately. -
Page 13: Warnings
The cold air stream must not be applied to open wounds. When using Cryo 6 to cool skin, do not increase the output of the laser device beyond the level recommended by the manufacturer. When applying cold to the face it is essential to protect the eyes. -
Page 14: Cryo 6 - In Brief
A compact cold-air device used to treat diseases of the support and musculoskeletal systems. Cryo 6 can also be used to cool the skin of patients undergoing dermatological laser treatment to relieve pain and thermal skin damage. What does Cryo 6 do? It blows very cold air onto the parts of the body to be treated at various speed settings. -
Page 15: Intended Use
- in patients undergoing dermatological laser treatment to prevent thermal skin damage Device types 1. Cryo 6 Physio to treat diseases of the support and musculoskeletal systems. 2. Cryo 6 Derma to cool the skin of patients undergoing dermatological laser treatment to relieve pain and thermal skin damage. -
Page 16: Device Set-Up
Device set-up 7.1 Fitting Cryo 6 must be placed upright and kept in an upright position for at least 30 minutes Caution before being switched on if the device has been transported on its side or had fitting work done on it. - Page 17 Device set-up 7.1 Fitting Glass plate Clamp bearing Silicon disc Spacing bolt Carry out the steps described above in reverse order to dismantle the glass plate. Never lift the device by the glass plate. Note: The treatment nozzle and the nozzle attachments can be kept in the storage box. Page 10...
-
Page 18: Fitting The Supporting Arm
7.2 Fitting the supporting arm Supporting arm The Cryo 6 device can be fitted with a supporting arm as an extra option. This arm allows a particular part of the body to be cooled without the therapist having to hold the tube. - Page 19 Device set-up 7.2 Fitting the supporting arm Fitting instructions The glass plate must be attached to the device so that a supporting arm can be fitted (see 7.1 Fitting) The glass plate contains an opening through which the supporting arm passes. The glass plate can be fitted so that it is symmetrical with the device.
- Page 20 Device set-up 7.2 Fitting the supporting arm Step 3 - attaching the anti-rotation element and pole Place the anti-rotation element on the glass plate spacer as shown in the picture. Anti-rotation element Then pass the supporting arm pole through the guide sleeve and the anti-rotation element from above, and lock it into place in the supporting arm securing element.
- Page 21 Device set-up 7.2 Fitting the supporting arm Step 4 - attaching the supporting arm Screw the supporting arm (a) onto the fitted pole. The recesses must be aligned in order to ensure that the supporting arm can move freely up and down. They must lie along an axis and allow the pole to bend.
-
Page 22: Configuration Menu
Settings 8.1 Device menu The Cryo 6 performs a self-test once it has been switched on. You can switch to the configuration menu during the self-test and subsequent pre- cooling of the device. Selecting the menu Press the “Menu” key to select the menu. -
Page 23: Device Type And Device Configuration
8.2 Device type and device configuration Device type Cryo 6 can be used as “Cryo 6 Physio” or “Cryo 6 Derma”. Use the arrows (14 and 15) to navigate to the pre-set configuration that you want to use. Then press the “Save” key to select it. -
Page 24: Default Settings And Service
Own programs and the favourite program that you have saved will not be lost. Press the “NO” key to retain changed parameters. Service This area is password-protected and is only accessible to people who have been trained by Zimmer MedizinSysteme GmbH. Press the “OK” key to quit the menu. Page 17... -
Page 25: Defrosting
Perform defrosting when the outgoing air stream is less strong than usual. This is often caused by the Cryo 6 being placed in a humid environment such as a bathing area or sauna. We also recommend defrosting the Cryo 6 and emptying the defrost water container if it has not been used for a prolonged period, for instance during holidays. -
Page 26: Own Programs And Favourites
“Programs” is activated as the start-up process (see point. 8.2). Own programs Cryo 6 offers storage options for three own programs in addition to the six factory pre-set programs which cannot be permanently changed. Fan level and time can be allocated individually to a storage location. -
Page 27: Information And Maintenance Programs
Settings 8.6 Information and maintenance programs Info Technical information about various device components is displayed under this menu item. No settings can be applied. Note: Maintenance programs The S01 and S02 maintenance programs simulate long-term operation and logs the correct condition of the device. Any faults are diagnosed and recorded. -
Page 28: Operating Instructions
9.1 Device description Pre-cooling As soon as Cryo 6 is switched on, the device starts to pre-cool to the minimum temperature to be reached. The compressor and condenser fan work together during this phase. At the same time the device performs a self-test. No data can be entered via the display during the self-test or pre-cooling. -
Page 29: Performing Cryotherapy
The factory settings mean that the start-up screen and start-up process are different Note: depending on whether you are using the device with the Cryo 6 Physio or Cryo 6 Derma pre-set parameters. See the next page for illustrations of both start-up screens. -
Page 30: Start-Up Screens
Operation instructions 9.3 Start-up screens Start-up screens The factory settings mean that the start-up screens and start-up process of the Physio and Derma versions are different. Derma start-up screen / direct start 05:30 Start/ Stop Direct start: Fan level and time can be selected directly. Physio start-up screen / programs 10:00 Start/ Stop... -
Page 31: Pre-Set Parameters / Change
Cryo 6 Derma is factory-set for direct start operation. Use the “Device configuration” menu to switch to program operation. Changing the pre-set Cryo 6 offers options to adjust the fan level and treatment time to individual values requirements and to save these changes (see chapter 8.5). -
Page 32: Technical Information
Technical information Mains power 100-120 V / 50 Hz / 60 Hz (9-12 A) 220-240 V / 50 Hz (7 A) 240 V / 60 Hz (7 A) Mains fuse 16 A circuit breaker in mains switch Protection class Applied part Type B Dimensions H 645 mm x W 390 mm x D 680 mm... -
Page 33: Cleaning Disinfection
Cleaning Disinfection - Before starting any maintenance and cleaning measures the device must always be switched off at the main switch and the mains cable must be disconnected. - Make sure that when cleaning and disinfecting the labelling of the device (such as warnings, labels of control devices, identification plate) is not damaged. -
Page 34: Ce Mark / Manufacturer
CE mark / manufacturer The device has a CE mark in accordance with the EC directive on medical devices 93/42/EEC. Manufacturer Zimmer MedizinSysteme GmbH Junkersstraße 9 D-89231 Neu-Ulm Tel. +49 731. 9761-291 Fax +49 731. 9761-299 www.zimmer.de Page 27... -
Page 35: Scope Of Delivery And Accessories
Scope of delivery / accessories Scope of delivery Version Cryo 6 Physio Item no. 95850912 1 treatment tube Physio 65370216 1 adapter for nozzles 65370225 1 nozzle 65370224 1 nozzle 10mm 65370223 1 nozzle 15mm 66850122 1 glass plate with handles... - Page 36 87413230 Blank plug for defrosted water container 65853112 Accessory storage tray 80400756 Plastic castors 75 mm 80401004 Plastic castors 100 mm Version Cryo 6 Physio Item no. 95850912 Treatment tube Physio 65370216 Adapter for nozzles 65370225 Nozzle 65370224 Nozzle 10mm...
-
Page 37: Device Combinations
Device combinations Cryo 6 can be used in combination with various laser devices. Please comply with the laser manufacturer’s instructions for use when doing so. The party combining the devices and thus operating a medical system is independently responsible for combining the devices correctly. -
Page 38: Safety And Maintenance
Safety and maintenance 15.1 Safety Cryo 6 is manufactured according to the DIN EN 60601-1 safety regulations. As the manufacturer, Zimmer MedizinSysteme GmbH can only consider itself to be responsible for the safety and reliability of the device if the device is operated using a proper power outlet with earth contact and the... -
Page 39: Maintenance
The software message must be confirmed by pressing the “OK” key after the air filter has been cleaned. Emptying the defrost When Cryo 6 is switched off after use, or when the defrosting program is started, the water container cooling system heats up and so produces defrost water. -
Page 40: Functional Test
Functional test Functional test After being switched on, Cryo 6 automatically performs a self-test and checks the function of the technical components. If necessary, the user can check the function of the cooling technology as described below: 1. Switch on the device. -
Page 41: Safety Check / Metrological Check
1 of the ordinance. A metrological control (MTK) according to section 11 of the MPBetreibV (Medical device operator ordinance) is also not required for the device Cryo 6. The device is not listed in attachment 2 of the ordinance. -
Page 42: Error Messages Troubleshooting Disposal
Troubleshooting Disposal Mains fuse Cryo 6 is fitted with a bipolar overload protection element integrated into the main is activated switch (10) to protect the device in the event of supply problems. If the fuse trips, the device automatically switches off via the toggle switch (10). The device can only be made ready for use again by switching it on via the toggle switch (10). -
Page 43: Error Messages
Neu-Ulm. For other functional problems, contact your service representative. Main office Zimmer MedizinSysteme GmbH Junkersstraße 9 D-89231 Neu-Ulm Tel. +49 731. 9761- 291 Fax +49 731. 9761- 299 www.zimmer.de... -
Page 44: Emc Declaration
Portable and mobile HF communication devices (such as mobile phones, cell phones) can affect medical electrical devices. Cryo 6 may only be operated with the original power cable indicated in the list of the scope of delivery and accessories. Operation of the device with a different power cable can lead to increased emissions or reduced interference immunity of the device! Guidelines and manufacturer's declaration –... - Page 45 Guidelines and manufacturer's declaration – Electromagnetic immunity The Cryo 6 device is intended to be operated in the electromagnetic environment as indicated below. The customer or user of the Cryo 6 device should ensure that it is used in such an environment.
- Page 46 Guidelines and manufacturer's declaration – Electromagnetic immunity The Cryo 6 device is intended to be operated in the electromagnetic environment as indicated below. The customer or user of the Cryo 6 device should ensure that it is used in such an environment.
- Page 47 If the measured field strength in the location in which the Cryo 6 device is used exceeds the above compliance level, the Cryo 6 device must be observed to verify normal operation. If abnormal performance is observed, additional measures may be necessary, such as re-orienting or relocating the Cryo 6.
-
Page 48: Instructions For Use
Cryo 6 Instructions for Use Zimmer MedizinSysteme GmbH Junkersstrasse 9 D-89231 Neu-Ulm Tel. +49 731. 97 61-291 Fax +49 731. 97 61-299 export@zimmer.de www.zimmer.de...
Need help?
Do you have a question about the Cryo 6 and is the answer not in the manual?
Questions and answers