Table of Contents
Advertisement
Advertisement
Table of Contents

Related Manuals for Zimmer Cryo 6


Summary of Contents for Zimmer Cryo 6
- Page 1 Instructions for Use Cryo 6...
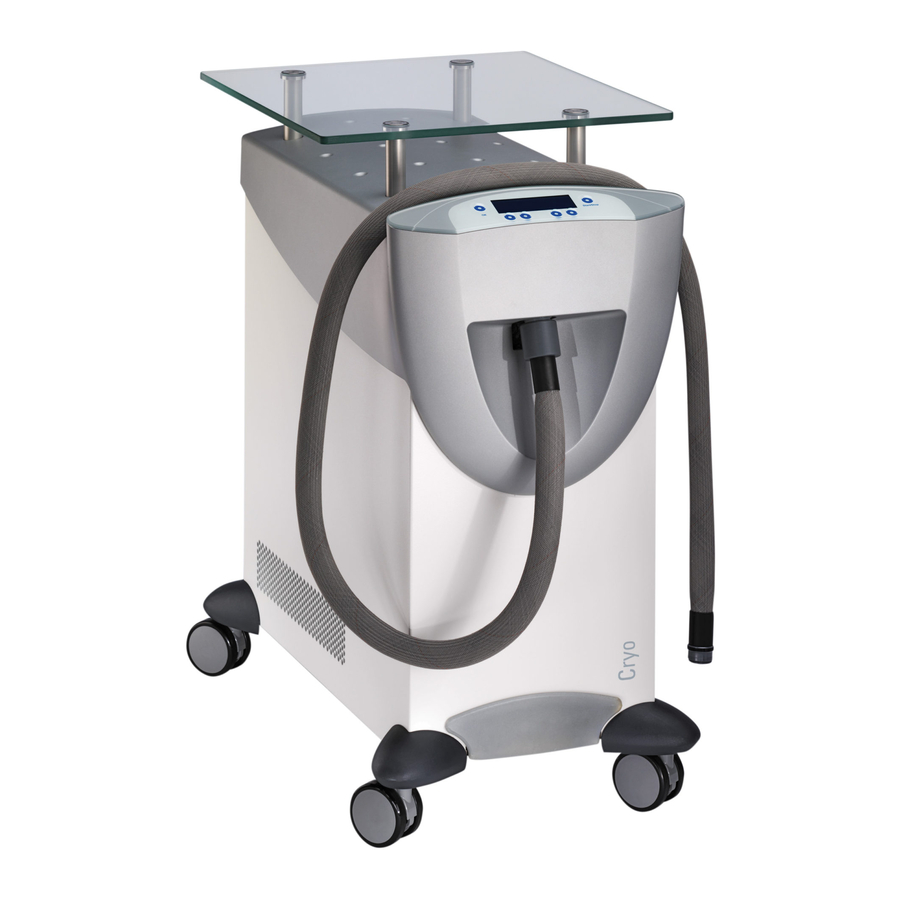
- Page 2 Illustrations Front of the Device Fig. 1 Devices and 1 Castor operating 2 Castor guards elements 3 Control panel 4 Tray 5 Treatment tube connector 6 Treatment tube 7 Container for defrosted water 8 Defrost drain...
- Page 3 Illustrations Rear of the Device Fig. 2 Devices and 9 Air filter operating 10 Mains switch elements 11 Power inlet 12 Identification plate...
- Page 4 Illustrations Screens and Displays Fig. 3 10:00 Start/ Stop Operating 13 OK key element display 14 Arrow key for navigation / changing parameters 15 Arrow key for navigation / changing parameters 16 Arrow key for navigation / changing parameters 17 Arrow key for navigation / changing parameters 18 Start/Stop button Fig.
-
Page 5: Explanation Of Symbols
Explanation of Symbols In the instructions for use this symbol indicates “Danger”. In the instructions for use this symbol indicates „Caution“ with regard to possible Caution damage of the device. Applied part type B Do not push sideways Maximum permissible load on the glass plate 35kg Max 35kg/ 77.16lb Follow instructions for use... -
Page 6: Table Of Contents
Explanation of Symbols Page Indications / Contraindications Application Information 2.1 General 2.2 Cryotherapy Warnings Cryo 6 - in brief Intended Use Device Set Up 6.1 Assembly 6.2 Assembling the Supporting Arm Settings 7.1 Configuration Menu 7.2 Device Type and Device Configuration 7.3 Basic Settings and Service... - Page 7 Contents Cleaning / Disinfection UL - Classification Scope of Delivery and Accessories Device Combinations Safety and Maintenance 14.1 Safety 14.2 Maintenance Functional Test Error Messages / Troubleshooting / Disposal Manufacturer´s EMC declaration Valid for Cryo6 devices. This instructions for use is an integral part of the device. It must be stored with the device and kept accessible at all times for anyone authorized to operate this device.
-
Page 8: Indications / Contraindications
Indications / Contraindications Indications Cryo 6 cold air device is intended to minimize pain and thermal injury during laser and dermatological treatments and for the temporary topical anesthetic relief for injections. Contraindications hypersensitivity to cold areas of impaired sensation ... -
Page 9: Application Information
Prior to treatment, patients should be informed of the goals and effects of cold air therapy with Cryo 6. Clearly advice the patient that the therapist must be immediately informed if discomfort, such as an extreme sense of heat or cold, occurs during the treatment. -
Page 10: Cryotherapy
At a distance of 5cm, the cooling spot covers app. 10cm Hygienic gloves should be worn during the treatment. Before treatment, the purpose and effect of cryotherapy using Cryo 6 should be explained to the patient. Advise the patient to report any adverse reactions during treatment (e.g. extreme cold sensations) immediately to the practitioner. -
Page 11: Warnings
Only accessories provided by Zimmer MedizinSysteme GmbH are to be used. Caution Magnetic and electric fields may affect the operation of the unit. Do not use Cryo 6 close to equipment that generates strong electromagnetic fields (e.g. X-ray or diathermy equipment or nuclear magnetic resonance tomography devices) Dispose of the packaging material properly. - Page 12 Warnings Do not increase laser output power or energy when using Cryo6 for skin cooling. Skin cooling may reduce effectiveness of some laser treatment on identical power output of the laser. To avoid the risk of electric shock; the device must be disconnected from the mains by unplugging the power cord before performing any maintenance or cleaning activities.
-
Page 13: Cryo 6 - In Brief
Cryo 6 - in brief What is the Cryo 6? Cryo 6 is used for skin cooling in conjunction with dermatological laser treatments for alleviating pain and thermal damage to skin tissue. What does the Cryo 6 Cryogenic air is blown onto the area of the body to be treated using an adjustable flow speed. -
Page 14: Intended Use
Intended Use Cryo 6 cold air device is intended to minimize pain and thermal injury during laser and dermatological treatments and for the temporary topical anesthetic relief for injections. Seite 7... -
Page 15: Device Set Up
Device Set Up 6.1 Assembly After horizontal transport or assembly, the Cryo 6 must stand upright for at least 30 Caution minutes prior to being switched on. The compressor might otherwise be damaged. Connect the power Connect the power cord to the socket (11) on the device and connect it to the mains. - Page 16 Device Set Up 6.1 Assembly Glass plate Clamp bearings Silicon washer Spacer bolts To remove the glass plate, reverse these steps. Do not lift the device by the glass plate. Notice: The nozzles for the cold air discharge are attached to the therapy nozzle at the end of the tube.
-
Page 17: Assembling The Supporting Arm
Device Set Up 6.2 Assembling the Supporting Arm Supporting arm The Cryo 6 device can be optionally equipped with a supporting arm. This arm allows a specific area of the body to be cooled without the therapist having to hold the tube. - Page 18 Device Set Up 6.2 Assembling the Supporting Arm Assembly In order to be able to assemble a support arm, the glass plate must be attached to the device (see 7.1 Assembly). The glass plate has an opening through which the support arm is guided.
- Page 19 Device Set Up 6.2 Assembling the Supporting Arm Step 3 – Attach the torsion protection and rod The torsion protection is attached to the glass plate spacers as illustrated. Anti-rotation Then, the supporting arm rod is inserted from above through the insertion duct and torsion protection and locked into the supporting arm bracket.
- Page 20 Device Set Up 6.2 Assembling the Supporting Arm Step 4 – Attach the supporting arm The supporting arm is screwed to the assembled rod (a). To ensure that the supporting arm can move freely up / down, the notches must be adjusted. They must lie on an axis and allow the rod to move in the direction of the bend.
-
Page 21: Settings
Settings 7.1 Device Menu After being switched on, the Cryo 6 first performs a self-test. During the self-test and the subsequent pre-cooling of the device, changes can be made in the configuration menu. To enter the menu, press the "Menu" key on the display during the self-test. -
Page 22: Device Type And Device Configuration
7.2 Device Type and Device Configuration Device type The Cryo 6 can be operated as "Cryo 6 Physio" and "Cryo 6 Derma". Use the arrow keys (14 and 15) to navigate to the desired preset. Select the desired preset using the "Save" key. -
Page 23: Basic Settings And Service
Your own saved programs and the favorite program will not be affected. If you select the "NO" key, the modified parameters will not be changed. Service This area is password protected and is only accessible for trained Zimmer MedizinSysteme personnel. Exit the menu using the "OK" key. -
Page 24: Defrosting
Defrost the device if the discharged air current is weaker than usual. The cause of this is often that the Cryo 6 is located in a humid environment (e.g. in balneotherapy suites, saunas). In addition, defrosting the Cryo 6 and emptying the water container is recommended if the device is not in use for a longer period of time (e.g. -
Page 25: Own Programs And Favorites
Own programs In addition to the 6 factory default programs which cannot be permanently modified, the Cryo 6 offers storage options for 3 of your own therapy programs. The fan level and time can be individually assigned to a storage location. -
Page 26: Info And Maintenance Programs
Settings 7.6 Info and Maintenance Programs Info Under this menu point, the technical information about different device components is displayed. Notice: No settings can be made. Maintenance The maintenance programs S01 and S02 simulate continuous operation and document the proper condition of the device. programs Potential faults are diagnosed and recorded. -
Page 27: Operating Instructions
Operating Instructions 8.1 Device Description Pre-cooling Once Cryo6 is turned on, the device starts to pre-cool to the minimum reachable temperature. During this phase, the compressor and the capacitor fan work together. In parallel, the device performs a self-test. During self-test or pre-cooling, no entries can be made on the display. -
Page 28: Start Screens
Start/ Stop Menü Notice: Depending on the preset settings, Cryo 6 Physio or Cryo 6 Derma, the start screen or start sequence is represented differently as a factory default. Please see the next page for illustrations of the two start screens. -
Page 29: Default Parameters / Modification
Operating Instructions 8.3 Start Screens Start screens As a factory default, the start screens or start sequence are set differently for the Physio and Derma designs. Start screen Derma / direct start 05:30 Start/ Stop Direct start Direct selection option for fan level and time. Start screen Physio / programs 10:00 Start/ Stop... - Page 30 “Basic Settings” function (see chapter 7.3). Adjustments to preset Cryo 6 allows the airflow and treatment time to be adapted to suit specific parameters requirements and for the new values to be saved in the unit’s memory (see chapter 7 and 8).
-
Page 31: Technical Information
Technical Information Power supply 100 - 120 V / 50 Hz / 60 Hz (9 – 11 A) Power Consumption standby: maximum: 9-11A Mains fuse 16 A circuit breaker in power on/of switch Protection class Applied part Type B Dimensions H 645 mm x W 390 mm x D 680 mm Weight 60 kg... -
Page 32: Cleaning Disinfection
Cleaning Disinfection - Before starting any maintenance and cleaning measures the device must always be turn off at the main switch and unplugged. - Make sure that during cleaning and disinfection no liquids penetrate the device. Do not use sprays. - If during cleaning or disinfecting liquid penetrates the device, please put the unit out of service, protect it from getting used again and contact your service representative. -
Page 33: Ul-Classification
UL-Classification The device bears the following UL Mark: CLASSIFIED BY UNDERWRITERS LABORATORIES INC. WITH RESPECT TO ELECTRIC SHOCK, FIRE, MECHANICAL HAZARDS ONLY IN ACCORDANCE WITH UL 60601-1 AND CAN/CSA C22.2 NO. 601.1 1KD1 Seite 26... -
Page 34: Scope Of Delivery And Accessories
Scope of Delivery / Accessories Scope of delivery 1 Neo light treatment tube 1 Instructions for use 1 Container for defrosted water Accessories Container for defrosted water Neo light treatment tube Castor 75 mm For safety reasons, only use original accessories, otherwise, proper functionality cannot be guaranteed. -
Page 35: Device Combinations
Device Combinations The Cryo 6 can be used in combination with several laser devices. Please follow the operating instructions of the laser manufacturer. Anyone who combines devices and thus operates a medical system does so at its own risk. When combining devices please observe the requirements of the standard IEC 60601-1. -
Page 36: Safety And Maintenance
Safety and Maintenance 14.1 Safety The Cryo 6 is manufactured in accordance with the safety regulations of DIN EN / IEC 60601-1. Zimmer MedizinSysteme GmbH, as the manufacturer, can only be considered liable for the safety and reliability of the device if ... -
Page 37: Maintenance
After cleaning the air filter, the notification from the software must be confirmed by pressing the "OK" key. Emptying the container If the Cryo 6 is switched off after use or the defrost program is started, the cooling for defrosted water system heats up and generates condensate. -
Page 38: Functional Test
Functional Test Functional test After switching on the Cryo 6, it performs a self-test and checks the functionality of the technical components. A functional test of the cooling equipment can be performed by the user as described below: 1. Switch the device on. -
Page 39: Error Messages Troubleshooting Disposal
Troubleshooting Disposal Mains fuse To protect the device from supply problems, the Cryo 6 is equipped with a 2-pole triggers overload fuse integrated into the main switch (10). If the fuse is triggered, the device automatically switches off via the toggle switch (10). To restart the device, it must be switched back on using the toggle switch (10). -
Page 40: Error Messages
Distributor 25 Mauchly, Suite 300 Irvine, CA. 92618 800 327 3576 949 727 2154 fax www.zimmerusa.com info@zimmerusa.com Manufacturer Zimmer Medizinsysteme GmbH Junkersstrasse 9 D- 89231 Neu-Ulm Tel.: +49 (0)731 / 9761-291 Fax: +49 (0)731 / 9761-299 www.zimmer.de export@zimmer.de Disposal Please observe the national regulations regarding disposal. Contact your distributor if necessary. -
Page 41: Manufacturer´s Emc Declaration
Portable and mobile HF communications equipment (e.g mobile telephones, cell phones) can impact medical electrical devices. The Cryo 6 may only be operated using the original power cable indicated in the scope of delivery list. Operating the device with another power cable can lead to increased emissions or reduced interference... - Page 42 Manufacturer´s EMC declaration Guidelines and manufacturer declaration - electromagnetic interference resistance The Cryo 6 device is intended for operation in the electromagnetic environment indicated below. The Cryo 6 customer or user should ensure that it is used in such an environment.
- Page 43 Guidelines and manufacturer declaration - electromagnetic interference resistance The Cryo 6 device is intended for operation in the electromagnetic environment indicated below. The Cryo 6 customer or user should ensure that it is used in such an environment.
- Page 44 If the measured field strength at the location in which the Cryo 6 device will be used exceeds the compliance level, the Cryo 6 device should be observed to verify proper functionality. If unusual performance characteristics are observed, additional measures may be required, e.g.
-
Page 45: Instructions For Use
Cryo 6 Instructions for Use Zimmer MedizinSystems 25 Mauchly, Suite 300 Irvine, CA. 92618 800 327 3576 949 727 2154 fax www.zimmerusa.com info@zimmerusa.com...
Need help?
Do you have a question about the Cryo 6 and is the answer not in the manual?
Questions and answers