Table of Contents
Advertisement
Advertisement
Table of Contents

Related Manuals for Zimmer CryoMini


Summary of Contents for Zimmer CryoMini
- Page 1 Operating Instructions CryoMini JP (GB)
- Page 2 Device Type B Electrical Shock Protection Level CryoMini This User Manual is to be considered as part of the CryoMini device itself and is therefore always to be kept in close vicinity of the device. Careful observation to instructions found within the User Manual is the supposition for correct usage and handling of the device as well as for patient and operator safety.
-
Page 3: Table Of Contents
Table of Contents Page Schematic Overview CryoMini in Brief Assembly Instructions Operating Instructions Adjustments, Settings and Menus Detailed Menu Options Treatment Settings Maintenance Models, Parameters and Adjustments for Preset Values Indications / Contra-indications Warnings Technical Data Cleaning and Disinfection Treatment and Application Suggestions... -
Page 4: Schematic Overview
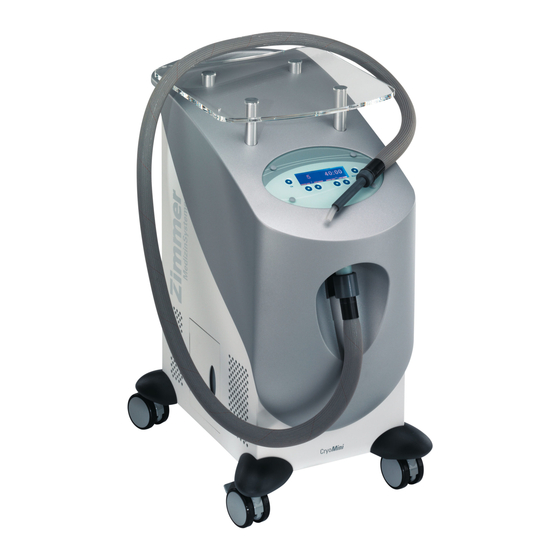
Schematic Overview Front View Figure 1 Legend: Castor Castor guards Control panel Standoff Treatment tube connector... - Page 5 Back and Left Side View Figure 2 Figure 3 Legend: Defrosted Water Container Air Filter Mains Switch Mains Inlet Label...
- Page 6 Control Panel: Controls and Display 18.1 16.1 17.1 Cooling recommended 30:00 -10°C Start/ Stop Figure 4 Function Keys: Increase Treatment Time Decrease Treatment Time Increase Fan Speed Level Decrease Fan Speed Level Start/Stop Fan Symbol 16.1 Fan Speed Time Symbol 17.1 Treatment Time Evaporator Temperature...
-
Page 7: Cryomini In Brief
CryoMini in Brief What is the CryoMini? CryoMini is a compact unit providing cold air to be used for skin cooling in conjunction with dermatological laser treatments to reduce pain and thermal damage to skin tissue. What does the CryoMini do? CryoMini blows cold air at an adjustable rate onto the patient’s body section... - Page 8 Pre-cooling Phase and The Minimal Load The Pre-cooling Phase begins once the CryoMini has been switched on. During this phase, the compressor and the condenser fan work together to reduce the temperature and to store a minimal cold reserve quantity, referred to as the “Minimal Load”.
-
Page 9: Assembly Instructions
Assembly Instructions Step 1: Attach the treatment tube to the air outlet of the CryoMini (5, Figure 1). Treatment tube (6) Figure 5 Step 2: Place a silicon washer on each 4 pre-assembled standoffs. Mounting of the glass plate Place the glass plate onto the standoffs. -
Page 10: Operating Instructions
Operating Instructions Switch on Unit Mains Switch (8, Figure 2), the display illuminates. Operating Status Once the device is switched on, a Pre-cooling Phase is initiated and the current status and Therapy is displayed on a bar graph (i.e. self test, pre-cooling etc.). When the device is ready for operation, the screen changes from the Pre-cooling Mode to the Therapy Mode display. -
Page 11: Adjustments, Settings And Menus
Switch on unit Switch on at mains switch (8, Figure 2). Self-test After device has been switched on, CryoMini performs a routine self-test. Adjustments to During the self-test and the Pre-cooling Phase, the System menu may be accessed System Menu and settings changed. -
Page 12: Detailed Menu Options
Adjustments, Settings and Menus 4.1 Detailed Menu Options Info Displays system technical data. No adjustments can be made in this option. Automatic Service Only for use upon request of a technician. Program S01 Automatic Service Only for use upon request of a technician. Program S02 Device Configuration Use this submenu to change the language used in the displays or to make technical... - Page 13 Adjustments, Settings and Menus 4.1 Detailed Menu Options Setting of temperature warning threshold: Use the setting to adjust the temperature warning threshold between –20 °C to +20°C. The factory-preset value is 4°C. Press Store Key (10, Figure 4) to apply and save the new setting.
- Page 14 4.1 Detailed Menu Options Display-Backlight: The time duration before CryoMini switches into Stand-by mode and the resulting screen saver modus (indicated by a dimming in the display) may be adjusted under this menu. Use the Arrow Keys (12, 13, Figure 4) to select a period between 0 and 300 seconds.
- Page 15 Adjustments, Settings and Menus 4.1 Detailed Menu Options Service This option is password-protected and accessible only by authorized personnel trained by Zimmer MedizinSysteme. To leave this menu option, press OK (14, Figure 4). Please enter passwort: [....] Start/ Stop Figure 18 Back to Treatment This option exits the menu and returns to the treatment display.
-
Page 16: Treatment Settings
05:30 - 10°C Start/ Stop Figure 20 After Pre-cooling Phase, the CryoMini is ready for treatment. Pressing the Start/Stop button starts treatment. Treatment End When the Treatment Time has elapsed, the air supply is cut off and an acoustic signal is emitted. -
Page 17: Maintenance
Maintenance Service Elements: Back Panel (8) Mains switch: The mains power switch is located at the rear of the unit. CryoMini performs an automatic self-test after mains switch is turned on (see Figure 2). (7) Air filter: The unit features an air filter (7, Figure 2) to remove coarse dust particles from the air used for cooling and treatment. -
Page 18: Models, Parameters And Adjustments For Preset Values
Main Settings function (see Adjustments, Settings and Menus, Chapter 4). Adjustments to preset CryoMini allows the Airflow and Treatment time to be adjusted and saved to meet the parameters: specific individual requirements. (see Adjustments, Settings and Menus, Chapter 4). -
Page 19: Indications / Contra-Indications
Indications / Contra-indications The CryoMini is intended to minimize pain and thermal injury during laser and dermatological treatments and for temporary topical anesthetic relief for injections. Indications Skin cooling during laser treatment to minimize pain and thermal skin tissue damage, e.g. -
Page 20: Warnings
CryoMini is intended for operation by or on order of authorized medical professionals only. Should the CryoMini need to be turned onto its side for maintenance or transportation, the device needs to stand upright for at least 30 minutes before it is... -
Page 21: Technical Data
Technical Data Supply voltages: 100V V / 50-60 Hz Connect the unit to the adequate mains voltage and frequency only. Current consumption: standby: maximum: Supply protection in unit: 16A circuit breaker in Mains switch Protection level: Application class: Type B, in accordance with IEC 601-1 MPG class: Storage / Transport: Temperature:... -
Page 22: Cleaning And Disinfection
Cleaning and Disinfection Clean the exterior of CryoMini with a commercially available synthetic cleaner or furniture polish (but not alcohol-based). Alcohol is recommended for the glass plate surface and the treatment tube. To disinfect the unit and its attachments, use commercially available equipment disinfectant in accordance with its manufacturer’s instructions. -
Page 23: Treatment And Application Suggestions
5cm Hygienic gloves should be worn during the treatment. The purpose and effect of cryotherapy using CryoMini should be explained to the patient before treatment. Advise the patient to report any adverse reactions during treatment (e.g. -
Page 24: Parts And Accessories
Parts and Accessories Only authorized parts and accessories should be used. Standard Delivery 1 Light treatment tube, woven version 2 Castors 75 mm 2 Castors 75 mm with brake 4 Castor guards 1 Plexiglas plate 1 Defrosted water container 1 Mains cable Europe 1 Instruction Manual Accessories available... -
Page 25: Safety
Safety CryoMini is manufactured in accordance to VDE 0750 part 1(DIN EN 60601-1) safety regulations. As the manufacturer, Zimmer MedizinSysteme GmbH assumes responsibility for the safety and reliability of the unit only on the following conditions: that the unit is supplied from an electrical socket with safety contact that meets all regulations and the electricity supply conforms to DIN VDE 0100 part 710 ... -
Page 26: Error Messages And Signals
In the event of Error “High temperature cooling circuit”, switch off the device and wait 10 minutes before switching on again. Certified Service Personnel can be reached by contacting the sales representative or by contacting Zimmer MedizinSysteme directly. When the expulsed air or air volume temperature decreases, defrosting is necessary. -
Page 27: Disposal
Disposal The unit must be disposed of through an authorized and accredited company and should under no circumstances be placed in the ordinary or bulk waste. -
Page 28: Emc Manufacturer's Declaration
CryoMini may be operated only with the original parts stated in the list of the scope of supply and accessories. Operation of the device with other parts can lead to increased emissions or reduced interference immunity of the device! Guidance and manufacturer’s declaration –... - Page 29 EMC Manufacturer’s Declaration Guidance and manufacturer’s declaration – Electromagnetic immunity The CryoMini device is intended for use in the electromagnetic environment specified below. The customer or the user of the CryoMini device should assure that it is used in such an environment.
- Page 30 Essential features of the CryoMini are: Troublefree delivery of cold air as well as troublefree operation of all functions. Guidance and manufacturer’s declaration – Electromagnetic immunity The CryoMini device is intended for use in the electromagnetic environment specified below. The customer or the user of the CryoMini device should assure that it is used in such an environment.
- Page 31 The CryoMini device is intended for operation in an electromagnetic environment in which the RF disturbances are controlled. The customer or the user of the CryoMini device can help to avoid electromagnetic disturbances in that it complies with the minimum distance between portable and mobile RF telecommuncation devices (transmitters) and the CryoMini device –...
- Page 32 CryoMini Operating Instructions Zimmer MedizinSysteme GmbH Junkersstrasse 9 D-89231 Neu-Ulm Tel. +49 731. 97 61-291 Fax +49 731. 97 61-299 export@zimmer.de www.zimmer.de...
Need help?
Do you have a question about the CryoMini and is the answer not in the manual?
Questions and answers