
Related Manuals for Sartorius PMA.Vision


Summary of Contents for Sartorius PMA.Vision
- Page 1 Operating Instructions PMA.Vision VIS1X..., VIS1X...EU Class I, Zone 1 and Class I, Division 1 Paint-mixing Scale for Use in Potentially Explosive Atmospheres of 1000028871...
-
Page 3: Table Of Contents
4.2 Sartorius Menu........ - Page 4 17 Sartorius Service........
-
Page 5: About These Instructions
About these Instructions Scope These instructions apply to the device in the following versions: Device Model PMA.Vision − VIS1X... − VIS1X...EU Target Groups These instructions are designed for the following target groups. The target groups must possess the knowledge listed. -
Page 6: Other Symbols
Safety Instructions 1.3.2 Other Symbols Required action: Describes actions which must be carried out. Result: Describes the result of the actions carried out. Text inside brackets refers to control and display elements. This symbol provides information for the sale of scales verified for use in legal metrology. -
Page 7: Explosion Protection
Explosion Protection If the device is used outside the Federal Republic of Germany, the relevant national electrical codes and safety regulations must be observed. Ask your dealer or Sartorius Service Center about the guidelines that apply in their country. Use within the scope of validity of the European ATEX Directive: −... -
Page 8: Flawlessness Of The Device
Keep live parts away from liquids. Moisture can lead to short circuits. Working on the Electrical Equipment Work on and modifications to the electrical equipment of the device may only be carried out by Sartorius Service personnel. The device may only be opened by Sartorius Service personnel. VIS1X... -
Page 9: Accessories, Consumables, And Spare Parts
− Malfunctions of the device − Device failure You should only use accessories, consumables, and spare parts supplied by Sartorius. Information on operational quality is available upon request from Sartorius. Only use accessories, consumables and spare parts that are in technically perfect condition. -
Page 10: Safety Instructions Concerning Installation And Operation Of The Device
(moisture, foreign bodies). − The scale and ex-link converter may only be opened by Sartorius Service with the power disconnected. Do not open the power supply. − Avoid generating static electricity on the glass panel of the operating display and plastic casing. -
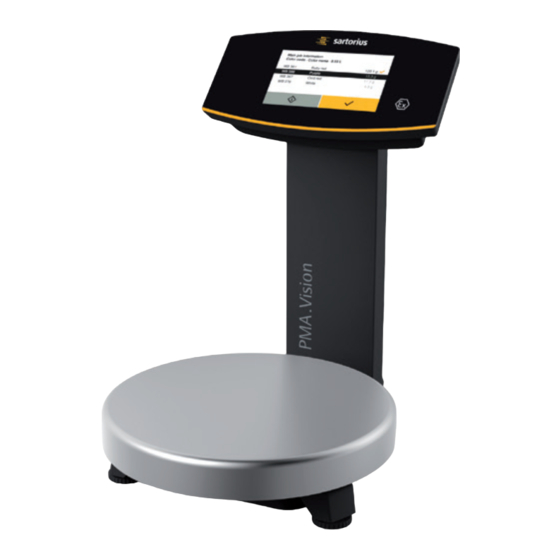
Page 11: Device Description
Device Description Device Description Device Overview Fig. 1: Scale front view Name Operating display (see also Chapter 4.1, page 14) Support column Weighing pan VIS1X Operating Instructions... - Page 12 Device Description Fig. 2: View of scale/ex link converter Name RJ-45 socket for link cable Cable holders Support column Link cable (blue) Ex-link converter Anti-theft locking device Grounding terminal for equipotential bonding Leveling feet (verified models only) Leveling (verified models only) Menu access switch VIS1X Operating Instructions...
-
Page 13: Symbols On The Device
Seal on Scales Verified for Use in Legal Metrology: Legislation requires that a seal be affixed to verified scales. On Sartorius devices, this seal takes the form of a sticker with the “Sartorius” logo. If the seal is removed, the validity of verification will become void and you must have your scale re-verified. -
Page 14: Operating Concept
Operating Concept Operating Concept Operating and Display Elements in the Operating Display NOTICE Sharp or pointed instruments (such as ballpoint pens) can damage the device! The operating display should only be operated by lightly pressing it using the tips of your fingers. -
Page 15: Sartorius Menu
Operating Concept Sartorius Menu Main job information 2nd job information Mixing w/o job Fig. 2: Sartorius Menu Symbol Name Description Access a formula/access the formula list Mixing without formula (weighing function) Connection Displays the connection status: status Error Ethernet cable not connected! -
Page 16: Scrolling In The Display
Operating Concept Symbol Name Description Setup Pressing calls up the setup menu. System settings can be changed there. Sort Pressing calls up the sorting function (sorting of available formulas). On/off − Pressing for longer than 3 seconds switches the scale off (standby). −... -
Page 17: Entering Text And Characters
Operating Concept Entering Text and Characters A keyboard will appear when you have to enter text and characters. Select the individual characters one after the other. The entered text appears at the top of the display. If you hold down a character for longer, the special versions of that character (umlauts, accent marks) and special characters appear. -
Page 18: Menu Structure
Formulas are not deleted following the mixing process (connection status hidden). Formulas are deleted following the mixing process. Mixing without job Display [Mixing without job] in the Sartorius menu. Hide [Mixing without job] in the Sartorius menu. Recalculation method Selection of the recalculation method when mixing without job. - Page 19 Setting access protection for the menu. Set user password Setting user password. Reset settings Resets all system settings to default settings. Activate upload mode Activate the upload mode. Activate service mode Activate the service mode (for Sartorius Service only). VIS1X Operating Instructions...
-
Page 20: Installation
Installation Installation Scope of Delivery Item Quantity Large weighing pan: d 233 mm USB cable, 3 m Power supply YPS07-USB Ex-link converter Link cable from converter to scale Installation Instructions Unpacking the Device Procedure Open the packaging, making sure to remove all parts carefully. After unpacking the device, check it immediately for any external damage. -
Page 21: Installing The Scale
Installation Installing the Scale NOTICE The scale must be disconnected from the power supply for all assembly work. Procedure Place the weighing pan onto the scale from above. Connecting the Scale Procedure Insert the link cable plug into the socket on the back of the display. Lay the link cable through the cable holders on the back of the scale. - Page 22 If deviations are evident during startup due to transport damage (e.g. no display, no backlighting), disconnect the scale from the power supply and contact the Sartorius Service Center.
-
Page 23: Establishing The Power Supply
If the stated supply voltage or the plug design of the power supply does not comply with your country’s standard then please inform your nearest Sartorius representative. Power supply assembly is described in the following. - Page 24 Installation Installing Power Supply WARNING Lethal electric shock and equipment damage due to incorrect power plug adapter! Only use the country-specific power plug adapter. Never plug the power plug adapter into the socket when it is disconnected from the power supply. Use the right mains adapter for your mains power supply: Mains adapter set YAK01 Region/Country...
-
Page 25: Anti-Theft Locking Device
Installation Removing/Replacing the Mains Adapter Unlock (1) and then remove (2) the mains adapter. Connection to Power Supply Insert a USB cable (2) into the ex-link converter. Insert the USB cable into the YPS07-USB power supply. Plug the power supply into a wall outlet (supply voltage). Anti-theft Locking Device If required, secure the scale at the back. -
Page 26: Leveling
(mixing without job, Max. 7500 g d=0.1 g see Chapter “6.4 Mixing without Job”, page 28). Otherwise, the Sartorius menu appears. The default language for the display text is English. To change the language, see Chapter “7.2 Setting the Language”, page 34. -
Page 27: Operation
The Sartorius menu is displayed. Main job information 2nd job information Mixing w/o job In the Sartorius menu, hold down the [On/Off] button for 3 seconds. The device goes into standby mode. Switching on the device Press the [On/Off] button in the operating display. -
Page 28: Zeroing/Taring The Scale
Max. 7500 g d=0.1 g Factor START 1.00 Mixing without Job Select the [Mixing w/o job] button in the Sartorius menu (1). Main job information The [Weighing] application appears. 2nd job information Mixing w/o job Remove the load from the scale. -
Page 29: Setting A Conversion Factor
(e.g., 250 ml of a 1 l formula). The conversion factor can be set between 0.1 and 6.0. Select the [Mixing w/o job] button in the Sartorius menu (1). Main job information The [Weighing] application appears. - Page 30 Operation Mixing a Formula with Factor Calculation (example) Suppose you want to weigh 500 ml for a basic formula that has a total volume of 1 l, and you don’t want to have to manually recalculate the individual components of the formula. The basic formula for 1 liter: 200 g 1st component 100 g 2nd component...
-
Page 31: Data Input
0.50 Correction factor: 1.07 Select l to confirm (1). Number of components: Total amount: 300.2 Component 1: 200.2 Component 2: 100.0 Data Input The data input (formulas) is carried out via Webservices (see “PMA.Vision web services” guide). VIS1X Operating Instructions... -
Page 32: System Settings
Formulas will not be deleted following the mixing process (connection status hidden). Formulas are deleted following the mixing process. Mixing without job Display [Mixing without job] in the Sartorius menu. Hide [Mixing without job] in the Sartorius menu. Recalculation method Cumulative... - Page 33 System Settings Parameter Setting values Explanation Ambient conditions Stable Stable environment. Unstable The effects of operation in unfavorable ambient conditions such as drafts or vibration can be filtered out by adapting measuring time for the weighed values. Weighing The display responds very quickly to large load changes. The display responds more slowly to small changes in weight (in the digit range).
-
Page 34: Setting The Language
Select the [Menu Key] at the bottom left of the main screen on the display. The Sartorius menu is displayed. Main job information 2nd job information Mixing w/o job Select the [Setup] button in the Sartorius menu. The [Settings] window appears. Settings Select [Language] or the top entry in the list. Language... -
Page 35: Resetting The Scale
Depending on the country-specific model version, not all weight units listed may be available. Resetting the Scale Select the [Setup] button in the Sartorius menu. The [Settings] window opens. Settings Select [More settings]. Calibration/Adjustment... -
Page 36: Protecting Menu Access With A User Password
Yes, reset Confirm the security prompt [All formulas and results will be deleted. Do you want to proceed?]. Protecting Menu Access with a User Password Select the [Setup] button in the Sartorius menu. Block access The [Settings] window opens. Settings Select [More settings]. - Page 37 To change the password, the old password must first be entered. A new password can then be set. To completely delete the password and allow access without password protection, leave the entry blank. Contact the Sartorius Service Center if you forget the password. VIS1X Operating Instructions...
-
Page 38: Scale Calibration/Adjustment
Depending on the area of use, the function for external adjustment may be blocked in some countries due to national legislation. Please observe the Sartorius notes on legal metrology. Please contact Sartorius Service or the national calibration authorities if you have any questions. - Page 39 Scale Calibration/Adjustment Select A to zero the scale. CAL: External Zero the scale 0.4 g < START Select [START]. CAL: External Start calibration 0.0 g < START Enter the calibration weight (1). Calibration weight Please adjust calibration weight. 5000.0 Select (1) in order to confirm the entry.
-
Page 40: Viewing Calibration Reports
Scale Calibration/Adjustment A report appears on the display. Report The report indicates the deviation identified during calibration. The report also gives Date and time: 2016-06-24 09:16 the result of the adjustment process. Calibration function: External calibration Start calibration: Start: manually Calibration weight: Set 2000.0 g Select... -
Page 41: Accessing The Scale Via The Network
Accessing the Scale via the Network Accessing the Scale via the Network Connecting to a Network with DHCP Usually, the IP address on a network is assigned by a DHCP server (Dynamic Host Configuration Protocol). A prerequisite for this is that DHCP mode is enabled on the scale. -
Page 42: Connecting To A Network With A Fixed Ip Address
Accessing the Scale via the Network Connecting to a Network with a Fixed IP Address The following settings must be made to connect the scale to a network with fixed IP addresses: 9.2.1 Configuring Network on a PC Open the Network and Sharing Center on your Windows PC: Start ->... -
Page 43: Configuring Network On The Scale
Accessing the Scale via the Network Select the entry “Internet Protocol Version 4” (3) from the list. Open the properties (4). Select “Use the following IP address” (5). Enter the IP address of the network connection (6). Confirm your entry with “OK” and close the following window with “OK”. 9.2.2 Configuring Network on the Scale Press the “i”... -
Page 44: Testing The Network Connection
Accessing the Scale via the Network Go into the submenu “DHCP”. Ethernet Device ID (0032602403) DHCP (On) IP (172.16.26.94) Subnet mask (255.255.240.0) Gateway (172.16.16.1) Select “Off”. DHCP Confirm with the l key. The DHCP mode is now turned off. Go into the submenu “IP (xxxxxxx)“. Select “t“... -
Page 45: Ping" Command
Accessing the Scale via the Network The submenu “Device Information” is displayed. Device information Manufacturer: Sartorius Model: VIS1Y_SAMPLE Serial number: 0032602403 Version BAC: 00-56-85.03 CN:14AF Version APC: 01-72-03.00 CN:6587 Revision APC: 265278 Device ID: 0032602403 MAC: 00:40:D5:90:2F:70 172.16.26.94 If the IP address of the scale changes, e.g. after the DHCP server allocates a new address, an info message notifies the user of the change. -
Page 46: Access Via Upnp (Universal Plug And Play)
− Support and activation of the UPnP Protocol in the router. Open the network devices page in the “Explorer”. In addition to other UPnP devices, all of the PMA.Vision scales located on the network are listed under “Other Devices”: Call up the properties of PMA.Vision “PAINT” by clicking with the right mouse button. -
Page 47: Changing The Device Name Of The Scale
Accessing the Scale via the Network Changing the Device Name of the Scale The scale appears on the network with a device name (device ID). The device ID is the serial number by default. Follow these steps to change the device ID: Press the “i”... -
Page 48: Cleaning And Maintenance
10.2 Servicing To ensure the continued accuracy of your scale, we recommend scheduling regular servicing at least once a year. Sartorius Service offers different service contracts with maintenance intervals that are tailored to your needs. A calibration certificate should always be issued as part of every maintenance session. -
Page 49: Faults
Faults 11 Faults Messages appear on the display when certain events occur: − Info messages are displayed for two seconds. The program then returns automatically to its original state. − Error messages are displayed until they are acknowledged with the key. -
Page 50: Storage And Shipping
Data”, page 53). 12.2 Shipping-related Tasks/Returns You can send defective devices or parts back to Sartorius. Returned devices must be clean, decontaminated, and packed in their original packaging. Transport damage as well as measures for subsequent cleaning and disinfection of the device or parts by Sartorius shall be charged to sender. -
Page 51: Disposal
The packaging is made of environmentally friendly materials that can be used as secondary raw materials. 13.2.2 Disposal Requirements The device has been decontaminated. Procedure Dispose of the device. Follow the disposal instructions on our website (www.sartorius.com). Dispose of the packaging in accordance with local government regulations. VIS1X Operating Instructions... -
Page 52: Serial Number Coding
Serial Number Coding 14 Serial Number Coding Sartorius Lab Instruments GmbH & Co. KG 37070 Goettingen, Germany Made in Germany 产品型号: 产品名称:PMA威视 0°C Ta +40°C II 2G Ex ib IIB T4 Gb FM 15ATEX0032X IECEx FME 15.0007X 1725 PCEC CE17.2173X... -
Page 53: Technical Data
15 Technical Data 15.1 General Data Specification Unit Value Scale Supply voltage Only via Sartorius power supply YPS07-USB Input voltage +5.0 Power consumption Further data IP40 in accordance with EN 60529/IEC 60529 Ambient conditions The specifications apply under the following ambient conditions: Environment For indoor use only. -
Page 54: Model-Specific Data
Technical Data 15.2 Model-specific Data Specification Unit Value Weighing capacity 7500 | 999.95 Readability 0.1 | 0.05 Tare range (subtractive) -7500 External adjustment weight/ 1, 2, 5 / accuracy class F2 or better Diameter of weighing pan Net weight 15.3 Verified Models with EC Type Examination Certificate: Model-specific Technical Data Specification Unit Value... -
Page 55: Device Dimensions
Technical Data 15.4 Device Dimensions Fig. 1: Device dimensions PMA.Vision VIS1X (information in mm) VIS1X Operating Instructions... -
Page 56: Accessories
In-use cover for support arm, pack of 10 YDC03PMA-CO10 In-use cover for weighing pan, pack of 10 YDC03PMA-WP10 CAL weight − for PMA.Vision, 5 kg, accuracy class F2 YCW654-AC-00 − for PMA.Vision, 2 kg, accuracy class F2 YCW624-AC-00 − for PMA.Vision, 1 kg, accuracy class F2... -
Page 57: Sartorius Service
Sartorius Service 17 Sartorius Service Sartorius Service is at your disposal for queries regarding the device. For information about the service addresses, services provided or to contact a local representative, please visit the Sartorius website (www.sartorius.com). 18 Conformity & Approvals 18.1 EU Declaration of Conformity... - Page 58 Conformity & Approvals VIS1X Operating Instructions...
-
Page 59: Explosion Protection Approvals
The connecting cable of the display unit must be prevented against damage and stress caused by strain. Only the Sartorius cable type YCC01-0052Mxx (XX = 10 for 10m, 20 for 20m; 30 for 30m) may be used. Maximum cable length: 100ft (30.5m). The data cable connected to the scale (weighing unit) is considered as intrinsically safe circuit. - Page 60 FM15ATEX0032X Equipment or protective system: PMA.Vision VIS1X…-… weighing unit (Type Reference and Name) Name of Applicant: Sartorius Lab Instruments GmbH & Co. KG Address of Applicant: Weender Landstrasse 94 - 108 Goettingen 37075 Germany This equipment or protective system and any acceptable variation thereto is specified in the schedule to this certificate and documents therein referred to.
- Page 61 4 mm 3. The CAT6 cable used between the PMA.Vision and the YCO16-Z Ex-Link Converter shall be obtained from Sartorius. 4. The enclosure of the PMA.Vision is non-conducting and may generate an ignition-capable level of electrostatic charges under certain extreme conditions.
- Page 62 Conformity & Approvals SCHEDULE to EC-Type Examination Certificate No. FM15ATEX0032X Certificate History Details of the supplements to this certificate are described below: Date Description March 2016 Original Issue. THIS CERTIFICATE MAY ONLY BE REPRODUCED IN ITS ENTIRETY AND WITHOUT CHANGE FM Approvals Ltd.
- Page 63 FM15ATEX0034X Equipment or protective system: YCO16-Z Ex-Link Converter (Type Reference and Name) Name of Applicant: Sartorius Lab Instruments GmbH & Co. KG Address of Applicant: Weender Landstrasse 94 - 108 Goettingen 37075 Germany This equipment or protective system and any acceptable variation thereto is specified in the schedule to this certificate and documents therein referred to.
- Page 64 2. The protective ground connectors on the PMA.Vision and the YCO16-Z Ex-Link Converter shall be connected together using a potential equalisation conductor with a cross-sectional area of at least 4 mm 3. The CAT6 cable used between the PMA.Vision and the YCO16-Z Ex-Link Converter shall be obtained from Sartorius.
- Page 65 If your equipment needs to be repaired, use only original spare parts supplied by the manufacturer! Only the Sartorius cable type YCC01-0052Mxx (XX = 10 for 10m, 20 for 20m; 30 for 30m) may be used. Maximum cable length: 100ft (30.5m). The equipment operator is responsible for any non-Sartorius cables used.
- Page 66 4 mm 3. The CAT6 cable used between the PMA.Vision and the YCO16-Z Ex-Link Converter shall be obtained from Sartorius. 4. The enclosure of the PMA.Vision is non-conducting and may generate an ignition-capable level of electrostatic charges under certain extreme conditions.
- Page 67 2. The protective ground connectors on the PMA.Vision VIS1X…-… and the YCO16-Z Ex-Link Converter shall be connected together using a potential equalization conductor with a cross-sectional area of at least 4 mm 3. The CAT6 cable used between the PMA.Vision VIS1X…-… and the YCO16-Z Ex-Link Converter shall be obtained from Sartorius.
- Page 68 Conformity & Approvals This certifies that the equipment described has been found to comply with the following Approval Standards and other documents: FM Class 3600 2011 FM Class 3610 2010 FM Class 3611 2004 FM Class 3810 2005 ANSI/ISA 60079-0 2013 ANSI/ISA 60079-11 2014...
- Page 69 4 mm 3. The CAT6 cable used between the PMA.Vision and the YCO16-Z Ex-Link Converter shall be obtained from Sartorius. 4. The enclosure of the PMA.Vision is non-conducting and may generate an ignition-capable level of electrostatic charges under certain extreme conditions.
- Page 70 2. The protective ground connectors on the PMA.Vision VIS1X…-… and the YCO16-Z Ex-Link Converter shall be connected together using a potential equalization conductor with a cross-sectional area of at least 4 mm 3. The CAT6 cable used between the PMA.Vision VIS1X…-… and the YCO16-Z Ex-Link Converter shall be obtained from Sartorius.
- Page 71 Conformity & Approvals This certifies that the equipment described has been found to comply with the following Approval Standards and other documents: CSA C22.2 No. 0.4 2013 CSA C22.2 No. 157 1992 (R2012) CSA C22.2 No. 213 1987 (R2013) CAN/CSA-C22.2 No. 60079-0 2011 CAN/CSA-C22.2 No.
- Page 72 Conformity & Approvals VIS1X Operating Instructions...
- Page 73 Conformity & Approvals VIS1X Operating Instructions...
- Page 74 Conformity & Approvals VIS1X Operating Instructions...
-
Page 75: Eu Type Examination Certificate (Verified Models)
Conformity & Approvals 18.3 EU Type Examination Certificate (Verified Models) VIS1X Operating Instructions... - Page 76 Conformity & Approvals Schilder und Marken / Plates and Markings / Plaques et marques / Placas y Marcas / Etichette e Sigilli Typ Waage / Type weighing instrument / Type d’instrument de pesage / Tipo del instrumento de pesaje / Tipo di strumento per pesare: PMA-EV, PMA-HD EG Baumusterprüfbescheinigung / EC type-examination certificate / Certificat d’examen UE de type / Certificado de examen UE de tipo / Certificato di esame UE del tipo : UK3066 VIS1X...
- Page 77 Conformity & Approvals Schale / Pan / Plateau de pesée / Plato de pesaje / Piatto di pesata Unterschale / Subpan / Plateau inférieur / Plato inferior / Piatto inferiore Libelle / Bubble level / Nivelle sphérique / Nivel de burbuja / Livella Segmentiertes LCD-Display / Segmented LCD display / Afficheur à...
- Page 78 Sartorius Lab Instruments GmbH & Co. KG Otto-Brenner-Strasse 20 37079 Goettingen, Germany Phone: +49.551.308.0 Fax: +49.551.308.3289 www.sartorius.com The information and figures contained in these instructions correspond to the version date specified below. Sartorius reserves the right to make changes to the technology, features, specifications and design of the equipment without notice.
Need help?
Do you have a question about the PMA.Vision and is the answer not in the manual?
Questions and answers