
Related Manuals for Sartorius PMA 7501-000G


Summary of Contents for Sartorius PMA 7501-000G
- Page 1 Installation Instructions Sartorius PMA.World | PMA.Net Model PMA 7501-000G | PMA 7501-000GL Electronic Paint-mixing Scales 98648-015-03...
-
Page 2: General View Of The Equipment
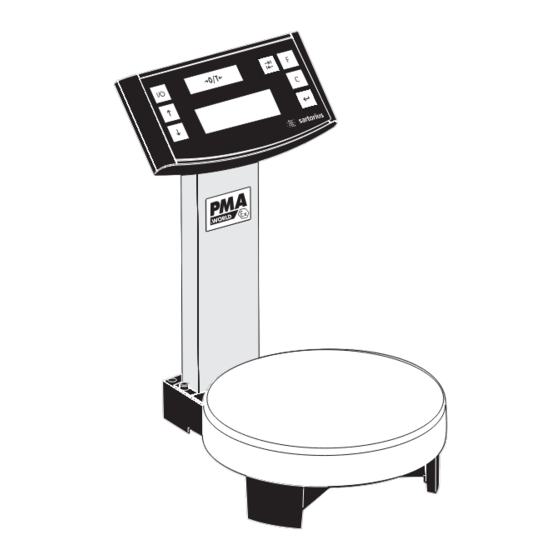
General View of the Equipment PMA7501-000G | PMA7501-000GL (PMA.World | PMA.Net ) 1 Display and control unit 10 Graphic display 2 Q key (On/Standby) 11 Weighing pan 3 R key: Upwards 12 Interfaces (D-Sub plug, 9-contact, 4 S key: Downwards Series PMA.World), Ethernet interface 5 U key: Zero/Tare (RJ45, Series PMA.Net) -
Page 3: Table Of Contents
PMA7501-... electric scales and their respective power supplies, models STNG 6 and TNG 6 (only with the power supply of H03 provided by Sartorius, or a similar type)may be used in areas exposed to the risk of fire, provided that the room is not impacted by larger amounts of accumu- lated dust and fiber, and thus a fire risk. -
Page 4: Warnings And Safety Precautions
PVC materials. Chemicals that corrode specified by Sartorius before connecting these materials must be kept away from the cable to Sartorius equipment, and these cables. disconnect any wires that are assigned – Never use a hammer to close the lid of a differently. -
Page 5: Getting Started
Getting Started § Remove the scale from its packaging. § After unpacking the scale, check it immediately for any visible damage as a result of rough handling during shipment. Equipment Supplied – Scale – Weighing pan – AC adapter or power supply –... - Page 6 If it does not match your local voltage rating or if the plug design differs from your local standard, contact your Sartorius office or dealer. Use only gen- uine Sartorius AC adapters! The use of AC adapters from other manufacturers, even if these units have a registered approval rating from a national testing lab- oratory, requires the approval of a certified technician.
-
Page 7: Operating The Pma7501-000G | -000Gl
Operating the PMA7501-000G | -000GL Turn on the scale using the After the scale has been If a different readout is Q key (2). turned on, it will automati- displayed, zero or tare the scale using the U key (5). cally run a self-test. - Page 8 Weighing with Two Decimal Places Note: To weigh using two decimal places, you must first adapt the settings (refer to the chapter on “Menu Settings) Press the I key (6). The display shows “0.00 g.” Place an empty paint can on the weighing pan (11). Press the U key (Zero/Tare) (5).
-
Page 9: Applications
Applications Formulation Mode (Calculation by a Factor) This mode enables you to weigh in amounts that are smaller or larger than that of your basic formula for a specific paint color (e.g., 250 ml of a 1-l formula). You can select various factors (amounts) by pressing the K formulation key (7): 0.25 0.5 0.75 1.0 1.5 2.0 2.5 3.0 3.5 4.0 4.5 5.0. - Page 10 3. “.25” is displayed next to the weight 4. Slowly pour in the first component, “250 g” of green paint, until the display shows “250 g.” 5. Pour in the second component, “250 g” of red paint, until the display shows “500 g.” 6.
- Page 11 Example (cumulative): Press the U key (5) Place an empty paint can on Pour in the first component. the weighing pan (11). 0.0 g + 50.0 g + 118.0 g Press the L key [MEM] (9). Press the L key [MEM] (9). Pour in the 2nd component.
-
Page 12: Calibration/Adjustment
Calibration/Adjustment You can calibrate/adjust the scale by pressing the U key (5). Calibration weight: 5,000 g; accuracy: + 0.075 g. After connection to AC power and before each calibration/adjustment, allow the scale to warm up for approx. 30 min. Hold down the U key (5) for 2 sec. When 5000 is displayed, release the key. -
Page 13: Menu Settings
Menüpunkt ist eingestellt. (We have come to the end of our example.) § Press the c key (Clear) several times to exit the menu. Note: To obtain a detailed list of the menu codes, please ask your nearest Sartorius office! - Page 14 Important Menu Settings § Hold down the L key [ENTER] for approx. 2 sec. “SETUP” will appear on the display (Level 1). Level 1 SETUP Language Settings Level 1 Level 2 Level 3 Level 4 § R key: select “LANGUAGE” LANGUAGE §...
- Page 15 Assigning the I Toggle Key By pressing the toggle key I (6), the scale toggles between the basic setting (see page 14) and the settings defined under “SETUP- APPLICATION – UNIT” and “SETUP- APPLICATION – DECIMALS” Level 1 Level 2 Level 3 Level 4 §...
- Page 16 Note: Keep the numeric code in a safe place! The scale can only be accessed by entering the correct code! Level 1 Level 2 Level 3 Level 4 § RS keys: select “INPUT” INPUT § Press the L key [ENTER] PASSWORD §...
- Page 17 § Press the L key [ENTER]; “o” will appear: etc. the new code is set § Press the c key (Clear) several times o CODES to exit the menu. Note: To obtain a detailed list of the menu codes, please ask your nearest Sartorius office.
-
Page 18: Troubleshooting
Troubleshooting Guide Problem Cause Solution o segments appear – No AC power available – Check the AC power supply on the weight display Weight display shows – The weighing pan is – Position the weighing pan “Low” is not in place Weight display shows –... -
Page 19: Care And Maintenance
$ Permissible moisture level for storage of Information the packaged scale: 90% max. $ Read and follow the instructions given in In this case, notify your nearest Sartorius Service Center or the International Tech- the section entitled “Safety Inspection.“ nical Support Unit based in Goettingen, Germany. -
Page 20: Information And Instructions On Disposal And Repairs
Disposal and Repairs In Germany and many other countries, In countries that are not members Sartorius AG takes care of the return and of the European Economic Area (EEA) or legally compliant disposal of its electrical where no Sartorius affiliates, subsidiaries, and electronic equipment on its own. -
Page 21: Pin Assignment
Interface Description Data Interfaces (PMA World) Pin Assignment Data output 9-contact interface port Pin 2: (RXD) Receive Data Pin 3: (TXD) Transmit Data Pin 4: (DTR) Data Terminal Ready Pin 5: (GND) Ground Pin 6: BPI bridge Pin 8: (CTS) Clear to Send Format: 7 Bit ASCII, 1 start bit, 1 or 2 stop bits Parity:... -
Page 22: Accessories
Directives: Council Directive 89/336/EEC “Electro- for any connections of cables or equipment magnetic compatibility (EMC)” not supplied by Sartorius. On request, Sar- torius will provide information on the min- Applicable European Standards: Electromagnetic Compatibility imum operating specifications (in accor- 1.1 Source: 89/336/EEC: Official Journal... - Page 24 Sartorius AG Weender Landstrasse 94–108 37075 Goettingen, Germany Phone +49.551.308.0 Fax +49.551.308.3289 www.sartorius.com Copyright by Sartorius AG, Goettingen, Germany. All rights reserved. No part of this publication may be reprinted or translated in any form or by any means without the prior written permission of Sartorius AG.
Need help?
Do you have a question about the PMA 7501-000G and is the answer not in the manual?
Questions and answers