Sartorius PMA.Evolution Operating Instructions Manual
Paint-mixing scale
Hide thumbs
Also See for PMA.Evolution:
- Installation instructions manual (86 pages) ,
- Operating manual (71 pages) ,
- Operating instructions manual (51 pages)

Related Manuals for Sartorius PMA.Evolution


Summary of Contents for Sartorius PMA.Evolution
- Page 1 Operating Instructions PMA.Evolution | PMA.HD EVO1S1 | SPO1S1 Paint-mixing Scale 98648-020-40...
-
Page 3: Table Of Contents
Contents Contents 7 Care and Maintenance 1 About this Document ........ -
Page 4: About This Document
Texts that use this mark describe activities that must be carried out in the specified order Texts that use this mark describe the result of an action 1.3 User Information The illustrations in these instructions are based on the PMA.Evolution (EVO1S1) model. Operating Instructions EVO1S1 | SPO1S1... -
Page 5: Safety
Immediately disconnect the damaged device from the power by pulling the plug. Do not expose the scale, its AC adapter or the accessories supplied by Sartorius to extreme temperatures, aggressive chemical vapors, moisture, shocks, vibrations or strong electromagnetic fields. Observe the conditions of operation described in the Technical Data section. -
Page 6: Intended Use
Safety Warning regarding installation and during operation: Lay the cables where they pose no risk of causing someone to trip. Danger of scale damage! Never close a paint can using a hammer while it is still on the weighing pan. When closing, place the paint can on a firm, stable surface. -
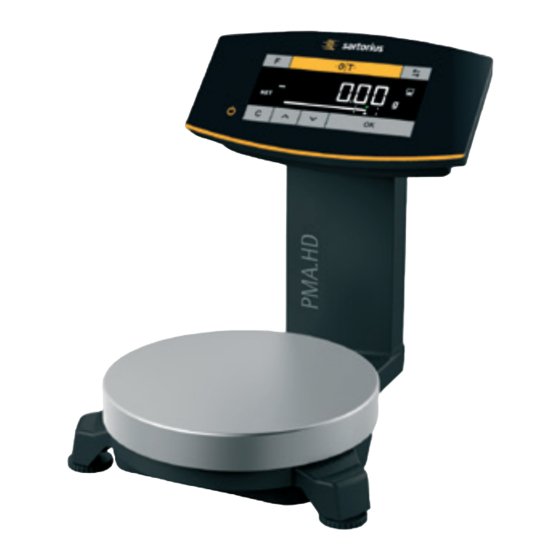
Page 7: Device Overview
Device Overview 3 Device Overview 3.1 Front View Description Operating and display elements (see also Chapter 3.3, page 9) Stand Weighing pan Operating Instructions EVO1S1 | SPO1S1... -
Page 8: Rear View
Device Overview 3.2 Rear View Description USB port Cable holders Stand AC adapter with country-specific mains adapter (optional) Leveling feet (only for PMA.HD model) Leveling (only for PMA.HD model) USB connection cable Anti-theft locking device Operating Instructions EVO1S1 | SPO1S1... -
Page 9: Operating And Display Elements
Device Overview 3.3 Operating and Display Elements Sharp or pointed instruments (such as ballpoint pens) can damage the device! − The touch screen should only be operated by lightly pressing it using the tips of your fingers. Function Factor key for paint-mixing applications Zeroing / Taring &... - Page 10 Device Overview Function Activated function in the menu list (see Chapter 3.4, page 11) Maximum weighing range Minimum load Min (for verified models only) Verification scale intervals (verified models only) Readability of the scale (scale interval d) Weight unit and stability indicator Communication with the PC Activating the “LOCK”...
-
Page 11: Menu List
Device Overview 3.4 Menu List The “o” in the active column indicates the activated function in the respective menu. Level 1 Level 2 Level 3 Active Level 4 Function CODE SETUP | - - - - Scale | - - - AMBIEN. Setup location 1.1.1 |- - - -... - Page 12 Device Overview Level 1 Level 2 Level 3 Active Level 4 Function CODE | - - - REC.MOD. Recalculation 1.3.4 (SETUP) |- - - - Gross weight 1.3.4.1 TOTAL |- - - - Individual 1.3.4.2 INDIV. GEN.SRV. | - - - MEN.RES. Menu reset 1.9.1 |- - - -...
- Page 13 Device Overview Level 1 Level 2 Level 3 Active Level 4 Function CODE DEVICE INTERF. | - - - PROT. Data transfer protocol 2.2.1 |- - - - SBI protocol 2.2.1.1 |- - - - XBPI protocol 2.2.1.2 xBPI | - - - BAUD Baud rate 2.2.2 |- - - -...
- Page 14 Device Overview Level 1 Level 2 Level 3 Active Level 4 Function CODE INPUT | - - - - Password 4.1. PASSWD. | - - - Change / Enter password 4.1.1 NEW PW Information INFO | - - - - Version number (firmware) VER.NO.
-
Page 15: Installation
Save the box and all parts of the packaging for any future transport. All cables should be unplugged when transporting. The following parts are included in the equipment supplied: Model PMA.Evolution PMA.HD Large weighing pan: d 233 mm Small weighing pan: d 180 mm... -
Page 16: Assembling The Scale
Installation 4.3 Assembling the Scale Inserting the Weighing Pan Place the weighing pan onto the scale from above. 4.4 Power Supply The scale is normally powered via the USB connection of your PC, which also supplies data for the scale. If this USB connection is not available, you can use AC adapter YPS06-USB (see Chapter “12 Accessories”, page 33) for the power supply, which comes with different, country-specific mains adapters. -
Page 17: Connecting The Scale
− If the stated supply voltage or the plug design of the AC adapter does not comply with your country’s standard, please inform the nearest Sartorius representative. − The power must be connected in accordance with the regulations applicable in your country. -
Page 18: Anti-Theft Locking Device
Getting Started Laying the USB Cable Lay the USB cable through the cable holders on the back of the scale. Connection to the Power Supply Insert the USB cable into a USB socket of a PC or laptop. Connecting a AC adapter (optional) Insert the USB cable into the YPS06-USB AC adapter. -
Page 19: Operation
Operation 6 Operation 6.1 Switching the Device On / Off Switching On the Device Briefly press the j key (On / Standby). The automatic self-test runs. This ends when the display shows 0.0 g. If another value is displayed: Set the scale to zero via the 0 key. Switching Off the Device Press and hold the j key for several seconds (On / Standby). -
Page 20: Weighing
Operation Cal.Ext. appears on the display and the negative calibration weight. Center the calibration weight on the weighing pan. The calibration is performed. The calibration is complete when CAL.DON appears in the display. Remove the calibration weight from the weighing pan. 6.5 Weighing 6.5.1 Weighing with One Decimal Place Place the empty paint can on the weighing pan. -
Page 21: Applications
Operation Danger of scale damage! Never close a paint can using a hammer while it is still on the weighing pan. When closing the paint can, place it on a firm, stable surface. 6.6 Applications 6.6.1 Calculation by a Factor This function enables you to weigh in amounts that are smaller or larger than that of your basic formula for a specific paint color (e. -
Page 22: Weighing Using The Recalculation Function
Operation 6.6.2 Weighing Using the Recalculation Function Let’s suppose that you poured in too much of one color component for a given formula (in this example, a 4-component recipe). This example further assumes that you previously poured in all of the other amounts exactly according to each of the values you entered and saved them by pressing the MEM key !. -
Page 23: Menu Settings
Operation Add 2.0 g of the second color component until the display shows “0.0 g” or the bar graph stops below the green arrow. “STO 02” appears on the display, the second (corrected) value is saved. STO 02 You are returned to the formulation program automatically. “04”... -
Page 24: Language Setting
Operation 6.7.2.2 Language Setting Level 1 Level 2 Press O, select LANG. LANG. Press ! o German Press O / P, select language English Press !, “o” appears, UK/US French The desired setting is applied. Italian Press § several times to exit the menu etc. -
Page 25: Activating The "Lock" Function
Operation Level 1 Level 2 Level 3 Level 4 Press ! SETUP | - - - APP.PRG. Press O / P, select APP.PRG. | - - - UNIT 2 Press !, press O / P, select UNIT 2 |- - - o Grams Press !, press O / P, select setting (e. -
Page 26: Resetting The Scale: "Reset
Operation Changing Passwords The password is numeric and can have up to 6 digits. Entering 6 spaces deletes the password, which deactivates the password function. This restores the device to its original setting (scale is not password-protected). Accessing the Setup menu (see Chapter 6.7.2.1, page 23). Level 1 Level 2 Level 3 Press O / P, select INPUT, press ! -
Page 27: Care And Maintenance
Electrical hazard from voltage or current! Repair work on the AC adapter (optional) must only be carried out by trained service technicians. Contact Sartorius Service for proper repairs (see Chapter 14.1, page 36). To ensure the continued accuracy of your scale, we recommend scheduling regular servicing at least once a year. -
Page 28: Malfunctions
Malfunctions 8 Malfunctions Problem Cause Remedy No segments appear − No AC power is available − Check power supply on the weight display The weight readout − No weighing pan on − Position the weighing shows “LOW” the scale The weight readout −... -
Page 29: Storage
The crossed-out waste bin symbol indicates that separate collection is required. In Germany and several other countries, Sartorius itself assumes responsibility for the return and conformant disposal of its electronic and electrical products. These products may not be placed with household waste or brought to collection centers run by local public disposal operations –... -
Page 30: Technical Data
Technical Data 11 Technical Data 11.1 General Data Scale Unit Value Power supply only via USB interface or Sartorius AC adapter YPS06-USB Input supply voltage +5.0 Power consumption Other data IP40 in accordance with EN 60529/IEC 60529 Ambient conditions The specifications apply under the following ambient conditions:... -
Page 31: Model-Specific Data
Technical Data 11.2 Model-specific Data Information Unit Value Value Model PMA.Evolution, EVO1S1 PMA.HD, SPO1S1 Weighing capacity 7500 | 999.95 2200 Readability 0.1 | 0.05 0.01 Tare range (subtractive) -7500 -2200 External adjustment weight / 1, 2, 5 / 1, 2 /... -
Page 32: Installation Guides For Windows Xp And Above
Technical Data 11.3.5 Installation Guides for Windows XP and Above ® Changing the Port Number If you use the USB interface with programs that limit the number of COM port designations (e.g., only COM1, 2, 3, 4), you may have to assign one of these port numbers to the new virtual port. -
Page 33: Accessories
YAK03 − India − Korea − China In-use cover for control panel, pack of 10 YDC03PMA10 In-use cover for support arm, PMA.Evolution, pack of 10 YDC03PMA-CO10 In-use cover for weighing pan, PMA.Evolution, pack of 10 YDC03PMA-WP10 Adjustment weight for PMA.Evolution: −... -
Page 34: Conformity & Licenses
Conformity & Licenses 13 Conformity & Licenses 13.1 EC Declaration of Conformity With the attached declaration of conformity [ Page 35], the compliance of the paint-mixing scale, models/series EVO1S1 and SPO1S1, with the directives cited is confirmed. Operating Instructions EVO1S1 | SPO1S1... - Page 35 Conformity & Licenses Operating Instructions EVO1S1 | SPO1S1...
-
Page 36: Appendix
14.1 Service Repairs may be performed by authorized service personnel or by the responsible service representative. Please contact Sartorius Service for all service needs, and in case of guarantee claims. Returning Devices You can send defective devices or parts to Sartorius. -
Page 37: Device Dimensions
Appendix 14.2 Device Dimensions 14.2.1 Model EVO1S1 14.2.2 Model SPO1S1 Operating Instructions EVO1S1 | SPO1S1... - Page 38 Sartorius Lab Instruments GmbH & Co. KG Weender Landstrasse 94–108 37075 Goettingen, Germany Phone: +49.551.308.0 Fax: +49.551.308.3289 www.sartorius.com The information and figures contained in these instructions correspond to the version date specified below. Sartorius reserves the right to make changes to the technology, features, specifications and design of the equipment without notice.
Need help?
Do you have a question about the PMA.Evolution and is the answer not in the manual?
Questions and answers