Table of Contents
Advertisement
Quick Links
Advertisement
Table of Contents
Troubleshooting

Subscribe to Our Youtube Channel
Related Manuals for Dexcom SEVEN


Summary of Contents for Dexcom SEVEN
- Page 1 user’s guide G-2-Co...
- Page 3 User’s Guide...
- Page 4 Nearest Hospital: Other Notes: © 2010 DexCom, Inc. All rights reserved. STS® is a registered trademark of DexCom, Inc. DexCom™ Seven™ and Take Control — Live Uninterrupted™ are trademarks of DexCom, Inc. All other trademarks and copyrights are the property of their respective owners.
-
Page 5: Seven Continuous Glucose Monitoring System
SEVEN CONTINUOUS GLUCOSE MONITORING SYSTEM Seven Receiver ™ Seven Sensor and Applicator ™ Seven Transmitter ™ Blood Glucose Meter Seven System User’s Guide | 1 ™... -
Page 6: Seven Continuous Glucose Monitoring System Kit Contents
SEVEN CONTINUOUS GLUCOSE MONITORING SYSTEM KIT CONTENTS • Seven Transmitter • Seven Receiver • DexCom™ DM2 Accessory Software • Receiver Carry Case/Belt Clip • Receiver Charging Cable • User’s Guide • Package Insert • Quick Start Guide • Transmitter Card •... -
Page 7: Seven System Checklist/Summary
The following checklists summarize the basic information you should remember for your continuous glucose monitoring sessions. You may find it helpful to check off each box during your first Seven System glucose monitoring session. Refer to the Quick Start Guide and this User’s Guide for more detailed information. - Page 8 The Receiver will automatically notify you again in 30 minutes if your glucose readings are still at or below 55mg/dL. • You cannot change the ALARM setting of 55mg/dL. Remove your Sensor when your session ends. 4 | SEVEN CONTINUOUS GLUCOSE MONITORING SYSTEM ™...
- Page 9 Charge the Receiver at least once a month (even when not in use) to prevent the back-up battery from draining. Read this entire guide before using your Seven Continuous Glucose Monitoring System. If you do not understand something or have any questions, please ask your Diabetes Management Team or another health care provider.
-
Page 10: Before You Start
Check that the date and time are correct on your Receiver. • Place the Seven Transmitter next to the Receiver for at least 5 minutes to make sure the two devices are communicating (“talking”) with each other. There will be an Antenna Symbol in the bottom right hand corner of the Trend Screens. -
Page 11: Table Of Contents
TABLE OF CONTENTS SEVEN CONTINUOUS GLUCOSE MONITORING SYSTEM SEVEN CONTINUOUS GLUCOSE MONITORING SYSTEM KIT CONTENTS SEVEN SYSTEM CHECKLIST/SUMMARY BEFORE YOU START INTRODUCTION INDICATIONS FOR USE IMPORTANT SAFETY INFORMATION Section 1 OVERVIEW OF THE SEVEN SYSTEM 1.1 GLOSSARY 1.2 SEVEN SENSOR OVERVIEw 1.3 SEVEN TRANSMITTER OVERVIEw... - Page 12 2.3 SEVEN TRANSMITTER ATTACHMENT 2.4 STARTING A NEw SEVEN CONTINUOUS GLUCOSE MONITORING SESSION 41 2.5 SEVEN SENSOR START-UP PERIOD 2.5.1 Problems During The Start-Up Period Section 3 SEVEN SYSTEM CALIBRATION 3.1 THE SEVEN SYSTEM CALIBRATION PROMPT (THE END OF THE START UP PERIOD) 3.2 AUTO UPLOAD CALIBRATION...
- Page 13 5.1.2 Manual Sensor Shut-Off 5.2 TRANSMITTER REMOVAL Section 6 SEVEN RECEIVER BATTERY 6.1 LOw BATTERY ALERT 6.2 CHARGING THE SEVEN RECEIVER BATTERY Section 7 SEVEN RECEIVER SETTINGS 7.1 GLUCOSE ALERT SETTINGS 7.1.1 High And Low Glucose Alert Levels (mg/dL Units) 7.2 SETTING THE TIME...
- Page 14 Section 9 SEVEN SYSTEM MAINTENANCE AND STORAGE 9.1 MAINTENANCE 9.2 STORAGE 9.3 CLEANING Section 10 TECHNICAL INFORMATION 10.1 DEVICE PERFORMANCE CHARACTERISTICS 10.2 PRODUCT SPECIFICATIONS 10.3 FCC REqUIREMENTS 10 | SEVEN CONTINUOUS GLUCOSE MONITORING SYSTEM ™...
-
Page 15: Introduction
This User’s Guide describes how to use your Seven System from start to finish of a continuous glucose monitoring session. Important safety information, warnings, precautions, cautions, and contraindications of the Seven System are described in the next few pages and throughout this guide. -
Page 16: Indications For Use
SEVEN Continuous Glucose Monitoring System is a glucose-monitoring device indicated for detecting trends and tracking patterns in adults (age 18 and older) with diabetes. e SEVEN System is intended for use by patients at home and in health care facilities. e device is for prescription use only. -
Page 17: Important Safety Information
SEVEN System results. • You should update the SEVEN System’s calibration every 12 hours at a minimum to ensure device performance. e performance of the SEVEN System when calibrated less frequently than the recommendation to calibrate a minimum of every 12 hours has not been studied. - Page 18 Entering incorrect fingerstick readings that occurred more than 5 minutes ago will affect device performance. CAUTION U.S. federal law restricts the sale of the Seven System to sale by or on order of a physician. 14 | SEVEN CONTINUOUS GLUCOSE MONITORING SYSTEM...
-
Page 19: Overview Of The Seven System
SECTION 1 OVERVIEW OF THE SEVEN SYSTEM Seven System User’s Guide | 15 ™... -
Page 20: Glossary
Calibration Required for the Seven System to display continuous glucose data and trend information. Performed by uploading blood glucose readings to the Seven Receiver. (Do not use alternative site testing for calibration.) Glucose Data When the Receiver does not display glucose readings sent Gaps from the Sensor to the Receiver. - Page 21 Sensor Probe underneath your skin. Seven Receiver A cell phone-like device programmed to collect and process data from the Sensor and to display the results as a Seven System reading (mg/dL). Seven Sensor A device inserted underneath the skin to continuously monitor glucose levels.
- Page 22 Status Box The upper right corner of the Receiver Trend Screen. When calibrated, there will be a glucose reading or a symbol telling you why a glucose reading is not available. 18 | SEVEN CONTINUOUS GLUCOSE MONITORING SYSTEM ™...
-
Page 23: Seven Sensor Overview
1.2 SEVEN SENSOR OVERVIEW The Sensor is a device that continuously measures your glucose levels. You will use a Blood Glucose (BG) meter to calibrate the readings measured by the Sensor. The glucose levels measured by the Sensor are sent by a wireless, low-powered, radio frequency (RF) to the Receiver every 5 minutes for up to 7 days. -
Page 24: Seven Transmitter Overview
Technical Support at 1-877-DEXCOM4 (339-2664) to order a new Transmitter so you can continue using your Seven System. • Your Transmitter is used for multiple Seven System monitoring sessions (1-year warranty). • The Receiver and Transmitter are designed and tested to withstand common electromagnetic interference, including airport security systems. -
Page 25: Seven Receiver Overview
To calibrate, you can manually enter BG readings (see Section 3.3) from any FDA cleared meter. You should always use the same glucose meter to calibrate your Seven System that you routinely use to measure your blood glucose. Do not switch your BG meter in the middle of a Sensor session Or you can directly connect your Receiver to the LifeScan OneTouch Ultra meter using the connection cable (Auto Upload, see Section 3.2). - Page 26 Seven Receiver Display Screen UP p Arrow Button Clear Button DOWN q Arrow Button Green Button Connection port to OneTouch Meter, battery charger 22 | SEVEN CONTINUOUS GLUCOSE MONITORING SYSTEM ™...
-
Page 27: Seven Receiver Screen Symbols
1.4.1 SEVEN RECEIVER SCREEN SYMBOLS The following symbols may appear on the Receiver display during use: AntennA: If seen in the bottom right corner of Glucose Trend Screens, the Y indicates that the Receiver and Transmitter are “talking” and glucose data has been... - Page 28 5 minutes. See Section 4.6 for more information. AwAitinG CALiBrAtion FinGerStiCK: Indicates a fingerstick BG reading is needed for calibration or the Receiver is processing a current fingerstick BG reading. See Section 3.4 for Calibration Troubleshooting tips. 24 | SEVEN CONTINUOUS GLUCOSE MONITORING SYSTEM ™...
- Page 29 CoDe: Indicates the Receiver may not be functioning properly. If you see this code, write the code down and use your meter to check your blood glucose readings. Notify DexCom Technical Support at 1-877-DEXCOM4 (339-2664). 6 hour SenSor expirAtion notiFiCAtion: Indicates that your Continuous Glucose Monitoring Session will end in 6 hours.
-
Page 30: Viewing The Seven Receiver Screens
1-hour trend screen if you are in the first series of a settings screen. The chart below shows the Receiver screens you can navigate through to view glucose readings or set your Seven System settings. 1-Hour Glucose... - Page 31 Manual Blood Glucose Upload Screens (See Section 3.3) NOTE: The Sensor Insertion Screens only appear if a Transmitter serial number has been entered and you are currently not in a Seven Continuous Monitoring Session. Sensor Insertion Screens (See Section 2.4) High/Low Alert Settings Screens (See Section 7.1)
- Page 32 Transmitter Serial Number Screens (See Section 7.3) The About Screen (See Section 7.4) Sensor Removal Screens NOTE: The Sensor Removal Screens only appear if you are currently in a Seven Continuous Monitoring Session (See Section 5.1.2) 28 | SEVEN CONTINUOUS GLUCOSE MONITORING SYSTEM...
-
Page 33: The Seven Receiver Display
1.4.3 THE SEVEN RECEIVER DISPLAYS SEVEN SYSTEM “OFF” MODE: • You will see this screen when the Seven System is in “off” mode (is not reading) • This screen will show that a Sensor is not inserted and a session ended more than one hour ago •... -
Page 34: Starting Your Seven Continuous Glucose Monitoring Session
7 days. At the end of the 2-hour Start-Up Period the Seven System will ask for 2 calibration BG readings. These two fingersticks must be taken with a BG meter and uploaded to your Receiver. -
Page 35: Seven Transmitter And Seven Receiver Communication
Serial Number (SN#) is programmed into your Receiver (See Section 7.3). • If the correct SN# has been entered into your Receiver and the two devices are still not communicating contact DexCom™ Technical Support for further assistance 1-877-DEXCOM4 (339-2664). Seven System User’s Guide | 31... - Page 36 When they are near metallic objects • While you are lying on a waterbed • When you are using an electric blanket CONTRAINDICATION The Seven System must be removed prior to Magnetic Resonance Imaging (MRI). 32 | SEVEN CONTINUOUS GLUCOSE MONITORING SYSTEM ™...
-
Page 37: Using A New Seven Sensor
2.2 USING A NEW SEVEN SENSOR The following sections will teach you how to insert your Seven Sensor and start a new continuous glucose monitoring session. Become familiar with the Applicator diagram below prior to insertion. Plunger Safety Lock /... -
Page 38: Removing The Sensor From Its Packaging
2.2.1 REMOVING THE SEVEN SENSOR FROM ITS PACKAGING • Carefully remove your Sensor from its packaging and examine it to make sure it is not damaged. • The Applicator is a single use, disposable unit. The safety lock prevents you from accidentally releasing the needle before you are ready. -
Page 39: Choosing A Insertion Site
2.2.2 CHOOSING A SEVEN SENSOR INSERTION SITE PRECAUTION Avoid injecting insulin or placing an insulin pump infusion set within 3 inches of the Sensor. Choose a site on a fatty area of your abdomen (belly) to place your Sensor. You can choose a site above or below your beltline. -
Page 40: Placing The Sensor
2.2.3 PLACING THE SEVEN SENSOR After you have cleaned the skin site, remove the adhesive backing from the Sensor Pod. Hold the Sensor by the Applicator area, making sure not to touch the sticky adhesive. Place the Sensor on the site you selected, with the widest part of the pod horizontal to the ground. -
Page 41: Sensor Insertion
Transmitter Release with your meter or in a safe place. When your glucose monitoring session is over, follow the steps in Section 5.2 to remove your Transmitter. 2.2.4 SEVEN SENSOR INSERTION After placing the Applicator on your abdomen and removing the Safety Lock, place two fingers under the collar (making sure not to squeeze the applicator) and place your thumb on the plunger. - Page 42 Once you feel the back tabs open, pull off the Applicator so that only the Sensor Pod remains adhered to your body. Press on the Release Tabs Seven Applicator Sensor now inserted Seven Sensor Pod 38 | SEVEN CONTINUOUS GLUCOSE MONITORING SYSTEM ™...
-
Page 43: Seven Transmitter Attachment
2.3 SEVEN TRANSMITTER ATTACHMENT The Transmitter wirelessly sends your Sensor glucose information to your Receiver. Once you have inserted the Sensor, you will need to snap the Transmitter into the Sensor Pod. To do this, you must perform the following steps: Clean and dry the bottom of the Transmitter with a damp cloth or an alcohol wipe before every use. - Page 44 Make sure that you have the correct Transmitter Serial Number (SN#) entered into your Receiver (for all new Receivers, the Manufacturer enters this number). See Section 7.3 for instructions on how to enter the SN# into your Receiver. 40 | SEVEN CONTINUOUS GLUCOSE MONITORING SYSTEM ™...
-
Page 45: Starting A New Seven Continuous Glucose Monitoring Session
2.4 STARTING A NEW SEVEN CONTINUOUS GLUCOSE MONITORING SESSION After you have checked that your Seven System is communicating, you need to tell your Receiver that you have inserted a new Sensor. To indicate that you have inserted a new Sensor and to begin the 2-hour Start-Up Period... - Page 46 You must insert a new Sensor every time you press “ OK” on the Sensor Insertion screen. • Each time you insert a new Sensor and press “ OK” on the Sensor Insertion screen, you will restart the 2-hour Start-Up period. 42 | SEVEN CONTINUOUS GLUCOSE MONITORING SYSTEM ™...
-
Page 47: Seven Sensor Start-Up Period
2.5 SEVEN SENSOR START-UP PERIOD The Sensor requires a two hour Start-Up period to “equilibrate” (adjust) to its new biological environment. The Start-Up period will last 2 hours from the time you have confirmed the Sensor insertion. During the Start-Up period, periodically check to see that the Antenna Symbol (Y) is visible in the bottom right corner of the Trend Screens and that your Receiver battery is charged. -
Page 48: Problems During The Start-Up Period
• If you have dislodged the Sensor or Transmitter you will have to replace your Sensor. • This screen is not the same as “???” in the Status Box (see Section 4.6.2). 44 | SEVEN CONTINUOUS GLUCOSE MONITORING SYSTEM ™... -
Page 49: Seven System Calibration
12 hours has not been studied. You can use any FDA cleared bg meter to calibrate your Seven System. You can transfer fingerstick blood glucose (BG) readings from any FDA cleared meter manually or the OneTouch Ultra meter transfers BG readings through the connection cable. - Page 50 The Seven System requires 2 BG fingerstick readings at the first calibration prompt. The Receiver will prompt you for these readings about 2 hours after you insert a new Sensor (see Section 3.1). After you complete initial calibration you must update Receiver calibration a minimum of once every 12 hours.
-
Page 51: The Seven System Calibration Prompt (The End Of The Start Up Period)
3.1 THE SEVEN SYSTEM CALIBRATION PROMPT (THE END OF THE START-UP PERIOD) Two (2) hours after Seven Sensor insertion confirmation (see Section 2.4) your Seven Receiver will prompt you to calibrate your Sensor by vibrating and displaying the following screen on the Receiver: Double Blood Drop Prompt •... - Page 52 Your blood glucose reading must be between 40 mg/dL and 400 mg/dL to calibrate. The Seven System will not use BG readings outside of this range for calibration. If you have readings outside of this range first treat yourself and then try calibrating the Sensor at a later time.
-
Page 53: Auto Upload Calibration
3.2 AUTO UPLOAD CALIBRATION 3.2.1 ONE TOUCH ULTRA METER – SEVEN RECEIVER REGISTRATION If you choose to use Auto Upload for calibration make sure your meter is “registered” to your Receiver and the Receiver date/time and OneTouch Ultra date/time match. - Page 54 The Seven Receiver and OneTouch Ultra meter date and time must be within 2 minutes of each other. If they are not, the BG fingersticks will not be accepted by the Seven System for calibration. Anytime you change the date/time on your Receiver, connect the meter to the Receiver using the Connection cable (without taking new BG fingerstick readings) to match the date/time on the devices.
-
Page 55: Auto Upload Using The Connection Cable
After a few seconds, “PC” will appear on the OneTouch Ultra meter screen (shown below): The Receiver will display the Connection Screen below. The following screen indicates that BG readings from the meter are successfully being uploaded to your Receiver for calibration. Connection Screen Seven System User’s Guide | 51 ™... - Page 56 Always check that the Receiver and BG meter date and time are the same. • If you use more than 1 OneTouch Ultra meter during Seven System use, any BG fingersticks you take using the “non-registered” meter will not be used for calibration even if you attach this meter with the connection cable.
-
Page 57: Manual Entry Calibration
3.3 MANUAL ENTRY CALIBRATION 3.3.1 ENTERING BG READINGS TO YOUR SEVEN RECEIVER FOR CALIBRATION USING MANUAL ENTRY PRECAUTION For Manual Entry Calibration you must enter the exact fingerstick reading that your blood glucose meter displays. Enter all fingerstick readings for calibration within 5 minutes. - Page 58 During initial calibration the Seven System will default to the BG reading of 120 mg/dL. To enter the BG reading taken from your BG meter, press the Up or Down Arrows until you arrive at the correct BG reading. Press the button to enter the BG reading.
-
Page 59: Calibration Troubleshooting
You will see this screen if you have connected a new/ different meter to your Receiver. Your Receiver will vibrate twice. • You will be asked to register the meter with your Seven System. See Section 3.2.1. • You will have to take 2 additional BG fingersticks and upload them. - Page 60 Double Blood Drop Prompt every 15 minutes for up to 3 hours after the Sensor Start-Up Period. Make sure you have followed the instructions in Section 3 (Seven System Calibration) and the instructions for how to address the Connection Failure Screen and New Meter Screen.
-
Page 61: Section 4
If you are still having problems with communication review Section 4.6.1 also. When you are prompted with the Double Blood Drop Prompt again, review Steps 1 and 2 to calibrate. No Communication Screen Seven System User’s Guide | 57 ™... - Page 62 If the “Awaiting Calibration Fingerstick” Symbol (shown below) is displayed, take 1 more BG fingerstick (reading must be within 40-400 mg/dL) and upload that reading to the Receiver. Awaiting a Fingerstick Screen 58 | SEVEN CONTINUOUS GLUCOSE MONITORING SYSTEM ™...
-
Page 63: Section 4
When you are prompted with the Shaded-Out Blood Drop Screen again, review Steps 1 and 2 to calibrate. No Communication Screen NOTE If you are still having trouble with Seven System calibration (e.g., receiving multiple prompts) following these steps, contact DexCom Technical Support at 1-877- DEXCOM4 (339-2664) for help. Seven System User’s Guide | 59... -
Page 64: Viewing Your Continuous Glucose Information
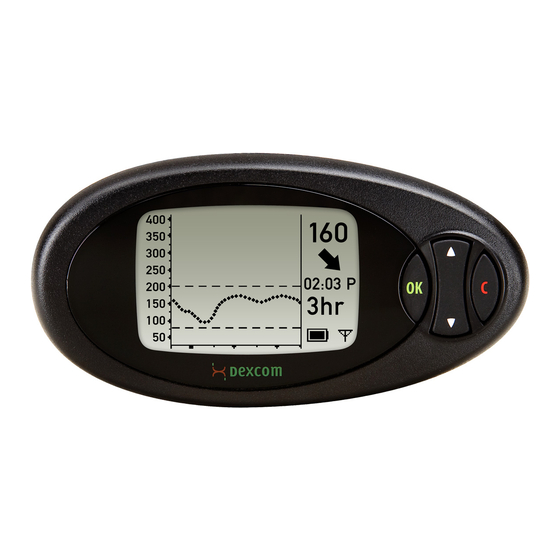
CONTINUOUS GLUCOSE INFORMATION WARNING Update the Seven System’s calibration every 12 hours at a minimum to ensure device performance. The performance of the Seven System when calibrated less frequently than the recommendation to calibrate a minimum of every 12 hours has not been studied. - Page 65 (100 mg/dL) Plot of the most recent glucose reading (100 mg/dL) on the 1-hour Glucose Trend Screen Low Glucose Alert Setting = 80 mg/dL (Default) High Glucose Alert Setting = 200 mg/dL (Default) Seven System User’s Guide | 61 ™...
-
Page 66: Glucose Trend Screens
• Update the Seven System’s calibration every 12 hours at a minimum to ensure device performance. The performance of the Seven System when calibrated less frequently than the recommendation to calibrate a minimum of every 12 hours has not been studied. -
Page 67: Glucose Trend Screen Information
4.1.1 GLUCOSE TREND SCREEN INFORMATION • The Seven System reports glucose readings from 40 to 400 mg/dL and updates glucose readings every 5 minutes. • The Seven System reads “LOW” when <40 mg/dL and “HIGH” when >400 mg/dL Low < 40 mg/dL High >... -
Page 68: High And Low Glucose Alerts
4.2 HIGH AND LOW GLUCOSE ALERTS One of the benefits of the Seven System is your ability to set High and Low Glucose Alerts that tell you when your glucose readings are out of your “target range” (see Section 7.1). This feature can be helpful during periods of time when you may not test your blood glucose (such as sleeping, driving, exercise, or long meetings). - Page 69 • Once you press a Receiver button to acknowledge the Alert, the Receiver will not notify you until your glucose readings rise above or fall below your High and Low Alert settings again. Seven System User’s Guide | 65 ™...
-
Page 70: Low Glucose Alarm (≤55 Mg/Dl)
Seven System results. In addition to your personal glucose alert settings, your Seven Receiver also has an automatic Low Glucose ALARM set at 55 mg/dL. You cannot change or turn off this ALARM. -
Page 71: The Seven System And Water
4.4 THE SEVEN SYSTEM AND WATER The Sensor and the Transmitter snapped into the Sensor Pod are water resistant when showering, bathing, or swimming. The Sensor has been tested to be water resistant when submerged for up to 3 ft for a maximum of 30 minutes. For added protection you can use a shower cover. -
Page 72: Sensor Recalibration/12-Hour Update
4.5 SEVEN SENSOR RECALIBRATION/ 12-HOUR UPDATE WARNING Update the Seven System’s calibration every 12 hours at a minimum to ensure device performance. The performance of the Seven System when calibrated less frequently than the recommendation to calibrate a minimum of every 12 hours has not been studied. - Page 73 The Seven System needs another BG fingerstick reading for calibration because the Sensor readings do not match your blood glucose meter readings. Reasons for “Glucose Data Gaps” and what to do to receive new Seven System readings are described in the next Sections.
-
Page 74: Missing Glucose Readings - No "Y
Box should go away and you will receive a glucose reading in the next 5-10 minutes. • If you are still having trouble receiving Seven System readings because of this problem, contact DexCom Technical Support at 1-877-DEXCOM4 (339-2664). 70 | SEVEN CONTINUOUS GLUCOSE MONITORING SYSTEM ™... -
Page 75: Missing Glucose Readings
The Receiver can tell if there are “Major” or “Minor” issues with your Sensor signal where it cannot calculate a Seven System glucose reading. Minor Sensor issues can be resolved (go away) and the Seven System will be able to give you more glucose readings. -
Page 76: Missing Glucose Readings - " " After Calibration Update/Recalibration
CALIBRATION UPDATE/RECALIBRATION • When you take and upload a BG fingerstick for calibration (Section 4.5), the Seven System checks how well it is functioning compared to the BG meter. The calibration update process takes about 10-15 minutes. During each calibration update attempt, the Seven System may determine that another BG reading is needed. - Page 77 Take another BG fingerstick and enter this information to the Receiver. After you do this your Seven System will take about 10-15 minutes to update calibration. The blood drop symbol will remain in the upper right corner during the 10-15 minute period.
-
Page 78: Seven System Early Shutoff Screens
During use your Receiver may detect a series of “Major” issues with your Sensor signal where it can no longer calculate Seven System glucose readings (see Section 4.6.2). At this time the Seven System will automatically turn off and display the following screen: Failed Sensor Screen If you see this screen then your Seven continuous glucose monitoring session has ended. - Page 79 Receiver and then calibrate at the end of the Start-Up Period (see Section 2). NOTE Remember to save your Transmitter after each Sensor removal. The same Transmitter is used for each Seven session until you have reached the end of the Transmitter battery life. Seven System User’s Guide | 75...
-
Page 80: Ending Your Seven System Continuous Glucose Monitoring Session
SECTION 5 ENDING YOUR SEVEN SYSTEM CONTINUOUS GLUCOSE MONITORING SESSION At the end of your Sensor wear period, you can simply remove your Sensor Pod by gently peeling up the adhesive patch from your skin (this will pull out your Sensor Probe). -
Page 81: Continuous Glucose Monitoring Period End
5.1 CONTINUOUS GLUCOSE MONITORING PERIOD END 5.1.1 AUTOMATIC SEVEN SENSOR EXPIRATION NOTIFICATION Your Receiver will notify you of how much time you have remaining until your Seven System Continuous Glucose Monitoring Session is complete. The Expiration Screen will appear 6 hours and 2 hours before your 7-Day session ends. At the 30-minute and 0-hour Expiration Screens, the Receiver will display the Expiration Screen and will also vibrate and beep over a 15 minute period if not cleared. - Page 82 Once the Final Expiration Screen appears, press any of the Receiver buttons to clear this notification. Glucose readings will no longer be displayed and the Receiver screen will indicate that the Seven System Session has ended by displaying the gray rectangle in the Status Box.
-
Page 83: Manual Sensor Shut-Off
5.1.2 MANUAL SEVEN SENSOR SHUT-OFF To manually end your continuous glucose monitoring period, follow the steps below: Press the Down Arrow 3 times until you see the 9-hour Glucose Trend Screen. Hold the Down Arrow for at least 7 seconds to get to the Receiver Settings screens. - Page 84 The Receiver will default to the 1-Hour Trend Screen. Glucose readings will no longer be displayed and the Receiver screen will indicate that the Seven System Session has ended by displaying the gray rectangle in the Status Box. A grayed out Status Box indicates that your...
-
Page 85: Transmitter Removal
5.2 SEVEN TRANSMITTER REMOVAL After pulling out the Sensor with the Transmitter still in the Sensor Pod, you will need to remove the Transmitter. To do this you can use either of the two methods below: METHOD 1 • The Safety Lock/Transmitter Release (Section 2.2.3) detached from the Applicator can be used as a tool to remove the Transmitter. - Page 86 If you did not save the Transmitter Release, you can simply use your forefinger on each hand and spread out the tabs at the back of the Sensor Pod (end closest to the wings). The Transmitter wings will “pop” out of the Sensor Pod. 82 | SEVEN CONTINUOUS GLUCOSE MONITORING SYSTEM ™...
-
Page 87: Seven Receiver Battery
SECTION 6 SEVEN RECEIVER BATTERY Your Receiver battery is rechargeable like a cellular phone. The battery will last for about 5 days before needing to be recharged. The Receiver will take 3 hours to charge when the battery has completely drained. -
Page 88: Low Battery Alert
Receiver to alert you for 15 minutes (it will vibrate/vibrate-beep-beep/vibrate- beep-beep (Louder)). The Receiver will not alert you anymore if you do not press any Receiver buttons to clear the Low Battery Alert Screen. 84 | SEVEN CONTINUOUS GLUCOSE MONITORING SYSTEM ™... -
Page 89: Charging The Seven Receiver Battery
6.2 CHARGING YOUR SEVEN RECEIVER BATTERY • To charge the Receiver battery, connect the charger cable into the port on the bottom of your Receiver. Make sure the “Push” button side of the charger cable is facing down. • Connect the plug into a standard power outlet. -
Page 90: Seven Receiver Settings
SECTION 7 SEVEN RECEIVER SETTINGS You can reach all of the Receiver Settings Screens by scrolling down to the 9-Hour Glucose Trend Screen and holding the Down Arrow for at least 7 seconds. Please refer to Section 1.4.2 for an overview of all Receiver screens. -
Page 91: Glucose Alert Settings
20 mg/dL (i.e. 220, 240, 260 mg/dL ). • You may select High Glucose Alert levels from 140 mg/dL to 400 mg/dL. Select the level recommended by your Diabetes Management Team by pressing the Button. Seven System User’s Guide | 87 ™... - Page 92 Glucose Alerts at this Alert setting. The Low Glucose Alert line will no longer appear on the Receiver Trend Screens. (For safety, there is a Low Glucose ALARM set at 55 mg/dL that you cannot turn off. See section 4.3). 88 | SEVEN CONTINUOUS GLUCOSE MONITORING SYSTEM ™...
-
Page 93: Receiver Time Screen
Arrow until you arrive at the Time/Date Screen: • Press the Button on the Receiver to set the time. Time / Date Screen NOTE: Make sure to set the correct time on your Seven Receiver. Seven System User’s Guide | 89 ™... -
Page 94: Setting The Time
The Receiver date is preset to Pacific Standard Time (PST) at the factory. • If you are unable to adjust the date/time to the current time zone’s date/time, there may be a problem with the Receiver. Please contact DexCom Technical Support at 1-877-DEXCOM4 (339-2664). 90 | SEVEN CONTINUOUS GLUCOSE MONITORING SYSTEM ™... -
Page 95: Time Loss Alert
If the Receiver’s back-up battery has drained, you will need to re-set the time and date. The Time Setting Screen will be shown on the display. Follow the steps in section 7.2.2 to set the time and date. Seven System User’s Guide | 91 ™... -
Page 96: Entering A New Transmitter Serial Number (Sn#)
7.3 ENTERING A NEW SEVEN TRANSMITTER SERIAL NUMBER (SN#) Any time you use a new Transmitter or new Receiver as part of your Seven System, you must enter the Transmitter Serial Number (SN#) into your Receiver. The Transmitter Serial Number (SN#) is located as a series of 5 numbers and letters on the back of the Transmitter. - Page 97 When you have programmed the new Transmitter Serial Number check the Receiver display in 5 minutes to make sure the Antenna Symbol appears in the lower right corner and the two devices are communicating. Seven System User’s Guide | 93 ™...
-
Page 98: The About Screen
Section 7.3 to enter your Transmitter Serial Number and see the About Screen. You will also see the About Screen when your Receiver “boots up” for the first time or the first use after recharging a completely drained battery. 94 | SEVEN CONTINUOUS GLUCOSE MONITORING SYSTEM ™... -
Page 99: Troubleshooting
SECTION 8 TROUBLESHOOTING Seven System User’s Guide | 95 ™... -
Page 100: Problems Uploading Bg Readings
If the Receiver’s display does not appear, plug the Receiver into the charger to make sure that the battery is charged. • If you still do not see a display, contact DexCom Technical Support at 1-877-DEXCOM4 (339-2664) for additional help. 96 | SEVEN CONTINUOUS GLUCOSE MONITORING SYSTEM ™... -
Page 101: Time Difference Between Bg Meter And Receiver
Connection Cable. • If you notice that there is a time difference between the Receiver and meter often, contact DexCom Technical Support at 1-877-DEXCOM4 (339-2664). There may be a problem with one of the devices. • Never change the time or date on the OneTouch Ultra meter. Always change the date and time on the Receiver and then register the meter with the Receiver. -
Page 102: Error Code
If an error occurs, note the error code number (sometimes an error code will not be available). • Contact DexCom Technical Support at 1-877-DEXCOM4 (339-2664). You may need to replace your Receiver. • Continue to check BG readings using your meter. -
Page 103: System Recovery
If the Receiver discovered an Error but was able to fix itself, the System Recover Screen will be shown on the display. System Recovery Screen • After seeing the System Recovery Screen, you do not need to do anything else to your Receiver. Seven System User’s Guide | 99 ™... -
Page 104: Seven System Maintenance And Storage
SECTION 9 SEVEN SYSTEM MAINTENANCE AND STORAGE 100 | SEVEN CONTINUOUS GLUCOSE MONITORING SYSTEM ™... -
Page 105: Maintenance
SEVEN ACCESSORIES • Insert cables only as directed. Only use cables intended for use with the Seven System. Do not force cables in place. • Remove cables carefully by pressing “Push” buttons (if available) made for easy removal. -
Page 106: Storage
Keep the Receiver clean and protected when not in use. • Receiver Warranty is 1 year. • Storage Temperature should be 32°- 113° F (0°- 45° C). • Store at Humidity levels between 10-85% Relative Humidity. 102 | SEVEN CONTINUOUS GLUCOSE MONITORING SYSTEM ™... -
Page 107: Cleaning
Wipe the Transmitter clean with a wet cloth or Isopropyl alcohol wipe between uses. The Transmitter is water-resistant, but do not soak the Transmitter in liquid. Do not use soap, nail polish remover, or paint thinner. Only use Isopropyl alcohol and water. Seven System User’s Guide | 103 ™... -
Page 108: Technical Information
SECTION 10 TECHNICAL INFORMATION 104 | SEVEN CONTINUOUS GLUCOSE MONITORING SYSTEM ™... -
Page 109: Device Performance Characteristics
Seven System. Performance may be best understood by viewing graphs called time-elapsed plots. In these plots, the readings from the Seven System were recorded over time and were overlaid with readings taken at the same time with a reliable laboratory method. Three representative time-elapsed plots are presented in this section. - Page 110 This, in turn, may result in the appearance that the Seven System agrees with blood glucose levels better than it does under typical conditions. Monitors that measure glucose in interstitial fluid often show better agreement to blood glucose levels when glucose levels are not changing rapidly or when glucose levels are not extremely low or high.
- Page 111 4, or Day 7 of the 7-day wear period. The remainder of the study took place at home. While using the Seven System in the clinic, 69 of the 72 participants had their blood glucose measured every 20 minutes with a reliable laboratory method, the Yellow Springs Instrument 2300 STAT Plus glucose analyzer.
- Page 112 Agreement between the Seven System and blood glucose levels is characterized using paired Seven System and YSI results. The Seven System and YSI readings were compared by pairing the Seven System reading that fell within 2.5 to 7.5 minutes after the YSI reading was collected.
- Page 113 Overall 2,318 * For the 40-60 and 61-80 mg/dL range the difference is presented as the difference in mg/dL between the Seven System and YSI, rather than the percent. The Seven System reports glucose concentrations between 40 and 400 mg/dL. When the Seven System determines the glucose level is below 40 mg/dL, it indicates “LOW.”...
- Page 114 Seven System calibration: Lifescan OneTouch Ultra, Roche Accu-chek Aviva, and Bayer Ascensia Contour. The agreement of the Seven System to blood glucose levels when using the Manual Entry feature for calibration was assessed by calculating the percentage of Seven System readings that were within 20%, 30%, and greater than 40% of the YSI readings on Day 4 of Sensor Wear.
- Page 115 70 mg/dL. If you set the Low Glucose Alert to 90 mg/dL, the Seven System will alert you 85% of the time when your glucose levels are at or below 90 mg/dL. The table also shows that at the same Alert setting (90 mg/dL), the Low Alert will not alert you 15% of the time (“Missed...
-
Page 116: The High Glucose Alert
Estimates of how well the adjustable High Glucose Alert performs are presented in the table below. For example, if you set the High Glucose Alert to 200 mg/dL, the Seven System will alert when your glucose levels rise above 200 mg/dL 79% of the time (True Alert). - Page 117 “distance” between the Seven System and YSI readings, but does not tell you if the Seven System is reading higher or lower than the YSI laboratory standard. The mean percent difference is the average of all of the positive and negative percent differences between the two devices compared and therefore tells you if the Seven System on average reads higher or lower than the YSI at each glucose range.
- Page 118 351-400 -13% Table 5 shows that the Seven System, on average, reads 3-10% higher than the YSI at glucose levels of 40-80 mg/dL and reads 10-13% lower, on average, than the YSI at glucose concentrations of 301-400 mg/dL (Mean Percent Difference). The Seven System reads,...
- Page 119 CLARKE ERROR GRID ANALYSES The Clarke Error Grid was used to determine if Seven System results are “clinically accurate”. The Clarke Error Grid divides a correlation plot into 5 zones, which are described in the table below. table 6. Clarke error Grid Description...
- Page 120 Figure 1. Clarke error Grid, Seven System results Compared to ySi results 116 | SEVEN CONTINUOUS GLUCOSE MONITORING SYSTEM ™...
- Page 121 “clinically accurate”. The Continuous Error Grid looks at how closely the Seven System readings match to the YSI Analyzer and also how closely the Seven System glucose rate of change (how fast the glucose rises or falls) compared to the actual blood glucose rate of change measured by the YSI.
- Page 122 4 hour increments after calibration. Performance was estimated at each 4-hour interval and stratified by glucose concentrations by calculating the percentage of Seven System readings within 20%, 30% and greater than 40% of the YSI readings. See the table below.
- Page 123 9. percentage of Seven System readings within 20%, 30% and >40% of the ySi Laboratory reading with data stratified in 4-hour increments after calibration and by glucose concentration (Day 1, 4, and 7) Time from % of Readings Calibration and...
- Page 124 Seven System readings within 20%, 30% and >40% of the YSI readings at the beginning (Day 1), middle (Day 4) and end (Day 7) of Seven System lifecycle. Results are shown in the table below.
- Page 125 PRECISION OF SEVEN SYSTEM READINGS In the same study, 28 of the subjects wore two Seven Systems. This was done to look at how similar two Seven Systems on the same person function (Sensor Precision). Precision was evaluated by comparing the glucose readings from the two Seven Systems. Results showed that Seven Systems generally agreed with each other within 16%.
- Page 126 “skipped.” Table 12, below, estimates the number of readings you can expect to receive from the Seven System over the entire 7-day period. For example, 69% of Seven System devices provided between 1,537 and 1,992 readings.
- Page 127 YSI readings over time are presented below. The horizontal axis represents time, with the matching Seven System and YSI readings plotted above the point in time when the measurements were taken. The circles ( ) on the graph represent the Seven System data, connected by a line.
- Page 128 Figure 2. example of “Good” Seven System performance YYY YSI Reading ••• Seven Glucose Reading 124 | SEVEN CONTINUOUS GLUCOSE MONITORING SYSTEM ™...
- Page 129 Figure 3. example of “Average” Seven System performance YYY YSI Reading ••• Seven Glucose Reading Seven System User’s Guide | 125 ™...
- Page 130 Figure 4. example of “poor” Seven System performance YYY YSI Reading ••• Seven Glucose Reading 126 | SEVEN CONTINUOUS GLUCOSE MONITORING SYSTEM ™...
- Page 131 ADVERSE EVENTS No adverse events related to use of the device were reported during the seven-day trial. Overall 89% of patients reported no symptoms of irritation and 11% reported at least one symptom at any insertion site. See Table 13 below for the types of irritation looked for and reported on during the trial.
-
Page 132: Product Specifications
Temperature: 2°-25° C (36°-77° F) Shelf Life up to 4 Months IPX 5: water resistance to jetting water Moisture Protection IPX 7: temporary submersion to a depth of 3 feet (1 meter) for 30 minutes 128 | SEVEN CONTINUOUS GLUCOSE MONITORING SYSTEM ™... - Page 133 9.28 ms every 5 minutes Average Number of Collisions due to Coexistence Total of 4 collisions, if collision occurs, no glucose • 20 DexCom™ Transmitters within 15 feet over a 24 reading is received. hr period (288 transmissions each) Seven System User’s Guide | 129...
- Page 134 Hz) Magnetic Field 3 A/m 3 A/m of a typical location in a IEC 61000-4-8 typical commercial of hospital environment Note: U is the a.c. mains voltage prior to application of the test level 130 | SEVEN CONTINUOUS GLUCOSE MONITORING SYSTEM ™...
- Page 135 SEVEN RECEIVER Reading Frequency Every 5 minutes Length: 4.5 inches (11.4 cm) Dimensions width: 2.3 inches (5.8 cm) Thickness: 0.85 inches (2.2 cm) weight 3.5 ounces (100 g) Communication Range 5 ft (1.5 m) Memory Storage 30 days Power Supply...
- Page 136 The Receiver is intended for use in the electromagnetic environment specified below. The customer or the user of the Receiver should assure that it is used in such an environment. IEC 60601 Seven Receiver Compliance Electromagnetic Immunity Test Test Level...
- Page 137 Level Guidance Portable and mobile RF communications equipment should be used no closer to any part of the Seven Receiver, including cables than the recommended separation distance calculated from the equation applicable to the frequency of the transmitter. Recommended Separation Distance 3 Vrms d =1.2 P...
- Page 138 Recommended Separation Distances Between Portable and Mobile RF Communications Equipment and Seven Receiver The Receiver is intended for use in an electromagnetic environment in which radiated RF disturbances are controlled. The customer or the user of the Receiver can help prevent...
- Page 139 BG METER CONNECTION CABLE Length 1.0 FT (30 CM) CHARGING CABLE AC Input 110-240 V, 50-60 Hz Length 6.6 FT (2 M) Seven System User’s Guide | 135 ™...
-
Page 140: Fcc Requirements
© 2007 DexCom, Inc. All rights reserved. This product is covered by U.S. Patents (6,931,327; 7,226,978; 7,276,029). STS® is a registered trademark of DexCom, Inc. DexCom™ Seven™ and Take Control — Live Uninterrupted™ are trademarks of DexCom, Inc. All other trademarks and copyrights are the property of their respective owners. - Page 144 DexCom, Inc. | 6340 Sequence Drive | San Diego, CA 92121 Technical Support Stay between the lines ™ © DexCom 2010. All rights reserved. LBL-010025 Rev 04 MT20094...
Need help?
Do you have a question about the SEVEN and is the answer not in the manual?
Questions and answers