Advertisement
Quick Links
Download this manual
See also:
User Manual
Step 1
Get to Know Your
Your SEVEN PLUS is made up of 3 components: the Re-
ceiver, the Transmitter, and the Sensor Applicator/Sensor.
Note: Your Receiver must be fully charged before you
begin these steps. A full charge can take up to 3 hours;
the Battery indicator will continue to fill until you take
your Receiver off the charger.
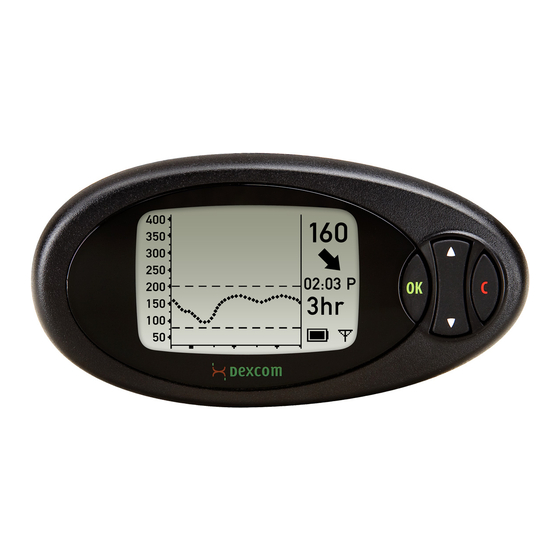
Receiver (press any button to turn on)
Most recent 5-minute
glucose reading
High glucose alert setting
Trend graph
Low glucose alert setting
qp buttons allow you to scroll through, highlight items,
and set values
OK button (confirms entries; allows you to access menu
items)
C (clear) button (clears alarms/alerts; allows you to access
previous screen)
Transmitter (NOT DISPOSABLE!)
Note: Keep your Transmitter within
5 feet of your Receiver for best
communication, even during the
start-up period.
Sensor Applicator (disposable)
Plunger
Safety Lock/
Transmitter Release
Collar
Applicator
(Needle/Sensor
Probe inside)
Transmitter Latch
Sensor Pod
Release Tab
Sensor (disposable)
Note: If you have problems with your
Sensor session, keep your Sensor
until you speak with Technical Support.
Step 2
Set Time/Date and ID
Initially, you'll need to set the time and date. Also, your
Transmitter and Receiver need to be able to talk to each
other—an ID code makes this possible.
To Set Time/Date:
a. Press any button to turn Receiver on.
b. Press OK to enter Main Menu.
c. Scroll (using qp buttons) to highlight Settings. Press OK.
d. Time/Date will be highlighted. Press OK.
e. Use qp buttons to set time/date. Press OK.
To Set ID (Note: ID may already be set):
a. Press OK to enter Main Menu.
b. Scroll to highlight Settings. Press OK.
c. Scroll to highlight Transmitter ID. Press OK.
d. Use qp buttons to set 5-digit ID number (found on flat
side of Transmitter). Press OK.
Step 3
Set High/Low Alerts
Based on the alert levels you set, your Receiver can alert
you when your Sensor readings become too high or too low.
These alerts are not meant to be your target levels, but the
levels at which you want to be alerted so you can treat before
you get too high or too low. You can leave levels at default
settings (high: 200 mg/dL; low: 80 mg/dL) or customize them
based on personal experience or suggestion from your health
care provider.
To Set High/Low Alerts:
a. Press OK to enter Main Menu.
b. Scroll to highlight Alerts. Press OK.
c. High Alert will be highlighted. Press OK.
d. Highlight desired alert type. Press OK.
e. Use qp buttons to set glucose level. Press OK.
f. Snooze feature is defaulted as "none" or "off." Press OK.
Note: See "Beyond the Basics" on back or refer to your
User's Guide to learn about additional alert options,
including "snooze."
g. Repeat above instructions to set Low Alert.
Step 4
Insert the Sensor
Sensor insertion is quick and easy. Before starting this step,
you should have a Sensor Applicator, the Transmitter, and
alcohol wipes at hand.
To Insert the Sensor:
a. Clean the placement site with alcohol. Let dry. (Placement
site: on your belly, out of the way of waistband or areas
where you put pressure while sleeping and at least 3
inches away from insulin pump infusion set if applicable).
b. Remove adhesive tabs from bottom of
Sensor Pod.
c. Place Sensor horizontally, NOT vertically.
Rotate your fingers around adhesive
to secure.
d. Remove Safety Lock/
Transmitter Key by
pulling straight out
(follow arrows in picture).
Save Transmitter Key.
e. Using your thumb and finger, it may help to pinch up on
your skin at base of the Sensor Pod (use non-dominant
hand).
f. With dominant hand,
"CLICK"
place 2 fingers above
collar (see picture). Put
your thumb on plunger and push down completely.
You should hear 2 clicks.
g. Using your thumb as a base, place your
" 2 CLICKS"
2 fingers below the collar and pull up
completely.
h. Make sure the Transmitter Latch is flush
against the skin. While still holding the
Sensor Applicator, use your other hand
to squeeze ribbed tabs on sides of
Sensor Pod. Rock the Sensor Applicator
forward and lift up and away from your body.
To Attach the Transmitter:
a. Clean Transmitter with alcohol wipe. Let dry.
b. Using your thumb and finger, it may help to pinch up on
your skin at the base of the Sensor Pod. Place Transmitter
in Sensor Pod (flat side down, thinner side away from latch).
c. Use a finger to hold Transmitter in
Transmitter Installed
Transmitter Latch
place. With your other hand, move
Transmitter Latch forward until you
hear 2 clicks.
Remove
Transmitter Latch
d. To remove Transmitter Latch, hold
sides of Sensor Pod with one hand and
Transmitter Latch with the other. Twist
off Latch.
Step 5
Start the Sensor Session
Once you've inserted the Sensor, your Receiver needs to
know it's there.
To Start the Sensor Session:
a. Make sure antenna symbol
is visible (lower right
corner of Receiver). Press OK.
b. Scroll down to highlight Start Sensor. Press OK.
c. Starting screen will appear and Receiver will return to
trend graph. The 2-hour start-up period has begun (no
data displayed during start-up); grayed-out Status Box
will gradually disappear.
Step 6
Calibrate
At the end of the 2-hour start-up period, you'll calibrate your
device by taking 2 fingerstick readings with your BG meter
(within 5 minutes or less of each other) and then immediately
entering them into your Receiver. You'll also need to calibrate
daily with 1 fingerstick approximately every 12 hours.
Calibrations can be entered sooner if desired.
To Calibrate:
a. After 2 hours, the Double Blood-Drop screen will appear
on your Receiver. Press C.
b. Wash hands, perform fingerstick, and get reading with BG
meter.
c. Press OK on Receiver.
d. Scroll to highlight Enter BG. Press OK.
e. Scroll to enter BG reading. Press OK.
f. Press OK a second time to confirm.
g. Repeat instructions (starting with step b) to enter second
fingerstick reading. Both readings need to take place
within 5 minutes or less of each other and be entered into
the Receiver immediately.
h. Two calibrations are needed each day (more calibrations
per day are OK, but not necessary). Every 12 hours you'll
be prompted to enter another fingerstick reading; follow
above instructions (steps b-f). Remember, you can cali-
brate sooner than every 12 hours if desired.
Step 7
End the Sensor Session
The Sensor automatically shuts off after 7 days (the Re-
ceiver will alert you before this happens), or you can shut it
off at any time by choosing the Stop Sensor menu option.
To Remove the Sensor Pod and Transmitter:
a. Loosen adhesive and peel Sensor Pod/Transmitter from
body.
b. Place Sensor Pod/Transmitter on hard surface.
Insert jagged edges of Transmitter Key (from Sensor
Applicator) so they "hug" Transmitter wings in Sensor
Pod.
c. Press Transmitter Key down until you cannot press
anymore and then pull up. The Transmitter will pop out of
the Sensor Pod.
Transmitter
Key (from
Applicator)
Sensor Pod
with Transmitter
Key snapped in
Note: If you did not keep the Transmitter Key, you can
use your fingers and spread out the back tabs of the
Sensor Pod. The Transmitter will then pop out.
d. Keep Transmitter.
I
I
DexCom, Inc.
6340 Sequence Drive
San Diego, CA 92121
I
Technical Support: 1-888-SEVENGO (1-888-738-3646)
www.DexCom.com
©2010 DexCom, Inc. All rights reserved. LBL 010681 Rev 02 MT 21099
Advertisement

Subscribe to Our Youtube Channel
Related Manuals for Dexcom SEVEN PLUS


Summary of Contents for Dexcom SEVEN PLUS
- Page 1 Insert the Sensor Once you’ve inserted the Sensor, your Receiver needs to Your SEVEN PLUS is made up of 3 components: the Re- Initially, you’ll need to set the time and date. Also, your Sensor insertion is quick and easy. Before starting this step, know it’s there.
- Page 2 Always wash hands with soap and water before opening the Sensor package. After opening the package, avoid touching the adhesive patterns in adults (age 18 and older) with diabetes. The SEVEN PLUS System is intended for use by patients at home and in health SEVEN PLUS.
Need help?
Do you have a question about the SEVEN PLUS and is the answer not in the manual?
Questions and answers