Table of Contents
Advertisement
Advertisement
Table of Contents
Troubleshooting

Related Manuals for Dexcom SEVEN PLUS


Summary of Contents for Dexcom SEVEN PLUS
- Page 1 USER’S GUI DE...
- Page 4 , SEVEN , Dexcom Data Manager , OpenChoice and Stay Between the Lines ® ® ® ® ™ ® trademarks of Dexcom, Inc. All other trademarks and copyrights are the property of their respective owners. SEVEN PLUS Continuous Glucose Monitoring System...
-
Page 5: System Kit Contents
Make sure to use the correct version of Data Manager with your SEVEN PLUS. The SEVEN Sensor works with the SEVEN family of products. The SEVEN PLUS Transmitter and Receiver are not backwards compatible with the SEVEN Transmitter and Receiver. -
Page 6: Introduction
DexCom would like to thank you for purchasing the SEVEN PLUS Continuous Glucose Monitoring System (SEVEN PLUS)! When you use the SEVEN PLUS, you will see real-time continuous glucose readings every 5 minutes for up to 7 days. These readings will help you detect trends and patterns in your glucose levels. - Page 7 The SEVEN PLUS is made up of three technologies that all work together: the Sensor, the Transmitter, and the Receiver. The Sensor is a disposable unit that you insert into your abdomen (belly) to continuously monitor your glucose levels for up to 7 days. The Transmitter is a reusable device that snaps into the Sensor Pod.
-
Page 8: Indication For Use
• performance of the device. WARNINGS This device is not designed to replace a blood glucose meter. The SEVEN PLUS must be used with • a blood glucose meter. Treatment decisions should not be based solely on results from the SEVEN PLUS. You must •... - Page 9 Enter all fingerstick readings for calibration within 5 minutes. Entering incorrect fingerstick readings that occurred more than 5 minutes ago will affect device performance. CAUTION U.S. federal law restricts the sale of the SEVEN PLUS to sale by or on order of a physician. SEVEN PLUS User’s Guide...
-
Page 10: Table Of Contents
SEVEN PLUS CONTINUOUS GLUCOSE MONITORING SYSTEM: SYSTEM KIT CONTENTS INTRODUCTION: INDICATION FOR USE IMPORTANT SAFETY INFORMATION CHAPTER 1: THE SEVEN PLUS BASICS 1.1 Glossary 1.2 Symbols Used in Labeling 1.3 Sensor Overview 1.4 Transmitter Overview 1.5 Receiver Overview... - Page 11 3.8 Beginning a Sensor Session 3.9 Sensor Start-Up Period 3.10 The SEVEN PLUS and Water 3.11 Taping the Sensor Pod CHAPTER 4: CALIBRATING YOUR SEVEN PLUS 4.1 How to Calibrate 4.1.1 Using OpenChoice for Calibration 4.1.2 Using Auto Upload for Calibration 4.2 Start-Up Calibration...
- Page 12 8.2.2.2 Status Box Symbols During Blood Drop Prompts 8.3 Sensor Failed Troubleshooting 8.4 Error Code Troubleshooting 8.5 Receiver and Cables Troubleshooting CHAPTER 9: TAKING CARE OF YOUR SEVEN PLUS 9.1 Maintenance 9.2 Storage 104 9.3 Cleaning CHAPTER 10: TECHNICAL INFORMATION 10.1 Device Performance Characteristics...
-
Page 13: Chapter 1: The Seven Plus Basics
THE SEVEN PLUS BASICS SEVEN PLUS User’s Guide... - Page 14 SEVEN PLUS Continuous Glucose Monitoring System...
-
Page 15: Glossary
Blood Glucose reading. A fingerstick blood glucose reading taken with your FDA-cleared blood glucose meter. Calibration This is when you transfer fingerstick readings into the SEVEN PLUS using Auto Upload or the OpenChoice feature. Calibrations are needed for your SEVEN PLUS to display continuous glucose readings and trend information. - Page 16 Receiver A cell-phone-like device, which collects your glucose information from the Transmitter. Your results are displayed on the screen as a SEVEN PLUS reading (mg/dL) and trend. To connect a OneTouch Ultra Meter to the Receiver using the Connec- Register tion Cable to make sure the date and time match.
- Page 17 Arrows on your Receiver screen that appear below your glucose reading (Rate of Change) to indicate how fast your glucose levels are changing. The SEVEN PLUS has 7 different Arrows, which show you when your glucose speed and direction change.
-
Page 18: Symbols Used In Labeling
SYMBOLS USED IN LABELING The following symbols may be found on the Sensor, Transmitter, and Receiver package labels. These symbols tell you about the proper and safe use of the SEVEN PLUS. This table shows what each symbol means. “ Use By” Date... - Page 19 Keep Dry Humidity Limitation Direct Current Type B Applied Part Water resistant Temporary to jetting water submersion to a depth of 1 meter for 30 minutes Follow Authorized Operating Representative Instructions in the European community Manufacturer SEVEN PLUS User’s Guide...
-
Page 20: Sensor Overview
Sensor wear period. The Sensor insertion site is similar to an insulin pump infusion site. Plunger Safety Lock/ Transmitter Release Collar Applicator (needle/sensor probe inside) Transmitter Latch Sensor Pod Release Tab SEVEN PLUS Continuous Glucose Monitoring System... -
Page 21: Transmitter Overview
1-888-SEVENGO (738-3646) to determine if you need to purchase a new Transmitter. • The Receiver and Transmitter are designed and tested to withstand common electromagnetic interference, including airport security systems. Remove Transmitter Latch Install Transmitter Transmitter Installed in Sensor Pod Transmitter Latch SEVEN PLUS User’s Guide... -
Page 22: Receiver Overview
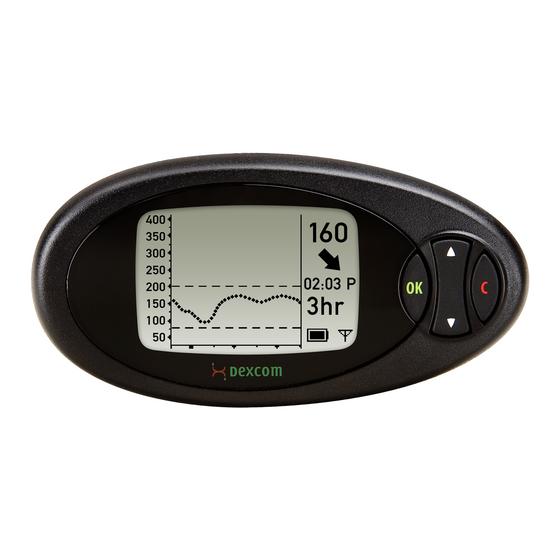
The Receiver looks like a cell phone and shows your Sensor-measured glucose information. The SEVEN PLUS only shows glucose readings in the milligrams per deciliter (mg/dL) unit of measure. In the United States, mg/dL is the standard unit used for glucose testing systems (i.e., blood glucose meters). - Page 23 A rrow Button Green Button Antenna Symbol Battery Life Indicator Connection port to OneTouch Meter and battery charger HELPFUL HINTS: • During nighttime use you may want to place the Receiver under your pillow or on your nightstand. SEVEN PLUS User’s Guide...
-
Page 24: Moving Through The Receiver Screens
Sensor To enter your fingerstick blood glucose Section 4.1.1 Enter BG readings for calibration (OpenChoice) To enter information about meals, insulin, exercise, Section 6.1 Events and health SEVEN PLUS Continuous Glucose Monitoring System... -
Page 25: Receiver Screens & Prompts
Out of Range, Rate of Change, and Other Alerts To change the time and date and Section 2.2 Settings Transmitter ID number and to look up your SEVEN PLUS’ hardware and software numbers Shutdown To temporarily turn off all communications between Section 5.5... - Page 26 You can set one of these (or neither), but not both. RISE ALERT: Your glucose levels are rising at 2mg/dL per minute or more. RAPID RISE ALERT: Your glucose levels are rising fast at 3mg/dL per minute or more. SEVEN PLUS Continuous Glucose Monitoring System...
- Page 27 If you see this screen you should make sure the Receiver and Trans- mitter are within 5 feet of each other. See Chapter 8 for Troubleshooting. OUT OF CALIBRATION: The SEVEN PLUS is not calibrated. If you see this screen you should take and enter an additional fingerstick reading.
- Page 28 ERROR CODE: The Receiver may not be working correctly. If you see this code, write the code down and use your meter to check your blood glucose readings. Notify DexCom Technical Support at 1-888-SEV- ENGO (738-3646). SYSTEM RECOVERY: The Receiver discovered an error that it was able to fix itself.
-
Page 29: Chapter 2: Seven Plus Set Up
SEVEN PLUS SET UP SEVEN PLUS User’s Guide... - Page 30 SEVEN PLUS Continuous Glucose Monitoring System...
-
Page 31: Charging Your Receiver Battery
When this happens, you will need to reset your Receiver’s time (see Chapter 2, Section 2.2.1, “Setting your Receiver Time and Date”). • Only use the DexCom battery charger provided in the Starter Kit. Do not use any other battery charger. You should charge the Receiver during daytime inactivity. -
Page 32: The Settings Menu
4. Use the Up p and Down q Arrow buttons to scroll until you select the day you want. Then press the button. 5. Use the Up p and Down q Arrow buttons to scroll until you select the hour you want. Then press the button. SEVEN PLUS Continuous Glucose Monitoring System... -
Page 33: Setting Your Transmitter Id
the next. 4. Continue to follow steps 2-3 until you have entered and accepted the last letter/number by pressing the button. Press the button if you make a mistake and want to go back. SEVEN PLUS User’s Guide... -
Page 34: About Sts Screen
The “About STS” Screen shows information about the Receiver, including the software number and version, hardware number and version, Transmitter type, and Receiver serial number. (“STS” is the product family for the SEVEN PLUS.) To reach the About Screen from the Settings Menu, highlight “About STS”... -
Page 35: Setting Your Alerts
SETTING YOUR ALERTS 2.3.1 FACTORY ALERT SETTINGS The SEVEN PLUS’ Alerts arrive from the factory with the following “default” settings. These default Alert Settings are provided in the below table: Alert Type Default Default Prompt Default Settings Sound/ Re-alert Vibrate... -
Page 36: Setting Glucose Alerts
High Alert sound = 2 high tone beeps ii. Low Alert sound = 3 low tone beeps iii. Rise Rate sound = 2 high tone beeps iv. Fall Rate sound = 3 low tone beeps SEVEN PLUS Continuous Glucose Monitoring System... - Page 37 Receiver will not re-alert you of the event (such as being above your High Glucose Alert). • Choosing “Disable” turns off this Alert type and the Receiver will not tell you if your glucose levels are high, low, or falling. The 55 mg/dl ALARM cannot be disabled. SEVEN PLUS User’s Guide...
-
Page 38: Setting Other Alerts
2.3.3 SETTING OTHER ALERTS The SEVEN PLUS provides many other notifications that you can set in the “Other Alert” Menu. See Chapter 11, Appendix I for a complete list of “Other Alerts.” The default setting for all of these Alerts is “Vibe then Beep.” In the “Vibe then Beep”... -
Page 39: Setting Out Of Range Alert
Receiver Alerts you. Continue using the Up p and Down q Arrow buttons to scroll to the time you want and press the button to select it. You will then return to the Trend Graphs. SEVEN PLUS User’s Guide... -
Page 40: Auto Upload Meter Registration
New Meter Screen to remove it. b. It doesn’t matter if you remove the cable from the meter or the SEVEN PLUS System first. 6. Check to see that the Receiver and meter have the same time. 7. Once you have registered, all new fingerstick readings taken and uploaded from this meter will be used to calibrate your System. - Page 41 System for calibration. Anytime you change the date/time on your Receiver, connect the meter to the Receiver using the Connection Cable (without taking new fingerstick readings) to match the date/time on the devices. You can upload fingerstick readings as usual after that. SEVEN PLUS User’s Guide...
- Page 42 SEVEN PLUS Continuous Glucose Monitoring System...
-
Page 43: Chapter 3: Using A Sensor
USING A SENSOR SEVEN PLUS User’s Guide... - Page 44 SEVEN PLUS Continuous Glucose Monitoring System...
-
Page 45: Before You Start
To use your SEVEN PLUS Continuous Glucose Monitoring System you will need a Sensor, a Transmitter, and a Receiver. You will also need a blood glucose meter and test strips for calibration. Once inserted and calibrated, the Sensor will continuously measure and display your glucose readings for up to 7 days (166 hours after the 2-hour Start-Up period). - Page 46 HELPFUL HINTS: • Check the expiration date on the Sensor. The expiration date format is YYYY-MM-DD. Sensors must be inserted on or before the end of the calendar day printed on the Sensor package label. SEVEN PLUS Continuous Glucose Monitoring System...
-
Page 47: Removing The Sensor From Its Packaging
Make sure there are no traces of lotions, perfumes or medications on the area. Clean the area • first with an alcohol swab. Make sure the area is clean and completely dry before you insert the Sensor. SEVEN PLUS User’s Guide... -
Page 48: Placing The Sensor
Press firmly over the entire patch area. 4. Hold on to the Applicator. Then pull the Safety Lock/Transmitter Key straight out away from the applicator, in the direction the arrow shows below. Remove the Safety Lock/Transmitter Key SEVEN PLUS Continuous Glucose Monitoring System... -
Page 49: Sensor Insertion
This step pulls the needle back into the Applicator and keeps the Sensor Probe under your skin. a. Remember to do this in the correct order: push plunger Pull back the collar - Retract down, then pull collar up. the Needle SEVEN PLUS User’s Guide... -
Page 50: Transmitter Attachment
5. The used Applicator can be thrown in the trash. Release the Applicator If you have any problems with insertion, save the Sensor and Applicator and contact DexCom Technical Support at 1-888-SEVENGO (738-3646). TRANSMITTER ATTACHMENT The Transmitter wirelessly sends your Sensor glucose information to the Receiver. - Page 51 • Make sure you hear 2 clicks when you snap the Transmitter in place (see Step 3). This helps ensure your device is water resistant (see Chapter 3, Section 3.10, “The SEVEN PLUS and Water”). • Make sure that you have the correct Transmitter ID Number entered into your Receiver (for all new Receivers, the Manufacturer enters this number).
-
Page 52: Transmitter And Receiver Communication
TRANSMITTER AND RECEIVER COMMUNICATION CONTRAINDICATION: The SEVEN PLUS must be removed prior to Magnetic Resonance Imaging (MRI). Keep your Receiver within 5 feet (1.5 m) of the Sensor/Transmitter for best communication. To check that the Receiver and Transmitter are talking, press any Receiver button to see the Glucose Trend Graphs. -
Page 53: Beginning A Sensor Session
If the correct Transmitter ID has been entered into your Receiver and the Receiver and Trans- • mitter are still not talking, then contact DexCom Technical Support for further help at 1-888-SE- VENGO (738-3646). HELPFUL HINTS: The Transmitter and Receiver may lose communication at the following times: •... -
Page 54: Sensor Start-Up Period
Do not tape over the Transmitter or any of the plastic parts of the Sensor Pod. Do not tape under the Sensor Pod or leave any substance on the skin where you insert the Needle. SEVEN PLUS Continuous Glucose Monitoring System... -
Page 55: Chapter 4: Calibrating Your Seven Plus
CALIBRATING YOUR SEVEN PLUS SEVEN PLUS User’s Guide... - Page 56 SEVEN PLUS Continuous Glucose Monitoring System...
-
Page 57: How To Calibrate
HOW TO CALIBRATE There are two methods you can use to calibrate your System. You can either use the OpenChoice feature on your SEVEN PLUS, or you may use the Auto Upload method. The OpenChoice feature allows you to hand enter your readings into the System, and you can use any FDA-cleared meter you choose. -
Page 58: Using Openchoice For Calibration
You will see a screen with a blood drop and a number in mg/dL units. a. During initial calibration the SEVEN PLUS will default to the reading of 120mg/dL. b. If there has been a reading in the past 15 minutes, the Enter BG Screen will display your current continuous glucose reading as your starting point. - Page 59 • Only fingerstick readings between 40-400 mg/dL can be used for calibration. If 1 or more of your readings entered was outside of this range, the SEVEN PLUS will not calibrate. You will have to wait to calibrate until your blood glucose is in this range.
-
Page 60: Using Auto Upload For Calibration
Auto Upload is when you use the OneTouch Ultra Meter and the Connection Cable that is available for purchase from DexCom Customer Support. You need to use the OpenChoice feature for all other meters. The steps below will show you how to use Auto Upload Calibration: 1. - Page 61 Do not share your blood glucose meter with other people. • If you use more than 1 OneTouch Ultra meter during SEVEN PLUS use, any fingersticks you take using the “non-registered” meter will not be used for calibration even if you attach this meter with the connection cable.
-
Page 62: Start-Up Calibration
OpenChoice Feature or the Auto Upload method to calibrate. 4. Your blood glucose readings must be between 40 mg/dL and 400 mg/dL for calibration.The SEVEN PLUS cannot use fingerstick readings outside of this range for calibration. HELPFUL HINTS: • If your readings are less than 40 mg/dL or greater than 400 mg/dL you should determine if you should treat yourself and then calibrate when it is convenient for you. -
Page 63: Calibration Update
CALIBRATION UPDATE You must update SEVEN PLUS calibration every 12 hours at a minimum. The performance of the System when calibrated less frequently than every 12 hours has not been studied. For OpenChoice Calibration you must enter the exact fingerstick reading that your blood glucose meter displays. -
Page 64: Re-Calibration (Blood Drop In Status Box " ")
• If you have not received any glucose readings in the past hour, and have attempted Re- Calibration by taking and entering at least 3 fingersticks that are 15 minutes apart each, then contact DexCom Technical Support at 1-888-SEVENGO (738-3646). There may be a problem with your Sensor. - Page 65 CONTINUOUS GLUCOSE READINGS, TRENDS, ALERTS AND ALARM SEVEN PLUS User’s Guide...
- Page 66 SEVEN PLUS Continuous Glucose Monitoring System...
- Page 67 Your fingerstick blood glucose meter only tells you your blood glucose level at one point in time (like a still picture). However, the SEVEN PLUS Trend Graphs and Trend Arrows (Rate of Change) will help you understand the direction your glucose level is moving (like a video camera).
-
Page 68: Glucose Readings
GLUCOSE READINGS Treatment decisions should not be based solely on results from the SEVEN PLUS. You must confirm with a blood glucose meter before making therapeutic adjustments. You must update SEVEN PLUS calibration every 12 hours at a minimum. The performance of the System when calibrated less frequently than every 12 hours has not been studied. - Page 69 The SEVEN PLUS reports glucose readings from 40-400 mg/dL and updates glucose read- • ings every 5 minutes. The glucose reading is in milligrams per deciliter (mg/dL) units. The System reads “LOW” when the glucose reading is less than 40 mg/dL, and “HIGH” when the glucose reading is greater than 400 mg/dL.
-
Page 70: Glucose Trends
In addition to your current glucose reading and Trend Graphs, Trend Arrows may appear to show you how your glucose readings are changing. Trend arrows appear here The Trend Arrows appear on the upper right corner of the Trend Graphs, just below your current glucose reading in the Status Box. SEVEN PLUS Continuous Glucose Monitoring System... - Page 71 • If the Rate of Change Arrow is missing, but you are concerned that your blood glucose level may be rising or falling, take a fingerstick and use your blood glucose meter to check your readings. SEVEN PLUS User’s Guide...
-
Page 72: Glucose Alerts And Alarm
With the SEVEN PLUS, you can set High and Low Glucose Alerts that help tell you when your glucose readings are out of your “target range.” The High and Low Glucose Alerts also have different tones (high and low beeps) to notify you. -
Page 73: Low Glucose Alert
This ALARM is a feature in addition to your personal glucose alerts. You cannot change or turn off this ALARM or its re-Alert settings. When your SEVEN PLUS glucose reading is at or below 55mg/dL the Receiver will notify you •... -
Page 74: Rise And Fall Glucose Rate Alerts
If you set your Rise Rate to 3 mg/dL per minute and your glucose levels rise at this level or faster, the Double Arrow Screen will appear and alert according to your settings. SEVEN PLUS Continuous Glucose Monitoring System... -
Page 75: Glucose Status
1 more fingerstick reading. If no readings display on the Receiver after this additional fingerstick, the Sen- sor needs to be replaced. (See Section 8.4) Sensor Error #1 SEVEN PLUS User’s Guide... -
Page 76: Missing Glucose Readings
5.4.3 SYSTEM GLUCOSE ERRORS Sometimes the SEVEN PLUS may tell you that it cannot provide a glucose reading. When this occurs you will see 3 question marks (???) in the Receiver Status Box. Check the placement of your Sensor to make sure it is still sticking well to your skin. Also make sure nothing is rubbing the Sensor Pod (i.e. -
Page 77: Out Of Range/No Antenna
If you are still having trouble receiving System readings because of this • problem, contact DexCom Technical Support at 1-888-SEVENGO (738-3646). HELPFUL HINTS: • You can set an Out of Range Alert to notify you when the Receiver and Transmitter are not talking (see Chapter 2, Section 2.3.4, “Setting Out of Range Alert”). -
Page 78: Temporary Sensor Shut Down
• Remember that your Alerts and ALARM will not work when the Receiver is shut down. • Your Sensor will stop 7 days after you start the Sensor. Shutting down does not extend Sensor life beyond 7 days. SEVEN PLUS Continuous Glucose Monitoring System... -
Page 79: Chapter 6: Diabetes Management Tools
DIABETES MANAGEMENT TOOLS SEVEN PLUS User’s Guide... - Page 80 SEVEN PLUS Continuous Glucose Monitoring System...
-
Page 81: Diabetes Events
DIABETES EVENTS With the SEVEN PLUS you can enter meal, insulin, health, and activity information. This information can help you and your diabetes management team review your glucose trends and patterns and may help you make better decisions about your diabetes management plan. These events can be reviewed later with the DexCom Data Manager software. -
Page 82: Carbohydrates
You can enter 0-250 units. • When you enter this menu, you will either see the last Insulin units you entered or you will see • 10 units (default). You cannot set different types of insulin. • SEVEN PLUS Continuous Glucose Monitoring System... -
Page 83: Exercise
You can enter 0-360 minutes for the duration of your exercise. The default is always 30 min- • utes. 6.1.5 HEALTH You can enter instances of changes in your health using the Health Menu. You can select Illness, Stress, High Symptoms, Low Symptoms, Cycle, • or Alcohol. SEVEN PLUS User’s Guide... -
Page 84: Data Manager Software
The software creates customizable charts to display your glucose trends. Change the date ranges to view long- or short-term patterns and trends. Plus, you can use data from current and previous SEVEN PLUS Receiver downloads and save or print files that you can take to your next doctor visit. -
Page 85: Glucose Monitoring Session
COMPLETING YOUR CONTINUOUS GLUCOSE MONITORING SESSION SEVEN PLUS User’s Guide... - Page 86 SEVEN PLUS Continuous Glucose Monitoring System...
- Page 87 • Remember to save your Transmitter after each Sensor removal. The same Transmitter is used for each session until you have reached the end of the Transmitter battery life. The Sensor can be thrown in the trash. SEVEN PLUS User’s Guide...
-
Page 88: Automatic Sensor Shut-Off
In some cases your Sensor Session may end before you have completed a full 7-day period. You should review Chapter 10, “Technical Information,” of this User’s Guide to determine how often you should expect this to happen. Examples of why this may occur are described on the next page. SEVEN PLUS Continuous Glucose Monitoring System... -
Page 89: Early Shut-Off - Sensor Failure
Sensor. HELPFUL HINT • You cannot reverse this decision after the final . Press the button if you do not want to stop the Sensor wear period. SEVEN PLUS User’s Guide... -
Page 90: Transmitter Removal
If you did not save the Transmitter Key, you can simply use your pointer finger on each hand and spread out the tabs at the back of the Sensor Pod (end closest to the wings). The Transmitter wings will “pop” out of the Sensor Pod. SEVEN PLUS Continuous Glucose Monitoring System... -
Page 91: Chapter 8: Troubleshooting
TROUBLESHOOTING SEVEN PLUS User’s Guide... - Page 92 SEVEN PLUS Continuous Glucose Monitoring System...
-
Page 93: Sensor Insertion Troubleshooting
You may use medical tape (such as Blenderm ) over the white adhesive patch of the Sensor Pod, • but do not place the tape over the Transmitter or the plastic parts of the Sensor Pod. SEVEN PLUS User’s Guide... -
Page 94: Calibration Troubleshooting
2. Make sure you plug the Connection Cable into the meter first and into the Receiver second. 3. Do not disconnect the cable while uploading or before you see the Trend Graph appear. 4. Re-try upload using the proper step order. SEVEN PLUS Continuous Glucose Monitoring System... -
Page 95: Blood Drop Prompts
2 fingersticks entered for calibration, or The Receiver could not understand (“???” in Status Box) your Sensor signal at the time you • entered the fingerstick readings for calibration. SEVEN PLUS User’s Guide... -
Page 96: Status Box Symbols During Blood Drop Prompts
1 more fingerstick if you are prompted by the • Shaded-Out or Single Blood Drop. (Readings must Awaiting Fingerstick Reading be within 40-400 mg/dL). (Blood Drop) Symbol Enter your fingerstick readings into the Receiver. • SEVEN PLUS Continuous Glucose Monitoring System... - Page 97 Out of Range Symbol HELPFUL HINTS: • If you are still having trouble with SEVEN PLUS calibration (e.g., receiving multiple prompts) following these steps, contact DexCom Technical Support at 1-888-SEVENGO (738-3646) for help.
-
Page 98: Sensor Failed Troubleshooting
Receiver, the Sensor may need to be replaced. If you clear this screen by pressing the button, you will Sensor Error #1 Screen see this error code (shown to the left) in the Status Box. SEVEN PLUS Continuous Glucose Monitoring System... -
Page 99: Receiver And Cables Troubleshooting
3. If your battery drains and is not charged for about 6 months, the back-up battery might also drain. When this happens, you will need to reset your Receiver’s time (see Chapter 2, Section 2.2.1, “Setting your Receiver Time and Date”). 4. Only use the DexCom battery charger. SEVEN PLUS User’s Guide... - Page 100 2.3, “Setting your Alerts” explains how to change these Alert options. 2. Remember “Vibe then Beep” will vibrate during the first alert and then will beep during the re- alert. If you do not hear a sound during the first alert, this is normal. SEVEN PLUS Continuous Glucose Monitoring System...
-
Page 101: Chapter 9: Taking Care Of Your Seven Plus
TAKING CARE OF YOUR SEVEN PLUS SEVEN PLUS User’s Guide... - Page 102 SEVEN PLUS Continuous Glucose Monitoring System...
-
Page 103: Maintenance
Charge the Receiver when the battery gets low. • Accessories Insert cables only as directed. Only use cables intended for use with the SEVEN PLUS. Do not • force cables in place. Remove cables carefully by pressing “Push” buttons (if available) made for easy removal. -
Page 104: Storage
2. The Transmitter is water resistant when snapped into the Sensor Pod, but do not soak the Transmitter in liquid. 3. Do not use soap, nail polish remover, or paint thinner. Only use Isopropyl alcohol and water. SEVEN PLUS Continuous Glucose Monitoring System... -
Page 105: Chapter 10: Technical Information
TECHNICAL INFORMATION SEVEN PLUS User’s Guide... - Page 106 SEVEN PLUS Continuous Glucose Monitoring System...
-
Page 107: Device Performance Characteristics
Upload) or a FDA-cleared blood glucose meter (using the OpenChoice feature). Once calibrated, the SEVEN PLUS reports glucose readings up to every 5 minutes. In a clinical study, SEVEN PLUS readings were compared to blood glucose measurements in order to assess its performance or how well the SEVEN PLUS measurements compare to a laboratory method that measures blood glucose levels. - Page 108 2 fingersticks per day for days 2-7 (approximately every 12 hours). All participants used the SEVEN PLUS in a controlled clinic environment on Day 1, Day 4, or Day 7 of the 7-day wear period. The remainder of the study took place at home. While using the SEVEN PLUS in the clinic 49 of the 53 participants had their blood glucose measured every 15 minutes with a reliable laboratory method, the Yellow Springs Instrument 2300 STAT Plus glucose analyzer.
- Page 109 Agreement between the SEVEN PLUS and glucose levels is characterized using paired SEVEN PLUS and YSI results. The SEVEN PLUS and YSI readings were compared by pairing the YSI blood glucose reading to a SEVEN PLUS glucose reading that occurred approximately 5 minutes after the YSI reading was collected.
- Page 110 44% of the time (“Missed Alert Rate***”) within 5 minutes of the blood glucose reading. Also at the 70 mg/dL alert level, 46% of the time the SEVEN PLUS may falsely alert you that your glucose level is at or less than 70 mg/dL when your actual blood glucose level is above 70 mg/ If you set the Low Glucose Alert to 90 mg/dL, the SEVEN PLUS should alert you 73% of the time within 5 minutes of when your glucose levels are at or below 90 mg/dL.
- Page 111 27% of the time (“Missed Alert Rate***”). Also at the 90 mg/dL alert level, 25% of the time the SEVEN PLUS may falsely alert you that your glucose level is at or less than 90 mg/dL when your actual blood glucose reading is above 90 mg/dL at that time.
- Page 112 SEVEN PLUS to YSI data has not been established with the SEVEN Sensor. During use of the SEVEN PLUS at home, the High Alert was set to 200 mg/dL and the Low Alert was set to 80 mg/dL. Subjects were asked to take a fingerstick each time a high or low glucose alert sounded.
- Page 113 301-400 Table 4 shows that the SEVEN PLUS, on average, reads 13% higher than the YSI at glucose levels of 40-80 mg/ dL and reads 9% lower, on average, than the YSI at glucose concentrations of 301-400 mg/dL (Mean Percent Differ- ence).
- Page 114 The Clarke Error Grid zones are labeled on a correlation plot in Figure 1. Each YSI result (on the horizontal axis) is matched up with its corresponding SEVEN PLUS result (on the vertical axis). A point is recorded where the two readings intersect. These results are based on 1,827 paired data points recorded.
- Page 115 Point Error Grid Regions for All Site The percentage of SEVEN PLUS results in the above graph are presented in Table 6 on the next page according to the percentage of points falling within each zone (A-E). Results are further broken down (stratified) according to therange of glucose concentration.
- Page 116 * N/A means that the Clarke Error Grid does not consider the possibility of these zones in that glucose range. The Continuous Error Grid was also used to determine if the SEVEN PLUS results are “clinically acceptable.” The Continuous Error Grid looks at how closely...
- Page 117 SEVEN PLUS readings within 20%, 30% and >40% of the YSI readings at the begin- ning (Day 1), middle (Day 4) and end (Day 7) of the SEVEN PLUS lifecycle. Results are shown in the table below.
- Page 118 Precision of SEVEN PLUS System Readings In the same study, 18 of the subjects wore two SEVEN PLUS ’ . This was done to look at how similarly two SEVEN PLUS ’ on the same person function (Sensor Precision). Precision was evaluated by comparing the glucose readings from the two SEVEN PLUS ’...
- Page 119 Number of Readings Provided The SEVEN PLUS is capable of providing a reading up to every 5 minutes, or up to 288 readings per day. For a variety of reasons, this does not always happen. Sometimes sensors cannot provide readings after calibration and readings are “skipped”...
- Page 120 Example of “Good” SEVEN PLUS Performance Figure 2. YSI Reading SEVEN PLUS Glucose Reading ••• Example of “ Average” SEVEN PLUS Performance Figure 3. YSI Reading SEVEN PLUS Glucose Reading ••• SEVEN PLUS Continuous Glucose Monitoring System...
- Page 121 Example of “Poor” SEVEN PLUS Performance Figure 4. YSI Reading SEVEN PLUS Glucose Reading ••• Adverse Events Overall 92% of patients reported no symptoms of irritation and 8% reported at least one symptom at any insertion site. During the trial irritation such as mild redness, mild swelling, mild bruising was seen.
-
Page 122: Product Specifications
Temperature: 2°-25° C (36°-77° F) Storage 25°C Condition 2°C IPX 5: water resistance to jetting water Moisture Protection IPX 7: temporary submersion to a depth of 3 feet (1 meter) for 30 minutes Sterile by election beam Sterilization SEVEN PLUS Continuous Glucose Monitoring System... - Page 123 Temperature: 0°- 45° C (32°- 113° F) Conditions 0°C 1 year Limited Warranty IPX 5: water resistance to jetting water Moisture IPX 7: temporary submersion to a depth of 3 Protection feet (1 meter) for 30 minutes SEVEN PLUS User’s Guide...
- Page 124 5 ft Average Number of Collisions due to Total of 4 collisions, if collision occurs, no glucose Coexistence. 20 DexCom Transmitters value is received within 15 feet over a 24 hr period (288 transmissions each) SEVEN PLUS Continuous Glucose Monitoring System...
- Page 125 5 sec Power 3 A/m 3 A/m Power Frequency Frequency magnetic fields should be (50/60 Hz) at levels characteristic of a Magnetic Field typical location in a typical IEC 61000-4-8 commercial or hospital envi- ronment SEVEN PLUS User’s Guide...
- Page 126 Memory Storage 3 to 5 days Re-Chargeable Battery Use 3 hours Charging Time Temperature: 0°- 45° C Storage/Operating 45°C (32°- 113° F) Conditions Humidity: 10-85 % Relative 0°C None Moisture Protection 1 year Limited Warranty SEVEN PLUS Continuous Glucose Monitoring System...
- Page 127 (50/60 Hz) at levels characteristic of a Magnetic Field typical location in a typical IEC 61000-4-8 commercial or hospital environment Note: UT is the a.c. main voltage prior to application of the test level SEVEN PLUS User’s Guide...
- Page 128 Note 1: At 80 MHz and 800 MHz, the higher frequency range applies Note 2: These guidelines may not apply in all situations. Electromagnetic propagation is af- fected by absorption and reflection from structures, objects and people SEVEN PLUS Continuous Glucose Monitoring System...
- Page 129 If abnormal performance is observed, additional measures may be necessary such as reorienting or relocating the Receiver. b. Over the frequency range 150 KHz to 80 MHz, field strengths should be less than 3 V/m. SEVEN PLUS User’s Guide...
- Page 130 Note 1: At 80 MHz and 800 MHz, the separation distance for the higher frequency range applies. Note 2: These guidelines may not apply in all situations. Electromagnetic propagation is affected by absorption and reflection from structures, objects and people. SEVEN PLUS Continuous Glucose Monitoring System...
-
Page 131: Fcc Requirements
Implant Communications Service. Analog and digital voice communications are prohibited. Although the Transmitter has been approved by the Federal Communications Commission, there is no guarantee that it will not receive interference or that any particular transmission from the Transmitter will be free from interference. SEVEN PLUS User’s Guide... - Page 132 SEVEN PLUS Continuous Glucose Monitoring System...
-
Page 133: Chapter 11
SEVEN PLUS User’s Guide... - Page 134 SEVEN PLUS Continuous Glucose Monitoring System...
-
Page 135: Appendix 1, Other Alerts
Repeat Double fingerstick Blood readings for Drop Alert Start-Up calibration. “Enter 1 More You must enter Every 5 Press Every 15 Startup BG” one additional minutes button minutes Shaded-Out fingerstick Blood Drop reading for Start Alert Calibration. SEVEN PLUS User’s Guide... - Page 136 Sensor soon. 2 times in There will be no the next 10 sound when the minutes for 6-Hour and 2-Hour 30-minute screens display. The 30-minute screen will be set to your Other Alert options. SEVEN PLUS Continuous Glucose Monitoring System...
- Page 137 Time Loss Alert The Receiver’s None Enter None back-up battery the time has drained, and you will need to re- set the Receiver’s time. The Time Loss Alert automatically takes you to the Time Setting Screen. SEVEN PLUS User’s Guide...
-
Page 138: Index
Index SEVEN PLUS Continuous Glucose Monitoring System... - Page 139 Start-up Calibration Alerts Troubleshooting Glucose Alerts Contact Information High DexCom Technical Support DexCom Website Setting Contents, SEVEN PLUS Continuous Not Working Glucose Monitoring System Kit 5 Other Alerts Setting Rise and Fall 16, 74 (Rate of Change) Data Manager Software...
- Page 140 Trend Graphs Sensor Error #1 75, 98 Sensor Applicator 15, 46 Automatic Shut-Off Troubleshooting Early Shut-Off Storage, System Expiration Date Symbols, Labeling Failed Insertion Insertion Site 47, 48 Overview Pod 16, 54 Probe 16 SEVEN PLUS Continuous Glucose Monitoring System...
- Page 141 index Tape Transmitter Attaching to Sensor ID Number Setting Latch 17 Overview Removal Safety-Lock/Transmitter Key Water Resistance...
-
Page 142: Additional Information
ADDITIONAL INFORMATION Receiver INPUT: 5 VDC, 750 mA Rated supply voltage range: 100-240 VAC (AC supply) Phases and current: 0.3A (AC supply) Rated frequency range: 50-60 Hz (AC supply) Type B applied part Sensor is sterilized by electron beam Do not reuse the Sensors Follow operating instructions Sensor and Transmitter are subject to IPX5 and IPX7: Water resistant to jetting water... - Page 144 Dexcom, Inc. | 6340 Sequence Drive | San Diego, CA 92121 USA Technical Support 1-888-SEVENGO (738-3646) | www.Dexcom.com Stay Between the Lines ® LBL-010004 Rev11 MT20472...
Need help?
Do you have a question about the SEVEN PLUS and is the answer not in the manual?
Questions and answers